
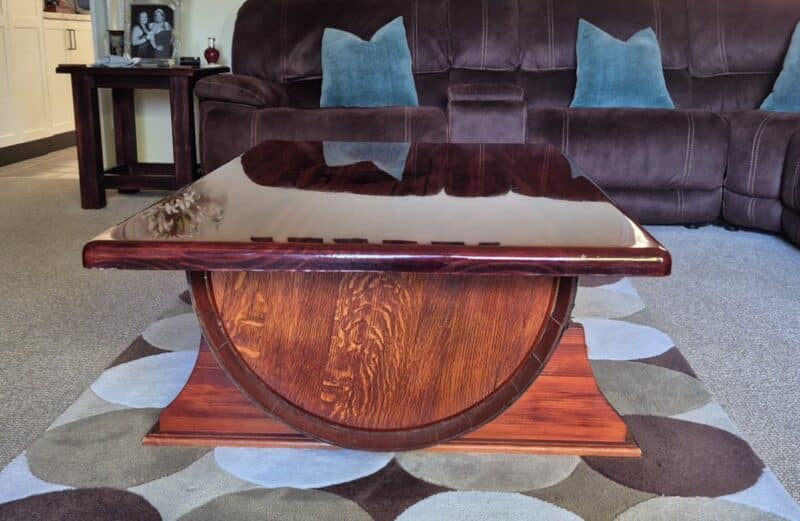
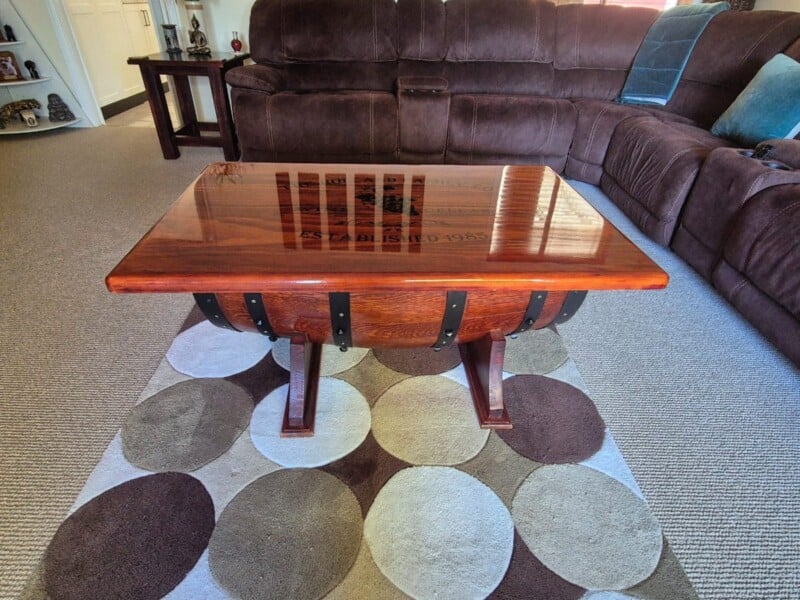
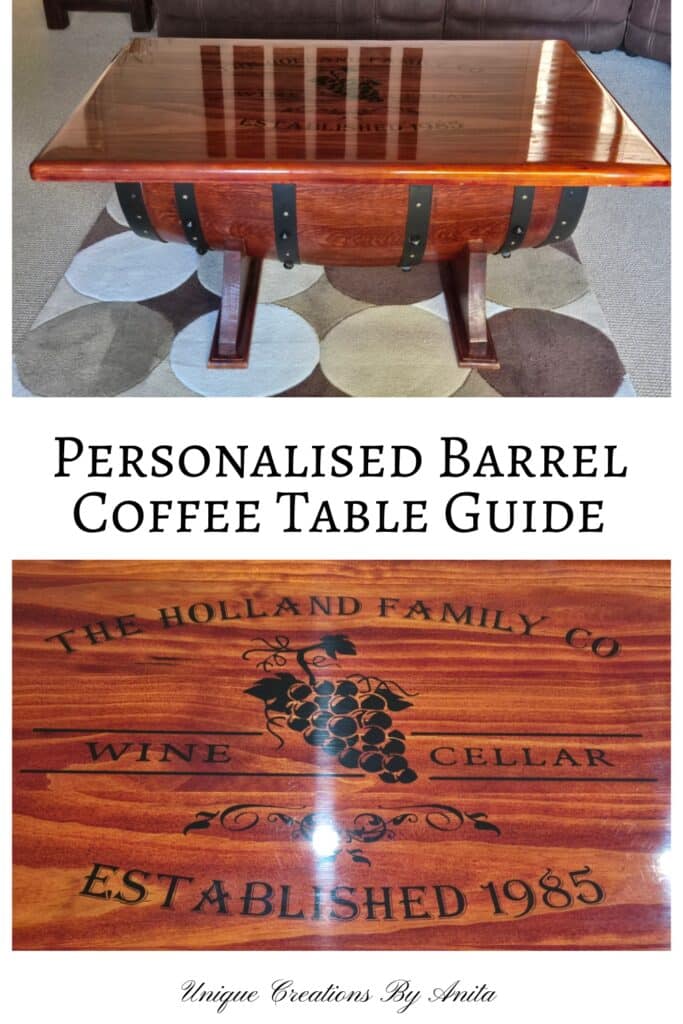
From the moment I first spotted an elegant wine barrel coffee table, I dreamed of building one that felt more like fine furniture and reflected my style. In this guide, How to Create a Custom Wine Barrel Coffee Table, I’ll walk you through every step—combining photos from several tables I’ve made—to show you exactly how to remove odours, cut and sand the barrel, craft graceful arch legs, and finish your piece with stain, polyurethane, decorative bands and a personalised resin-sealed decal.

Before we dive into this tutorial, be sure to subscribe to my bimonthly newsletter to be the first to see my latest projects. You can also follow me on Pinterest and Facebook, where I also include my unique mixed-media art projects
How to Create a Custom Wine Barrel Coffee Table
Updated 8/8/2025
**This post may contain affiliate links. This means I earn a small commission on links used at no extra cost to you. Please see my disclosure policy for more information.**
Materials Needed
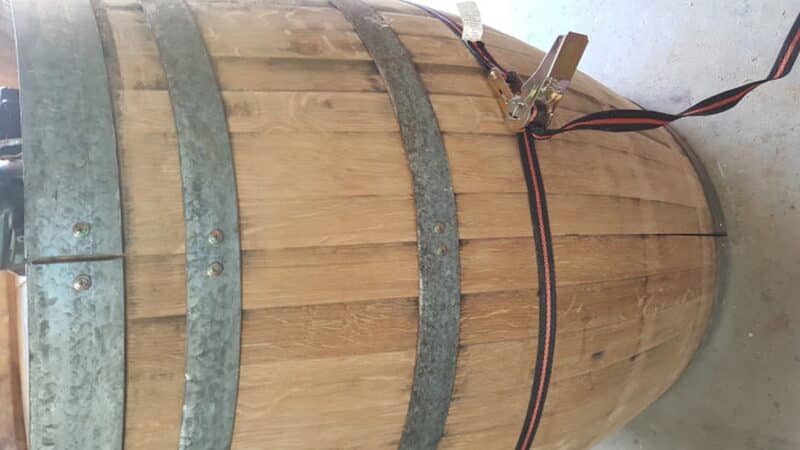
- Wine barrel (red-wine seasoned)
- Ratchet straps, angle grinder with cutting disc
- Jigsaw & pilot-drill bits
- Orbital sander with 120–320 grit discs
- Thick hardwood (≥40 mm) or laminated timber for legs
- Compass for arch layout
- Old bed slat (20 mm thick) for leg base
- Wood router with round-over bit
- Cedar-tone stain & satin polyurethane
- Black spray paint (for bands)
- Truss-head screws
- Wood glue & pocket-hole jig
- Pocket screws, wood filler
- Hinges for tabletop attachment
- Reclaimed tabletop (min. 25 mm thick)
- Custom decal & epoxy resin kit
- Cricut vinyl cutter
- Safety gear: goggles, gloves, dust mask, hearing protection
Removing Stains and Smells
My wine barrel had previously held red wine and carried a strong odour inside. To neutralise it, I filled the barrel with water and a cup of bleach and left it to soak for 24 hours. That removed most of the smell, though a faint whiff lingered until later treatments.
I’ve had dehydrated barrels before, which makes this step tricky—the water seeps through gaps between the staves. The method still works; you just need to top the water up more often. Leaving the barrel outside, full of water, in the sun helps the staves swell and seal the gaps.

Sanding the Wine Barrel
Sanding the wine barrel can be done at two stages: before cutting or after cutting.
Sanding before cutting lets you remove the middle bands and sand the entire surface in long, even passes for a smoother finish; the trade-off is the curved barrel wants to roll and shift, even when braced.
If you remove the bands, number them so they can be reinserted in the same position for a snug, accurate fit. To remove the bands, place a block of wood on the lip of the hoop and tap the block with a hammer, working evenly around the barrel. Refit them the same way

Sanding after cutting is easier because each half sits flat on the bench; however, working right up to the bands can chew through sanding discs if they catch, or leave scratches on the bands—fine if you’re chasing a rustic look.
Cutting the wine barrel in half
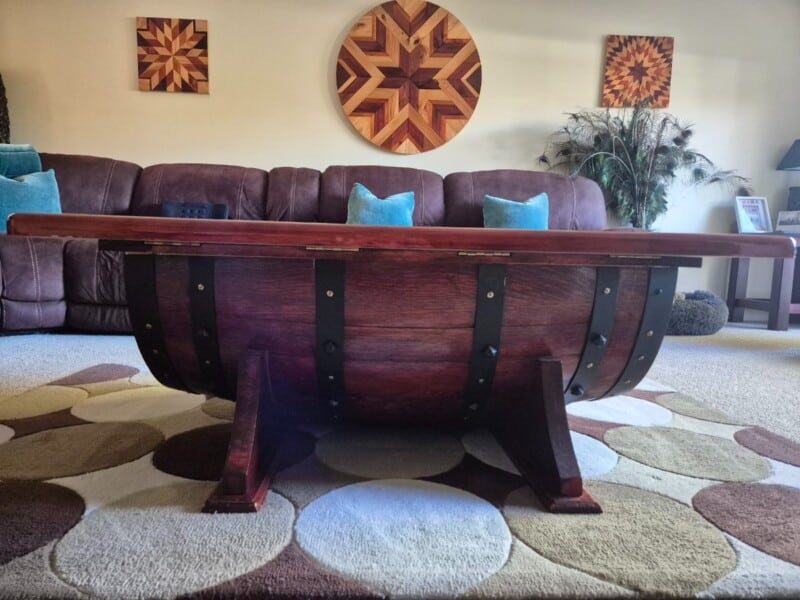
Before cutting, fix the bands to the staves. Drill pilot holes through each band on both sides of the cut, then drive self-drilling button-head screws into every stave. If you skip this, the barrel will fall apart once cut. Make sure the bung/plug hole sits at the bottom or will be hidden under the apron.

Mark the true centre so you don’t have to rip any staves lengthwise. Fit ratchet straps—those bands are under tension, and the final cut can pop. Use an angle grinder with a cutting disc to cut the bands.

Before releasing the straps, drill a pilot hole large enough for a jigsaw blade at the centre of the top and bottom of the barrel, then cut them with the jigsaw.
Crafting the Arch Legs
Thick hardwood (I laminated two 20 mm boards) supports the barrel’s weight. Mark the barrel’s mid-width and desired lift (40 mm).

On your timber blank (880 mm length), draw a semicircular arch with a compass, leaving extra at each end for sloping.
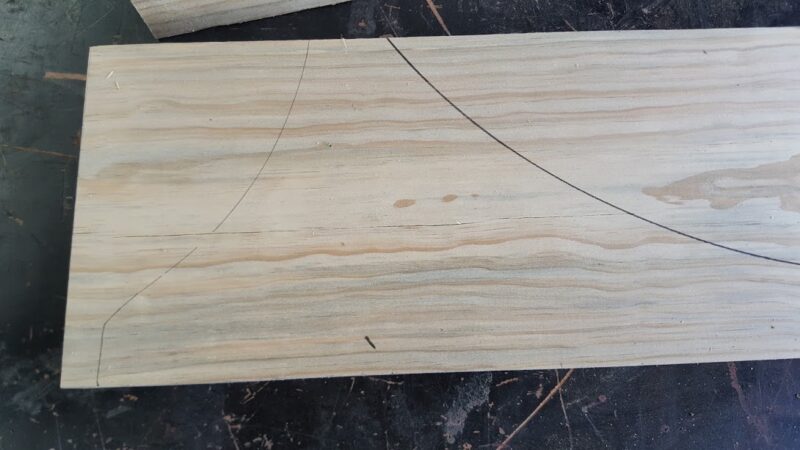
If you’re adept, tilt the jigsaw blade to match the barrel’s curve; otherwise, cut straight and refine by sanding. Use the compass to mark side slopes before final cutting.

Perfecting Leg Fit
Cut a bed-slat segment to 884 × 80 × 20 mm and router all edges with a round-over bit for elegance. Centre and clamp the leg assembly, then drill and screw through the slat into each arch leg. To match the barrel’s curve, hold the leg assembly against the barrel and sand the inner slope with an angle-grinder sanding disc until flush.

To finish the legs neatly, I used an old bed slat cut to 884 mm (L) × 80 mm (W) × 20 mm (Thick), which leaves a 20 mm gap all the way around. I ran a round-over bit on the router to soften the edges. I centred the leg on the base, clamped it, then drilled from underneath and screwed everything together. Because parts of the barrel surface weren’t level, I had a lot of sanding to do. To speed it up, I used an angle grinder with a sanding disc. Keep shaping the slope on the inside of the legs until you get a clean, snug fit.
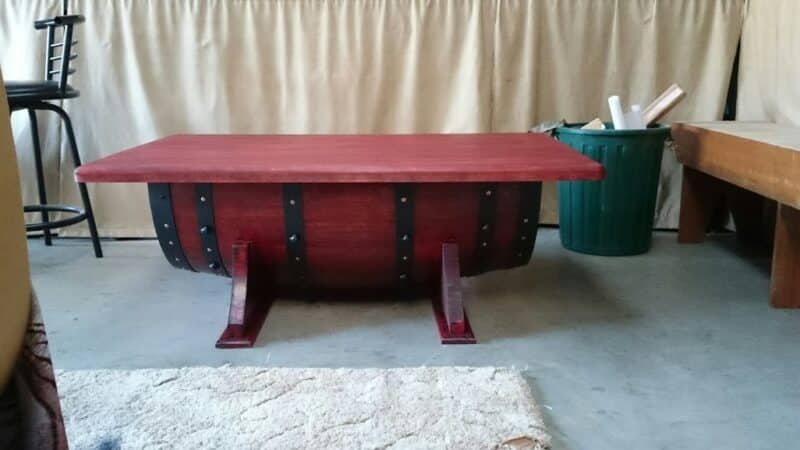
Staining and Painting the Barrel
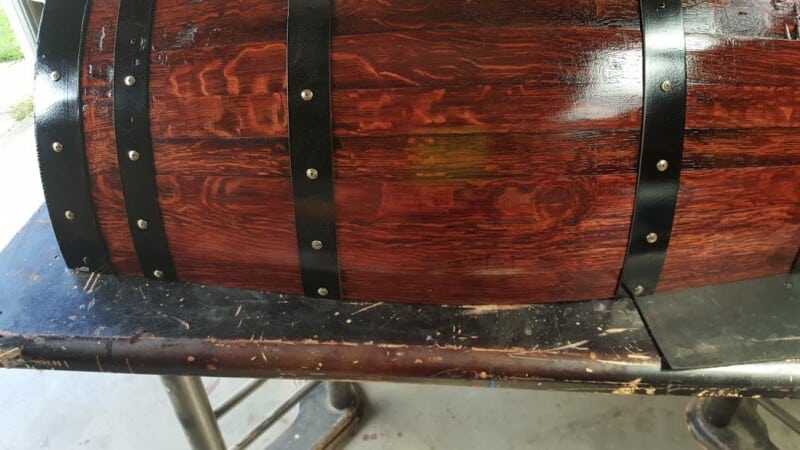
Sand the bands with 180-grit, then spray them matte black.
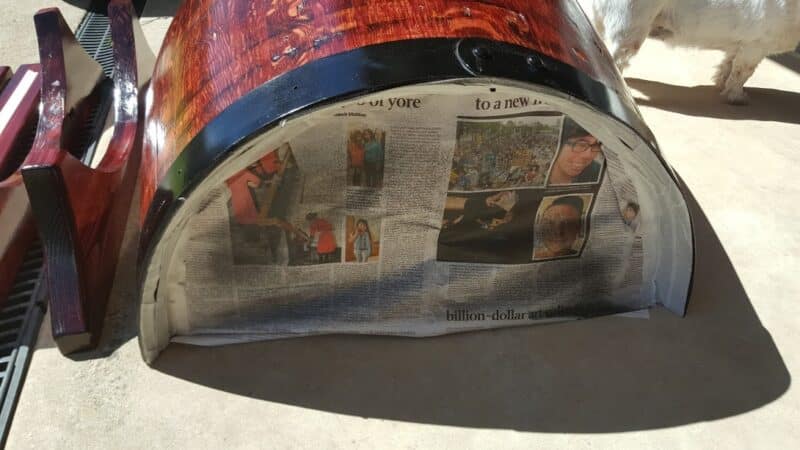
The easiest setup is to cover the barrel with newspaper, lay each band on the protected surface, and spray—then leave them there to dry.
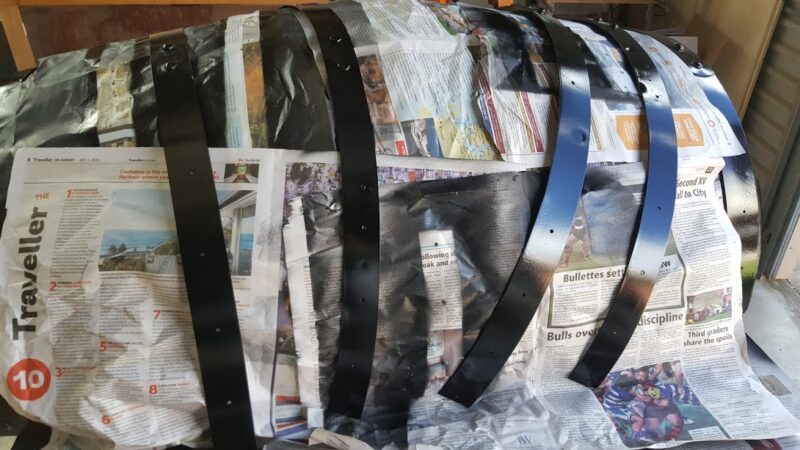
Since the top and bottom bands can’t be removed, mask the surrounding wood with newspaper (and tape) and spray them in place. Apply light, even coats to avoid overspray.
Stain all exterior wood surfaces with cedar-tone stain; wipe off excess. To make your project more visually interesting and secure the hoops, you can use self-drilling button head screws.
First, create a template from cardboard to ensure your screws are evenly spaced. Use this template as a guide to drill through each stave.
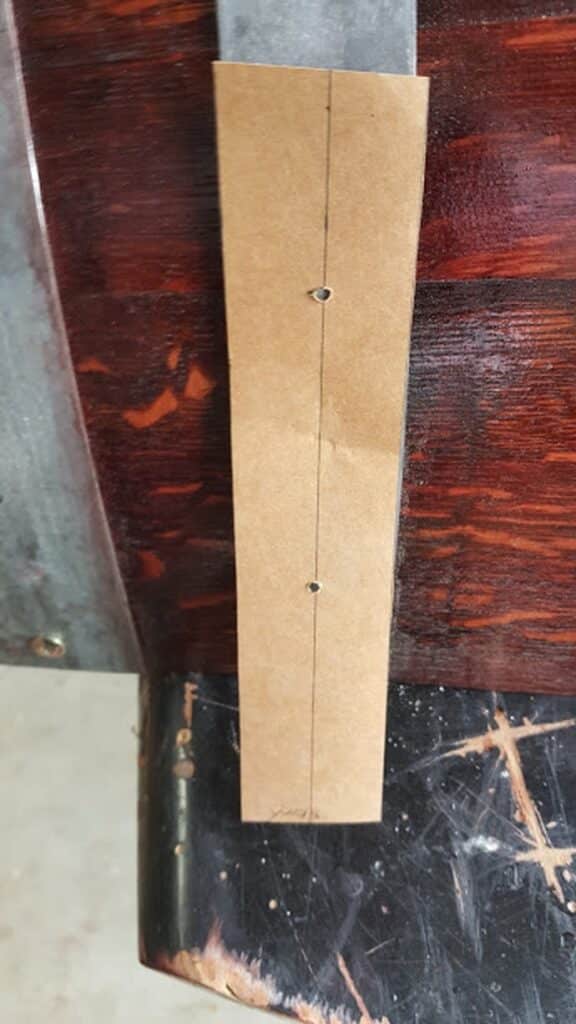
The uniform spacing will create a subtle studded effect that adds a professional, finished look to your work.

After thorough drying, apply two coats of satin polyurethane, sanding lightly between coats.
Securing Barrel to Legs
Position the barrel on the leg assembly, ensure level, then pre-drill from inside the barrel into the leg centres. Start with a small bit to confirm alignment, then use long screws (four per leg) to fasten. Inside the barrel, sand and seal with two coats of satin polyurethane to eliminate any remaining odours.

I wasn’t sure the legs would carry the barrel’s weight, so on the first build, I added a support beam under the barrel between the legs (see photo) and screwed it in from the top and sides. Later builds were fine without it, but the beam is a good idea—it stiffens the legs and adds stability.

Building the Apron
Cut timber strips—two at 780 × 90 × 20 mm and two at 880 × 90 × 20 mm—for the lid lip. Join with pocket holes, glue and screws.

Next, line the lip up in the right spot and drill through it into the barrel. Then I filled the screw holes with wood filler, stained the lip, and added two coats of satin polyurethane. Inside the barrel, I also glued in a strip of wood and fixed it with screws to help keep the barrel in shape, as I wasn’t sure it might move.
I ran a router with a round-over bit to soften all the edges.

Making the tabletop
My tabletop was an old coffee table I picked up for free (I show how I find them in this post). I like a thick top because it looks more high-end, but new timber is too expensive—using recycled timber saves a fortune.
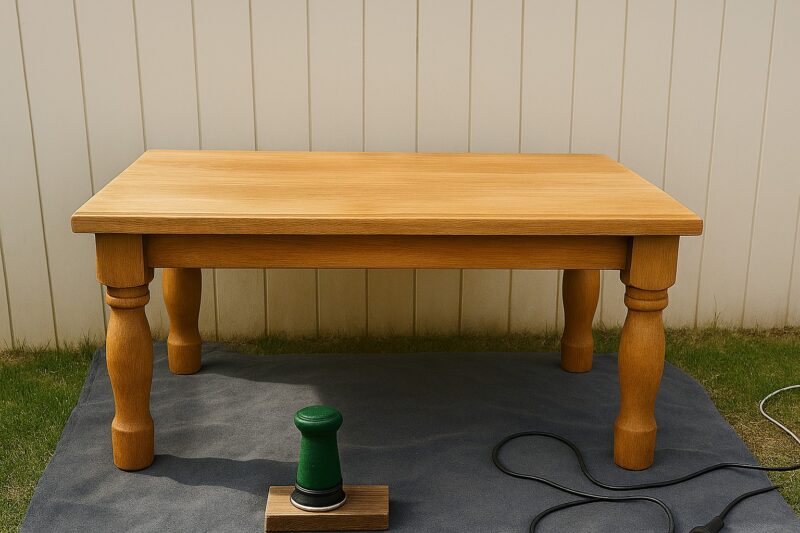
They’re usually dented and scratched, but most dents lift easily: place a damp cloth over the dent and press with a hot iron—the steam raises the fibres. Once dry, give the surface a quick sand from 120 up to 320 grit, and it’s ready to reuse. Stain the tabletop with the stain of your choice.
Attaching the Tabletop
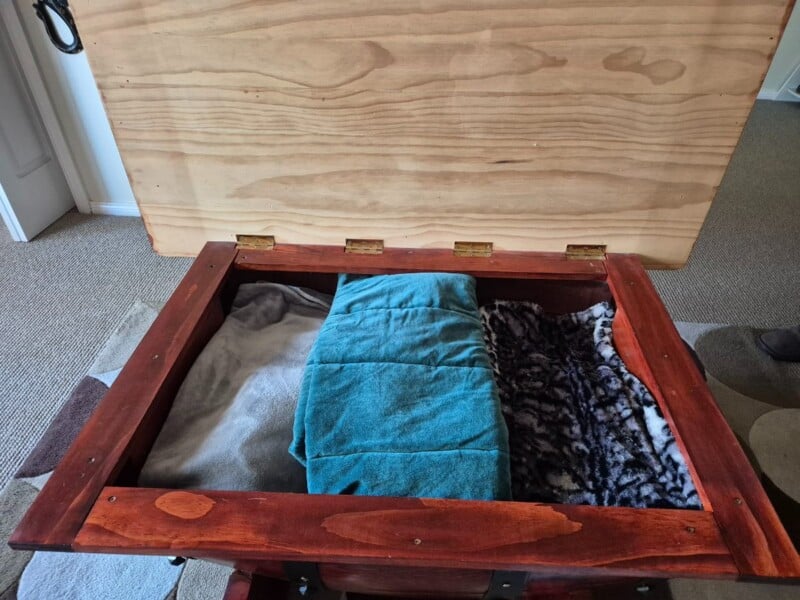
Centre your tabletop over the apron lip. Mark hinge locations, mortise shallow recesses with a chisel and hammer, then screw hinges into place. Ensure the lid opens smoothly.

Creating the Decal
To personalise the tabletop, I designed a decal in Microsoft Word and had it made online. To match the wine-barrel theme, I created a winery-style logo with our family name and the year we were married. If you’ve got a Cricut Explore Air™ 2, you can cut your decal—just make sure it has no border or background.

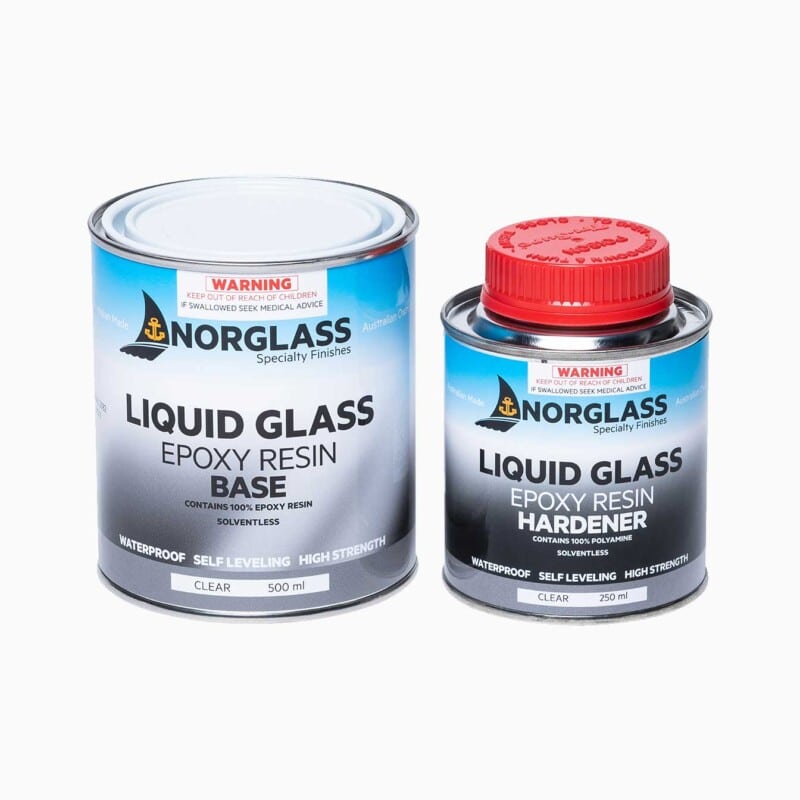
I stained the table, then sealed it with one coat of satin polyurethane. I learnt to seal first after a test run—without it, the stain bled into the decal, and it lifted while the resin cured. I applied the decal and poured the liquid glass according to the manufacturer’s instructions. The photos don’t do it justice; the glass-like surface reflected everything and was tricky to shoot.

I used Norglass Liquid Glass on the tabletop and got a perfect finish the first time—no additional sanding needed, which has never happened for me with epoxy resin. I’ve also found the surface doesn’t mark as easily as epoxy.
I made this wine barrel coffee table in 2016, and this photo—taken in August 2025—shows the surface is still perfect.
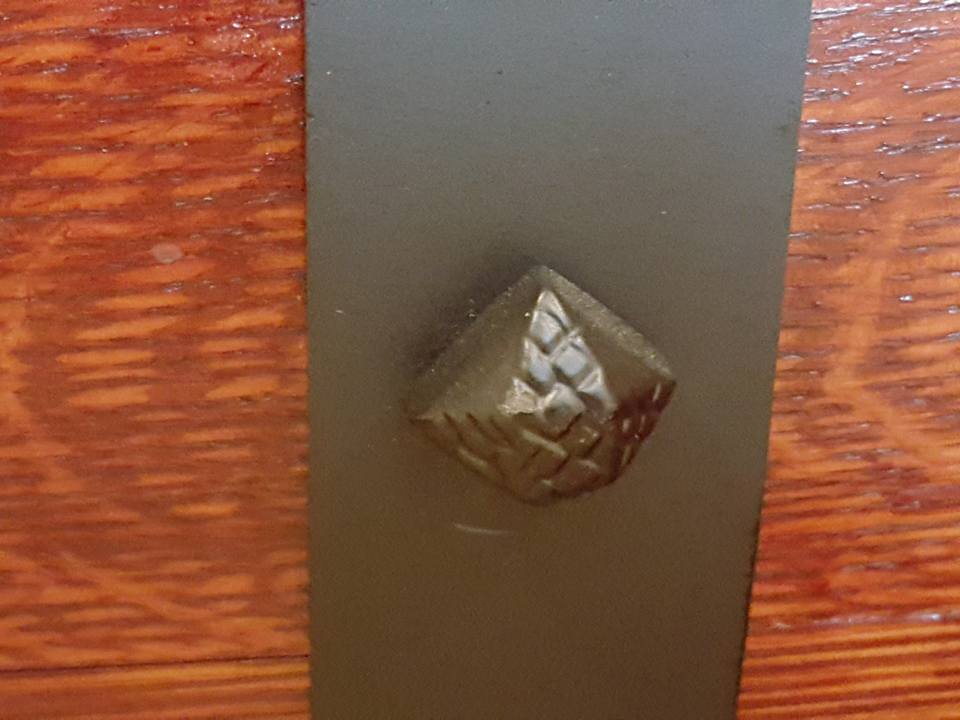
To finish the look, I added a few cast-iron studs to the sides.
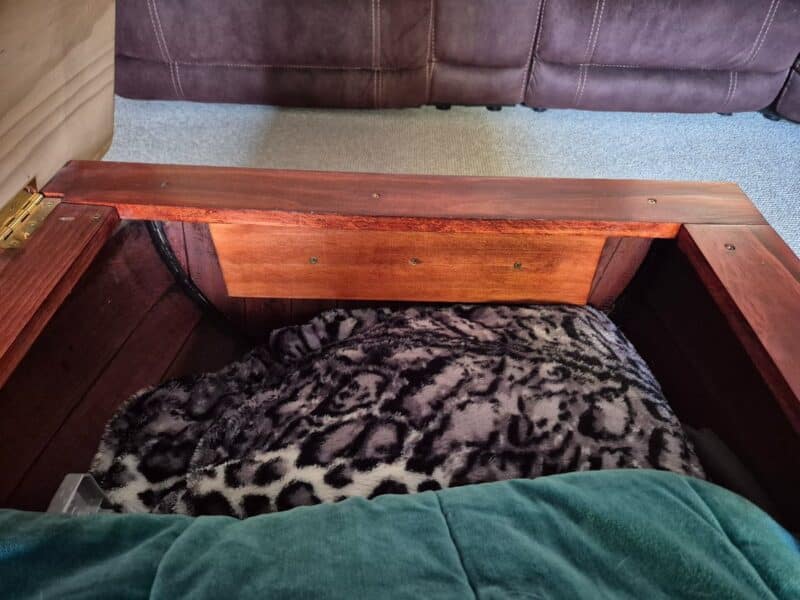
The hinged lid opens for toy/blanket storage.
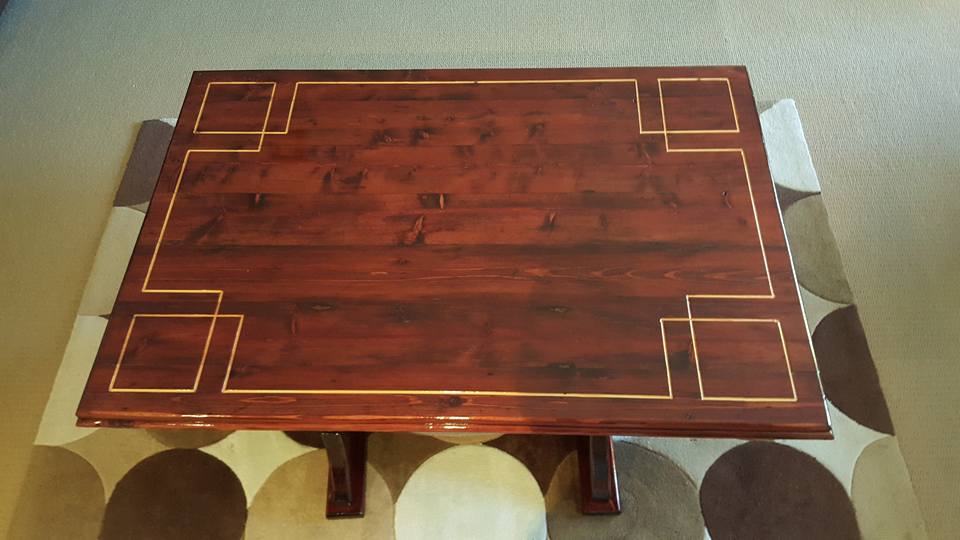
One of the wine barrel tables I made had a Greek key design carved into the tabletop with a router.
More wine barrel projects
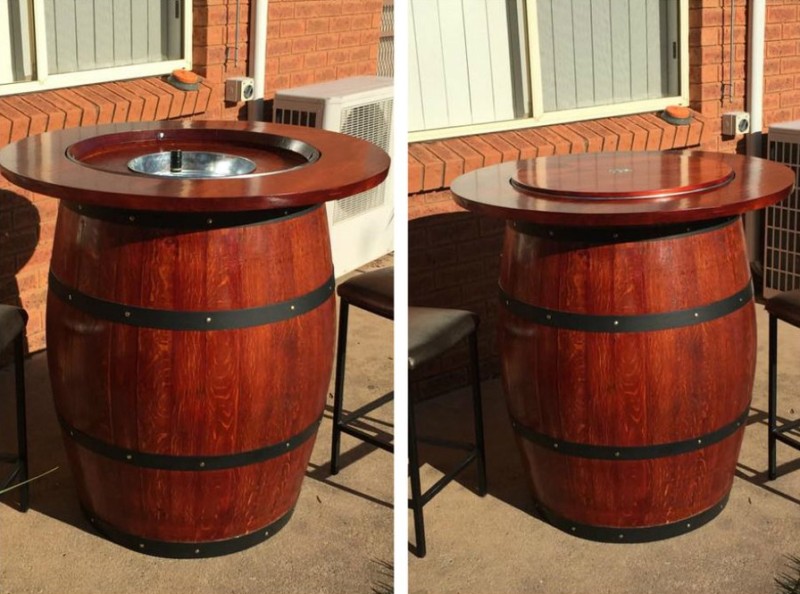
I made this outdoor wine barrel table with a hidden ice bucket under the lid to chill drinks.
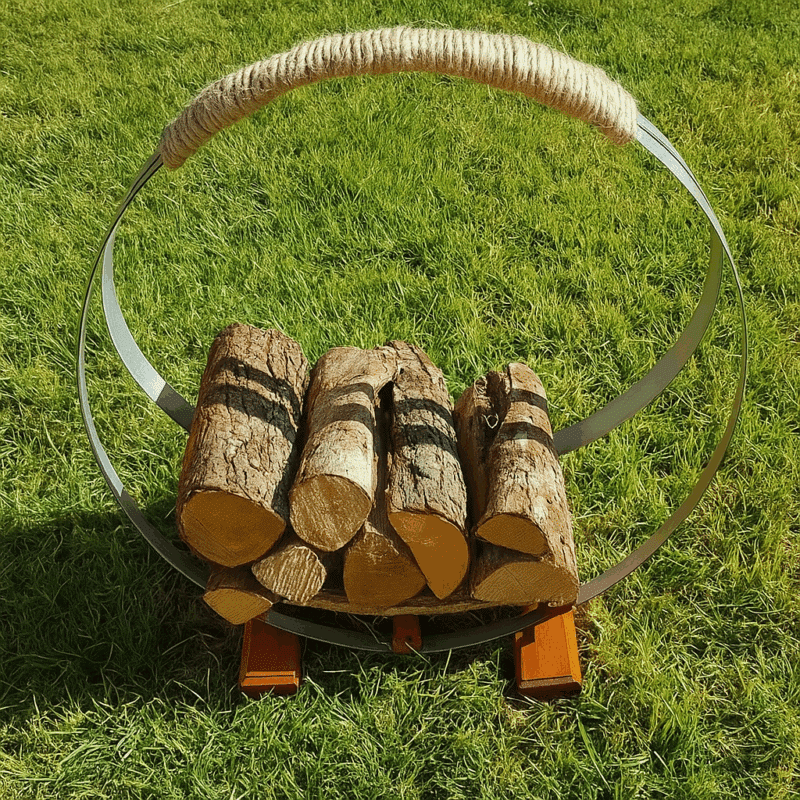
The bands are also great for making firewood stands.

If you’re interested in any of the items used in this project, we’d appreciate it if you used our affiliate links. Clicking these links earns us a small commission at no extra cost to you, helping us create more inspiring and exciting projects to share. We’d also love to hear your thoughts—feel free to leave a comment or share this post!

34 Comments
Emilia M Birtch
November 24, 2016 at 4:22 amUnique and beautiful wood finish should open up a unique furniture shop these creations I think the customer would love!
Anita Holland
December 2, 2016 at 6:56 amThank you, a great compliment
Donald Jones
January 14, 2019 at 6:54 pmI’m a bachelor, living alone, and I really like the ‘manliness’ of your barrel table. Doesn’t hurt that it really looks terrific in fit and finish either. Such a great idea.
Anita Holland
January 18, 2019 at 5:03 amThank you, It is one of my pride and joys being the first one I made.
Crystal
January 26, 2018 at 3:07 amThis is amazing. Would love to see one of these with hinges to utilize the space inside the barrel!! I live in an old brick house that has the smallest rooms you could imagine, so my husband and I have to think about utilizing every little bit of space we can get! Thanks for tutorial!
Anita Holland
January 28, 2018 at 10:30 amThank you Crystal, My table does have hinges and storage inside. I use mine as a toy box for when my niece comes to visit. Sorry about the mess, but it will give you an idea what the inside looks like. Have a look at the post added a picture in.
TR
July 29, 2019 at 2:08 amGreat idea… Folks please finish the inside of the lid when making this so your project looks complete..
Anita Holland
July 29, 2019 at 4:49 amThank you. I did leave the inside because I made a mistake and poured the resin on the top first. The resin poured perfectly first time, no dust or bubble which is a near miracle as far as resin goes. So I was not going to tempt fate and risk damaging the top surface. But yes I do agree do the underneath first.
Debbie-Dabble
August 18, 2019 at 10:19 pmWOW!!! This is absolutely amazing!! Love the look of the stain on it! Gorgeous! Thanks so much for stopping by!!
Hugs,
Debbie
Anita Holland
August 19, 2019 at 7:45 amThank you so much for the lovely comment. The table is my pride and joy.
Debra Jerry
August 24, 2019 at 12:26 pmWow, Anita! This is just beautiful! Pinned.
Anita Holland
August 24, 2019 at 12:55 pmThank you so much, it is one of my favourite projects because it is unique to me.
Amy Johnson
August 30, 2019 at 3:54 pmThis is so stunning! What beautiful craftsmanship. And I love the added bonus of storage!
Anita Holland
August 31, 2019 at 2:46 amThank you so much Amy, It is one of my projects I am most proud out. A family heirloom my kids can fight over.
Dylan Peterson
September 9, 2019 at 7:04 pmIt’s cool that support beams can be added to wine barrels to help support their weight when being used as tables. My sister has been telling me about how she wants to get some decorative tables for an Italian restaurant that she wants to open in a few months, and I think that wine barrel tables could be the perfect aesthetic for her. I’ll share this information with her so that she can look into her options for someone who can build these kinds of tables for her.
Anita Holland
September 11, 2019 at 1:29 amThank you so much for popping by. This wine barrel is my pride and joy.
Treat and Trick
September 25, 2019 at 12:22 amThis is so unique and beautiful! Thanks for visiting and commenting on my post..
Anita Holland
September 26, 2019 at 1:04 pmThank you so much, and you are very welcome.
Pat
October 28, 2019 at 10:04 pmHi Anita, Love this idea. We have been attempting making wine barrel furniture and love this decal. But I am curious. You said you designed it in word and ordered it on line. I just bought a cricut maker and wondering why this could not be designed in design space and I note some people make stencils and some make it with vinyl and polyurethane over the vinyl. Which would you suggest. I love your decal, how would I go about designing that in design space, any hints would be eagerly accepted. Love your work.
Anita Holland
October 28, 2019 at 11:53 pmHi Pat, I made this table years ago before I even knew what a Cricut or silhouette was 🙂 I have a Cricut now, and you could definitely do this in design space. I use my Cricut in a lot of my projects if you look on my website under the Cricut category. You can design it in design space and cut it using oracle 651. You do need to seal the table first with the polyurethane before you add the decal. The stain will eat into the decal if you don’t. You can find all the images if you search free clipart and just convert the images into SVG files using inkscape which is free. I design all my own images this way. Once you have the SVG files you can add them to design space and cut them. Let me know if you need any more help, I will be happy to assist you.
M. Vanbellinghen
January 26, 2020 at 9:24 pmJe suis menuisier et j’ai rarement vu une table barrique de vin aussi belle ! Bravo Anita, excellent travail.
I’m a woodworker and I´ve never seen such a beautiful wine barrel table. Bravo Anita.
Great job
Anita Holland
January 27, 2020 at 1:30 amThank you so much, It was one of the first builds that I kept for myself. My kids are already fighting over who will be getting it next. lol
Sara
June 28, 2021 at 8:59 pmSo beautiful and what amazing storage; I wouldn’t have thought to hinge it! I don’t think the table top is a cop-out at all; it’s far better to save a piece from landfill than to make one new!
Anita Holland
June 29, 2021 at 2:26 pmThank you Sara, I could not think of another way to attach the lid so I had to hinge it.
Maria
June 29, 2021 at 12:25 amWhat a unique wine barrel table. Love everything about it.
Anita Holland
June 29, 2021 at 2:26 pmThank you so much Maria, It has pride of place on my lounge.
Libbie@alifeunfolding
June 29, 2021 at 2:37 amWhat a great project. The wood is just beautiful!
Anita Holland
June 29, 2021 at 2:29 pmThank you so much Libbie, the liquid glass that I put over the surface made it look stunning.
Dee
June 29, 2021 at 1:48 pmWow that is really something! Such a good detailed post, a tremendous amount of work but it turned out fantastic! Congratulations!
Anita Holland
June 29, 2021 at 2:32 pmThank you Dee, I love trying to come up with new ideas. Thanks for stopping by.
Janet
June 29, 2021 at 8:57 pmYou are so creative…love what you do!
Anita Holland
July 2, 2021 at 8:00 amThank you so much Janet, that is really kind of you to say.
Rosemary Palmer
July 5, 2021 at 4:53 amLove this – I’ve always wanted a barrel from Jack Daniels, just a couple hours from here.
Anita Holland
July 5, 2021 at 3:21 pmThank you so much Rosemary, I have made a few pieces of furniture from them.