
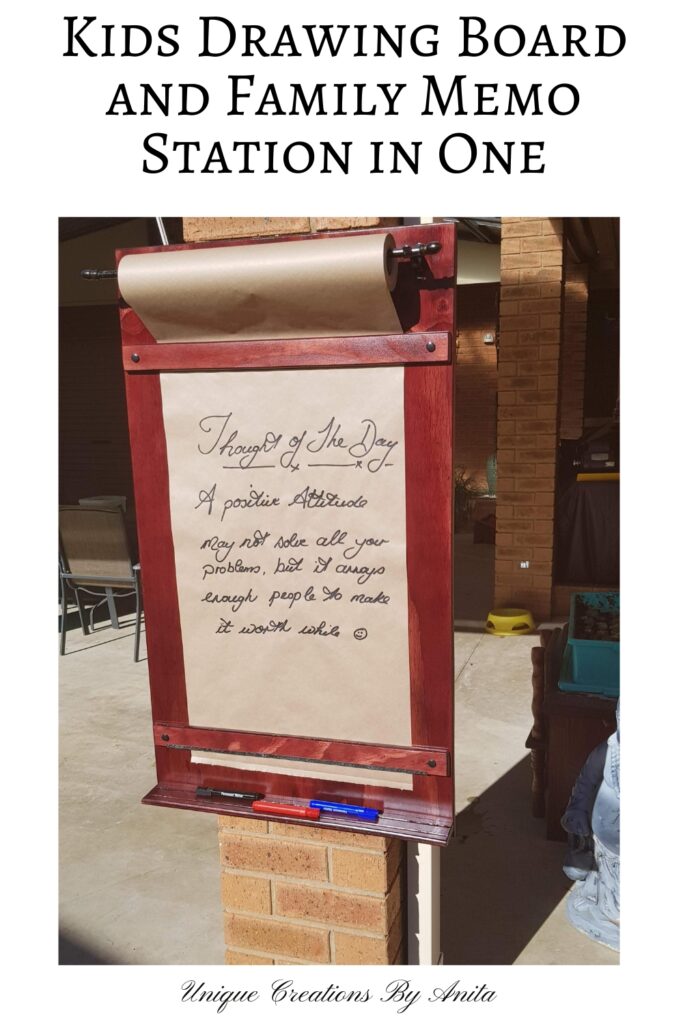
When my sister tagged me in a Facebook post featuring a Kraft paper roll message board, she didn’t realise she was sparking my next DIY project. Within minutes, friends began commenting, assuming I had made it, and asking how much I charged! That got me thinking, “How hard could it be to make one myself?” It turns out it was surprisingly easy!
This paper roll message board is a versatile and functional piece you can hang in your kitchen, kids’ playroom, home office, or even the garden shed. Use it as a memo board, shopping list, kids’ drawing board or teaching aid—it works for just about anything.

Before we dive into this tutorial, be sure to subscribe to my bimonthly newsletter to be the first to see my latest projects. You can also follow me on Pinterest and Facebook, where I also include my unique mixed-media art projects.

DIY Wall-Mounted Kraft Paper Roll Message Board for Kids, Home or Classroom
**This post may contain affiliate links. This means I earn a small commission on links used at no extra cost to you. Please see my disclosure policy for more information.**
Materials Needed
- 12mm plywood board (1200mm x 600mm for base)
- Two plywood strips (600mm x 50mm)
- Plywood for pen holder (600mm x 60mm)
- Kraft paper roll (450mm wide x 50m)
- Curtain rod and brackets
- Wood glue and epoxy glue
- Router with round-over and grooving bits
- Stain or paint of choice (I used dark mahogany)
- Satin polyurethane (for sealing)
- Screws, pilot drill bit, large head nails
- Flush wall mounts
- Aluminium foil cutting strip (blade)
- Orbital sander and 180 grit sandpaper
- Jigsaw
Step 1: Build the Message Board Base
Start by sourcing your Kraft paper roll. I recommend buying one first to ensure it’s a size you can easily find replacements for. I could only find a 450mm x 50m roll in my town.

Cut a piece of 12mm plywood to 1200mm x 600mm for your base. Then cut two strips of plywood 600mm long x 50mm wide. These will be your front slats that hold the paper flat to the board. Sand the wood surface smooth with an orbital sander using 180-grit paper. This helps ensure your writing appears clearly on the paper. Use a router with a round-over bit to smooth the sharp edges for a clean finish.

Stain or paint your wood. I used dark mahogany stain and sealed it with two coats of satin polyurethane.

Step 2: Add a Marker Pen Holder
The next step was to create a holder for the marker pens. It’s practical to have them easily accessible whenever you want to jot something down. I used a 600mm x 60mm piece of plywood for the holder.
Before cutting the wood to size, use a router with a grooving bit to add slots for the pens—this is much easier to do while the board is still full-sized. I made the mistake of cutting the wood first, which made routing the grooves quite awkward, so mine ended up a little uneven.

Step 4: Install the Paper Roll
Use a curtain rod and brackets to hold your paper roll. Drill the brackets onto the baseboard, ensuring they’re level before adding the rod. The rod just rests in the brackets.

To make the ends of the rod more attractive, I added small wooden knobs using epoxy glue and bolts to ensure they fit snugly. Once cured, I spray-painted the entire rod black to match the brackets.

Step 5: Add a Paper Cutting Strip
For the cutting blade, I initially tried attaching metal directly to the front, but it was bulky and awkward. My husband had a better idea—repurpose the cutting strip from a foil dispenser. Genius!
")
Secure the strip along the bottom edge using strong adhesive or large head nails (though I’m still looking for a cleaner mounting method—drop your suggestions in the comments!).

This was how I attached the blade, not the prettiest, but it worked.
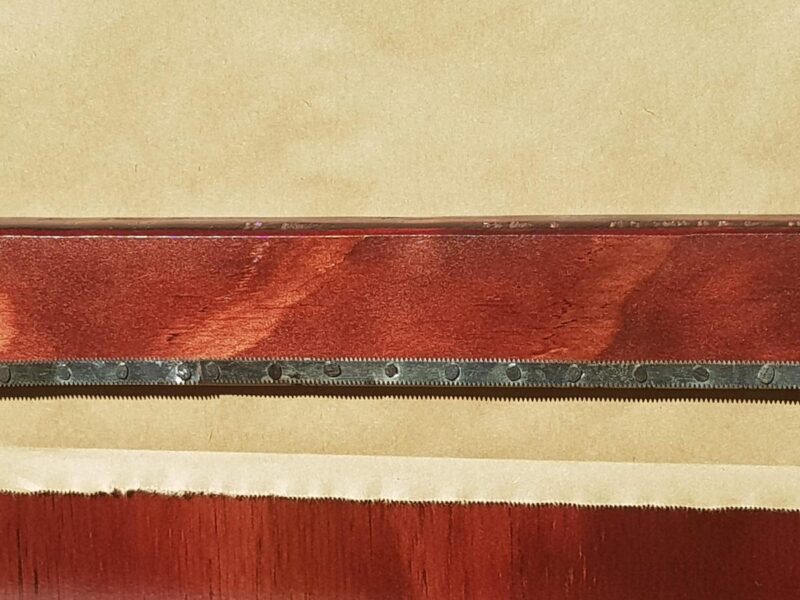
Attaching the paper supports and pen holder
Drill pilot holes in the message board base where you want to attach the pen holder. Line up the holder and use the existing holes as a guide to drill through the back of the holder itself. Apply some wood glue, then screw the two pieces together. To prevent the front wood strip from splitting, pre-drill those holes as well.
Before securing the two wooden strips that hold the paper in place, insert a washer on each side between the base and the front support. This creates a small gap, allowing the Kraft paper to feed through smoothly without catching or tearing. I added screwcaps to hide the screws.

Step 6: Mount to the Wall
Use flush mounts to hang the message board securely on the wall. These provide a clean, close fit and are easy to install.
Now your Kraft paper roll message board is ready to use! Whether it’s for family reminders, kids’ drawings, classroom fun or meal planning, you’ll find a use for it every day.

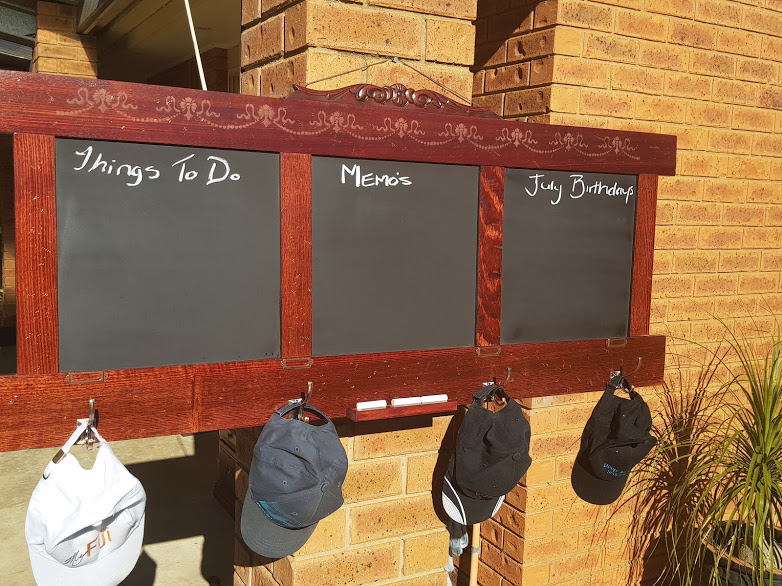
More notice board project ideas
This notice board was made from a recycled bed headboard—I repurposed the panels into functional chalkboards.
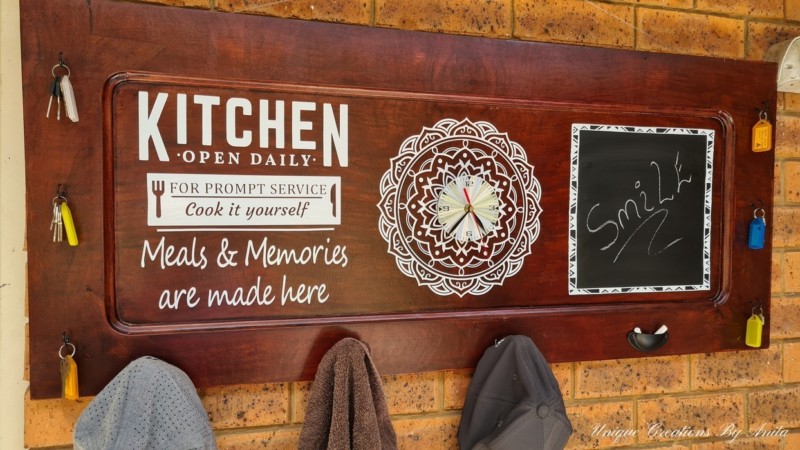
This functional kitchen board was created from a panel I salvaged while upcycling an old piano into a bar.

If you’d like to find any of the items used in this project, we’d greatly appreciate it if you used our affiliate links. These links provide us with a small commission at no extra cost to you, allowing us to continue creating and sharing more inspiring projects. We’d also love to hear your thoughts—feel free to leave a comment or share this post!


Christina Woodcock
August 15, 2018 at 7:20 pmI love this such a neat idea! And the color RED I love!
Anita Holland
October 3, 2018 at 10:11 amThank you Christina, Sorry for the late reply I just found your comment in my spam folder.
Mike Waterhouse
November 30, 2018 at 2:44 pmFor the Blades I used cheap Hack Saw blades from the dollar store they work well for this and used pallet boards
Anita Holland
December 7, 2018 at 2:31 amThat is a great idea, I will remember that for next time. Thanks for the info.
David Rice
December 11, 2018 at 12:29 pmGood idea, Mike. Something else that may help: attach the hack saw blades to the rear side of the horizontal wood strip.
Anita Holland
December 12, 2018 at 1:22 amHi Dave, If you look in the picture with the two wooden stripes you will see a metal stripe. I sharpened that to a blade and attached it to the back to cut the paper but it did not work. It has to be on the front because you need to be able to pull upward to tear it.
Debbie Hessler
November 8, 2018 at 7:33 amYou are totally awesome! I love everything you’ve done. I started out with a search for Unicorn Spit and look how far I’ve come!! 😂
Because you like to use scrap pieces, I’m wondering if you might have had any PVC pipe to use, instead of buying a curtain rod.
I did this for my front window which is some ridiculous width and the cost for a curtain rod of that length was even more ridiculous! I painted the rod to match the finial ends I had and it turned out great!
Keep up the good work. I am truly in awe of you! 😍
Anita Holland
November 9, 2018 at 12:11 amThank you very much, that is a great compliment. I used the curtain rod because I had one lying around at home. PVC pipe would have been my second choice I always go with the easiest method. Thank you for your support.
Helena
July 23, 2019 at 3:44 pmI ilke it very much!
Kisses! Helena
Anita Holland
July 24, 2019 at 3:21 amThank you so much
Anita Holland
July 24, 2019 at 3:22 amThank you and you are very welcome.
Kippi
July 24, 2019 at 1:08 pmSuper cool project I am pinning this one!!!
Happy crafting,
Kippi
Ps. Share this project on my site kippiathome.com at the YTS blog hop
Anita Holland
July 25, 2019 at 1:22 amThank you, I will pin it now.
Sylvia | Grace for a Gypsy
July 27, 2019 at 2:20 amWow! Another great project Anita! Thanks for linking up to the GATHERING OF FRIENDS LINK PARTY 3
Leanna Forsythe
July 28, 2019 at 9:29 pmOne of these has been on my list forever. I kept seeing one at Michaels and at Home Sense, but neither one was large enough. This is perfect, thank you for the tutorial. I love it.
Anita Holland
July 29, 2019 at 1:54 amThank you I always loved them, and they are so basic to make.
Elise L Ho
July 29, 2019 at 10:38 pmThat is so cute. Kraft paper is so versatile and inexpensive.
Anita Holland
July 30, 2019 at 4:09 amThank you, so many uses for them now.
Deborah
July 30, 2019 at 3:28 amI love this. YOu were my favorite pick for Waste Not Wednesday this week.
Anita Holland
July 30, 2019 at 4:09 amThank you so much, very kind of you to say.
Deborah
July 30, 2019 at 12:28 pmAnita, I realized you were Leanna’s favorite two weeks ago so I needed to pick a different one…I’m sorry. Totally love this project…which is obvious by my almost doubling it as a favorite…lol.
Michelle
July 30, 2019 at 8:03 pmWhat a fun idea! And so useful. Message central in the household!
Thanks for linking up with Creative Compulsions!
Anita Holland
July 31, 2019 at 4:12 amThank you!
Anita Holland
August 3, 2019 at 6:44 amThank you so much for hosting and the feature. I have just found these parties and I have lots of great projects I hope you will like. So I will be back.