
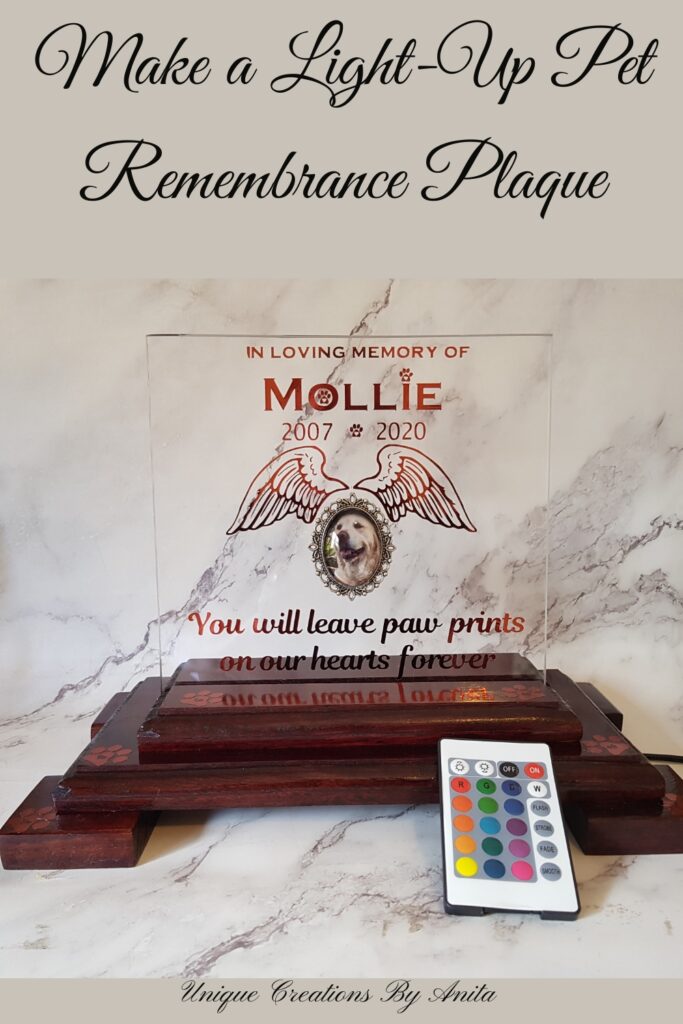
Losing a pet is never easy. Recently, my future daughter-in-law had to say goodbye to her beloved dog Mollie due to cancer. Mollie was a loyal companion through every season of life—whether you were happy, sad, or even just sitting on the loo, she was always there with unconditional love.
To honour her memory, I wanted to create a pet memorial plaque that was more personal than a simple framed photo. Inspired by an LED headphone stand I built a few years ago, I used a similar idea with perspex and LED lights to make something heartfelt and beautiful. Once the lights are switched on, the colours shine through the perspex, creating a glowing tribute that brings comfort and fond memories.

Before we dive into this tutorial, be sure to subscribe to my bimonthly newsletter to be the first to see my latest projects. You can also follow me on Pinterest and Facebook, where I also include my unique mixed-media art projects.
How to Make a Pet Memorial Plaque with LED Lights and Vinyl Decals
**This post may contain affiliate links. This means I earn a small commission on links used at no extra cost to you. Please see my disclosure policy for more information.**
Materials Needed
- Scrap wood or drawer front
- 6mm clear perspex (205 mm x 185 mm)
- Dark mahogany wood stain
- Orbital sander and sanding discs (220 grit)
- Router with round-over bit
- Table saw or router (for groove)
- Vinyl cutter (Cricut Explore Air 2)
- Self-adhesive bronze foil
- Transfer tape
- Diamond glaze glue or E6000
- LED light strip (USB or battery operated)
- Spray polyurethane
- Jigsaw
- Microfibre cloth
- Small picture frame with glass
Step 1: Preparing the Wooden Base
I started by cutting the wood into the following sizes:
- 1 piece – 280 mm x 170 mm
- 1 piece – 210 mm x 100 mm
- 4 pieces – 60 mm x 60 mm
Using a router with a round-over bit, I softened all the edges. After sanding off the old varnish with an orbital sander, I stained the wood with a dark mahogany finish. This warm tone gave a more elegant look and suited the theme well. Before assembling the layers, I stained each piece individually to ensure full coverage in tight corners.

Step 2: Assembling the Plaque Base
I glued and nailed the smaller wood section onto the larger base. To speed things up, I added nails to hold everything in place. This allowed me to move on without waiting for the glue to dry.

Clamp the wood with wood clamps if you don’t have a nail gun.

Step 3: Cutting the Groove for the Perspex
In hindsight, it’s easier to cut the groove before assembly. I used a table saw to make two passes across the centre of the top wood layer. You can also use a router.

The groove needed to be just wide and deep enough for the perspex to slot in snugly. Be careful not to cut too wide, or the plaque won’t stay upright.

The four feet were glued and nailed to the underside of the base, lifting the plaque slightly to make room for the wires.
Step 4: Finishing the Base
The whole piece was sealed with two coats of clear spray polyurethane. I chose spray for speed, but any wood sealer will work. Let it dry thoroughly before adding any other components.

Step 5: Cutting and Inserting the Perspex
I cut the 6 mm perspex to 205 mm x 185 mm using a jigsaw. Sand the edges with 320-grit sandpaper for a smooth finish. Leave the protective film on the perspex until you’re done applying the vinyl to avoid scratches. Test that the perspex slides neatly into the groove in the wood.

Step 5: Adding a Photo Tribute
For the photo, I used a mini charm frame, often used for wedding bouquets. You can get similar frames online.
I printed a favourite photo of Mollie on photo paper and glued it behind the glass with Diamond Glaze. Avoid using Mod Podge—it can smudge the ink. The frame will be glued onto the Perspex with E6000 glue after the foil vinyl has been added.

Step 6: Designing the Vinyl Decals
Using my Cricut Explore Air 2, I created a custom design with Mollie’s name, paw prints, and decorative elements. The fonts and graphics came from the Cricut Design Space and free clipart libraries.

I used self-adhesive bronze foil, which looks stunning against the wood. To reduce waste, I filled in the unused space with extra paw prints. Make sure to tape down the foil to the cutting mat to prevent any movement while cutting.

Step 7: Applying foil to the Plaque and Perspex
After weeding out the unwanted parts of the foil design, I used transfer tape to lift the decals.


Use a scraper to press down firmly so the foil transfers cleanly, then peel back the transfer tape slowly. I found foil is harder to work with than vinyl, so take your time.

Then, I carefully positioned the decals on the wooden base and burnished them with the felt scraper.

Slowly remove the transfer tape.

Once all the decals have been transferred, you can glue the photo charm onto the perspex.

Step 8: Installing the LED Lights
I used a self-adhesive LED strip and placed it inside the groove under the perspex. You can find LED strips in various colours and settings (flashing or static).

To hide the wires, drill a small hole in the base and feed the wire through to the back or underside.

When switched on, the lights shine through the perspex beautifully.

Step 9: Cleaning Tips
Perspex can scratch easily, so avoid harsh chemicals. For cleaning, use warm, soapy water and a soft microfibre cloth. This will keep the surface clear and fingerprint-free.

This pet memorial plaque was a touching way to celebrate Mollie’s life. The glowing lights and heartfelt message create a beautiful keepsake that brings comfort during such a difficult time.
If you’re looking for a unique way to honour a beloved pet, I hope this tutorial inspires you to create something truly meaningful.

We recently lost my beloved Jack Russell Diesel, and my sister made me this super cute memorial candle.

More pet-related projects
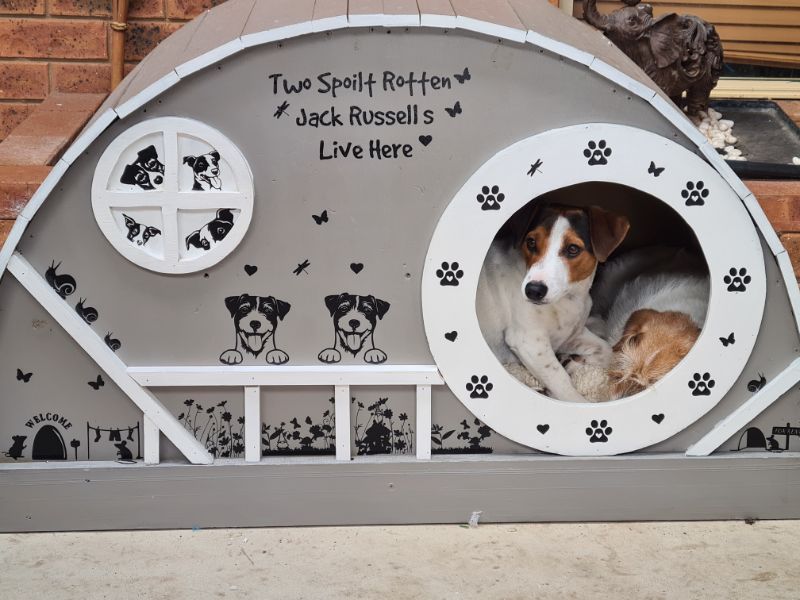
Our two Jack Russells now have their own cosy Hobbit-style dog house—straight out of the Shire!
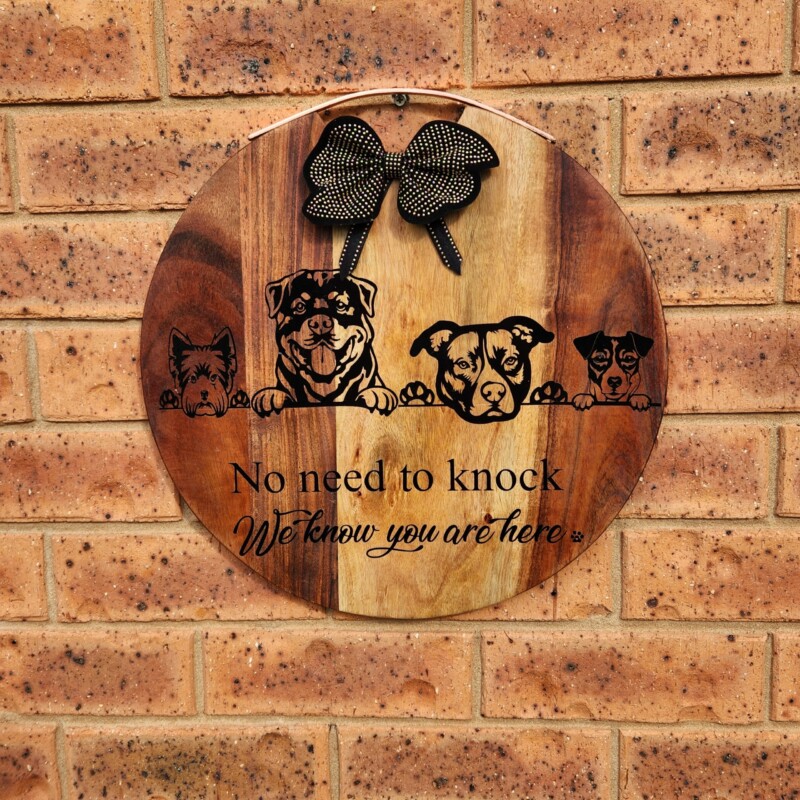
I turned a recycled cheese board into a welcome sign, complete with cute dog graphics made on the Cricut. More Cricut project inspiration can be found HERE.

If you’d like to find any of the items used in this project, we’d greatly appreciate it if you used our affiliate links. These links provide us with a small commission at no extra cost to you, allowing us to continue creating and sharing more inspiring projects. We’d also love to hear your thoughts—feel free to leave a comment or share this post!
19 Comments
Karen, the next best thing to mummy
March 9, 2020 at 8:41 pmLoosing a beloved pet is heart breaking, This is a lovely tribute to a family member #anythinggoes@_karendennis
Anita Holland
March 10, 2020 at 11:46 amThank you Karen, she loved it.
Karen, the next best thing to mummy
March 12, 2020 at 5:02 amPopping back #alittldbitofeverything@_karendennis
Michele Morin
March 9, 2020 at 11:03 pmWhat an amazing project!
Anita Holland
March 10, 2020 at 11:47 amThank you so much, it was really fun to make.
Claire
March 10, 2020 at 3:41 pmWhat a loving tribute for her furry friend
Anita Holland
March 11, 2020 at 2:47 pmThank you.
Michelle Leslie
March 11, 2020 at 1:27 amThis is so very special Anita. What a beautiful way to remember our fur babies who cross over the rainbow bridge <3
Anita Holland
March 11, 2020 at 2:46 pmThank you Michelle, It was hard to make because I have a dog that is really sick at the moment and we are going to have to make the hard decision soon. 🙁
Dee | Grammy's Grid
March 11, 2020 at 3:22 amWhat an awesome gift, love it!! I’m sure she will treasure it. Thanks so much for linking up with me at my #UnlimitedMonthlyLinkParty 10, open March 1 to 26. All entries shared on social media if share buttons installed.
Anita Holland
March 11, 2020 at 2:43 pmThank you so much for the very kind comment.
Anita Holland
March 11, 2020 at 2:44 pmThank you Dee, she loved it.
Pamela
March 13, 2020 at 12:26 amWhat an amazing gift! You can see how much love went into this. So impressed with your wood skill too!
Anita Holland
March 16, 2020 at 3:16 pmThank you so much, I am a big dog lover and woodworker.
Margaret Birding For Pleasure
March 15, 2020 at 5:56 pmWhat a lovely thing to make in tribute to your pet who died. Have a wonderful week ahead and stay safe from the virus.
Anita Holland
March 16, 2020 at 3:22 pmThank you so much.
Anita Holland
March 16, 2020 at 3:18 pmThank you so much
Cecilia
March 18, 2020 at 10:04 amWhat a sweet idea! Thanks for sharing at Vintage Charm!
Anita Holland
March 21, 2020 at 11:36 amThank you so much.