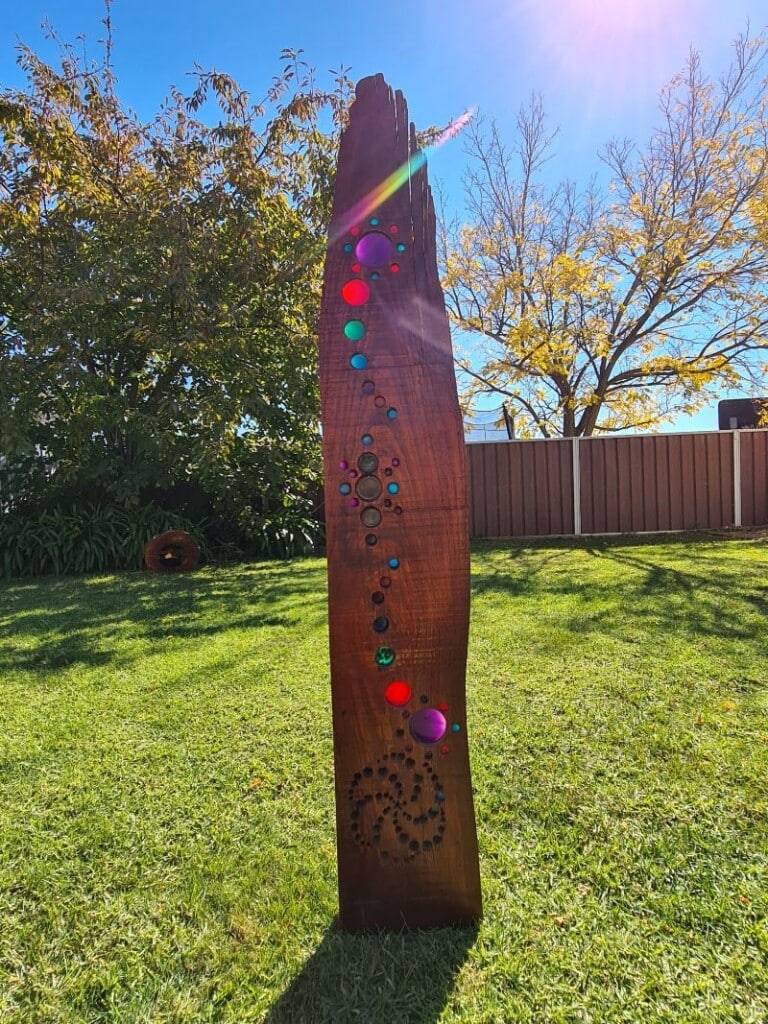
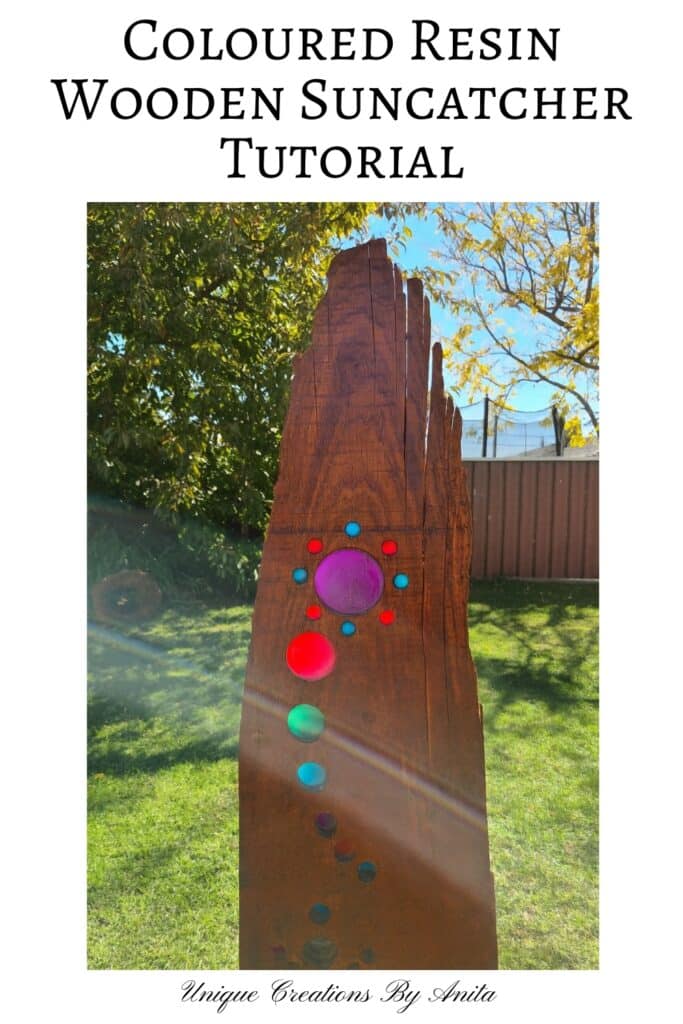
I love finding ways to turn old and weathered timber into something beautiful, and this DIY wooden suncatcher with coloured epoxy resin is one of my favourite recycled garden décor projects. What started as a battered piece of wood under my sister’s carport turned into a glowing suncatcher that catches the light most magically. Instead of turning the wood into a sign, which is the usual go-to for reclaimed timber, I wanted something more unique. The idea of drilling holes and filling them with resin came to me, and the result was a one-of-a-kind garden sculpture.

Before we dive into this tutorial, be sure to subscribe to my bimonthly newsletter to be the first to see my latest projects. You can also follow me on Pinterest and Facebook, where I also include my unique mixed-media art projects
Wooden Suncatcher with Coloured Epoxy Resin
**This post may contain affiliate links. This means I earn a small commission on links used at no extra cost to you. Please see my disclosure policy for more information.**
Materials Needed
- Reclaimed piece of wood
- Orbital sander with sanding discs (80 to 120 grit)
- Hammer and chisel
- Drill with spade bits and hole saws
- Aluminium foil tape (or resin-proof tape)
- Cling film (Saran Wrap)
- Epoxy resin and pigment powders or liquid
- Small mixing cups and sticks
- Blow Torch (to remove bubbles)
- Wood stain (cedar or your choice)
- Exterior or marine varnish
- Sturdy metal post or rebar with U-bracket (for the stand)
Preparing the Wood
The first step is to bring your piece of wood back to life. At first glance, this timber looked badly weathered, but from years of working with recycled materials, I’ve learnt that most of the damage is often only surface deep. After removing the loose pieces by hand, the solid wood underneath was ready to be worked with.
")
Sanding the Wood
Start by chiselling out any deep grooves or damaged areas in the timber. This clears away weak spots and prepares the surface for sanding. Next, use 80-grit sandpaper to strip back the rough outer layer. Work steadily until the surface feels more even. Once the bulk of the roughness is gone, switch to 120-grit sandpaper to smooth the wood further.
Because this project is for the garden, there’s no need to sand beyond 120 grit. A slightly textured finish helps the stain and sealer grip the wood more effectively.

A cedar wood stain gave it warmth and a protective base colour.

Creating and Transferring the Design
My inspiration came from crop circle patterns. To transfer the design, I printed it out and used carbon paper to trace it onto the wood. For circles, hole saws and spade bits worked perfectly.

I began with the smaller design, and that’s when I realised it wasn’t the best choice. Using a drill and drill bit to make the tiny holes was far too time-consuming because the wood was so thick.
The second problem was that the holes were too close together, and they ended up blending into one another, which spoiled the look. Larger shapes allow more light to shine through, so I recommend sticking to bolder, wider circles. I didn’t want to waste the wood, so I kept going and switched the design to larger holes.

Drilling the Holes
I began with a battery-powered drill but quickly swapped to a corded one to avoid waiting for batteries to recharge. Hole saws and spade bits gave the cleanest cuts. For the deeper sections of the wood, I had to drill the holes in stages. I drilled as deep as the hole saw would go, then used a hammer and chisel to chip out the wood before drilling again to go deeper.

Since I was making up the design as I went along, once I had one half of the pattern drilled, I used it as a template for the other side. To transfer it, I placed paper over the drilled holes and made impressions with the saw blades and a hammer. This little trick saved a lot of time compared to retracing everything with carbon paper.

Even at this stage, the wooden suncatcher already looked impressive, but I knew adding resin would take it to another level.

If you choose to stop at this stage, be sure to add two to three coats of exterior or marine varnish to protect the suncatcher from the weather.

Taping the holes for resin
The article I read recommended using silver duct tape to seal the holes. To help it stick better, it suggested heating the tape and pressing it down firmly to close any gaps. I followed those instructions, but within minutes, the resin was running out of the tape and spilling all over the table. I believe part of the problem was the groove visible in the wood.

There are resin-proof tapes available, but I couldn’t get one locally, and the nearest town is 100 km away. I went through my husband’s toolbox and found some aluminium foil tape, which worked perfectly. This mistake also highlighted that I had taped the wrong side of the wood. You want the resin to sit flush with the front—if it sits at the back, you won’t be able to see it.
To update this section, I’ve since learnt a better way to tape the holes. Before adding the tape, place a layer of Saran Wrap over the holes. This gives a smooth finish and also prevents the resin from reacting with the tape’s adhesive.

Pouring the resin

I mixed about 300 ml of epoxy resin and split it into smaller containers before tinting each with colour pigment. Glow-in-the-dark powders would also look amazing for a nighttime effect.

Adding the resin to the suncatcher
For this project, the less resin you use, the better the effect. Aim for a layer about 1 cm deep. I had mixed too much resin and didn’t want to waste it, so I filled some of the holes. That turned out to be a mistake—the deeper the resin, the less light shines through, as you can see in the middle and bottom holes.
")
Once the resin is poured, bubbles will start to form on the surface. To remove them, simply swipe a blow torch flame lightly across the resin. I didn’t have a blow torch on hand, so I used a small crème brûlée torch from the kitchen, and it worked just as well.
")
The resin needs to sit for 24 hours to cure fully. The image below shows a close-up of the back, where the resin level turned out perfectly. After the 24 hours are up, you can remove the tape.

Sealing and Finishing
After 24 hours, I peeled off the tape. When I removed the tape, I found the surface of the resin was sticky, as if some of the tape adhesive had stayed behind. I used a cloth and plenty of elbow grease to clean off the residue. This is another reason why it’s a good idea to add a layer of Saran Wrap before taping. Any resin that leaked onto the wood was sanded away, and then the wood was re-stained. A couple of coats of exterior varnish sealed and protected the piece against the weather. To mount the suncatcher, I attached it to a metal post with a U-bracket.

Four years later, I refreshed it with a new coat of stain and varnish, and it’s still going strong.

Now that my neighbour’s large tree has been removed, it catches even more sunlight, creating stunning colour reflections in the garden.

")
Tips for Making a Wooden Resin Suncatcher
Designing and Drilling
- Keep designs bold and simple. Large circles let more light through and are quicker to drill.
- Avoid small, close-together holes. They can merge into each other and spoil the look.
- Use templates wisely. Drill one half of the design, then trace or transfer it to the other side to save time.
Working With Resin
- Less resin works best. A shallow 1 cm pour gives a brighter effect than deeper fills.
- Don’t overfill. Deeper resin blocks the light and dulls the colours.
- Pop bubbles quickly. Use a blow torch, or even a crème brûlée torch, to sweep across the resin surface.
Taping the Back
- Skip the duct tape. It doesn’t seal well, and resin will leak through.
- Use aluminium foil tape with cling film. This gives a smooth finish and stops resin from reacting with adhesive.
- Tape the front, not the back. Resin should cure flush with the surface you want visible.

More garden decor projects
Here’s another garden décor idea using a similar method—a suncatcher with an African Sunset theme, created from a wood slice with a vinyl decal applied over the resin.

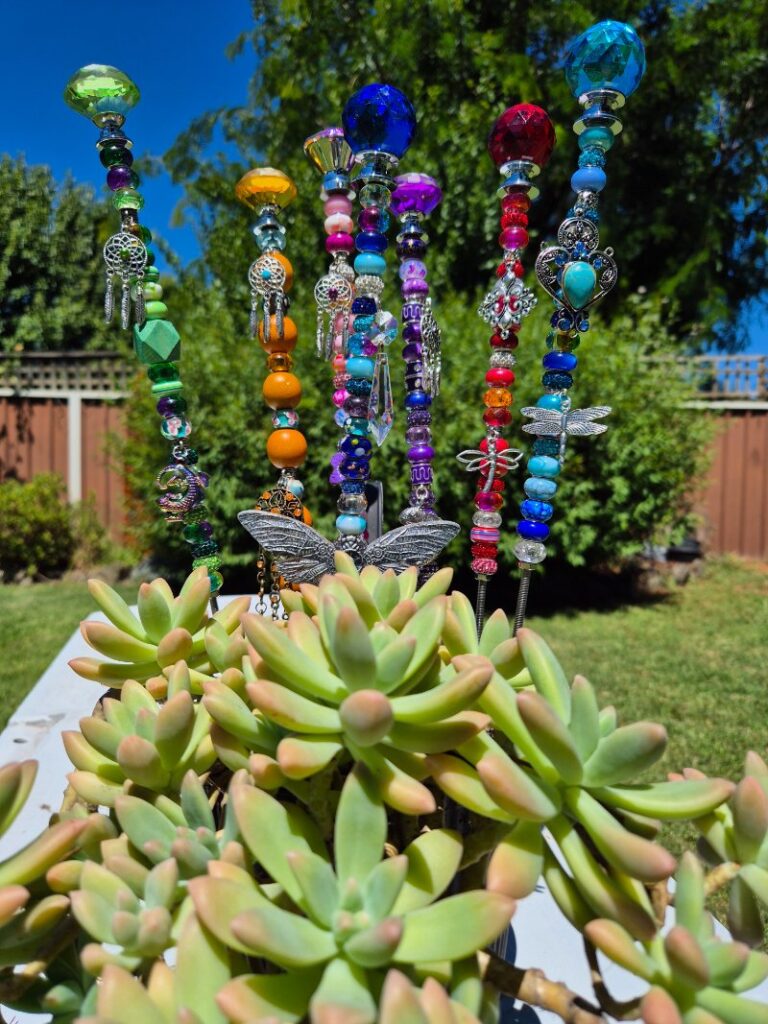
A simple way to brighten up any garden planter is with beaded garden stakes. Made from beads and glass knobs, they catch the light beautifully and sparkle in the sun.
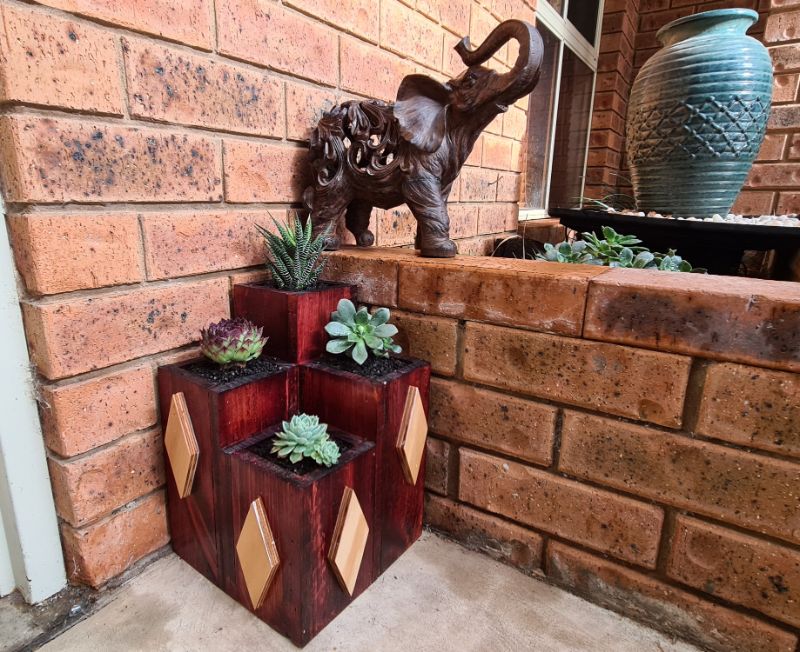
This garden planter was built from recycled pallet wood and designed as a multi-tiered planter.

If you’re interested in any of the items used in this project, we’d appreciate it if you used our affiliate links. Clicking these links earns us a small commission at no extra cost to you, helping us create more inspiring and exciting projects to share. We’d also love to hear your thoughts—feel free to leave a comment or share this post!

57 Comments
Heather
November 4, 2017 at 3:52 pmLOVE LOVE LOVE this project!! It turned out SO AMAZING!! Could you please tell me what brand/type of pigments you used to color your Resin with? I want to try doing this myself, but worry that I’ll use the wrong coloring agent and the resin will become opaque.
Thanks so much and keep up the great creative work!!
Heather
Anita Holland
November 5, 2017 at 5:49 amI will email you the details.
Lisa
November 4, 2017 at 9:06 pmWhat is the name of the colorant that you use to color the epoxy? It looks to me like acrylic paint but I can’t make out the label from the picture so if you could tell me that would really help I’ve got some pieces of wood that I’ve been looking for a project to do with them and your suncatchers are perfect to use this wood to make suncatchers out of them plus they’re just so pretty.
Lisa
July 10, 2022 at 3:48 amThank you for sharing this idea
Toni
November 12, 2017 at 6:28 amI’m getting ready to make my suncatcher also.., Would you mind emailing me the type of pigment as well please.., Thank you!
Anita Holland
November 12, 2017 at 7:46 amI will email you the details.
Toni Cottone
November 12, 2017 at 6:29 amI’m getting ready to make my suncatcher also.., Would you mind emailing me the type of pigment as well please.., Thank you!
Anita Holland
November 13, 2017 at 4:34 amDid you get the information on the resin pigment?
Bright
September 17, 2018 at 3:01 amThis looks so cool. What a conversation piece!!!
Condo Blues
September 11, 2019 at 1:04 pmI love it! I tried something similar cutting the ends of glass bottles to eventually fill the holes but it failed. You have the perfect solution. I LOVE the reclaimed wood!
Anita Holland
September 12, 2019 at 4:00 amThank you so much, I was going to try glass first but I could not cut it very well so gave up.
Michelle
September 16, 2019 at 1:19 amA unique and fun project! I love the whimsy of it.
Linda on Poinsettia Drive
September 16, 2019 at 2:01 amHow awesome. Thank you for sharing on the Classy Flamingos.
Anita Holland
September 16, 2019 at 11:51 pmThank you so much, very kind of you to say.
Our Hopeful Home
September 16, 2019 at 10:22 pmWhat a lovely, unique creation! You are quite talented! Thanks for sharing at Vintage Charm. xo Kathleen
Anita Holland
September 16, 2019 at 11:52 pmThank you, I loved how it turned out apart from the small circles down the bottom.
Cap Creations
September 27, 2019 at 7:55 pmYour suncatcher is so neat! What a great piece of garden art. Thanks for sharing!
Anita Holland
September 29, 2019 at 9:23 amThank you, pity the tree blocks most of my garden sun.
Luanne Bingham
October 13, 2019 at 1:35 pmYou are amazing! This is quite a creative masterpiece! I love what you did by bringing the wood and look of glass together with an amazing design which I could look at in my garden every single day. You rock!! Love love love it!!
Anita Holland
October 14, 2019 at 10:34 pmThank you so much Luanne, It was one of my more creative projects.
Bobbie
June 14, 2020 at 4:45 pmWhat a beautiful creative idea. I was thinking this very idea and wondered how resin would look. You just convinced me to do this! Thank you so much for sharing your experience it’s so helpful to know what works and what doesn’t! Nice job Anita.
Anita Holland
June 16, 2020 at 5:00 pmThank you so much, and I hope you will share your project once it is completed.
Kimberly
June 16, 2020 at 8:15 pmSO impressed! Have the perfect pieces of wood to do this on. Could you please email me your order details g fi or the resin and especially the pigment. *Also,* how has it held up over these years? 🙂
Anita Holland
June 17, 2020 at 4:13 pmHi Kimberley, You can use any resin suitable for tabletops and bar counters. The pigments I bought from china. I did not post brands because I live in Australia so the brands will be different. It has been a few years and the resin is still looking good, but the wood could do with a freshening up. Some of the wood stain colours has slightly lighted so not as vibrant.
JO
August 11, 2020 at 8:09 pmHi Anita! At last – another Southern Hemisphere girl!! I live in South Africa & many of our family are in Melbourne – similar latitude to Cape Town.
I LOVE this project & have 2 lovely pieces of wood that I could use for something similar – I just have to pursuade hubby to detach them from our front wall!! They need to be given some TLC after years of weather treatment so…
Hold toes that I can convince the “old man”!
Anita Holland
August 12, 2020 at 12:45 pmThank you so much JO. I am an EX South African born in Witbank and lived in white river for years. I hope your husband helps you out. If not, do as I do and do it yourself and ask for forgiveness rather than permission. Always works lol
Chuck
August 20, 2020 at 11:42 amDid the resin change color or yellow in the UV sunlight over the years.. Or did it maintain its color
Anita Holland
August 21, 2020 at 8:54 amThe colour stayed the same. It was the wood that lost some of its colour. But saying that all the holes were filled with coloured resin so it would be hard to say how it would work on just clear resin.
Michelle Leslie
December 10, 2020 at 4:24 amYou must be one of the most creative people I have EVER met Anita and your work is always so beautifully executed too. This is incredible. We have so many trees in our garden, but there this one spot the gets sun for most of the day, and something like this would be perfect in that spot.
Anita Holland
December 11, 2020 at 4:23 pmAWWW, Michelle, your comment has truly touched me. I do try and think of different projects to keep my hobby interesting, so comments like yours make me think I am succeeding. Thank you, Thank you, my special friend, on the other side of the world.
Ehoo
January 25, 2021 at 6:46 pmThank you for allowing us to learn from your mistakes. Brilliant project idea. I was just given my own drill. And hubby has a set of almost unused hole saws, hmmm…. G’day from Queensland ☺
Anita Holland
January 27, 2021 at 11:48 amYou are very welcome. My projects don’t always work out the first time, but I get there in the end. Congratulations on taking the first steps to make your own.
Rosemary Palmer
June 14, 2021 at 10:46 pmI am constantly amazed at your creative abilities and thoughts. Most would have trashed it, but you turned it into a treasure.
Anita Holland
June 15, 2021 at 3:09 pmThank you so much Rosemary, my imagination is a curse sometimes because I can never switch off. I have so many ideas and not enough time to make them.
Linda Johnston
June 14, 2021 at 11:21 pmLove how your suncatcher turned out! I’m sharing this with my daughter who just graduated as an art major. working with resin was part of one of the many cousres she took. So was using tools to work with wood. I know she’ll like it and may even be inspired!
Anita Holland
June 15, 2021 at 3:10 pmThank you Linda, I bet it will be a breeze for her to do. I love working with power tools.
Maria
June 15, 2021 at 3:46 amWhat a wonderful project. Such a great addition to outside.
Anita Holland
June 15, 2021 at 3:11 pmThank you Maria, it is a great addition and I will be making another one with just the large holes.
Michelle James Designs
June 15, 2021 at 11:33 amThis is sooo cool and so unique! I love it. I just started using UV resin and it is a lot of fun!
Anita Holland
June 15, 2021 at 3:11 pmThanks Michelle, Resin is such a great media to play around with and you can use it in so many projects.
Meegan
June 16, 2021 at 10:12 pmAbsolutely incredible! With all of your details, colors and components, this suncatcher is beyond beautiful and unique! Wow!
Anita Holland
June 21, 2021 at 10:31 pmThank you so much Meegan, it was one of my experiments that sort of worked. lol
Anita Holland
June 24, 2021 at 4:49 pmThank you so much Meegan for the awesome comment.
Lorie Johnson
July 14, 2022 at 11:58 amLove it……How did you attach your stand?
Anita Holland
July 14, 2022 at 12:38 pmThank you, I attached thick rebar to the back using U Brackets.
Kaz
July 20, 2022 at 12:38 pmHow stunning, thanku for a thorough tutorial and really appreciate u explains the do’s and don’t, much appreciated.
For a first go it really is beautiful.
Cheers
Kaz from Oz
Anita Holland
July 24, 2022 at 11:04 amThank you and you are very welcome.
Tami Wass
August 20, 2022 at 6:27 amI was just perusing through Pinterest and ran across some very similar pieces for commission. I thought, I can do this, but how?😂 Then I saw your tutorial. This is awesome! I love the design. It turned it beautiful! Your instructions are very detailed and cute now know that I can do it!😂 I would love to receive your material list. Thank you. I look forward to seeing more of what you are doing.
Anita Holland
August 23, 2022 at 8:11 amThank you so much Tami, I am glad my tutorial could help.
Andrea D
December 6, 2022 at 1:05 pmHow do you make it stand by itself in the garden?
Anita Holland
December 6, 2022 at 5:05 pmIt is attached to a rebar post that is stuck into the ground.
Lynette
January 12, 2023 at 8:15 pmLove this piece. You have a great sun catcher.
I would love to make this. Could you please email details so could make please
Anita Holland
January 16, 2023 at 6:29 pmHi Lynette the tutorial is on the page you were looking at just scroll up.
Penny
July 30, 2023 at 12:07 amJust the kind of tutorial I need. Reading the mistakes and how to rectify the imperfections were very helpful. Hope you post more of your creations. Resin is so much fun to create with, but could do without the frustrations. Thanks. You are very encouraging.
From Ontario, Canada.
Anita Holland
August 16, 2023 at 7:53 pmYou are very welcome.
Vicky Keisler
December 13, 2023 at 1:56 amThis is so mesmerizing to look at! Thank you for sharing the tutorial. Can you give a little detail on how you used the Saran Wrap, did you just lay over the holes then tape with aluminum tape?
Anita Holland
December 13, 2023 at 4:04 pmThank you, I cut a piece of saran wrap big enough top cover the hole and stretched it over the tape so I had a smooth surface. Then put the tape over the hole with the saran wrap positioned over the hole. Then I added a few layers of tape. This will just give you a nice smooth surface.