
I had seen a repurposed piano on Pinterest and immediately knew I had to try one myself. But instead of a desk or bookshelf, I decided mine would become a Piano bar/Drinks cabinet. After spotting an upright piano on Facebook Marketplace for $120, I jumped at the chance. In hindsight, that was steep—many people give them away if you’re willing to collect. Like all my projects, I wanted to make this one truly my own.
I already knew from experience that anything alcohol-related sells well. But I wasn’t prepared for just how much work this transformation would involve. It wasn’t a weekend project—it took months of labour. But once complete, the result was worth every minute. Here’s how I transformed an old piano into a show-stopping home bar.

Before we dive into this tutorial, be sure to subscribe to my bimonthly newsletter to be the first to see my latest projects. You can also follow me on Pinterest and Facebook, where I also include my unique mixed-media art projects.
How to Repurpose a Piano into a Bar/Drinks Cabinet
**This post may contain affiliate links. This means I earn a small commission on links used at no extra cost to you. Please see my disclosure policy for more information.**

Materials Needed
- Upright piano (check local giveaways)
- Screwdriver and drill with driver bits
- Angle grinder and cutting discs
- Pliers and a syringe with a thick needle
- Paint scraper, hammer
- Sandpaper (120 and 240 grit) and an orbital sander
- Paint stripper, scrubbing brush
- Spray adhesive and a staple gun
- Faux snakeskin leather fabric or similar
- Small timber strips, plywood for counters and shelving
- Mirror cut to size
- Liquid nails
- Cedar wood stain, satin polyurethane (spray or wipe-on recommended)
- Glass holders (DIY with 10mm plywood)
- LED strip lights
- L-brackets and screws
- Brasso for polishing pedals
- Wine glass rack and bottle holders
- Jigsaw and hole saw
Step 1: Strip the Piano Down
Start by removing all removable panels. The two large panels (top and bottom) usually clip off easily. The keyboard lid is attached with one large hinge and screws, also easy to remove. Underneath, the front panel lifts out once the lid is gone.
I planned to make the keyboard area a drinks counter. The keys lifted straight off, and I removed the wooden base and key spikes, which were glued down. A paint scraper helped get under them.

Step 2: Cut and Remove the Strings
Old pianos weigh around 400 kg, with most of the weight in the iron harp. I attempted to cut the strings using an angle grinder, but it was dangerous. The tension made them snap back violently. My husband helped release the tension first using a drill with a driver bit. He then cut them safely using pliers.

Step 3: Remove the Harp
With the strings gone, I could access the harp bolts. The harp was too heavy to lift alone, so we laid the piano flat and slid it out together. All remaining timber supports were glued in place. Some were removed with a hammer and scraper, though the wood did splinter slightly.

Step 4: Prepare the Inside for Display
I wanted to add a mirror to the back panel, but the pins had to go first. This took ages—each one was unscrewed using a drill. I saved them for a future project.

To improve the look of the piano’s inside, I sanded the back panel using 120-grit discs. Then I glued in faux snakeskin fabric using spray adhesive.

A staple gun held the edges, and I used timber trim to cover the staples and prevent the fabric from moving.

Step 5: Restore and Stain the Wood
The outer veneer looked okay in photos but was damaged in person. I sanded all large flat areas with an orbital sander using 120 then 240 grit. For round or carved areas, I used paint stripper. After applying it with a brush, I let it sit for a few hours and scrubbed the varnish off with warm, soapy water.

Where veneer was lifting, I used a syringe to inject glue underneath and clamped it. Cling wrap prevented glue from sticking to the clamps. I stained the whole piece with cedar stain and sealed it with two coats of satin polyurethane. In hindsight, spray-on or wipe-on poly would avoid visible brush marks.
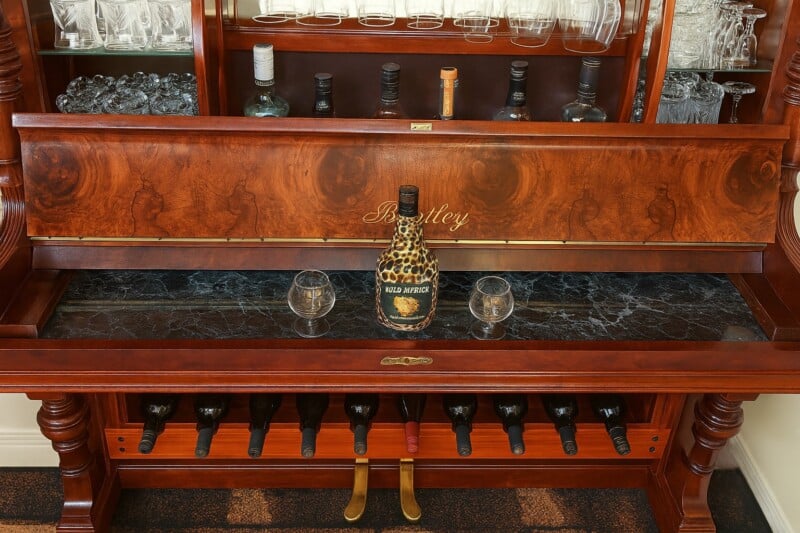
Step 6: Create the Countertop
I built a new countertop using plywood, which I covered in marble-look laminate. You could also use timber or tile for a different effect. Once it was fitted, I reattached the legs.

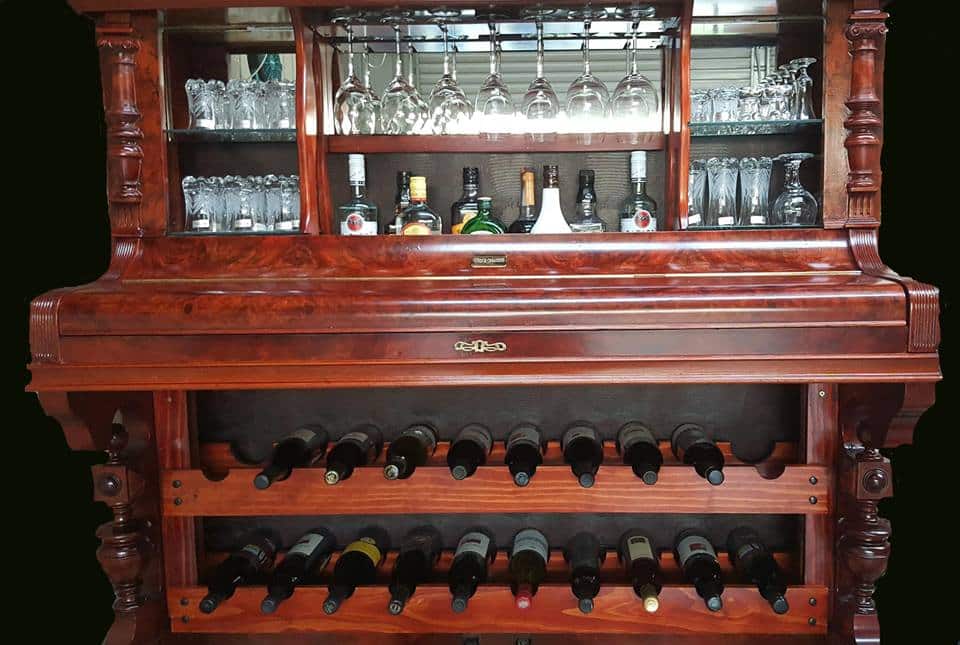
Step 7: Build the Wine Rack
For bottle storage, I made a DIY wine rack from two 1200mm x 200mm planks. One plank had 1½ inch holes, the other had 3½ inch holes. I used a hole saw to cut them, then split both planks in half. The smaller holes go at the front for the bottle necks, and the larger ones hold the bases.
Step 8: Add Shelves and Mirror
I added side supports between the lid and base for the shelves. They looked plain, so I cut decorative shapes into them using a jigsaw. To support the shelves, I attached scrap timber strips to the piano sides and screwed the glass shelves in place.
A mirror behind the shelves added a glamorous touch. Since the back was uneven, I first attached plywood, then glued the mirror with Liquid Nails. I framed it with timber trim for a clean finish.

Step 9: Install Glass Racks
To hold glasses, I made a glass holder using 10mm plywood. I cut grooves for the stems to slide into, spacing them to allow for wider modern glasses. Spacer blocks were used so the glass bases fit neatly. I attached the rack to the top of the bar.

Step 10: Add LED Lighting and Final Touches
Before gluing the mirror, I drilled a hole for the LED wire. The lights were tucked out of sight and provided a warm glow at night, highlighting the mirror and glasses.
")
Finally, I polished the piano pedals using Brasso and reassembled all the side panels with L-brackets.
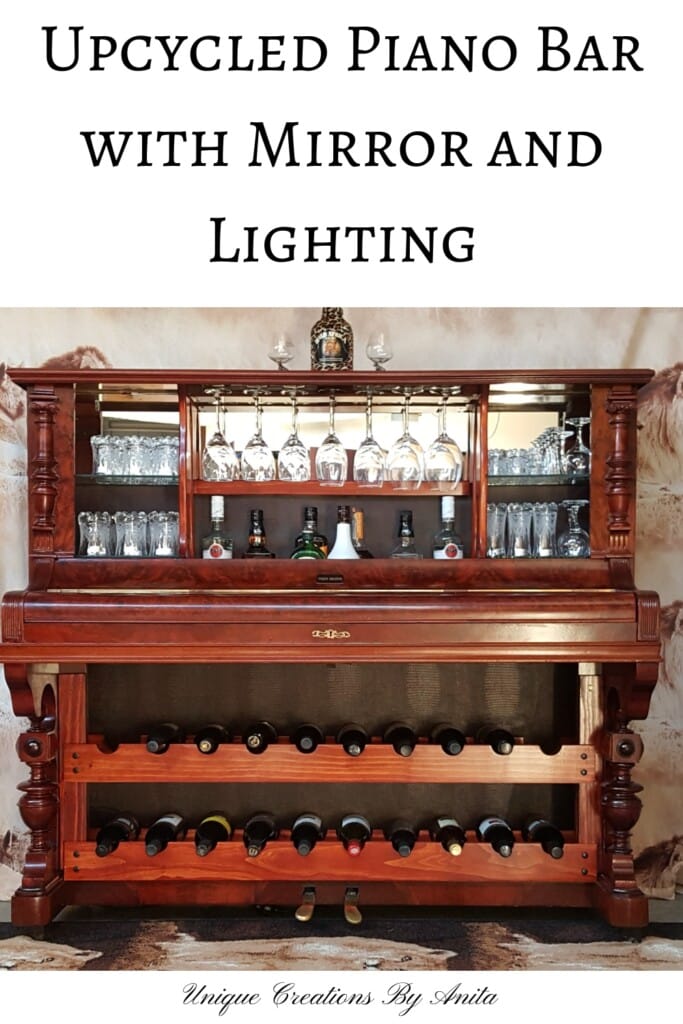
Final Result
After months of effort, this DIY piano bar is finally complete. The photos don’t do it justice, as it was too heavy to move out of my workshop. I hung a backdrop and laid a rug to hide the mess. Now, it’s waiting for the buyer to collect and take home.

")

More creative DIY projects.
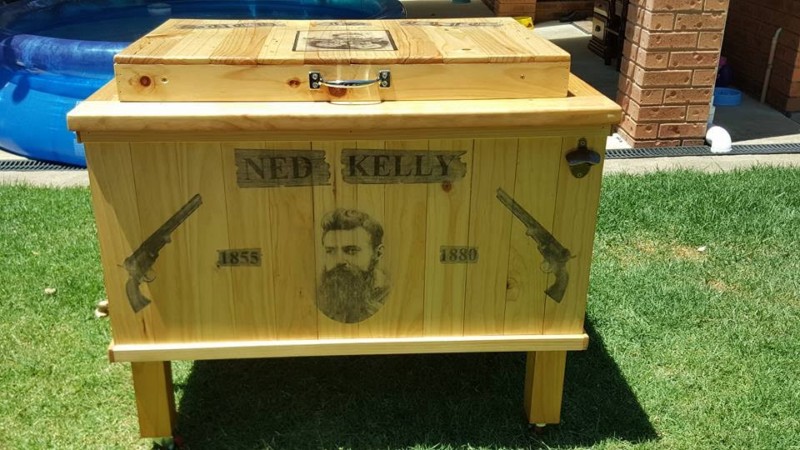
I recycled an old freezer into a stylish patio cooler—perfect for keeping drinks and ice cold during family gatherings and parties.
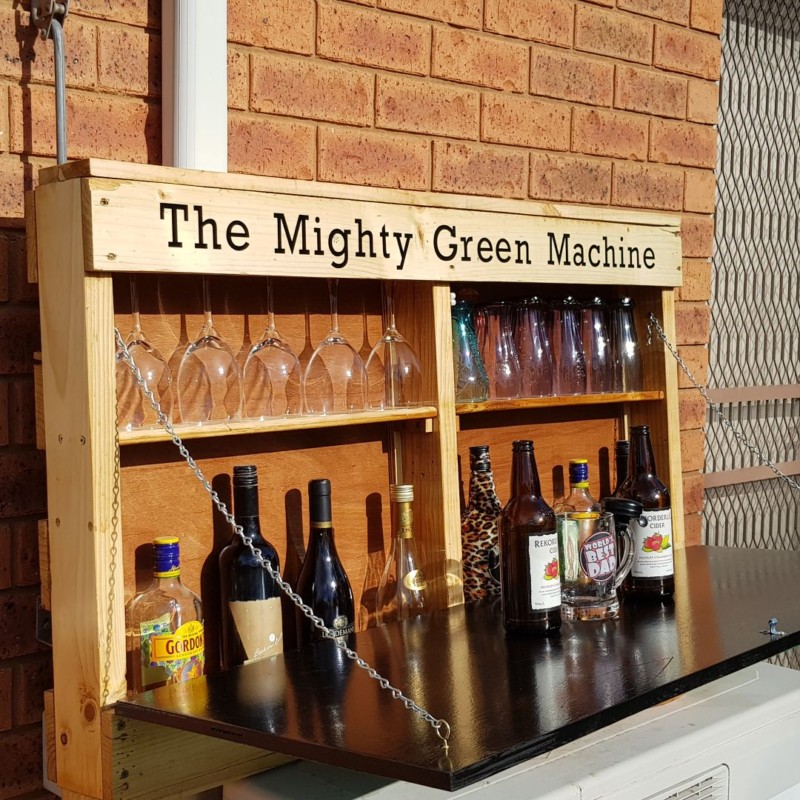
This wall-mounted bar, made from recycled pallet wood, features a drop-down counter with storage for drinks and glasses—perfect for outdoor entertaining.

If you’d like to find any of the items used in this project, we’d greatly appreciate it if you used our affiliate links. These links provide us with a small commission at no extra cost to you, allowing us to continue creating and sharing more inspiring projects. We’d also love to hear your thoughts—feel free to leave a comment or share this post!
62 Comments
Emilia M Birtch
November 24, 2016 at 4:11 amthat is gorgeous! so creative!
Anita Holland
December 2, 2016 at 6:58 amMy only creation I have been unable to sell. Asking $750 but cant sell it.
Andrea
February 21, 2017 at 4:29 pmI can’t believe you can’t sell it!!!!! It is gorgeous!! Where are you located??
Anita Holland
February 22, 2017 at 5:03 amI live in a little country town in NSW Australia, think that is the main reason I am having problems selling it.
Dianne Yonan
February 21, 2017 at 3:34 pmThat is beautiful. Excellent job. I’m sure you’ll find a buyer eventually.
Anita Holland
February 22, 2017 at 5:03 amThank you Diane!
Lila
February 21, 2017 at 4:41 pmAs a pianist, I find this insulting. Poor piano. So sad.
Anita Holland
February 22, 2017 at 5:01 amI respect you opinion, and I agree it is a shame but so many pianos end up in the dumps, so rather turn it into something that can be used.
georgia
February 21, 2017 at 4:54 pmI have a piano like this I would GIVE away. Northern Colorado
Anita Holland
February 22, 2017 at 4:58 amBetter to give it away and let someone use or repurpose it than have it sent to the dump. So many creative ways to repurpose them. Someone will be very grateful for you generous offer.
Nancy
February 21, 2017 at 5:06 pmI’d buy this in a heartbeat.
Anita Holland
February 22, 2017 at 4:55 amThank you, I put a lot of work into this project.
Linda at Mixed Kreations
February 16, 2020 at 5:05 pmA lot of work but well worth it. It’s beautiful! I’m sure the right person will come along soon.
Anita Holland
February 16, 2020 at 11:52 pmThank you so much, I did eventually sell it.
Mary Favara
February 21, 2017 at 6:34 pmThat is really amazing and beautiful. I’m sure someone will fall in love with it.
Nancy
February 22, 2017 at 2:34 amI think it’s beautiful – the problem with it might be that it’s a large piece of furniture. I had to give up my beautiful piano because it was too big for my new townhouse. But anyone who has the space would love this! And I think your price is reasonable so hang in there, the right buyer will certainly come along!
Anita Holland
February 22, 2017 at 4:54 amThank you, I think living in a small country town is the issue with selling this. But will hang on.
Mac
February 22, 2017 at 4:44 amGreat job ! I’ve never seen this done before.
That is a fair price.
Anita Holland
February 22, 2017 at 4:52 amThank you!
Sharon Williams
February 22, 2017 at 11:16 amI am considering one from my church that is in poor shape to repurpose in order to hold historical documents, pictures, etc. The church is 120+ years old and would like to display items so I was thinking of a roll around cabinet that could be brought out during social functions. Thanks for the tips on removing the insides
Anita Holland
February 23, 2017 at 6:05 amYour Welcome!
Diana Lassahn
February 22, 2017 at 12:39 pmJust gorgeous. Having refinished furniture I appreciate all the work that went into this. Beautiful finish job. Hang in there someone will buy it.
Betty Wampler
February 22, 2017 at 2:32 pmWhat a beautiful way to redo this piano. Wish you lived in Indiana.
Chas Greener
July 11, 2019 at 1:36 pmThis turned out absolutely fantastic. As a musician myself I have made an unplayable clarinet into a lamp.- love this repurpose. Thank you so much for sharing!
Anita Holland
July 12, 2019 at 3:41 amThank you so much, I will pop over and have a look sounds great.
Michelle Leslie
July 27, 2019 at 4:01 pmOh my word Anita, this is STUNNING. It turned out so beautifully. Wow!!!!!
Anita Holland
July 28, 2019 at 12:20 amThank you so much, Michelle, it was my first and last expensive repurpose. And in the end, it would not fit in my house so I had to sell it. lol
Michelle
July 31, 2019 at 5:05 pmI am amazed that you looked at a piano and saw a bar. That is awesome! It turned out beautifully!
Anita Holland
August 1, 2019 at 1:15 amThank you! This was my biggest and most expensive repurpose but it did turn out great.
Nina Lewis
August 1, 2019 at 5:14 pmYou did an amazing job!
Thanks so much for sharing this at out Party in Your PJs link party.
Anita Holland
August 1, 2019 at 11:27 pmThank you so much for the lovely comment.
Rhonda Gales
August 3, 2019 at 6:22 pmWhat an amazing upcycle! I will be featuring your post on my Sunday’s Best linkup.
Anita Holland
August 4, 2019 at 9:45 pmThank you so much for the compliment and the feature.
Amy
August 5, 2019 at 3:58 amI don’t drink, but this is awesome! Found you at snickerdoodle create bake make.
Anita Holland
August 5, 2019 at 4:03 amThank you so much.
Veronica Lee
August 5, 2019 at 5:18 amWOW! I’ve never seen anything like this! How super amazing! I am certain you’ll find a buyer eventually.
Anita Holland
August 5, 2019 at 7:14 amThank you so much, This was an older post I have since sold it.
Marie
August 10, 2019 at 3:03 pmYou always come up with the most ingenious ideas, Anita! This is AMAZING and now I want a piano. Pinned 🙂
Anita Holland
August 10, 2019 at 10:20 pmThank you Marie, I was always told my ideas so different that is why I was encouraged to start this blog. I just need to improve my writing skills. The piano was my biggest and most expensive project, now I stick to using recycled materials. Thank you for Pinning my project.
T'onna | Sew Crafty Crochet
August 10, 2019 at 3:24 pmBeautiful piano! The transformation into a wine bar is amazing and such a creative idea! Thanks for sharing at the Snickerdoodle Create Bake Make Link Party!
Anita Holland
August 10, 2019 at 10:20 pmThank you so much
Alexandra
August 10, 2019 at 4:11 pmThis is an incredible transformation, while keeping the original keys and pedals in tack. Gorgeous piece! I have chosen it as one of my features at this week’s Snickerdoodle Create Bake Make Party, which goes live today (Saturday) at 5pm EST.
Anita Holland
August 10, 2019 at 10:21 pmThank you so much for your kind comments and the wonderful feature.
Julie Briones
August 12, 2019 at 5:58 amSuch a super upcycle of a used piano, Anita! The new finish you put on it is beautiful, and it’s such a smart idea! Wish I could fit something similar into My Wee Abode! 😉 So good to have you at Tuesday Turn About!
Anita Holland
August 12, 2019 at 8:19 amThank you so much Julie, I put a lot of work into that piano and I was really happy with the outcome.
Suzan | It's My Sustainable Life
August 22, 2019 at 11:34 amLove this upcycle!! Gives a whole new meaning to “piano bar” 🙂
Anita Holland
August 23, 2019 at 6:44 amThank you so much for your great compliment and for the feature. The piano was my biggest project to date and loved how it turned out.
Julie
August 24, 2019 at 11:53 amThis is so quirky and fun, it’ll be one of the features at Handmade Monday tomorrow evening 🙂
Anita Holland
August 24, 2019 at 12:53 pmThank you so much for the lovely comment and the feature. Greatly appreciated.
Christina Woodcock
February 16, 2020 at 6:58 pmAnita, all I can say is WOW WOW WOW! I know repurposing a piano is hard work! You turned something old into a gorgeous piece again!
Anita Holland
February 16, 2020 at 11:54 pmThank you Christina, I had always wanted to make one and it turned out better than I could have hoped.
Maria Brittis
February 20, 2020 at 1:50 pmvery nice idea, love the look
Anita Holland
February 20, 2020 at 6:00 pmThank you so much, it was the biggest project I have attempted.
Sara
July 20, 2020 at 10:54 pmUnbelievably incredible project! Make me wish I drank more just so I could make one too, but I’ll just live vicariously through you!
Anita Holland
July 22, 2020 at 6:49 pmThank you so much Sara, I don’t drink that much either and had to sell it in the end because I had no room left in my house. lol
Michelle Leslie
July 20, 2020 at 10:59 pmBlown AWAY!!!!!!!!!! Geez Anita, it looks amazing. I never realized how many things were inside a piano and we have my Mom’s one standing in the lounge. It’s more than 100 years old and solid wood, so we won’t be changing it anytime soon, but I will be keeping an eye out for a cheaper/damaged one after seeing your masterpiece.
Anita Holland
July 22, 2020 at 6:51 pmThan k you, I would have to admit I was heartbreaking taking it apart. So much work goes into making them it is incredible. But not many people play the piano at home anymore so they end up at the dump.
Marty Walden
July 25, 2020 at 2:09 amAbsolutely wow! So much work but what a project! Great job!
Anita Holland
July 27, 2020 at 11:21 amThank you so much.
Jeanne
December 31, 2020 at 3:37 amAnother cool project. Did you save a lot of the workings for steam punk projects? I can imagine there are you would have a lot of material!
Richard
January 16, 2021 at 7:35 pmLovely job great to see such talent, I hope you found a buyer! I’m just pulling apart my old piano but the kids love playing with the harp so I’m leaving it in and polishing it up with Brasso ( its a product we have in Scotland and it makes all the strings shine!) Did you do anything with your old harp after it came out?
Anita Holland
January 17, 2021 at 1:45 pmThank you so much Richard. It is funny you ark about the harp. I am doing the harp and the panels at the moment. The harp I plan on doing up as a garden “sculpture”