
Every year, our small town runs a Christmas light competition. Homes light up the streets, and many displays raise money for local charities. It’s a magical time and one of our favourite traditions.
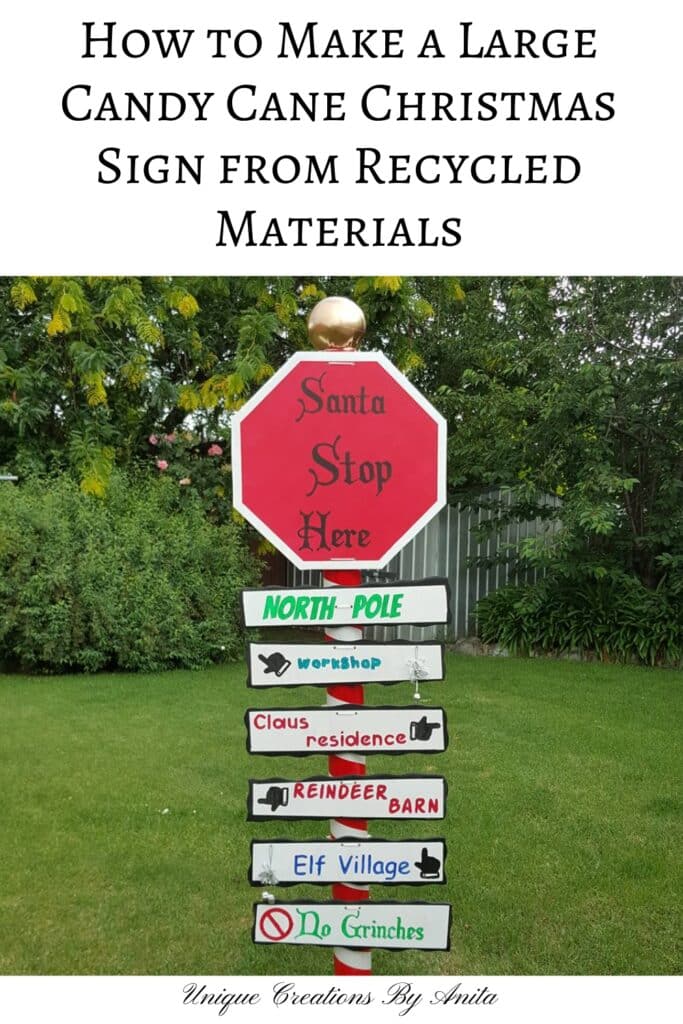
My sister joins the competition each year, and this time she wanted something a little different — a giant “Santa Stop Here” sign for her front yard. The store-bought versions were all too small. So, she asked me to build her a custom sign.

So, the next challenge was this oversized Santa signpost!
Before we dive into this tutorial, be sure to subscribe to my bimonthly newsletter to be the first to see my latest projects. You can also follow me on Pinterest and Facebook where I also include my unique mixed-media art projects.

How to make a Santa Stop Here Christmas Sign Post
**This post may contain affiliate links. This means I earn a small commission on links used at no extra cost to you. Please see my disclosure policy for more information.**
Materials Needed
- PVC pipe (recycled)
- Plywood sheet (60cm x 60cm)
- Kraft paper (for template)
- White primer
- Red spray paint
- Gold spray paint
- Masking tape
- Carbon paper
- Printed text (A4 size)
- Acrylic paints
- Makeup brushes or fine paintbrushes
- Cable ties
- Old rubber or plastic ball
- Pillow stuffing
- Clear acrylic spray
- Clear outdoor varnish
- Jigsaw
- Sander + 180-grit sanding discs
- Thinners or acetone
- Rebar or garden spikes (for mounting)
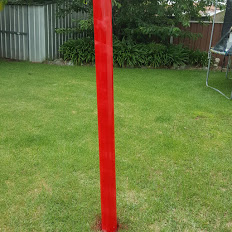
Preparing the PVC Pipe
I used leftover PVC pipe from a building site. It was dirty and covered in concrete, but most of it washed off with a good scrub. I removed printed numbers using thinner on a rag. Acetone or even non-acetone nail polish remover also works.

To get the candy cane look, I wrapped thick masking tape around the pipe in a spiral from top to bottom. Then I sprayed two coats of red paint.

To make it easier to paint and dry, I placed the pipe over metal garden spikes. Once the paint dried, I removed the tape to reveal a perfect striped finish.

Cutting Out the Stop Sign
I started with a 60cm square sheet of plywood. I made a paper template using kraft paper first. Once I was happy with the size and shape, I traced it onto the wood. I used a jigsaw to cut it out, then sanded the surface smooth using a random orbital sander with 180-grit paper.

If you want to make smaller signs, you can freehand the design onto scrap wood and cut it out with a jigsaw.
")
Painting the Sign
First, I applied a coat of white primer. This helps the red paint stick better and also acts as the background.

Once dry, I taped off the edges of the sign and painted the centre with crimson red. When the paint dried, I removed the tape to reveal clean, crisp edges.
Adding the Text
Since my handwriting isn’t great, I created the words using PiZap, then printed them on A4 paper. I used carbon paper to transfer the letters onto the sign. Just place the carbon sheet between the printout and the wood, then trace the letters.
I painted the letters using acrylic paints and fine makeup brushes, which gave better control than most paintbrushes.

Making the Sign Topper
The pole needed something extra. I couldn’t find anything in the shops, but then I remembered an old ball in the shed. I cut a cross in the bottom of the ball, but it collapsed instantly. To bring it back into shape, I stuffed it with pillow filling. I spray-painted it metallic gold and attached it to the pole with a cable tie. It gave the sign a perfect festive finish.

Attaching and Sealing the Signs
To attach the signs, I drilled two holes in the middle of each one and used cable ties to secure them to the pipe. I also added cable ties above each sign to keep them from sliding down.

To protect everything from the weather, I sprayed the signs with clear acrylic sealer. Once dry, I added two coats of clear outdoor varnish for extra durability.
")
Installing the Sign in the Garden
Because the sign is so large, it needs extra support to stand securely in the garden. Instead of rebar and wood for the painting process, I used a metal star picket post for better stability. The picket was hammered into the ground, and the painted PVC pipe simply slid over the top. This method keeps the sign firmly in place, even on windy days, and makes it easy to remove or reposition when needed.

More Christmas DIY Projects
If you are looking for more unique DIY Christmas ideas, check out the cool flashing winter wonderland shadow box

Or these stunning hand-painted Unicorn Spit Christmas baubles, which are simple to make.


If you’d like to find any of the items used in this project, we’d greatly appreciate it if you used our affiliate links. These links provide us with a small commission at no extra cost to you, allowing us to continue creating and sharing more inspiring projects. We’d also love to hear your thoughts—feel free to leave a comment or share this post!


39 Comments
Alan
December 10, 2017 at 5:10 pmHi there, great and easy design. Did not see though what you did for a base. Did you just use the wood & poles?
Anita Holland
December 11, 2017 at 10:16 amHi Alan
I chose PVC pipe because it is hollow. I could not come up with a design which stayed up in the wind, using a stand and being so big. So I went for the simplest Way I could think of. Which was rebar and a wooden stack in the ground. Example in the third picture from the top. I also made mine 1.8m high Because unfortunately there are always people out there that have to steal. And being that high it would be very difficult to steal it. Hope this helps let me know if you need more info.
Audra @ Renewed Projects
November 17, 2019 at 3:36 amWhat a whimsical Christmas decoration! I bet its a hit with all the neighborhood kids.
Anita Holland
November 17, 2019 at 9:56 amThank you, it was for the Christmas lights display my sister does for charity every year.
Marie
November 17, 2019 at 3:51 pmThis sign is awesome, Anita! Thanks for the tip on how to make the perfect octagon. I have to show my daughter this because I know she’ll want one for her house. Pinned 🙂
Anita Holland
November 18, 2019 at 12:11 pmThank you Marie, it looks really great with all the Christmas lights and displays my sister does every year.
Dee | Grammy's Grid
November 19, 2019 at 7:41 amHow cute!! Thanks so much for linking up at the #UnlimitedMonthlyLinkParty 6. Shared.
Teresa
November 21, 2019 at 4:39 pmSo cute! My kids would love something like this. Thank you for sharing at The Really Crafty Link Party. Pinned.
Anita Holland
November 22, 2019 at 1:05 amThank you so much
Joanne
November 21, 2019 at 11:59 pmThis is so adorable! You did a great job. Pinned.
Anita Holland
November 22, 2019 at 1:05 amThank you so much, very kind of you to say😍
Marilyn Lesniak
November 23, 2019 at 12:07 amThank you for sharing at #OverTheMoon. Pinned and shared. Have a lovely week. I hope to see you at next week’s party too! Happy Holiday!
Anita Holland
November 23, 2019 at 12:58 amThank you😃
T'onna | Sew Crafty Crochet
November 23, 2019 at 5:43 pmSuch a cool Christmas sign! I’m pinning this to my Cheerful Christmas board! Thanks so much for sharing at the Snickerdoodle Create Bake Make Link Party!!!
Anita Holland
November 25, 2019 at 12:19 amThank you so much 😁
Sharon
November 24, 2019 at 1:07 pmHow clever is that ball idea?!! Genius!
Thank you so much for linking with us at Creative Muster! Pinned this! Blessings to you. xoxo Sharon from Adoring Creations
Anita Holland
November 25, 2019 at 12:20 amThank you Sharon😍
Marilyn Lesniak
November 30, 2019 at 6:16 pmThank you for sharing at #ThursdayFavoriteThings. Pinned and shared. Have a lovely week. I hope to see you at next week’s party too!
Anita Holland
December 1, 2019 at 1:39 amThank you, I will be there 😁
Greg
December 1, 2019 at 5:32 pmCool idea but, I almost passed on this because I don’t like beets.
Anita Holland
December 2, 2019 at 12:08 amThank you, glad you liked it.
Michelle Leslie
December 21, 2020 at 10:47 pm😀 The “No Grinches” put a big smile on my face 😀 You always come up with such novel ideas. Imagine using PVC pipe to make a big sign. That would never have crossed my mind and now it makes so much sense. I bet your sister’s house was the talk of the town.
Anita Holland
December 25, 2020 at 12:09 pmThank you Michelle, It was all I had at home, so I had to use it. lol
Sara
December 21, 2020 at 10:59 pmLove the sign and your brilliant way to get it to stand up. I”m sure it got Santa’s attention – lol!
Anita Holland
December 25, 2020 at 12:09 pmThank you Sara, They do get lots of people stopping to take pictures with the sign. lol
Libbie@alifeunfolding
December 21, 2020 at 11:42 pmWhat a fun and festive sign! I bet your neighbors love it.
Happy Christmas!
Anita Holland
December 25, 2020 at 12:10 pmThank you so much Libbie.
Cat Michaels
December 22, 2020 at 12:07 amWow, Anita, I want to visit your small town and see all the other fab decorations. I’m always attracted to these types of signs when I see them in retail but steered away because of their cost. This is an enticing cost-saving alternative!
Anita Holland
December 25, 2020 at 12:10 pmThank you cat, It was a fraction of the cost and 3 time the size so a bargain.
Deana Landers
December 22, 2020 at 1:21 amWhat a great sign. I’m sure your sister loved it and the passersby! I love it♥️
Anita Holland
December 25, 2020 at 12:11 pmThank you so much Deana.
Maria
December 22, 2020 at 4:24 amMy grand kids would love this
Anita Holland
December 25, 2020 at 12:12 pmThank you maria.
Meegan
December 22, 2020 at 4:27 amHow fun is this! So fun and creative for my apartment cottage decor. My neighbors will really enjoy it.
Anita Holland
December 25, 2020 at 12:13 pmThank you meegan, it was so easy to make it just looks hard because there are so many steps. lol
Marty Walden
December 22, 2020 at 11:06 amThis is so adorable! I love original projects that make my crafty wheels start turning!
Anita Holland
December 25, 2020 at 12:13 pmThank you so much Marty, I love trying to come up with new projects. It is so much fun having no idea how it will turn out.
Brooke
December 23, 2020 at 1:11 amI love this so much! That red on the pole is perfect. Great job and smart using a paper template. I always try and do that do, but sometimes I just get so excited I forget.
Anita Holland
December 25, 2020 at 12:14 pmThanks Brooke, I am the same, I only remember after my project is completed.