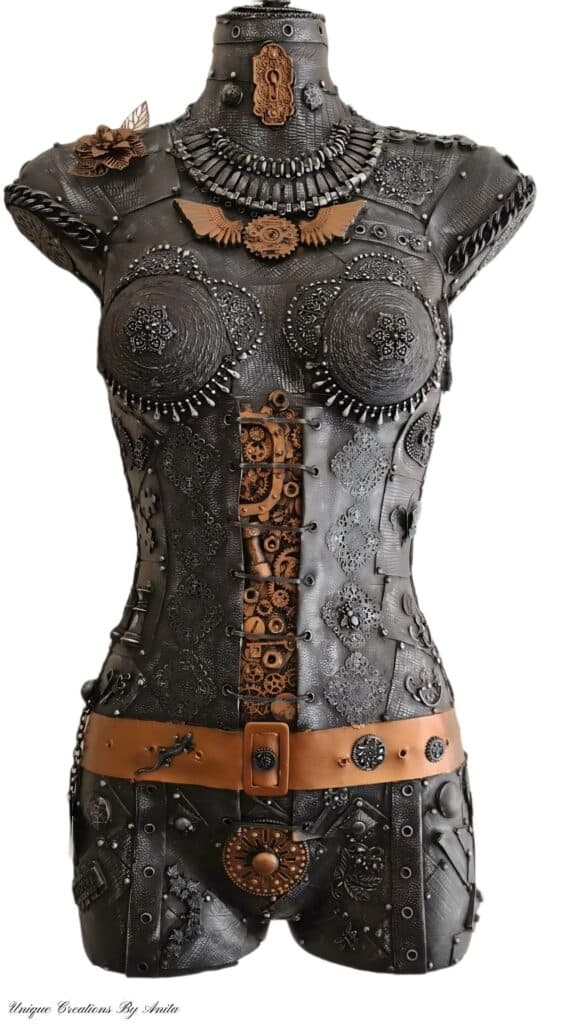
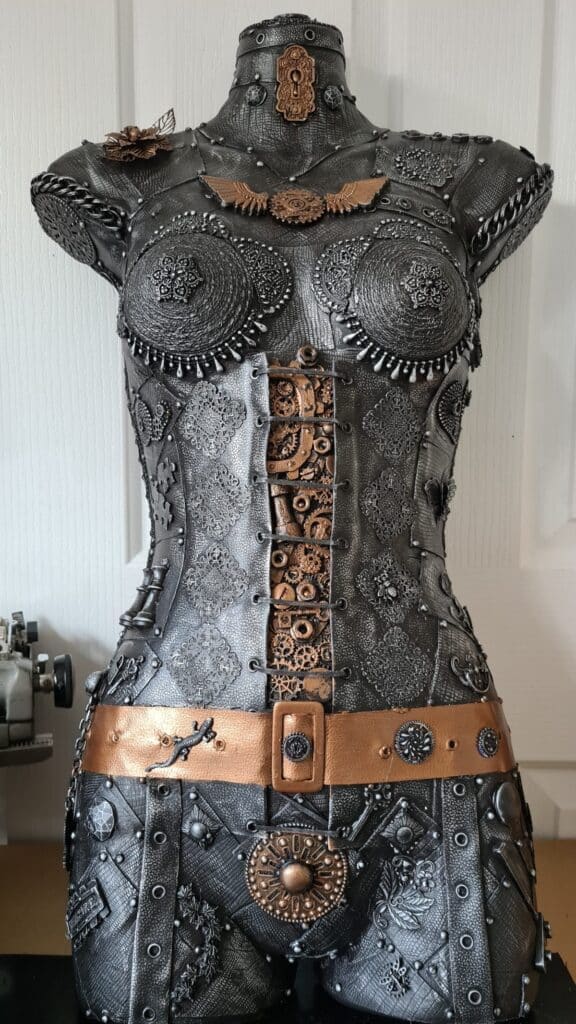
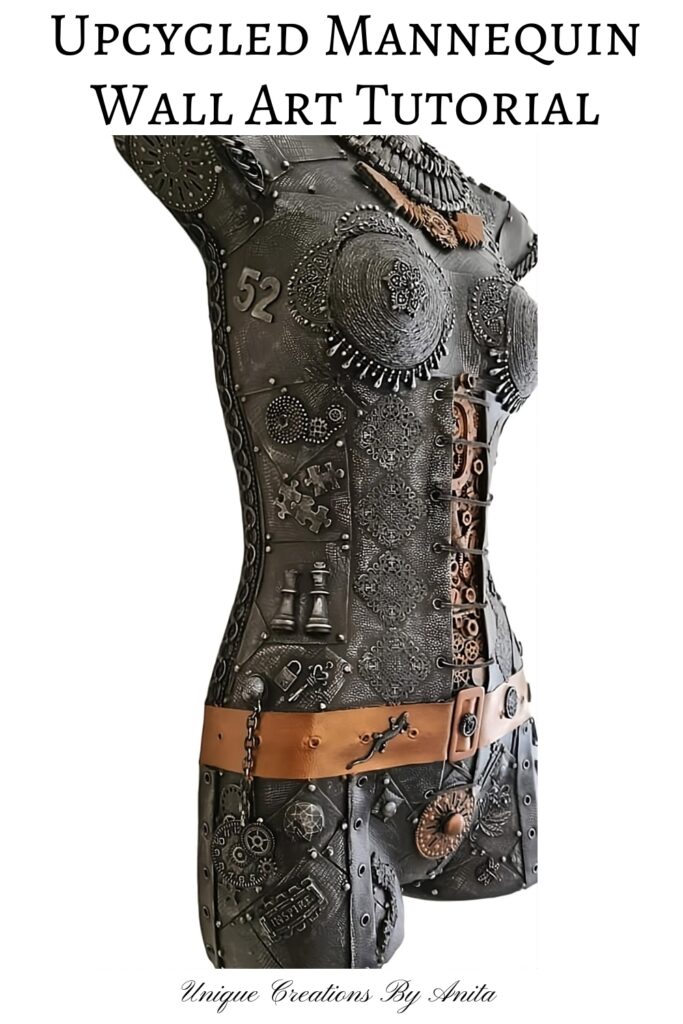
Today I’m sharing my Mixed-Media Assemblage Mannequin Torso (Steampunk-Inspired). I transformed a thrifted torso with found hardware, gears, and copper accents. This project blends upcycling, texture play, and bold metallic finishes. It’s perfect for artists who love layering and dimension. I’ll walk you through priming, building depth, and highlighting those raised details. Create a striking wall sculpture with budget materials and loads of character.
Assemblage is an art form that combines found objects into a three-dimensional composition. Everyday items—hardware, packaging, fabric, and natural fragments—become the raw materials. By arranging, layering, and fixing pieces, you create new meaning from familiar things. The contrasts of texture, scale, and history tell the story, encouraging upcycling, play, and personal expression.
Before we dive into this tutorial, be sure to subscribe to my bimonthly newsletter to be the first to see my latest projects. You can also follow me on Pinterest and Facebook, where I also include my unique mixed-media art projects.
Steampunk Assemblage Mannequin Torso (Mixed-Media DIY Tutorial)
**This post may contain affiliate links. This means I earn a small commission on links used at no extra cost to you. Please see my disclosure policy for more information.**
Materials needed
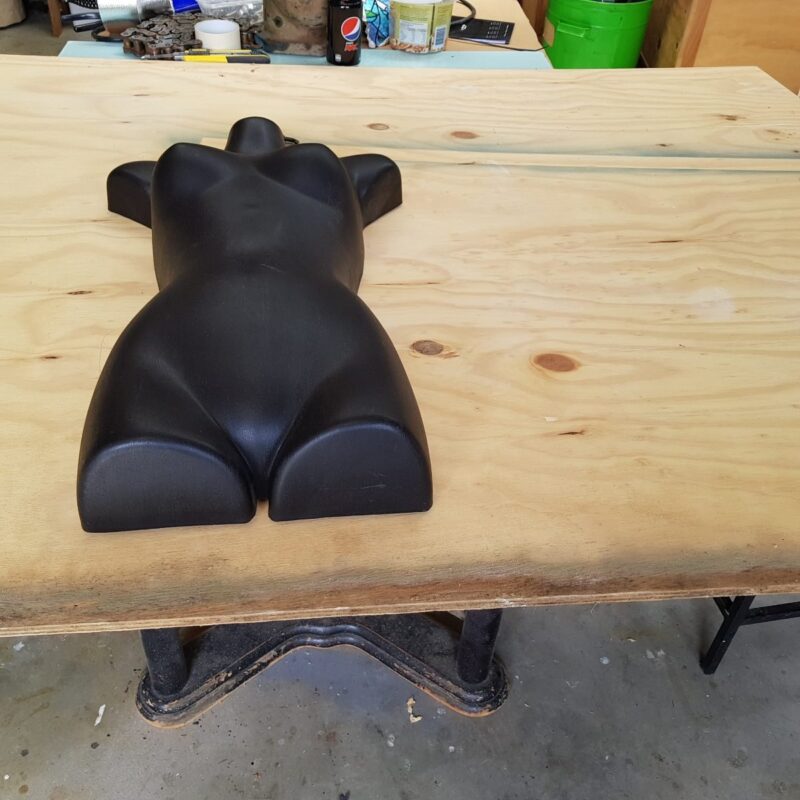
- Thrifted plastic mannequin torso
- Leather scraps/offcuts, leather strip for corset, braided trim
- Sisal or macramé rope
- Eyelets + punch tool, leather lacing
- Half-round beads (for faux rivets), pearl drop beads, assorted charms
- Found hardware: nuts, bolts, washers, upholstery studs, small gears
- Resin castings + silicone moulds (wings, discs, chess pieces, lock and keys etc.)
- Metal filigree discs , squares and assorted
- Blu Tack, strong tacky glue (e.g., Crafter’s Pick The Ultimate),
- Hot-glue gun + black glue sticks
- 80-grit sanding block, craft knife & Cutting mat, scissors
- Black acrylic paint
- Metallic/rust effect paint
- Silver wax paste (or DIY)
- Detail brushes, foam brush,
- Acrylic spray (optional; test on leather first)
- Timber block, keyhole wall bracket, screws, drill/driver
- Safety gear: silicon fingers
Prep the torso
Most shop mannequins are smooth plastic, which isn’t ideal for glue. Scuff the surface first. Use an 80-grit sanding block and make light, overlapping strokes. You’re not removing material—just dulling the shine so the glue can grip in. Wipe away dust, then wash with warm soapy water.
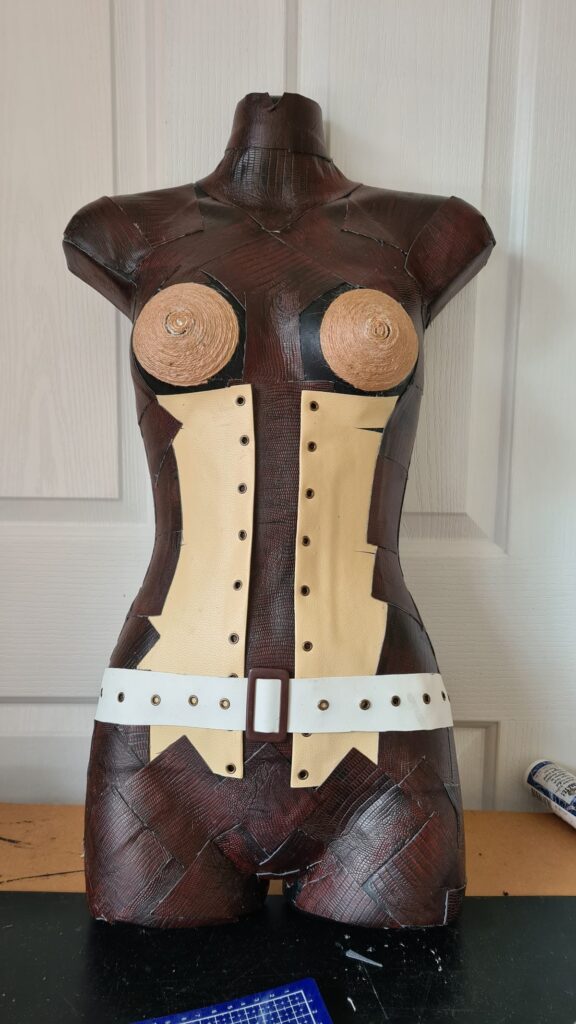
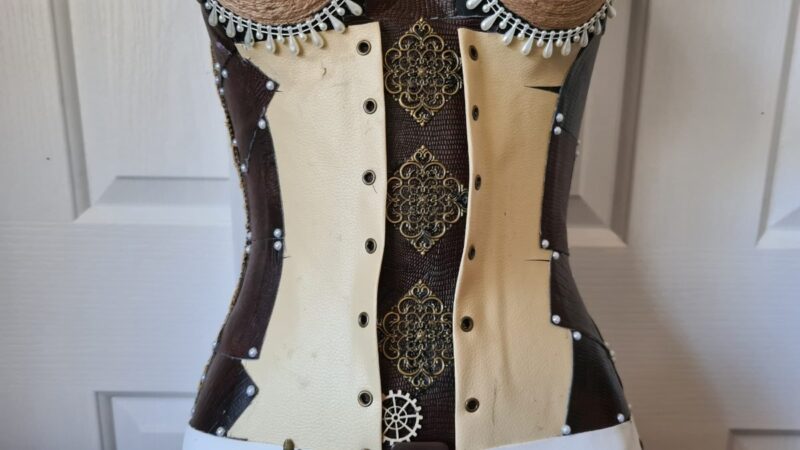
Making the front corset
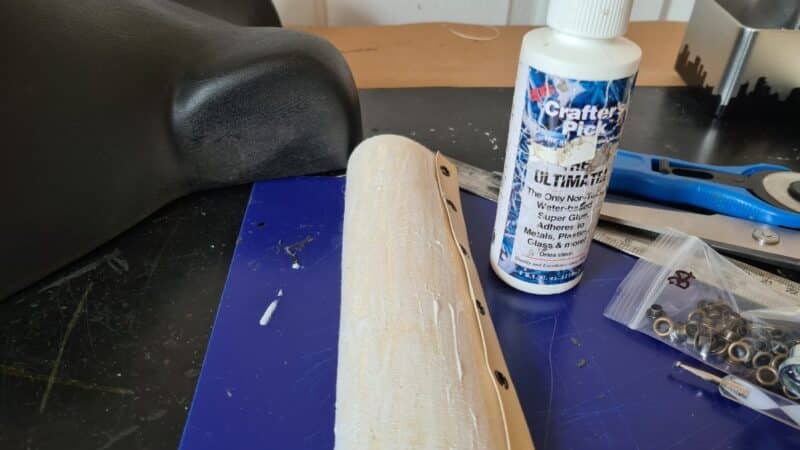
Glue a leather strip down the centre—this will be the base for all embellishments under the corset lacing. Use a strong tacky glue; my preference is Crafter’s Pick The Ultimate. It’s thick and dries clear.
I didn’t have large scrap pieces in a matching colour, but that’s fine—the whole section will be painted black later. Cut two leather strips to run from just under the bust to the waist. Fold a seam along the long edges and secure it, then punch eyelets for the laces you’ll add later.
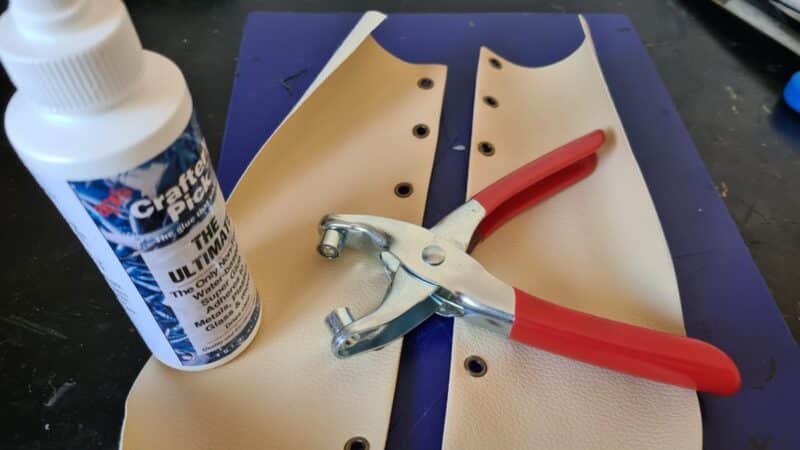
Brush a thin, even coat of glue onto the leather, but keep a clean border around the eyelets. Leave the lacing channel unglued so you can open the corset later to add the embellishments.
Covering the mannequin base
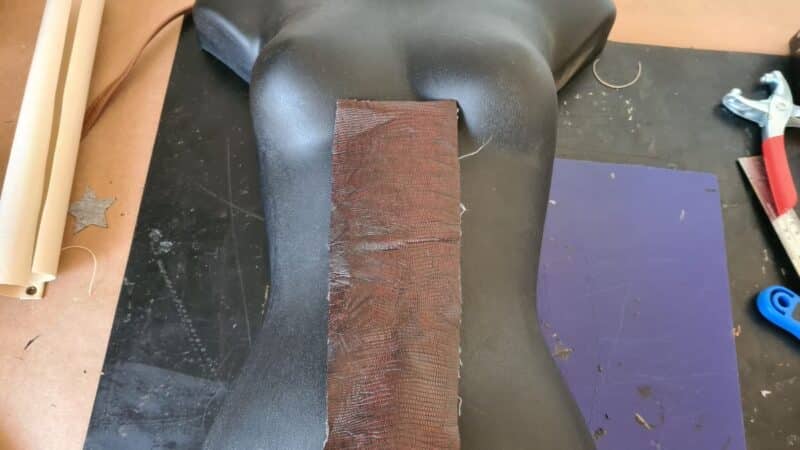
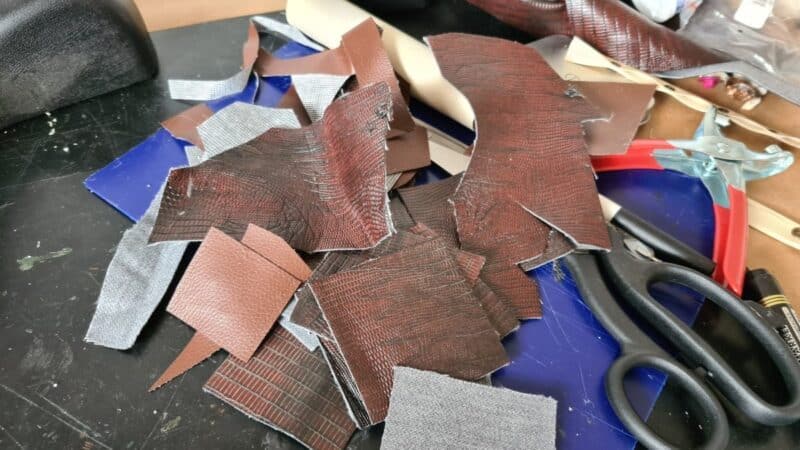
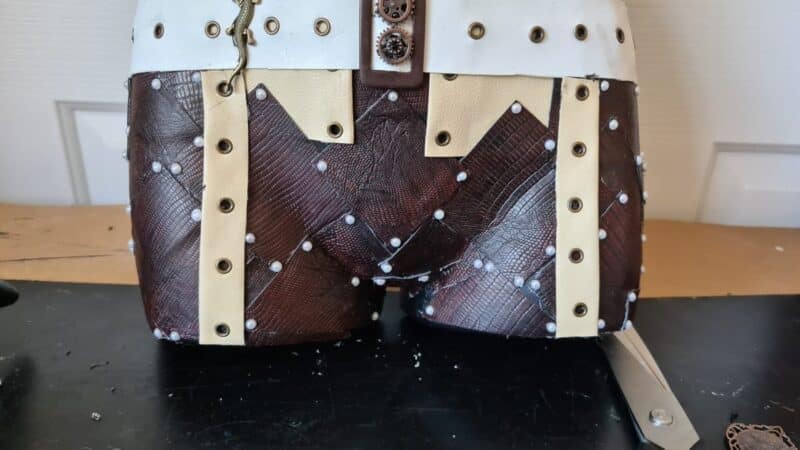
Cut scrap leather into squares, plus a few rectangles, to patch the mannequin—vary the sizes for texture. Salvage leather from old jackets and handbags, or ask your local upholsterer for offcuts—most would otherwise go in the bin.
When you reach the bust, make small V-shaped relief cuts so the leather can mould to the curves without creases. Overlap the patches slightly, mixing sizes and shapes for depth. Work in small sections, pressing edges flat and wiping away any stray glue.

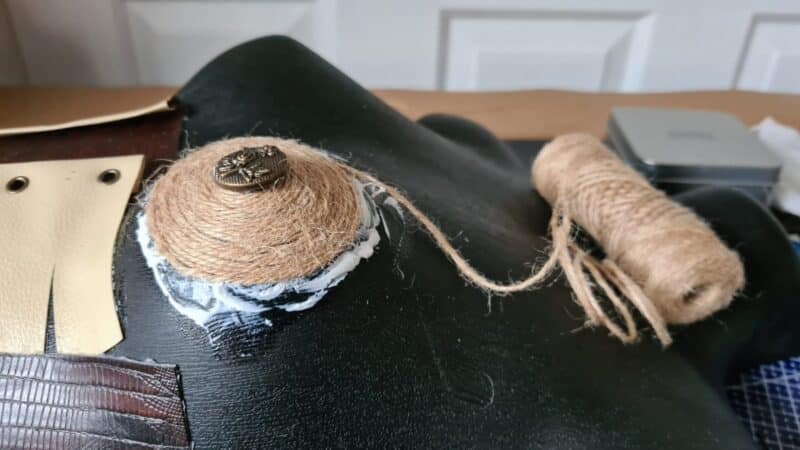
The bust is the trickiest area to decorate because of the curves. On a previous mannequin, I cut leather into “pizza-slice” wedges and glued them on. For this one, I used sisal rope—macramé rope works well too.
Start at the centre and tack the rope with hot glue to anchor it. This holds it in place so you can keep pulling the rope tight without it slipping.Once that sets, brush craft glue over the area. Spiral the rope around the button, working outward. Keep the coils snug, press as you go, and trim the end neatly under the last wrap.
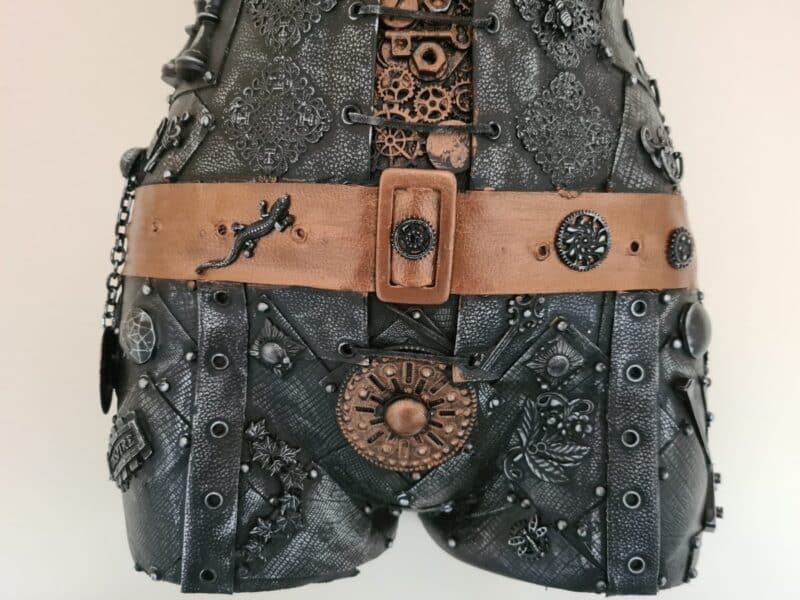
Continue covering areas of the mannequin with patches. I made a belt from a leather strip and a recycled buckle from an old jacket.
Adding embellishments
The aim of embellishment is to build rich layers and texture. There are many ways to do this; in this tutorial I’ll show you my step-by-step method.
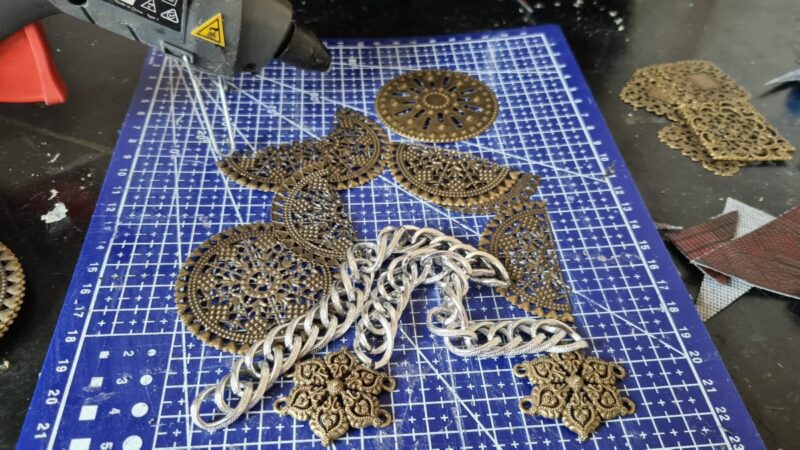
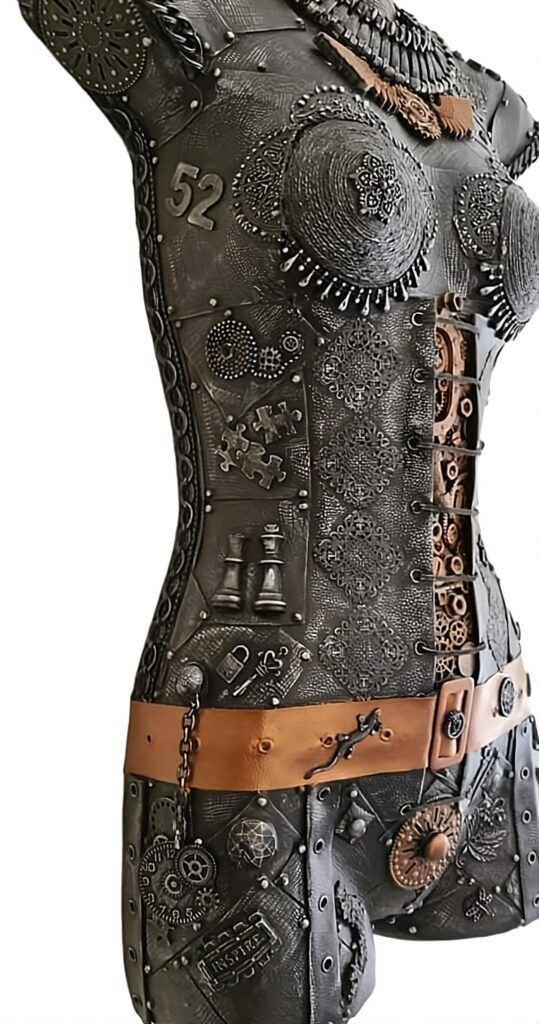
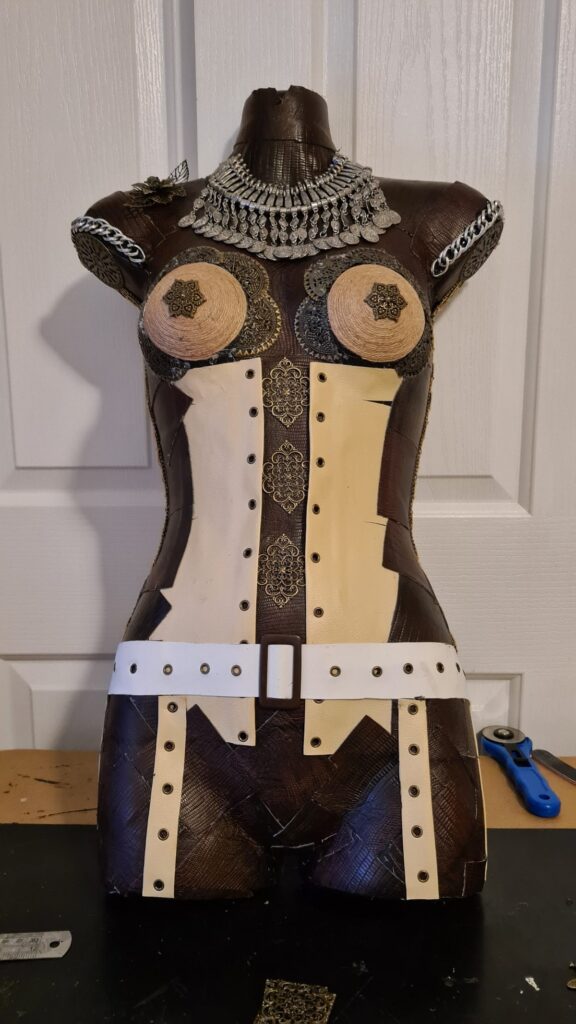
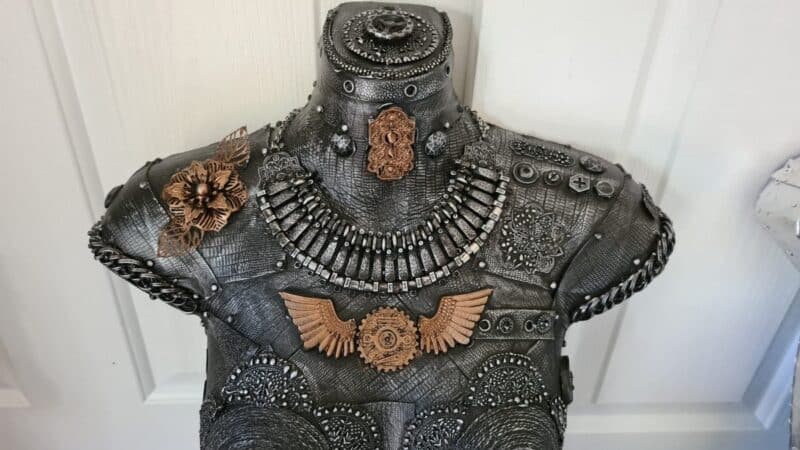
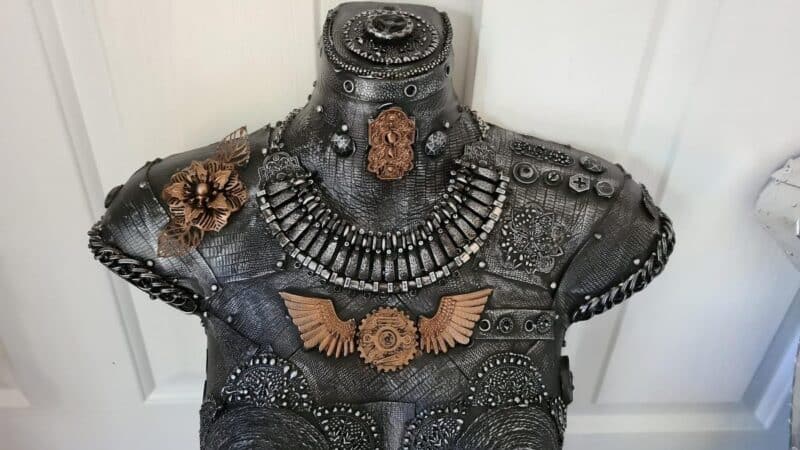
To fill the gaps around the bust and shoulders, I used metal filigree discs and a recycled necklace. Cut the discs in half and hot-glue them in place. If glue squeezes through the openings, dont stress you can cut it away later with a craft knife. Tacky glue works too, but it dries slowly and slows progress.
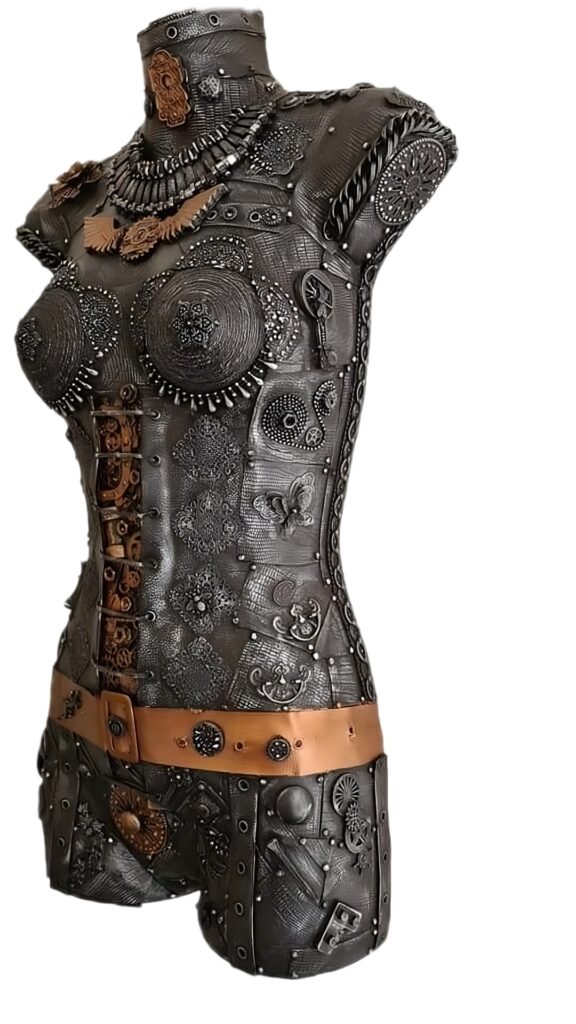
I cut more leather strips and set metal eyelets, running them down the front of the legs. To hide the glue start on the sisal rope, I used charms from a broken bracelet. A decorative button works too. I also found a gorgeous metal necklace at an op shop for $2, which sits perfectly around the neck.
Adding half beads
My mannequin has a steampunk theme, so I wanted the patches to look like riveted plates. Glue a half bead on every patch corner to mimic rivets.
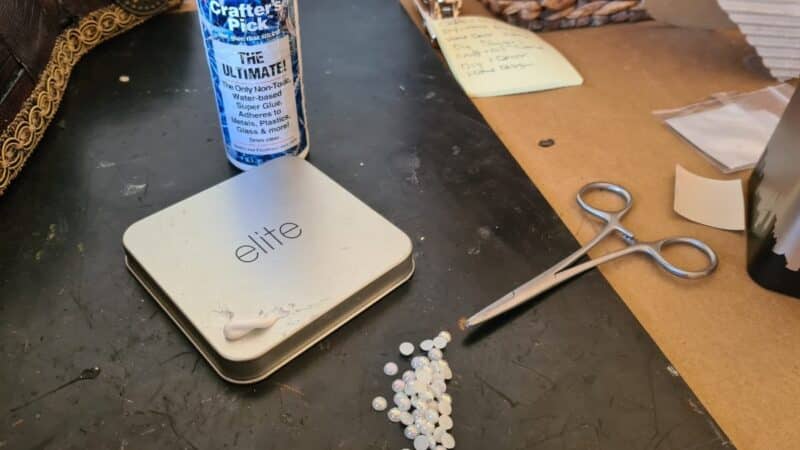
I tried scissor clamps first, but they were too time-consuming. A faster method: press a tiny ball of Blu Tack onto a pen tip. Pick up each domed bead, touch its base into glue, then press it onto the corner.
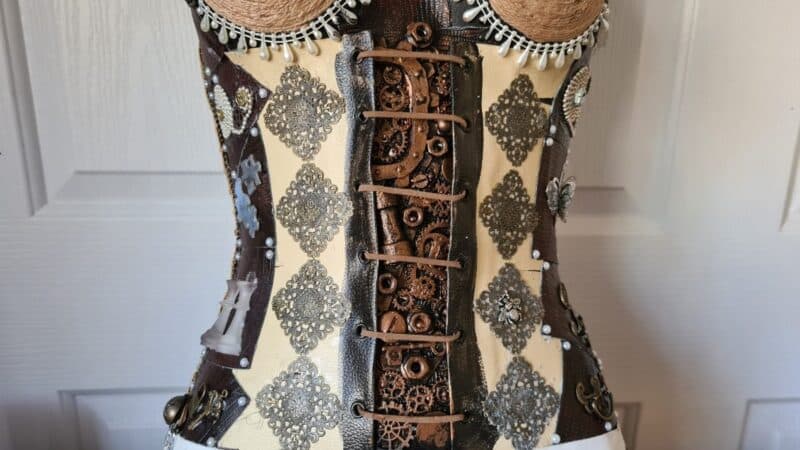
Under the bust, drape a string of pearl drop beads to finish the look and add extra detail.
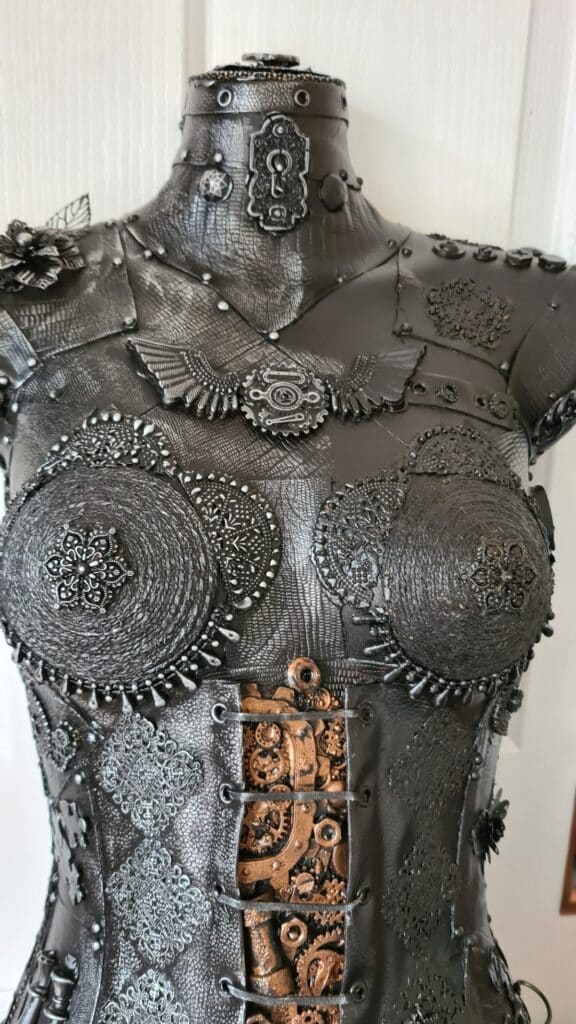
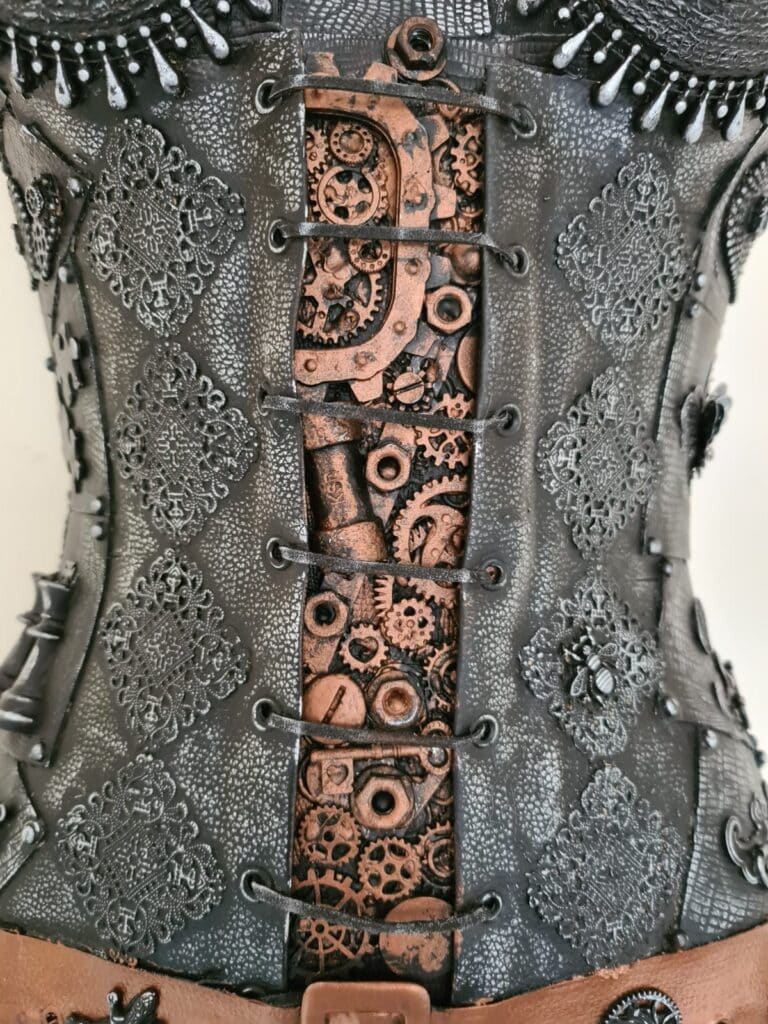
Filling between corset
I left the corset open so the interior could read as mechanical. I filled the cavity with industrial elements—nuts and bolts from my workshop and gear charms—plus a few larger resin castings made in moulds. Start at the centre and fix each piece with hot glue for instant grab, then keep layering to build depth and drama.
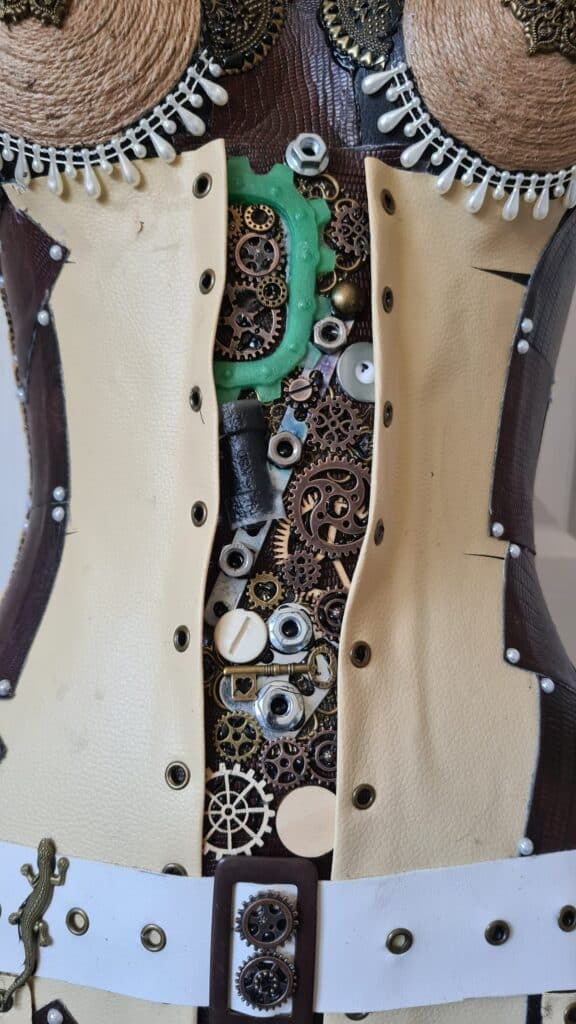
The wings and centre disc are resin castings made in moulds. The flowers and butterflies are 3D metal charms.
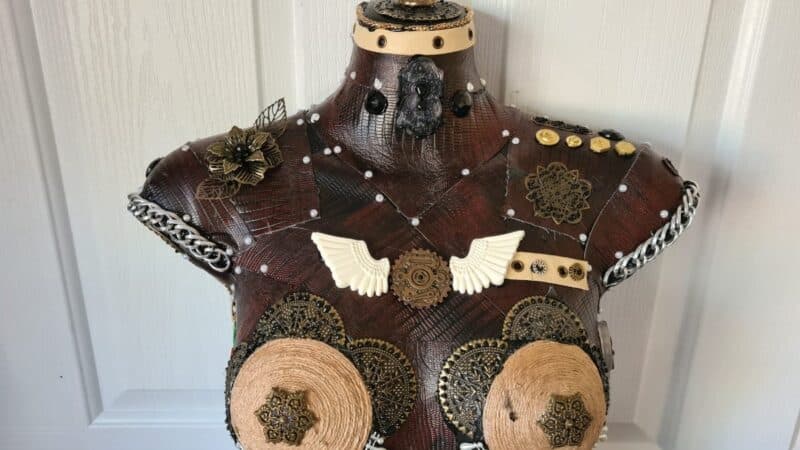
I’ve also used upholstery studs, LEGO pieces, and textured beads across the front. If something catches your eye and you can’t place it, ask and I’ll share the details.

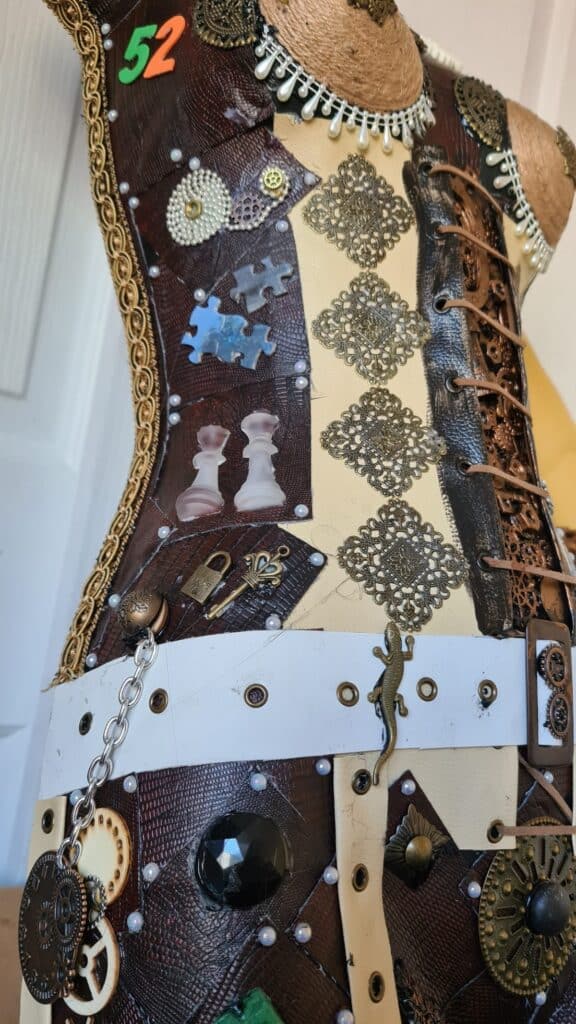
There are too many little additions to list, so I’ve included the before-paint photos—zoom in to see everything I used. The most obvious detail is the braided trim running down the side of the mannequin; it’s perfect for hiding the raw edges and joins of the leather patches.

The spirals are beaded chains glued into tight coils. Jigsaw-puzzle pieces always pop in assemblage, and the king and queen chess pieces were cast in resin. I also tuck in a number with personal meaning on every build.
Painting the industrial embellishment rust
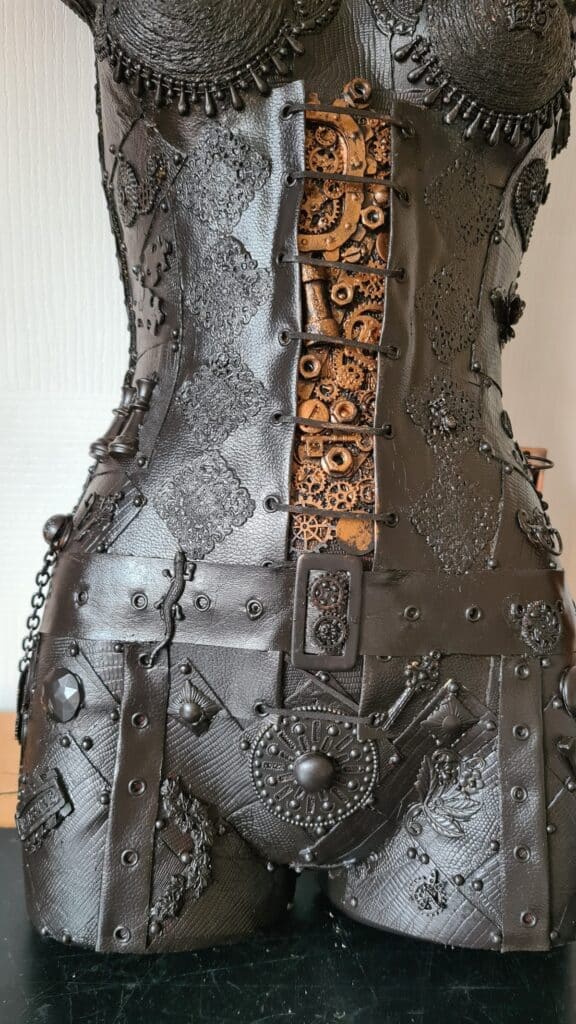
My vision was contrast: a polished, silver-waxed exterior with a rusty, industrial core.

I created the “rust” in the centre using metallic rust paint, dabbing with a sponge and refining with a brush to build layered texture and colour.
Paint the mannequin
To unify the piece, coat the remaining surfaces in black acrylic paint. Work the paint into every seam, rivet and texture so no base shows. Use a detail brush for nooks and crannies and a foam brush for larger areas. Apply thin coats to preserve the texture, rotating the form to catch missed spots.
Adding the silver wax paste
When waxing, don’t coat everything—just kiss the high points. Leave black showing in the recesses so the texture reads. The easiest method is fingertip application: barely touch the wax (don’t scoop), then lightly glide over the raised embellishments.
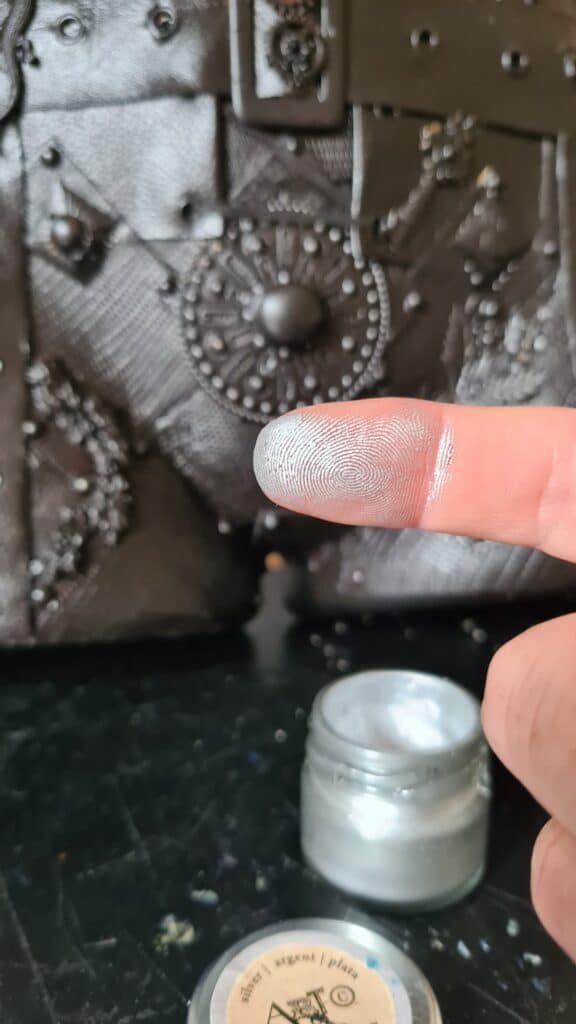
Build up in thin passes and stop when the details pop.
If you don’t have silver wax paste at home, you might already have the ingredients to make your own, and this post will show you how.
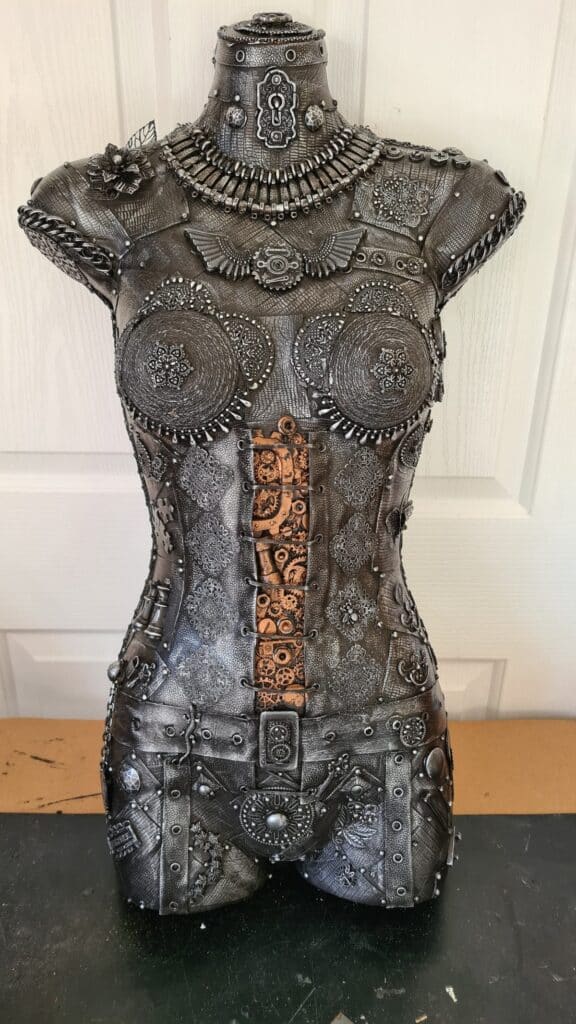
Add some focal highlights
To lift key details and create focal points, brush metallic rust paint onto select areas. Feather the colour into the black so those accents stand out without overpowering the piece.
Sealing the surface
I usually seal my finished mannequins with one coat of clear acrylic spray, and it always looks great. On this piece, though, some leather stayed tacky for days after sealing—likely a reaction. Test your leather first on a scrap or hidden spot. Mine did fully cure after a few weeks. If you’d rather avoid that risk, leave it unsealed, though a seal coat gives a nicer finish.
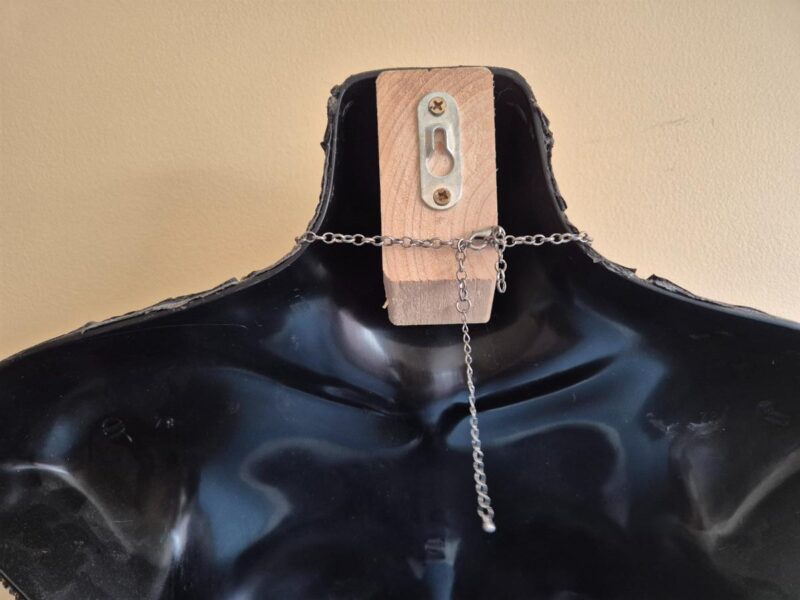
Hanging the mannequin
Because the mannequin’s back is hollow, hanging it flat on a wall was tricky. I fixed a timber block inside the cavity and screwed it in place. On the front, I positioned the decorative disc at the top and the keyhole detail at the neck to hide those screws.
From the back (see image), a keyhole wall bracket is screwed into the timber block; it slides over a wall screw for a secure, flush mount.
More assemblage mannequin ideas
For this mannequin, I embossed aluminium cut from recycled soda cans, pop-riveted the panels to the form. To finish the look I made some leather accessories.
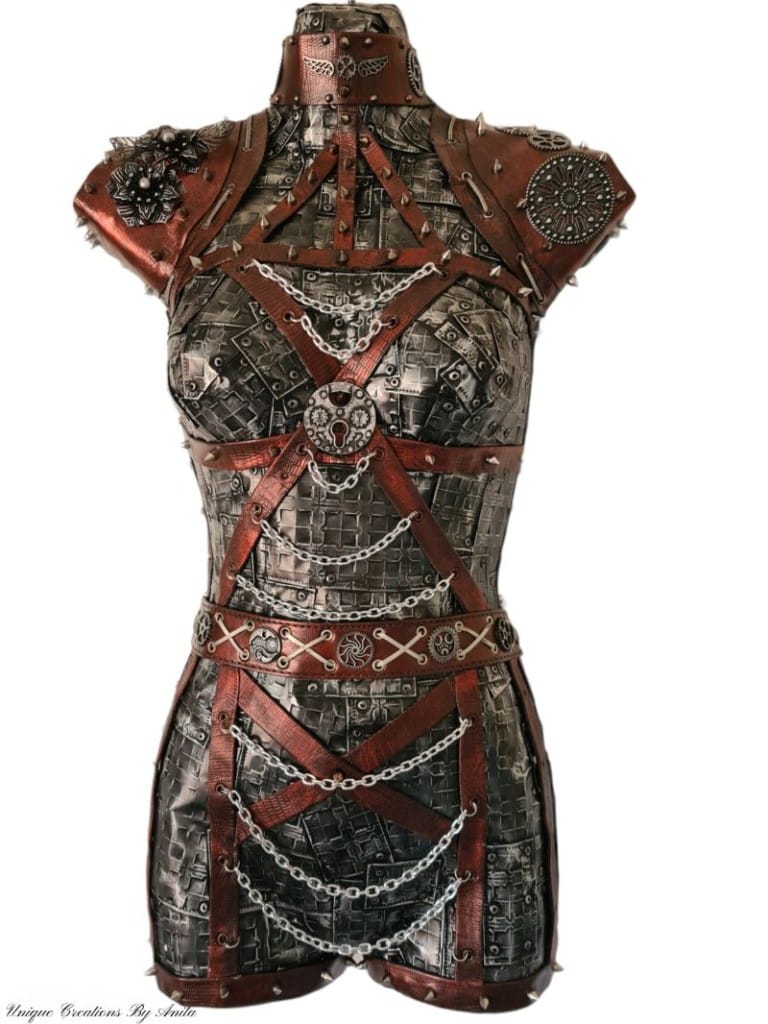
This was my first steampunk assemblage mannequin made with mostly recycled materials.


If you’d like to find any of the items used in this project, we’d greatly appreciate it if you used our affiliate links. These links provide us with a small commission at no extra cost to you, allowing us to continue creating and sharing more inspiring projects. We’d also love to hear your thoughts—feel free to leave a comment or share this post!
2 Comments
Michelle Leslie
January 14, 2026 at 2:49 amWow, wow, wow!!! I’ve always loved your mannequins, but wow!! They way you build up the layers of interest boggles my mind and then bring everything together so beautifully. She’s stunning.
Anita Holland
January 20, 2026 at 7:12 pmThanks Michelle, I love making them but hate parting with them once complete. 🤣