
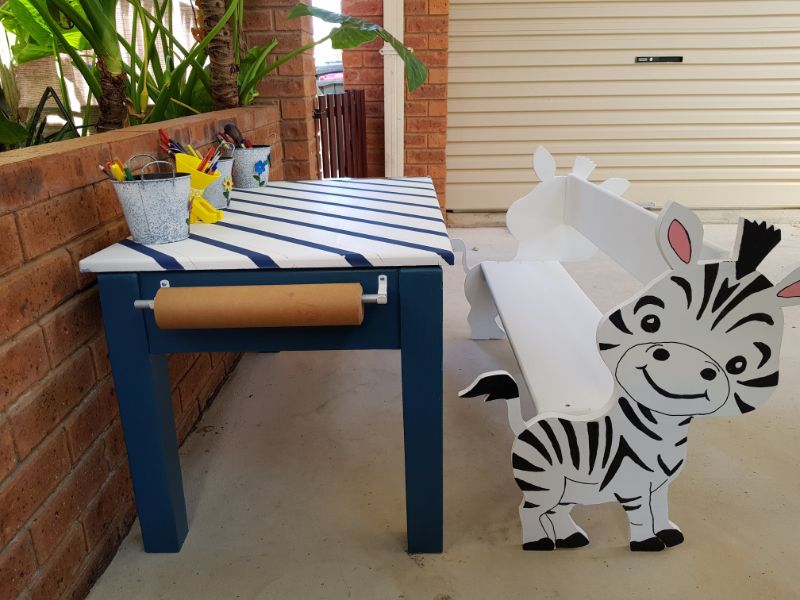
When I set out to create my DIY Zebra Toddler Bench: A Simple Striped Seat for Creative Play, I wanted a project that would delight my great-niece and complement her new craft table. This playful zebra bench combines fun design with sturdy construction, making it perfect for little hands to sit and play on.

Before we dive into this tutorial, be sure to subscribe to my bimonthly newsletter to be the first to see my latest projects. You can also follow me on Pinterest and Facebook, where I also include my unique mixed-media art projects.
DIY Zebra Toddler Bench: A Simple Striped Seat for Creative Play
**This post may contain affiliate links. This means I earn a small commission on links used at no extra cost to you. Please see my disclosure policy for more information.**
Materials Needed
- Formply or thick plywood sheet (approx. 63 cm height)
- A large sheet of kraft paper
- Mini projector or overhead projector
- Marker pen
- Masking tape
- Jigsaw
- Orbital sander with 180‑grit discs
- Wood board for seat (100 cm × 25 cm) and backrest (100 cm × 15 cm)
- Wood router with round‑over bit
- Wood glue
- Screws (suitable length)
- Countersink drill bit
- Spirit level
- Paint (white and black)
- Carbon transfer paper
- Clear acrylic spray
- Clear polyurethane
- Clamps
- Table saw or straight edge wood
Transfer and Trace Your Zebra Design
First, select a zebra silhouette with all four feet flat on the ground so your bench will sit perfectly level. Open the image in LunaPic (or any basic editor) and mirror it, then tape a large sheet of kraft paper to a smooth, vertical surface.

Position your mini projector about one metre away, mark its feet on the floor so it won’t move, and focus until the zebra stands roughly 63 cm tall.

Trace every stripe, contour and facial marking with a fine marker, doing both mirrored images at the same time to guarantee identical size and detailing.

Prepare and Cut the Side Panels
Next, transfer those traced patterns onto your plywood by taping the kraft‑paper stencils firmly to the wood. I used Formply because I had plenty at home. If you are using pine or other light wood, you can simply trace around the outline and cut the wood.

Lay strips of masking tape directly over each cut line to reduce splintering if you are using plywood.

Once both zebra‑shaped panels are cut, peel away the tape and use an orbital sander fitted with 180‑grit discs to smooth the edges.

Shape the Seat and Backrest Boards
Cut one board 100 cm × 25 cm (seat) and one 100 cm × 15 cm (backrest) from your chosen timber.

Round over every edge with your router and round‑over bit, then sand with 180‑grit paper until all surfaces feel smooth and safe for little hands.

Build and Align the Support Blocks
Cut four support strips from plywood—two at 25 cm for the seat and two at 18 cm for the backrest.

Glue and screw each block between the inside faces of your zebra‑shaped side panels to secure the seat and backrest in place. I pre‑drilled pilot holes through both the seat and the backrest, then switched to a countersink bit so the screw heads would sit neatly below the surface. This will eliminate any sharp edges and keep little fingers safe.

Screw the seat firmly in place, checking level one last time.

Repeat for the backrest, adjusting the clamp height so the top edge of the backrest is even.

Because the zebra’s contours raise the backrest higher than a straight‑edged bench, select a silhouette that accommodates this extra height. Once the support blocks were fitted, I dismantled the bench into its four main pieces. I could paint each component more quickly and with greater precision.

Prime, Paint and Protect
Apply two even coats of white chalk or acrylic paint, allowing each coat to dry completely.

Once dry, reposition your cardboard zebra stencils on the bench, slip carbon transfer paper underneath, and carefully trace every stripe and facial detail with a pen to transfer crisp guide lines onto the wood.

With the carbon‑paper guidelines in place, painting the zebra pattern is straightforward. You simply follow each transferred line and fill in the stripes and facial details with black acrylic paint. Since the design relies on just two colours—black and white—it makes for a quick finish with minimal colour mixing required.

First, I sealed the painted stripes with a coat of clear acrylic spray—this locks in the colours and prevents any bleeding when adding further layers. Once the spray was fully dry, I applied two coats of clear polyurethane to give the bench a tough, long‑lasting finish.

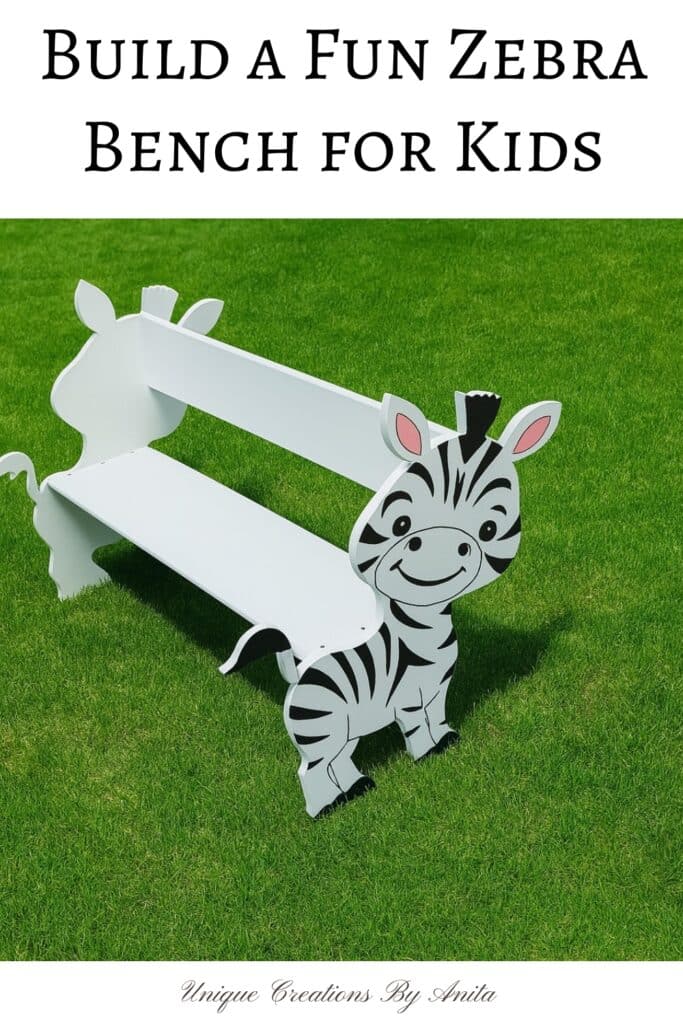
Once the paint and sealants were fully cured, I applied wood glue to the joints and re‑secured the seat and backrest to the zebra‑shaped sides using screws. Ta‑da—your Zebra Toddler Bench is complete and ready for play!

DIY toddler‑friendly play furniture ideas
Transformed an old table into a custom craft desk that perfectly complements the Zebra Toddler Bench.

Upcycled a sturdy old desk into a sand‑pit tabletop for sensory play.

I upcycled an old study desk into a toddler‑sized LEGO/activity table complete with built‑in storage.


If you’d like to find any of the items used in this project, we’d greatly appreciate it if you used our affiliate links. These links provide us with a small commission at no extra cost to you, allowing us to continue creating and sharing more inspiring projects. We’d also love to hear your thoughts—feel free to leave a comment or share this post!


27 Comments
Steav Smith
September 23, 2018 at 5:07 amNice post. I was checking constantly this blog and I’m inspired!
Very useful info particularly the remaining part 🙂 I deal with such info a Lot. I was looking for this particular info for a very lengthy time.
Thanks and good luck.
RG
August 20, 2019 at 4:25 pmYou are the best great Aunt on the planet! Kudos!
Anita Holland
August 23, 2019 at 6:49 amThank you so much for the great compliment.
Lydia C. Lee
August 26, 2019 at 8:43 pmThat looks fantastic but way to complicated for me!
Anita Holland
August 26, 2019 at 11:04 pmThank you, looks harder than it is.
Felicity Frankish
August 27, 2019 at 9:39 amThis is the cutest bench ever! What a great idea 🙂
Anita Holland
August 27, 2019 at 10:34 amThank you so much, she really loves it.
Kristie
August 31, 2019 at 2:26 pmI am impressed by your use of the projector to create large patterns, how you used router to make everything smooth, and the level! Great job! #littlecottagelinkparty
Anita Holland
September 2, 2019 at 11:26 amThank you so much.
Dee | Grammy's Grid
September 1, 2019 at 7:53 amHow cute! Thanks so much for linking up at the #UnlimitedMonthlyLinkParty 4. Shared.
Anita Holland
September 2, 2019 at 12:35 pmThank you.
Julie
September 1, 2019 at 9:53 amHow cute, what a clever way to transfer the image.
Anita Holland
September 2, 2019 at 12:37 pmThank you, I used to do it this was years ago using an overhead projector to do murals on the kid’s bedroom walls. It works great if you can’t draw like me.
Dina
September 1, 2019 at 10:57 pmWow, great projects, the bench and the table. I’m sure kids love it.
Anita Holland
September 2, 2019 at 12:39 pmThank you so much, if I was a kid I would want one. lol
Jennifer
September 3, 2019 at 5:48 amThanks for sharing at the Weekend Blog Hop at My Flagstaff Home! –Jennifer
Anita Holland
September 3, 2019 at 11:22 amYou are welcome
Condo Blues
September 4, 2019 at 1:49 pmYour bench is adorable!
Anita Holland
September 5, 2019 at 7:47 amThank you so much.
Marie
September 4, 2019 at 2:03 pmThis bench is so ADORABLE! My grandson would squeal with delight if he got one of these. Thanks for the detailed tutorial. Christmas is coming 😉
Anita Holland
September 5, 2019 at 7:49 amThank you, Marie, My niece was so excited when she saw it, it was so cute to watch her. That is why I make so much for her.
Michelle
September 4, 2019 at 11:55 pmThe zebra bench is so cute! I had no idea that the overhead projector could be replaced by the mini projector. What a cool upgrade! I bet your niece will be tickled with her new bench!
Thanks for linking up to Creative Compulsions!
Anita Holland
September 5, 2019 at 7:51 amThank you so much. Yes, they are amazing, the one I have you can use and image from your phone or a memory card. We watch movies on our phone and blow it up onto a wall so we can all watch when we are away on holiday.
Debbie-Dabble
September 9, 2019 at 12:49 amOMG!! This is adorable!!
Hugs,
Debbie
Anita Holland
September 9, 2019 at 11:54 amThank you so much.
Abrie & Marina Veldtmann
January 10, 2025 at 5:36 amDear Anita you inspired us and we were asked to make a zebra bench like yours for a customer. We decided to try another zebra illustration. We also suggested the bench be painted black for practical purposes and the zebra on the side panels would show up quite nicely. We worked tediously and loved every minute, even suggesting a toy box to slide in underneath the bench with zebra painted handles …. . Thank you again you are awesome and we love the work you do. We would love to send you the photographs and will reply to your email once we received it. God bless you and thank you again.
Anita Holland
January 17, 2025 at 10:08 pmThank you so much, glad to be able to offer some help. I would love to see your project you can can click on the Facebook icon on my page and send them through messages.