
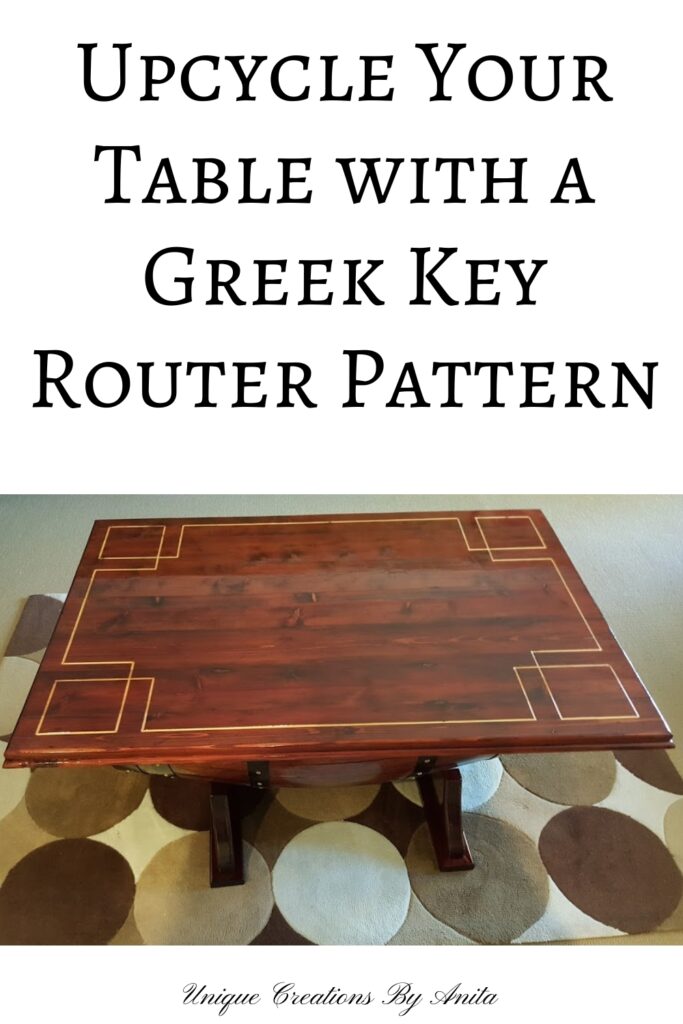
Over the years, I’ve made several wine barrel tables—each one with its own unique feature. For this table, I wanted to try something a little more refined by adding a Greek key design to the tabletop. At first, I thought a stencil would do the trick. But all I could find were small repeats, which would’ve taken forever to line up, and I’m not the most patient DIYer.
After some Googling, I found a clever way to create the pattern myself—and it turned out easier than I expected. This tutorial focuses on how to create a Greek key pattern on a tabletop, not how to build the full wine barrel table. If you’d like to see my wine barrel tutorial, I’ve linked it below.

Before we dive into this tutorial, be sure to subscribe to my bimonthly newsletter to be the first to see my latest projects. You can also follow me on Pinterest and Facebook where I also include my unique mixed-media art projects.
How to add a Greek key Design to a tabletop
**This post may contain affiliate links. This means I earn a small commission on links used at no extra cost to you. Please see my disclosure policy for more information.**
Materials Needed
- Old tabletop (or recycled table)
- 20mm thick plywood (cut smaller than the tabletop to create a border)
- 4 wood strips (60mm wide x 20mm thick)
- Table saw
- Wood glue
- Orbital sander and sanding disc
- Wood router (small base works best), round groove router bit
- Clamps
- Straight piece of wood (to use as a router fence)
- Kraft paper (cut to tabletop size)
- Tape measure
- Masking tape
- Hammer and chisel (for corner clean-up)
- Wood stain (light and dark)
- Foam paint roller
- Oil-based gloss varnish
- Fine paintbrush
Step 1: Prep the Tabletop
I used an old recycled table for this project. It had lots of dents and scratches. One trick I always use is steaming the dents out. Place a wet cloth over the dent and run a steam iron over it. The steam causes the wood to expand and reduce the dents. Once dry, I sanded the whole surface smooth.

I like my wine barrel tabletops to have a thick, solid look. So I glued a 20mm plywood sheet to the underside of my table. My tabletop was 1300mm x 830mm x 20mm, and the plywood was cut to 1290mm x 820mm, creating a 50mm inset border.
Then I cut four 60mm wide x 20mm thick wood strips with my table saw—two for the width and two for the length. These filled the outer edge, leaving a 10mm overhang. I routed the corners of the strips to give the table a softer, finished look before gluing them into place.

Step 2: Stain the Surface
Important: Stain the wood before cutting the Greek key pattern.
If you stain after cutting, the stain can bleed into the grooves and ruin the design. I used two contrasting stains—one dark for the background and one light for the routed areas.

Step 3: Draw the Design
I cut a piece of Kraft paper to the size of the tabletop: 1290mm x 820mm. This left a 50mm border around the edges. The Greek key design is simple—just straight lines.

I used a long piece of timber as a straight edge (because I didn’t have a long enough ruler). Using a tape measure and pencil, I marked out the design. Once I was happy, I outlined the router paths with a Sharpie.

To avoid confusion, I taped off the areas that should remain uncut using masking tape.

Step 4: Cut the Greek Key Pattern
I taped the paper template to the tabletop, making sure it was centred. Then I set up a wooden fence guide clamped in place to help make straight router lines. Even though I own a large router, I used my small one. It gave me more control and was easier to line up using the base plate. I cut all the lines using a round groove router bit. For the corners where the router couldn’t reach in one pass, I cleaned up the pattern with a hammer and chisel and smoothed them with sandpaper.

Step 5: Seal the Tabletop
The contrast between the dark stain and light routed design looked amazing. But I wasn’t happy with the two-tone legs, so I stained them to match.
To stop the dark stain from bleeding into the grooves, I sealed the surface using a foam roller and oil-based gloss varnish. I applied a thin first coat, lightly rolling it over the surface to avoid pooling in the grooves.
Once dry, I used a fine paintbrush to varnish inside the grooves only. After that dried, I lightly sanded with 240-grit sandpaper and added three more coats of varnish.

Pro Tip: Dust-Free Varnish Finish
To get a flawless finish, I set up an old tent outdoors the day before. I vacuumed it and used it as a dust-free space to cure the table. Every 30 minutes, I wiped down the surface with a tack cloth to remove settled dust. It’s a bit time-consuming, but it gives me a smooth, professional finish every time.


More Wine Barrel Table Projects
DIY Personalised Wine Barrel Table with Liquid Glass Finish

How to Build a Wine Barrel Table with a built-in wine bucket


If you’d like to find any of the items used in this project, we’d greatly appreciate it if you used our affiliate links. These links provide us with a small commission at no extra cost to you, allowing us to continue creating and sharing more inspiring projects. We’d also love to hear your thoughts—feel free to leave a comment or share this post!


6 Comments
Teresa
January 9, 2020 at 3:37 pmThat’s just amazing! Thank you for sharing at The Really Crafty Link Party. Pinned.
Anita Holland
January 12, 2020 at 12:55 pmThank you so much. 😁
Sherrie
January 9, 2020 at 11:08 pmHi,
Awesome table! Love the Greek design. Have a great day!
Anita Holland
January 12, 2020 at 12:56 pmThank you so much Sherrie😁
Michelle Leslie
August 16, 2021 at 10:31 pmOh, that’s really clever, Anita. I haven’t had much luck with straight lines and a router either, so I’m definitely going to use your “guide” trick next time.
Anita Holland
August 18, 2021 at 8:18 amThanks, Michelle, The guide is a definite winner.