
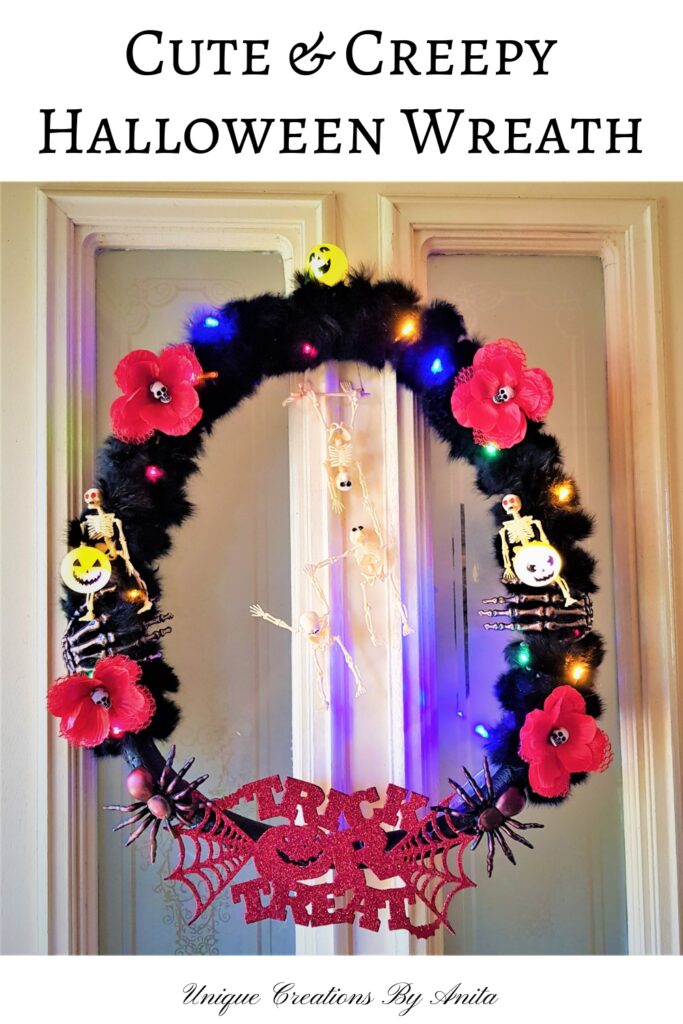
Last Halloween, my 4-year-old great-niece was beyond excited. It was her very first time dressing up and getting ready to hand out candy. She had her costume on, her sweets ready by the door, and waited with so much anticipation, only for no one to knock. We soon realised the house didn’t have any Halloween decorations or signs to show they were taking part.
This year, I wanted to make it extra special for her. So I decided to create a fun and spooky Halloween wreath that could hang on the front door. Something eye-catching, playful, and filled with quirky little details to let everyone know they’re ready to join in on the Halloween fun. It’s also a great way to get creative with items you already have at home, especially if you live in a place like Australia, where Halloween supplies can be limited.

Before we dive into this tutorial, be sure to subscribe to my bimonthly newsletter to be the first to see my latest projects. You can also follow me on Pinterest and Facebook where I also include my unique mixed-media art projects
Halloween Wreath – A Fun DIY Project to Delight Trick-or-Treaters
**This post may contain affiliate links. This means I earn a small commission on links used at no extra cost to you. Please see my disclosure policy for more information.**
Materials Needed
- Dual draught guard or foam tubing
- Black fur boa or tinsel
- Fishing line or hot glue gun
- Cricut machine (optional)
- Scrap cardboard
- Craft glue and glitter
- Battery-operated fairy lights
- Ping pong balls
- Orange paint
- Black vinyl
- Craft knife
- Halloween decorations (flowers, spiders, mini skeletons)
Making the Wreath Frame
In Australia, Halloween wreaths aren’t common, and wreath frames are hard to find, especially during winter. Pool noodles were out of stock in my small town, so I got creative.

I found a dual draught guard at my local budget shop for $3. It came in two foam tubes, which I separated and taped together into a circle. This made the perfect lightweight base for the wreath.

Decorating the Frame
I wrapped a black fur boa (from an old fancy dress costume) around the frame.

It gave it that fuzzy, spooky feel. I secured it with fishing line, but you can also use a hot glue gun if that’s easier.

Making the Trick-or-Treat Sign
Using my Cricut machine, I designed a “Trick or Treat” sign and cut it out six times from scrap cardboard. I glued all six layers together to make a sturdy, 3D sign.

Next, I coated the sign in craft glue and sprinkled on black glitter for a sparkly finish. It really pops against the fuzzy wreath.
Adding Lights and Pumpkins
To help the wreath stand out at night, I added some battery-operated Christmas lights. To make mini pumpkins, I used leftover ping pong balls.

Finishing Touches
For decoration, I used whatever I had around the house. The red flowers were pulled from a Halloween headband and glued onto the wreath.

Mini skeletons from a discount store got posed using a hairdryer—I heated them up and bent their arms and legs while warm. I even made a mini trapeze swing and hung them for a playful scene.

The plastic spiders were originally plain black, so I gave them a coat of white gesso, then added coloured wax paste for an aged, gothic look.

Want More Halloween Ideas?
Halloween Wine Bottles – Spooky mixed media bottle decor

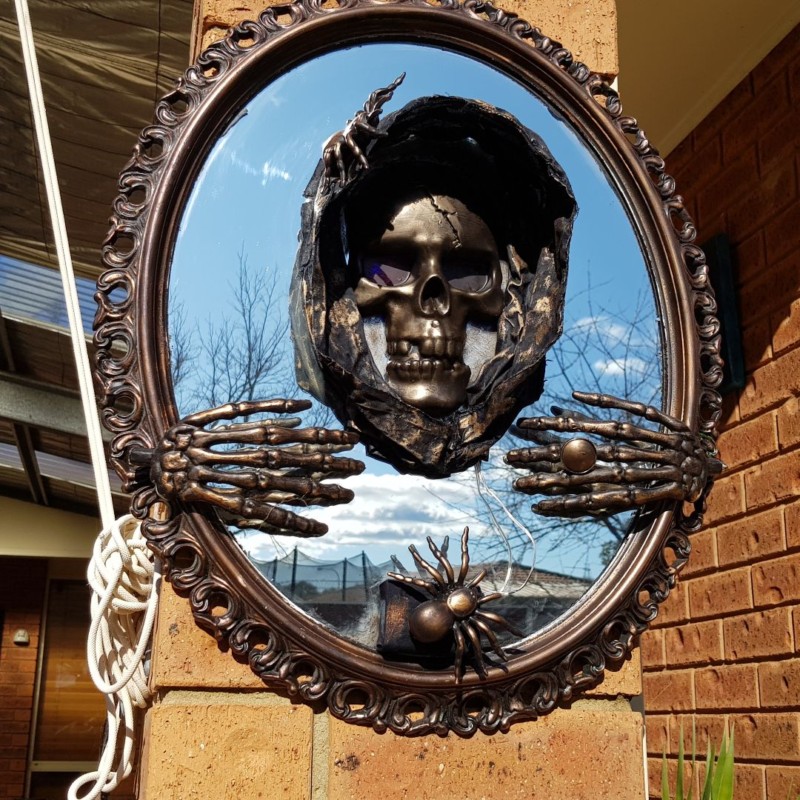
Halloween Mirror – A haunting twist on an upcycled mirror or Grim Reaper created using cement and a towel.


If you’d like to find any of the items used in this project, we’d greatly appreciate it if you used our affiliate links. These links provide us with a small commission at no extra cost to you, allowing us to continue creating and sharing more inspiring projects. We’d also love to hear your thoughts—feel free to leave a comment or share this post!


11 Comments
Sylvia | Grace for a Gypsy
September 11, 2019 at 2:57 amVery cute idea! Found you at the PARTY IN YOUR 275
Anita Holland
September 11, 2019 at 3:33 amThank you for stopping by.
Michelle
September 12, 2019 at 2:36 amLoving all your Halloween DIYs! Very cute Halloween wreath!
Anita Holland
September 12, 2019 at 4:02 amThank you Michelle, Too cold to play outside in my shed at the moment, so Halloween craft was the next best thing.
Lisa L Lombardo
September 14, 2019 at 9:34 pmI love the day of the dead feel this wreath imparts! Thanks for sharing your talents with us on Farm Fresh Tuesdays!
Sylvia | Grace for a Gypsy
September 15, 2019 at 6:16 amLove these Halloween decorations. Thanks for linking up with us at the GATHERING OF FRIENDS LINK PARTY 6. Pinning
Ann
September 15, 2019 at 9:45 pmI’m sure your great niece will love the wreath. Thank you for sharing at Party In Your PJ’s!
Carol
September 25, 2019 at 10:53 amYour story of your little great-niece touched me and I am sending big hugs and wishes for a happy Halloween this year. Lovely wreath – maybe you should ask a couple of children in your neighborhood to come by for candy too!
Anita Holland
September 26, 2019 at 1:07 pmI know, I only found out after the fact. Halloween has only just started to get popular here, but she will be ready this year.
Cecilia
September 30, 2019 at 12:57 amGreat wreath! Thanks for sharing at Vintage Charm!
Anita Holland
October 1, 2019 at 10:27 pmThank you