
I was scrolling through Pinterest one day when I stumbled upon some incredible mixed-media art projects. Instantly, I thought to myself, this is something I want to try. But after checking prices online and in-store, I was shocked by how expensive the supplies were.
Since I wasn’t sure if it was something I’d be good at, or even enjoy, I didn’t want to invest a heap of money in materials I might only use once. So, rather than researching the exact ingredients in each product, I simply looked around my craft stash and tried to recreate the supplies myself using what I already had on hand to make my own mixed media supplies.
While I can’t speak to the long-term quality of these homemade versions, they were absolutely perfect for experimenting and helped me decide whether mixed media was a creative path I wanted to pursue.

Most mixed media art requires waxes, shimmer sprays, embellishments, and texture pastes—all of which can get quite pricey. But with a bit of creativity, I made my DIY versions at home, saving a small fortune in the process.
These may not be the “official” methods for making mixed-media supplies, but they worked beautifully for me. Below, I’ll walk you through how I made my wax pastes, shimmer sprays, embellishments with a Cricut or Silhouette, resin appliqués, and reusable stencils.
Before we dive into this tutorial, be sure to subscribe to my bimonthly newsletter to be the first to see my latest projects. You can also follow me on Pinterest and Facebook, where I also include my unique mixed-media art projects.
How to make your own Mixed media supplies
**This post may contain affiliate links. This means I earn a small commission on links used at no extra cost to you. Please see my disclosure policy for more information.**
Materials Needed
- Annie Sloan clear wax (or similar furniture wax)
- Mica powders in assorted colours
- Metallic acrylic paint
- Travel-sized spray bottles
- Small sealable containers
- Colour pigments (optional)
- Water
- Cricut or Silhouette cutting machine
- Stencil film
- Epoxy resin
- Silicone moulds
- Heat gun
- Craft glue
- Cardstock
DIY Mixed Media Wax Pastes

Start by scooping a small amount of Annie Sloan (Any brand will work) clear wax into a container. Mix in a pinch of bronze mica powder. Stir thoroughly until the colour blends smoothly.

You don’t need much mica to achieve a rich, pigmented wax. Add it in small increments until you get the intensity you like.

The beauty of this method? You can make any colour on demand and only mix what you need. It’s a budget-friendly way to expand your collection without overspending.

With mica powder being so affordable, you can easily purchase every colour, unlike the original products, which are prohibitively expensive. For example, Prima Marketing Art Alchemy Metallique Wax in Vintage Gold (0.68 Fl Oz) costs around $26 on Amazon in Australia and about $16 in some craft stores. Even at $16, collecting all the colours would be a significant expense.
How to Make Shimmer Sprays
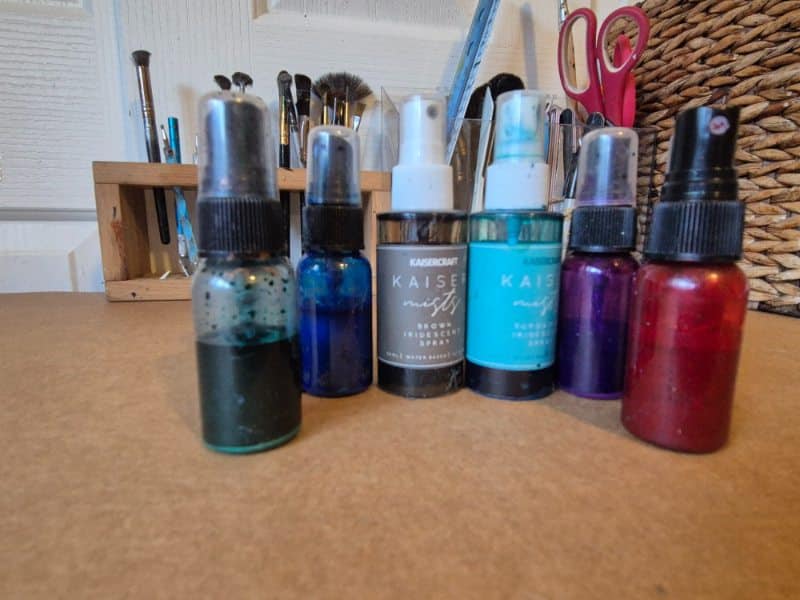
Shimmer sprays add a dreamy, metallic finish to mixed-media art.

Mix the Solution
- Add a small amount of mica powder (start with 1/4 teaspoon) and stir well until fully dissolved. Adjust the amount for more or less shimmer.
- Add 1 part rubbing alcohol to 2 parts distilled water in the spray bottle (e.g., 1 oz alcohol to 2 oz water).
The mica powder will always settle at the bottom of the spray bottle, so you’ll need to give it a good shake before each use—but that’s no different from most store-bought shimmer sprays. I added a small glass bead from my craft stash to help mix the mica powder more thoroughly when shaking, and it worked a treat.

During my early experiments, I noticed that some of the mica powders didn’t have enough pigment to give a strong colour. My first attempt to boost the colour was by adding metallic acrylic paint, but it didn’t mix well and left the spray a bit gloopy. I later tried alcohol inks, and they blended beautifully while giving the spray a vibrant, rich colour. That simple swap made all the difference!

Mixed Media Embellishments Using a Cricut Vinyl Cutter
Embellishments are essential in mixed media art projects as they add depth, layer, and texture, transforming a flat surface into a dynamic, tactile experience. Items like Tim Holtz embellishments, resin pieces, and paper die cuts introduce varied shapes, sizes, and materials, creating visual interest and a sense of dimension.

While Tim Holtz and other craft supplies are stunning, they often come in packs of 30 to 50 similar items, which can quickly become expensive. A few years ago, I invested in a Cricut vinyl cutter and have since used it with cardstock to create my own custom embellishments, offering a cost-effective and creative alternative.

Download a free stencil design or purchase one from Etsy. There are also plenty of free graphics online that you can convert into SVG files using Cricut Design Space or software like Inkscape. Once converted, you’re ready to cut your own custom cardboard embellishments at home.

This method also works great for making your own stencils with a Cricut. You’ll just need to purchase some Mylar stencil film to get started.
Cricut and Silhouette machines are well worth the investment if you’re a frequent crafter; they’ll save you heaps over time.
Mixed Media Resin Embellishment
I use this method for all my mixed-media art projects. Silicone moulds are easy to find online from places like Amazon and other craft suppliers, but I buy most of mine from Temu in China; they’re usually only a couple of dollars each, which is a huge saving.
I used the standard 2:1 ratio of resin. While it worked well, the downside was the 24-hour curing time, which really slowed down the creative process.

Carefully pour the mixed resin into your silicone moulds, making sure to fill all the fine details and avoid air bubbles. You can gently tap the mould or use a toothpick to release trapped bubbles if needed.

Let the resin cure undisturbed for at least 24 hours in a dust-free area. Once fully hardened, gently remove the resin shapes from the mould by flexing the silicone. The finished pieces should come out cleanly and capture every detail of the mould design.
Now that I’m working on mixed media projects almost daily, I’ve switched to using polyurethane quick-dry resin. It’s been a game-changer for small moulds, as it cures in around five minutes, perfect for speeding up the creative process and making multiple pieces in one session.

The only downside is that this type of resin dries in an off-white or ivory tone rather than clear. While this isn’t ideal for all projects, it’s great for embellishments that will be painted or waxed later, making the colour less of an issue.
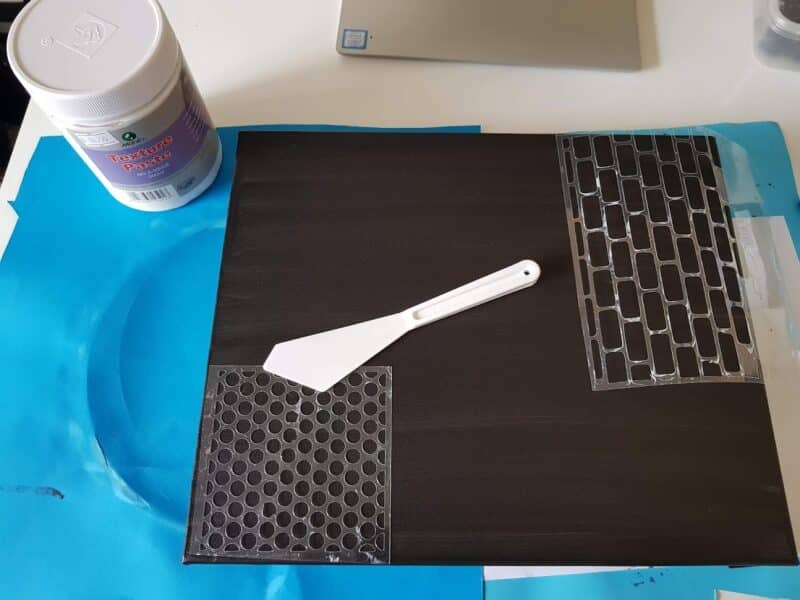
Making stencils
No mixed media canvas is complete without added texture from stencils. Creating your own stencils is simple; all you need is some stencil film and a cutting machine like a Cricut or Silhouette. Find a free design online or use a graphic you already love, then let your machine do the cutting for you.

Countless websites are offering free graphics, but if you’d rather skip the searching, you’ll find plenty of ready-to-use stencil designs on Etsy for just a few dollars. Making your own stencils is not only budget-friendly but also allows you to customise every detail of your artwork.
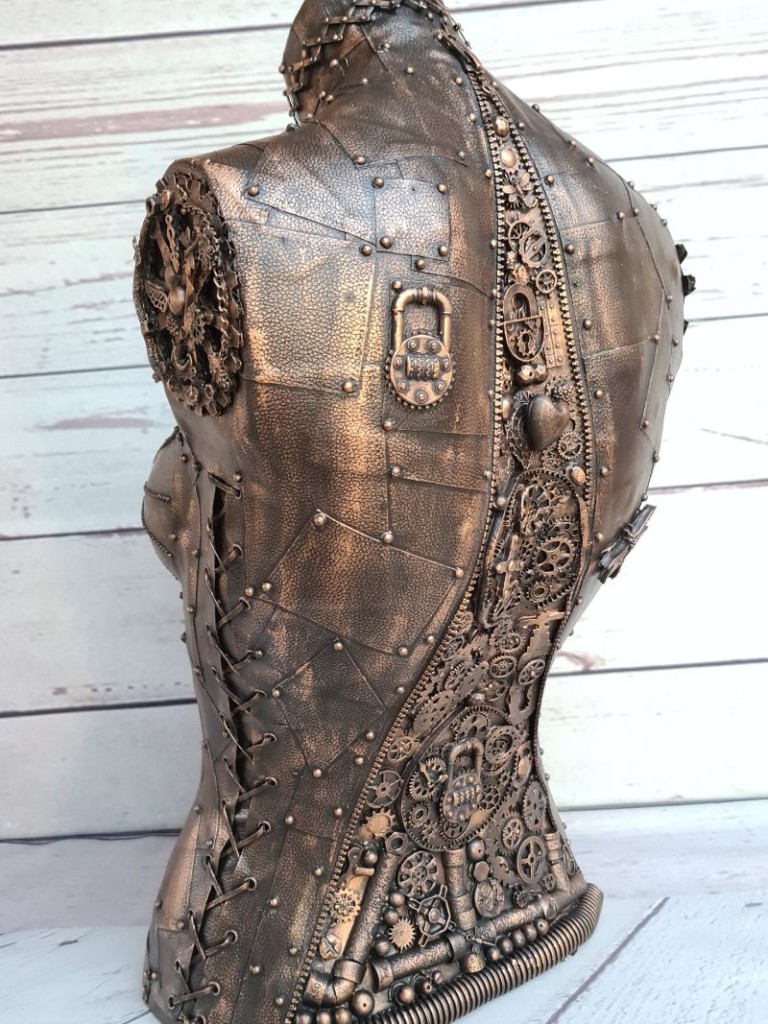
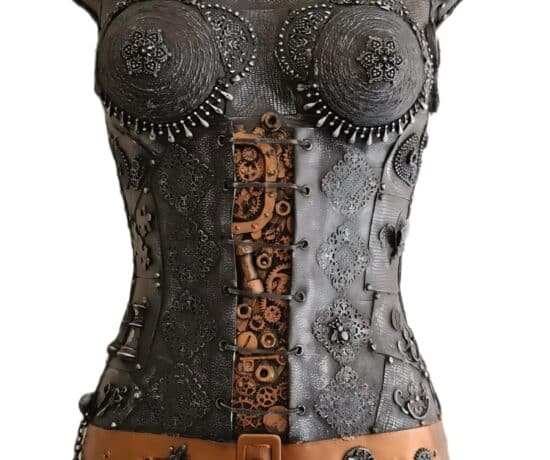
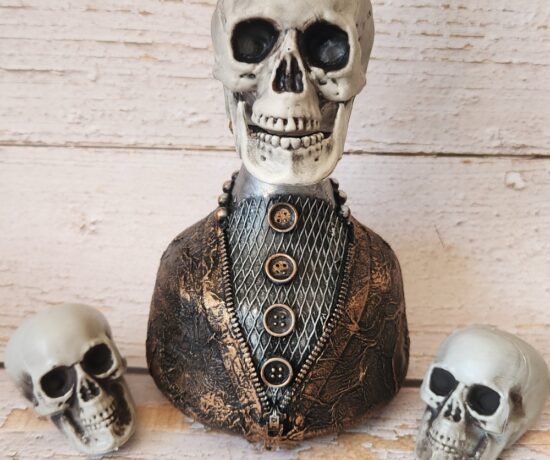
Apart from the key and the gear, I made all the other embellishments by hand to create the rich texture on this project.

Update: After a few years of creating mixed media art, it turns out I’m pretty good at it! What began as a hobby has become a fun and profitable side hustle.
I’ve also written a new post on how to add texture to your mixed media projects, filled with tips and creative ideas.

The Steampunk Mannequin was one of my earliest projects, and I documented the entire process to create a detailed tutorial, making it easier for others to follow and recreate. I have many mixed media projects on my website; you can find them HERE.


If you’d like to find any of the items used in this project, we’d greatly appreciate it if you used our affiliate links. These links provide us with a small commission at no extra cost to you, allowing us to continue creating and sharing more inspiring projects. We’d also love to hear your thoughts—feel free to leave a comment or share this post!

44 Comments
Naomie Moore
May 24, 2019 at 1:14 amOh wow! You did an outstanding job! It’s just beautiful. You have a real eye for design and color. Love it! Fantastic instructions too, just love your work. ❤🤗
Anita Holland
May 24, 2019 at 2:42 amThank you so much, very kind of you to say. It makes me feels great when others enjoy my projects. I am getting braver now and trying new projects so hopefully, I will have something new for you soon.
Michelle
August 1, 2019 at 6:45 pmWhile I realize that the potential of projects to make with epoxy resins is not the primary subject of this post, this particularly excites me. Thanks for mentioning it again!
Anita Holland
August 1, 2019 at 11:29 pmThank you, To be honest, there are so many ideas in this project. I don’t think it could focus on just one. I am a big fan of resin I have done a few projects lately.
Jennifer
August 3, 2019 at 7:51 pmWow, could have fooled me. I thought all those things were metal. Thanks for sharing at the Weekend Blog Hop at My Flagstaff Home! –Jennifer
Anita Holland
August 4, 2019 at 9:44 pmThank you so much. The Cricut is such a great machine, it takes longer but that is not an issue for me.
Jeanne Vogel
August 4, 2019 at 4:32 pmWhat a great idea to make your own mixed media supplies! I used a lot of items, from thrift shops, jewelry, light swtich plates, plastic parts from things but being able to replicate the embellishments & mediums would be nice! Thanks for the tips!
Anita Holland
August 4, 2019 at 9:42 pmThank you so much, I did not know if I would be able to do mixed media so I did not want to pay for all the supplies. And being regular to DIY there are always products around the house to use. And the Cricut is the best machine I ever bought.
Anita Holland
August 4, 2019 at 9:43 pmThank you so much.
Kathy A
August 4, 2019 at 10:09 pmThanx for all your hints! Great project.
Anita Holland
August 4, 2019 at 10:13 pmThank you so much.
Anita Holland
August 5, 2019 at 3:22 amThank you, and you are very welcome.
Michele Michael
August 6, 2019 at 1:22 amNice post. I love your mixed media. Please post over at Funtastic Fridays. We would love to have you. I’m a mixed media artist also.
Anita Holland
August 6, 2019 at 3:38 amThank you so much, I would love to join, I am still new to these parties and trying to find them.
Dee | Grammy's Grid
August 7, 2019 at 3:53 pmThanks so much for linking up at the #UnlimitedMonthlyLinkParty 3!
Anita Holland
August 8, 2019 at 2:32 amThank you!
alice
August 9, 2019 at 2:53 amThis came out really neat and I like the steam punk feel of it. I never thought to mix my own colors using mica but that’s a good idea. Thanks for sharing this with us at #OMGHWW.
Anita Holland
August 9, 2019 at 4:44 amThank you so much, I have just finished a steampunk bottle lamp. Think I am hooked in the mixed media now. It works out so much cheaper to mix your own supplies if you have the products at home.
Julie
August 10, 2019 at 10:55 amWow, you’ve got some great money saving ideas here. The finished canvas is so lovely. Those colours are really vibrant. I can see I need to get myself some of those mica powders and have a play.
Thanks for sharing at Handmade Monday 🙂
Create With Joy
August 11, 2019 at 9:32 pmAmazing creation Anita and great post!
Thanks for sharing at Inspire Me Monday at Create With Joy.
Congrats – you are one of our Featured Guests this week! 🙂
Anita Holland
August 11, 2019 at 10:50 pmThank you so much for the lovely comments and an even bigger thank you for the feature. I have never really promoted my projects but these link parties are awesome. Thanks for hosting.
Bernadette
August 12, 2019 at 6:43 amFascinating! The composition is really inspiring, and so is making your own stuff. I’m going to try the wax–I use wax colors to embellish picture frames and haven’t found a good wax base to make my own. I have a Cameo and I love it!
Cecilia
August 18, 2019 at 5:56 pmWhat a great DIY tutorial! Thanks for sharing at Vintage Charm!
Anita Holland
August 19, 2019 at 7:44 amThanks.
Sylvia
September 9, 2019 at 4:36 pmI just wandered onto this page…so many good ideas..thanks so much..I have a cricut and don’t use it so much..but I will now!!!
Anita Holland
September 11, 2019 at 1:29 amThank you so much, I love my Cricut, so many great uses for it.
Dee | Grammy's Grid
March 15, 2020 at 11:20 pmPlease don’t linkup non-vegan posts to the vegan themed party. Post removed.
Anita Holland
March 16, 2020 at 3:18 pmReally sorry, I missed that it was themed.
creativejewishmom/sara
March 16, 2020 at 10:07 pmGreat post, so much helpful info! Not familiar with all those products as I haven’t done the kind of mixed media art you do, but now you’ve got me curious! thanks for sharing on craft schooling Sunday!
Anita Holland
March 21, 2020 at 11:35 amThank you so much.
Lydia C. Lee
March 17, 2020 at 7:04 amLooks great!
Anita Holland
March 21, 2020 at 11:35 amThank you, photos don’t do it justice.
Allyson
March 21, 2020 at 2:18 amGreat tips for using resin and molds, also, using glue for the paper designs. Pinning. Visiting from BFF Open House.
Anita Holland
March 21, 2020 at 11:38 amThank you so much.
kristie
March 23, 2020 at 1:09 pmI love your ideas! This is on of my features on the Little Cottage Link Party tomorrow.
Anita Holland
March 23, 2020 at 1:33 pmThank you so much, that is very nice of you to say.
Ann
March 24, 2020 at 6:06 amYou’d never guess those embellishments were made from paper. Great job! Thank you for sharing at Party In Your PJ’s
Anita Holland
March 24, 2020 at 2:03 pmThank you so much, the Cricut is a great machine to make them.
Anita Holland
March 24, 2020 at 1:39 pmThank you so much for the feature on mixed media supplies
Anita Holland
March 27, 2020 at 12:41 pmThank you so much for the lovely comment, it is greatly appreciated.
Anita Holland
March 27, 2020 at 12:42 pmThank you so much.
Kaz
May 29, 2020 at 1:28 pmFantastic thanku so much..
JOANNE KEET
July 4, 2020 at 8:34 pmA very interesting and helpful article and your work is STUNNING!!
I live in South Africa and have not heard of the “Circut” or “Silhouette” cutting machines. Perhaps they are known by a different name here?? Could you please e-mail me more information regarding what you can do with them & costs?
THANK YOU!
Anita Holland
July 6, 2020 at 9:35 amI have sent you an email.