
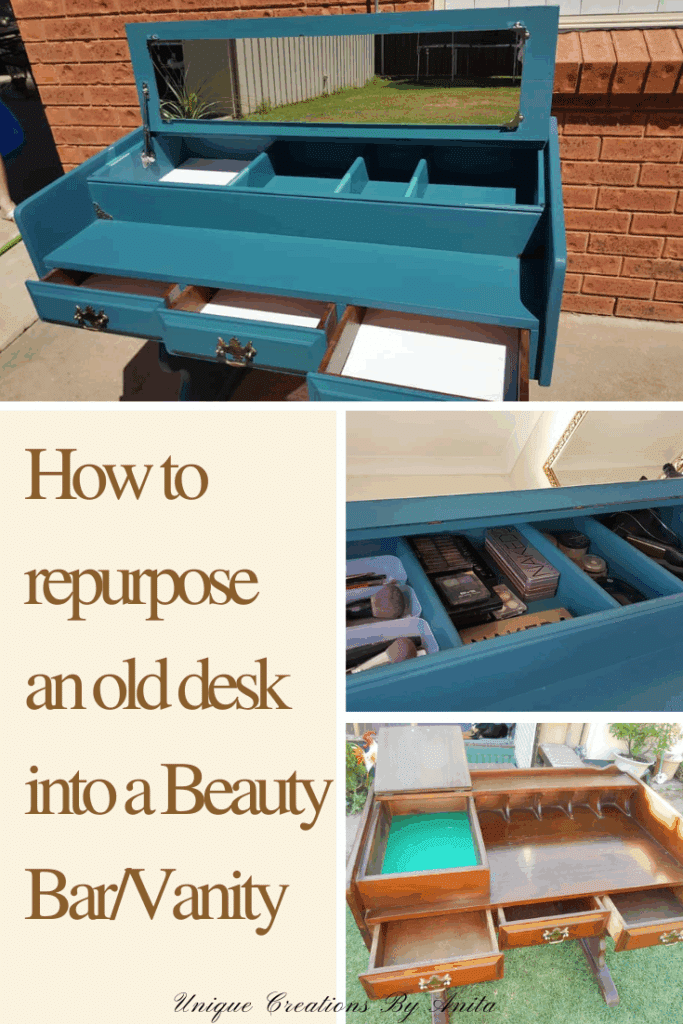
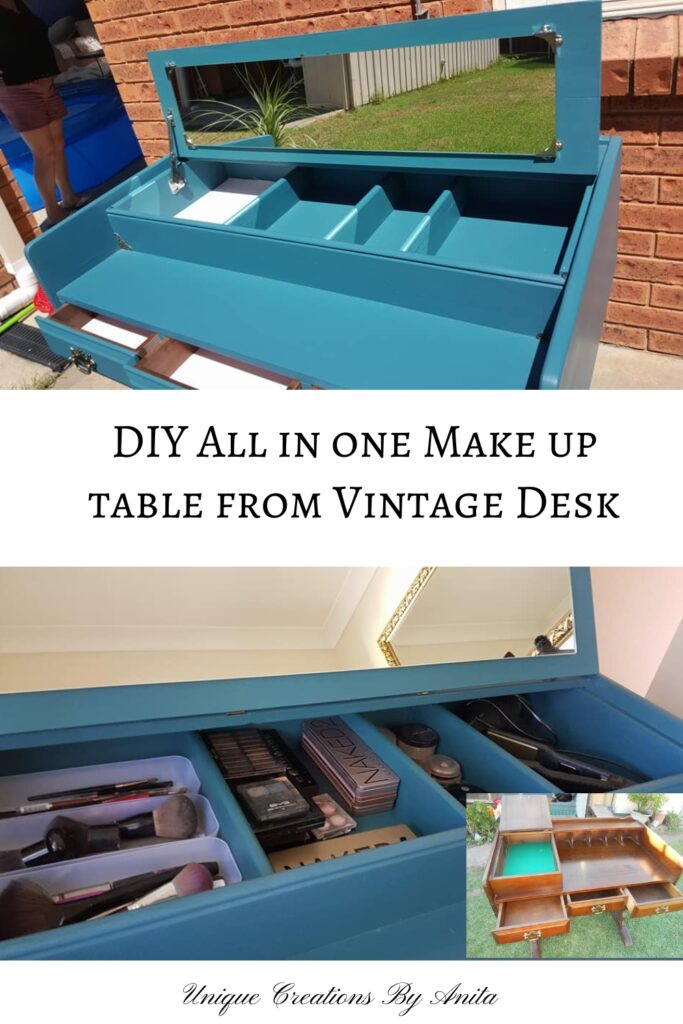
Old study desks seem to have lost their charm in today’s market—they’re bulky, outdated, and often hard to sell. But with a little creativity, they can be turned into something both beautiful and practical. When my daughter recently bought herself a “beauty bar” (as they’re commonly called here in Australia), it sparked an idea. I had an old desk sitting in storage, and rather than let it go to waste, I decided to give it a new life. In this post, How to Repurpose an Old Desk into a Makeup Table/Vanity Table, I’ll show you how I transformed that tired old piece into a stylish and functional vanity that neatly stores all your beauty products in one organised space.

Before we dive into this tutorial, be sure to subscribe to my bimonthly newsletter to be the first to see my latest projects. You can also follow me on Pinterest and Facebook where I also include my unique mixed-media art projects
How to repurpose a desk into a Makeup table/dresser
**This post may contain affiliate links. This means I earn a small commission on links used at no extra cost to you. Please see my disclosure policy for more information.**
Materials Needed
- Old wooden desk (study or writing desk style)
- Chalk paint in chosen colour (e.g. Peacock mix: 2 parts Napoleonic Blue, 1 part Antibes Green, 1 part Aubusson Blue)
- Clear wax (for sealing chalk paint)
- Orbital sander
- Sandpaper (120, 180, 240 grit)
- Wood filler (to repair deep scratches or gouges)
- Scrap wood (for internal partitioning and box build)
- Wood glue
- Nail gun and nails (or hammer and finishing nails)
- Rubber mallet
- A measuring tape or ruler
- Square ruler (to keep partitions aligned)
- Screws
- Screwdriver or drill
- Hinges (matching or decorative)
- Handle/knob for lid (optional)
- Decorative metal corner pieces (for finishing touches)
- Lift-up hinge (optional, for supporting lid)
- Mirror cut to size (can be custom cut at local glass shop)
- Mirror corner brackets or strong adhesive
- Drawer liners (non-slip mat or decorative paper)
- Double-sided tape (for lining drawers)
- Plastic baskets or dividers (for organising beauty items)
- Old tabletop offcut (for vanity lid, optional)
- Router (optional) with round-over bit (for softening edges)
- Thickness planer (optional) for cleaning recycled wood
- Clamps (to hold guide fences when cutting)
- Jigsaw (to cut lid or top panel)
- Paintbrushes or foam rollers
Stripping down the desk
While I do love natural wood, I knew a plain wooden desk wouldn’t appeal to most women looking for a modern makeup station. These old writing desks don’t get much love these days, so it was the perfect candidate for a total transformation.
")
I began by removing all the original hardware, which I loved and planned to reuse later. Then I used a rubber mallet to gently knock out the paper trays and side partitions.

Building the Top Partition Box
To add more functionality and storage to the vanity, a partition box was built on top using scrap wood already on hand. Since it would be painted, the appearance of the wood wasn’t important. The reclaimed timber was cleaned up using a thickness planer to remove old stain and varnish, then a router with a round-over bit was used to soften the edges. Final prep was done with a quick sand using 120- and 240-grit sanding discs.

I mapped out where I wanted each compartment to go using my daughter’s makeup sets as a guide. A square ruler helped me ensure everything was perfectly aligned. One mistake I made: I didn’t sand the base before attaching the partitions, which made it harder to smooth everything afterwards—lesson learned!

To assemble the compartments, I used wood glue and a nail gun, securing everything from both the front and back while the glue dried.

Making the New Tabletop
I cut the lid from an old tabletop offcut, allowing for a 2 cm overhang at the front. To make a clean cut, I clamped a straight edge to the wood to guide my jigsaw. I kept a decorative lip on the original desk to enhance the overall look.

After a successful test fit, I sanded down the rest of the desk to remove scratches and rough spots, even though I’d be using chalk paint later.

Some deep gouges on the back were filled with wood filler and sanded smooth with 180- and 240-grit discs.

Painting the Vanity
I fell in love with a chalk paint colour I saw on Pinterest—Peacock by Annie Sloan—but it wasn’t available locally and required mixing three colours: 2 parts Napoleonic Blue, 1 part Antibes Green, and 1 part Aubusson Blue. It wasn’t cheap, but the colour was worth every cent.

As this was my first time using chalk paint, I was a bit sceptical about the “no primer” claim. The first coat was patchy, but the second coat went on beautifully. I finished with two layers of clear wax for protection and sheen.

Reattaching the Hardware
I reused the original drawer pulls and added new hinges in a similar style.

I wasn’t planning to add a handle to the lid, but I had one leftover and decided to install it using screws from below.

Decorative metal corners were added to the front to give the piece a more polished, finished look.

Inside the lid, I installed a lift hinge—though it took a few tries to get the placement right. A tip here: pre-fit any hardware before painting! I had to fill in a few holes and touch up the paint inside the lid, but thankfully, the colour difference wasn’t noticeable.

Adding the Mirror
No makeup vanity is complete without a mirror! I had a leftover piece from a faux live-edge mirror project and had it cut to size at a local glass shop. At first, I tried attaching it with self-adhesive Velcro, but it didn’t hold. I eventually used mirror clips for a more secure fit.
Lining the Compartments & Final Touches
To protect the compartments and drawers, I lined them with non-slip matting and secured it with double-sided tape. I also added plastic baskets to help organise smaller beauty items like lipsticks, eyeliners, and mascaras. One of the larger compartments was left open to store a hairdryer and straightener.

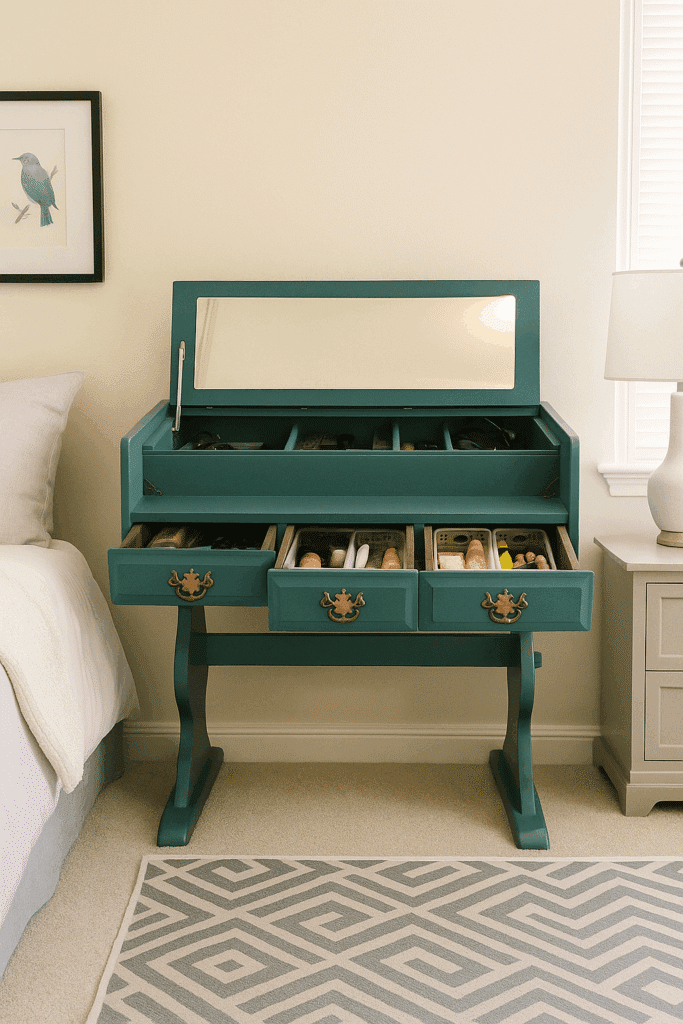
Final Look and Function
The final product is a beautiful, functional makeup vanity made from a discarded desk. It has plenty of storage, a flip-top mirror, and compartments to keep everything organised. It’s perfect for any teen or young adult looking for a stylish space to do their makeup, and even better knowing it was created from upcycled materials.


Side View


More Repurposed Desk Ideas
Love this transformation? I’ve also turned old desks into a stand-up sandpit and other fun projects—so stay tuned for more creative makeovers.

Here’s another old desk that I transformed into a fun and functional LEGO play station for a toddler.


If you’d like to find any of the items used in this project, we’d greatly appreciate it if you used our affiliate links. These links provide us with a small commission at no extra cost to you, allowing us to continue creating and sharing more inspiring projects. We’d also love to hear your thoughts—feel free to leave a comment or share this post!


60 Comments
Kristie
February 16, 2020 at 10:36 amVery nice, Anita! I can only marvel at your patience and skill in the completion of this beauty bar desk/table!
Anita Holland
February 16, 2020 at 11:51 pmThank you so much, It did turn out better than I hoped.
Deana Landers
July 13, 2021 at 12:55 amAnita, this is really nice. I love color you chose.
Anita Holland
July 14, 2021 at 2:50 pmThank you Deana.
Kate Holmes
February 17, 2020 at 2:27 pmHow very clever! I really love the paint colour too. #AnythingGoes
Anita Holland
February 17, 2020 at 11:19 pmThank you so much, I saw the colour on a Pinterest post and had to have it.
Jeanna
February 17, 2020 at 4:03 pmI don’t know if I’m more impressed by your project or that you have a jigsaw. Fantastic and creative idea and a beautiful job. I love the color, one that I have in the loft.
Anita Holland
February 17, 2020 at 11:18 pmThank you so much, if you are impressed by the jigsaw you will be blown away by my workshop. I have every tool and machine a woodworker would need, lol
Lydia C. Lee
February 17, 2020 at 8:37 pmThat’s great. Aren’t you skilled?!
Anita Holland
February 17, 2020 at 11:17 pmThank you so much.
Sherry
February 18, 2020 at 12:43 amWhat an amazing transformation!! I LOVE the color!!!!! Very nice!
Anita Holland
February 18, 2020 at 1:39 amThank you so much for the lovely comment. It was the colour I loved first then found a piece of furniture to go with it.
Esme Slabs
February 18, 2020 at 1:58 pmHi Anita, Welcome and thank you for sharing your post at #Senisal. So glad you found us and hope that you will now be a regular weekly participant. RT your post
Anita Holland
February 18, 2020 at 7:48 pmThank you, yes I will be back next week.
Su-sieee! Mac
February 19, 2020 at 3:53 amVery cool! And satisfying, no doubt, when you finished. You’ve got me motivated to build small basic planter boxes.
Anita Holland
February 20, 2020 at 11:21 amThank you so much for the kind comment, It feels great to be able to inspire others to try new projects.
Monika Ohson | TravelerInMe
February 19, 2020 at 7:50 pmBrilliant work Anita. Its good to recycle things as much as we can.
Anita Holland
February 20, 2020 at 11:27 amThank you so much, Monika, I have been building from recycled materials for years now it is a great way to keep my hobby cheap.
Marie
February 20, 2020 at 3:22 amAnita, this is such a clever repurpose! It’s like the desk was waiting to become a fabulous vanity! All those drawers make it a perfect piece of furniture to use as a makeup table. Love the color too! Pinned 🙂
Anita Holland
February 20, 2020 at 11:29 amThank you Marie, I saw the colour on Pinterest and had to have it. I just had to wait for the perfect piece of furniture to come along and this old desk was it. I have always been a hater of painted wood but I have now been converted. lol
Teresa
February 21, 2020 at 2:43 amGreat repurpose, I love the new color too. Thank you for sharing at The Really crafty Link Party. Pinned.
Anita Holland
February 21, 2020 at 1:23 pmThank you so much, I do believe the colour makes the table.
Michelle
February 21, 2020 at 7:26 pmWhat a cool idea and an amazing makeover!
Michelle
http://mybijoulifeonline.com
Anita Holland
February 23, 2020 at 1:07 pmThank you so much, Michelle.
Julie Briones
February 22, 2020 at 9:52 amSuch a super smart and pretty idea to convert a desk into a makeup vanity! Thanks for sharing at Tuesday Turn About!
Anita Holland
February 23, 2020 at 1:09 pmThank you so much, beauty bars are very popular here in Australia.
Julie
February 23, 2020 at 12:03 amYou really do put so much effort into your furniture renovations and the hard work really pays off. The results are just beautiful. I love your attention to detail.
Anita Holland
February 23, 2020 at 1:13 pmThank you so much Julie, I love to try and make and old piece of furniture great again. I get such a thrill doing it. lol
Anita Holland
February 23, 2020 at 1:10 pmThank you so much for the shout out.
Cecilia
February 24, 2020 at 8:44 amThis is lovely, Anita–great color! Thanks for sharing at Vintage Charm!
Anita Holland
February 25, 2020 at 2:38 pmThank you so much and great party.
Ann
February 24, 2020 at 11:26 amI love how you repurposed this old desk, Anita. You are being featured on my blog Tuesday evening. Thank you for sharing at Party In Your PJ’s!
Anita Holland
February 25, 2020 at 2:39 pmThank you so much for the lovely comment and for the feature. I really appreciate it.
Dee | Grammy's Grid
February 25, 2020 at 1:54 amLooks great, nice job!! Thanks so much for linking up with me at my #UnlimitedMonthlyLinkParty 9, open February 1 to 26, shared. My themed party 11 for Handcrafted Jewelry is open February 15 to 25 if you have any appropriate posts.
Anita Holland
February 25, 2020 at 2:41 pmThank you Dee, I must confess I always assume the parties are all anything goes. I will have to check that in the future.
Melissa
February 25, 2020 at 12:13 pmWhat an amazing job! Truly a beautiful piece! Thanks so much for sharing with us at Farm Fresh Tuesdays! You are one of my features this week at Little Frugal Homestead! Stop by to see your feature and say Hi! Congrats!
Melissa | Little Frugal Homestead
Anita Holland
February 25, 2020 at 2:44 pmThank you so much Melissa for the feature I will be sure to pop by next week with another of my projects.
Anita Holland
February 25, 2020 at 2:45 pmThank you so much for the great feature.
Mayor Sonni (@Readeropolis)
February 27, 2020 at 5:51 amWow – awesome makeover! It gave me some ideas for fixing up an old side table. It’s good to recycle things when you can. Dropping by from Traffic Jam Weekend #222.
Anita Holland
February 27, 2020 at 11:52 amThank you so much, Happy I could give you some inspiration.
Marilyn Lesniak
February 27, 2020 at 11:30 amSorry I am late! I have been running behind this making memories! Thank you for sharing at #OverTheMoon. Pinned and shared. Have a lovely week. I hope to see you at next week’s party too! Come party with us at Over The Moon! Catapult your content Over The Moon! @marilyn_lesniak @EclecticRedBarn
Anita Holland
February 27, 2020 at 11:51 amThank you so much Marilyn, I will be back next week.
Anita Holland
March 3, 2020 at 11:16 amThank you so much for the great feature on my makeup table.
Anita Holland
March 3, 2020 at 11:20 amThank you so much for the great comment and the feature on my mirror.
Anita Holland
March 5, 2020 at 4:19 pmThank you so much, I saw that colour on Pinterest and just had to have that colour. Beauty bars are very popular here now that women have become make-up crazy. Mine still fits in my one wash bag.lol
Christina Woodcock
March 18, 2020 at 8:30 amAnita this is gorgeous your hard work
payed off! 💙
Anita Holland
March 21, 2020 at 11:36 amThank you so much Christina, it does feel great when you get a good end result.
Anita Holland
April 20, 2020 at 1:41 pmThank you so much for the lovely comments and for the great feature.
15 Bedroom and Bathroom Makeup Storage Tips You'll Love • Organizenvy
March 10, 2021 at 7:06 am[…] you’re a handy DIY type, check out this upcycled makeup vanity project from Unique Creations By […]
Pam
July 12, 2021 at 9:32 pmThat’s a great idea! And love that color!!!
maria
July 12, 2021 at 9:50 pmWhat a pretty upcycle. You really did a beautiful job. I love that kids desk too I see.
Anita Holland
July 14, 2021 at 2:48 pmThank you so much, Maria, the kid’s desk was a huge hit with my great-niece.
Rosemary Palmer
July 12, 2021 at 10:18 pmWhat a great find, and makeover. Everything – hardware, color and how it will be used – just perfect.
Anita Holland
July 14, 2021 at 2:49 pmThank you, the colour was something I saw and had to try, I just had to wait for a piece of furniture.
Sara
July 12, 2021 at 10:25 pmBeautiful transformation! You are a woman of many talents!!
Anita Holland
July 14, 2021 at 2:50 pmThank you Sara, for your comments always make my day.
Cat Michaels
July 13, 2021 at 1:12 amAnita, they just don’t make furniture they way they used to. Love repurposing old stuff instead of tossing it, and you have the knack! Your little sand play station is too cute!
Anita Holland
July 14, 2021 at 2:51 pmThanks Cat, I love the challenge of creating something new.
Meegan
July 13, 2021 at 1:52 pmI just love how you added so many details to make this a one-of-a-kind piece. It’s so lovely in blue! You are very talented for having a vision for making something out of nothing.
Anita Holland
July 14, 2021 at 2:51 pmThank you Meegan, I get these ideas in my head and sometimes they pay off like this project.