")
When my daughter moved into her new home on a tight budget, she needed furniture for four bedrooms, and new pieces weren’t an option. That’s why transforming an old headboard with a DIY geometric design became the perfect solution. In just one day, I turned a discarded four-poster bed headboard into a modern masterpiece that instantly elevated her master bedroom’s style and saved us hundreds of dollars.
I shot this photo outdoors to capture the headboard’s true colours—bedroom lighting simply didn’t do them justice.

Before we dive into this tutorial, be sure to subscribe to my bimonthly newsletter to be the first to see my latest projects. You can also follow me on Pinterest and Facebook, where I also include my unique mixed-media art projects

How to give a headboard a geometric makeover
**This post may contain affiliate links. This means I earn a small commission on links used at no extra cost to you. Please see my disclosure policy for more information.**
Materials Needed
- Old headboard frame (I used a free four-poster bed headboard)
- Handsaw
- Orbital sander with 120–220-grit sandpaper
- Wood filler and gap filler
- Plywood offcut for large holes
- White primer
- White chalk paint
- Chalk paint in two shades of grey
- Painter’s tape
- 5-inch mini paint roller and tray
- Paintbrush for edges
- Water-based polyurethane sealant
- Cleaning cloths
- Dust mask and gloves
Prepare the Headboard
First, cut the posts to the desired height with a handsaw and smooth the ends using your orbital sander. Wipe away dust and apply a coat of white primer.

I quickly realised I hadn’t filled the nail and screw holes—so I overfilled them with wood filler (to allow for any shrinkage), let it dry, then sanded flat.

For larger gaps where the side rails had been, I inserted a plywood patch and filled the edges with gap filler to create a flush surface.

Apply the Base Coat
Once the filler was dry, sand again lightly and clean all surfaces. Chalk paint works wonders for hiding imperfections and dries swiftly, so I applied two generous coats of white chalk paint to the entire headboard. Let each coat dry fully before adding the next to ensure a crisp finish.

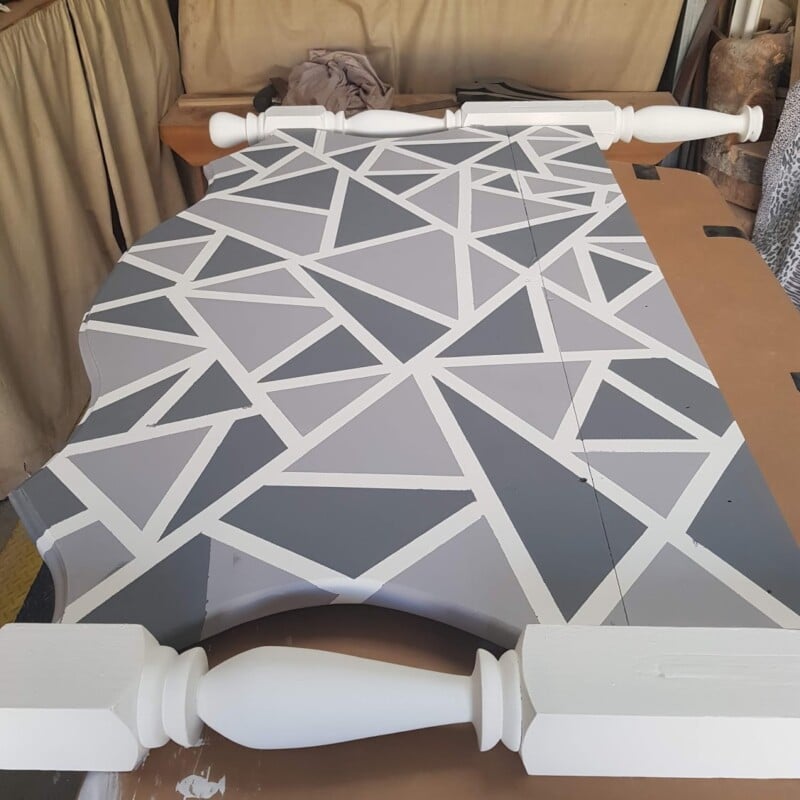
Tape Your Geometric Pattern
Without detailed plans, I simply used painter’s tape to create straight-ish lines and random shapes across the headboard face. For extra interest, I sometimes nested smaller shapes within larger ones. This free-form approach kept the design dynamic and eliminated the need for measuring or templates.

Paint the Shapes
I used leftover chalk paint in two shades of grey from the barn-quilt headboard I made for the master bedroom. Then rolled each shape in turn with a small paint roller. I started with the lighter grey, let it dry, then switched to the darker shade—this prevented roller-transfer smudges.

I left the outer frame pure white to create a clean, modern border around the geometric pattern.

Seal and Finish
After the paint cured, gently peel off all tape. If you notice any paint bleeding beneath the tape, gently touch up those spots with a small paintbrush. To protect your work and add durability, brush on two coats of water-based polyurethane, sanding lightly between coats if desired. Once fully dry, reinstall the headboard—it now looks like a custom designer piece, yet costs only a few dollars in paint and filler.
Budget and Time
This project takes about one afternoon from start to finish and costs under AUD 30 in supplies (assuming you already own basic tools). Chalk paint, filler and sealant are readily available at hardware stores and home-improvement centres.

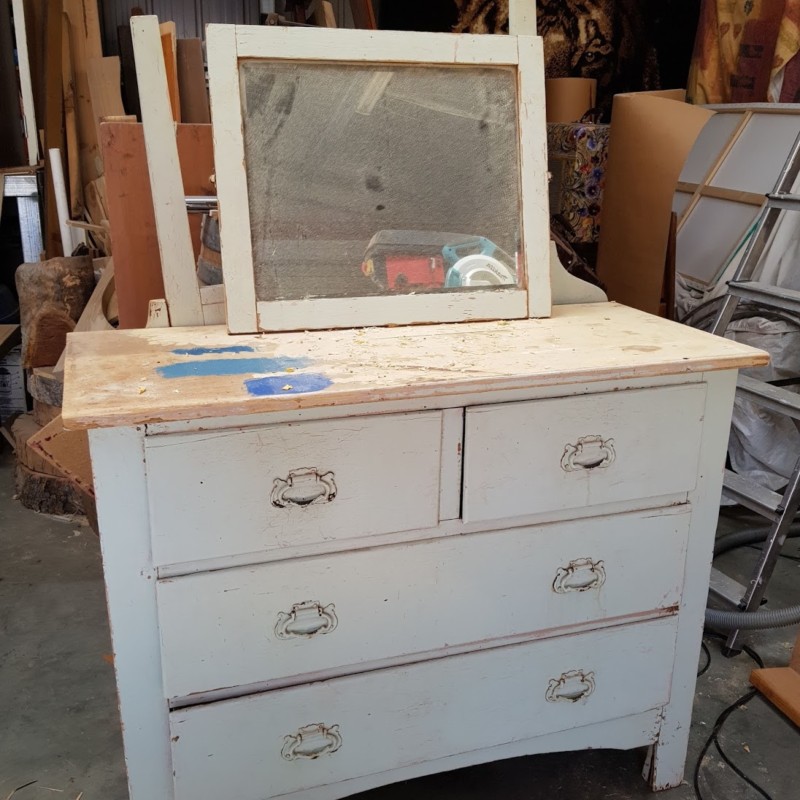
My daughter was so delighted with the headboard makeover that she rescued a vintage dresser destined for the tip and asked me to restore it for her bedroom.
More headboard inspiration
If you’re after more headboard inspiration, take a look at my tutorial where I transformed old kitchen cupboard doors and scrap wood into a stylish DIY headboard.


If you’re interested in any of the items used in this project, we’d appreciate it if you used our affiliate links. Clicking these links earns us a small commission at no extra cost to you, helping us create more inspiring and exciting projects to share. We’d also love to hear your thoughts—feel free to leave a comment or share this post!

32 Comments
Michelle Leslie
January 14, 2020 at 3:09 pmHow I wish we stayed closer, Anita. Darn it why did you have to move halfway across the world 😉 I love how creative and unique you are. You always surprise me. Love how this headboard turned out
Dee | Grammy's Grid
January 14, 2020 at 10:31 pmThat turned out nice!! Thanks so much for linking up with me at the #UnlimitedMonthlyLinkParty 8. Pinned.
Anita Holland
January 15, 2020 at 12:50 amThank you so much DEE 🙂
Allyson
January 14, 2020 at 10:59 pmWhat a unique headboard you created! It looks good in the bedroom. I really like the barn quilt headboard, also. I’m visiting from You’re the Star ~ Stone Cottage Adventures. If you’re interested, I shared a Winter painted craft #120. 🙂
Anita Holland
January 15, 2020 at 12:50 amThank you so much for the lovely comment. I will pop over and see your project.
Kippi
January 16, 2020 at 3:35 pmSuper groovy headboard idea. I am going to try out that way of painting.
Happy New Year!
Hugs,
Kippi
Anita Holland
January 18, 2020 at 7:19 amThank you so much.
Grandma's House DIY
January 16, 2020 at 5:29 pmThanks so much for sharing with us at the To Grandma’s house we go link party! I’ll be featuring you next week on Instagram, Facebook and on my blog!
Anita Holland
January 18, 2020 at 8:58 amThank you so much for the comments and the feature. 😍
Teresa
January 16, 2020 at 5:45 pmThat’s just amazing! Thank you for sharing at The Really Crafty Link Party. Pinned.
Catscue Catmom
January 17, 2020 at 3:40 pmWhat a creative idea, and it looks like an amateur like me could do it – thanks!
Anita Holland
January 18, 2020 at 5:20 amThank you, and I am very sure anyone with even basic DIY skills could do it.
Ann
January 19, 2020 at 12:45 amVery creative. Thank you for sharing at Party In Your PJ’s!
Anita Holland
January 19, 2020 at 6:54 amThank you so much😁
Antionette Blake
January 20, 2020 at 8:34 pmWow, what a great idea to create a personalized headboard whether you have limited funds or not. #trafficjamweekend
Anita Holland
January 21, 2020 at 2:22 pmThank you so much. 😁
lisa lombardo
January 21, 2020 at 1:00 amVery cool! Love it! Thanks so much for sharing this on Farm Fresh Tuesdays, Anita!
Anita Holland
January 21, 2020 at 2:24 pmThank you so much😁
Cecilia
January 21, 2020 at 2:00 amWhat a great tutorial! Thanks for sharing at Vintage Charm!
Anita Holland
January 21, 2020 at 2:25 pmThank you so much, very kind of you to say. 😍
Bhawna
February 3, 2020 at 4:52 amWow! .. what a great fixer upper. I literally threw our old bed out today in the garage so we can buy something new and contemporary. I think I need to show this to my husband. If he helps me we can save some serious money here <3 Thank you sooo much!
Anita Holland
February 4, 2020 at 1:40 amThank you so much, why waste all that money when you can give it a cheap makeover and it will look new and modern.
Deana Landers
January 5, 2021 at 12:37 amWhat a great idea, Anita! I love the headboard. It looks very stylish and retro.
Anita Holland
January 7, 2021 at 1:43 pmThank you so much Deana, It turned out better than I hoped.
Maria
January 5, 2021 at 1:10 amvery pretty design love it for decorating my guest room.
Anita Holland
January 7, 2021 at 1:44 pmThank you so much Maria.
Kim Purvis
January 5, 2021 at 10:57 amI love it! The colors are really good together. What a unique piece. Pinned
Anita Holland
January 7, 2021 at 1:45 pmThank you so much kim.
Susan
January 5, 2021 at 12:42 pmI have boys – this is a fun way to make headboards they would like! This looks like a fun project we can do togethr.
Anita Holland
January 7, 2021 at 1:45 pmThank you, I think it would suit any room really because of the colours.
Meegan
January 11, 2021 at 4:21 pmAnita, This is absolutely incredible. I never would have thought of using a geometric pattern with this style, but it works perfectly. Especially with the various shades of paint. Very impressive, my friend!
Anita Holland
January 12, 2021 at 5:14 pmThank you Meegan, I never gave the style a thought I just wanted I pretty headboard. lol