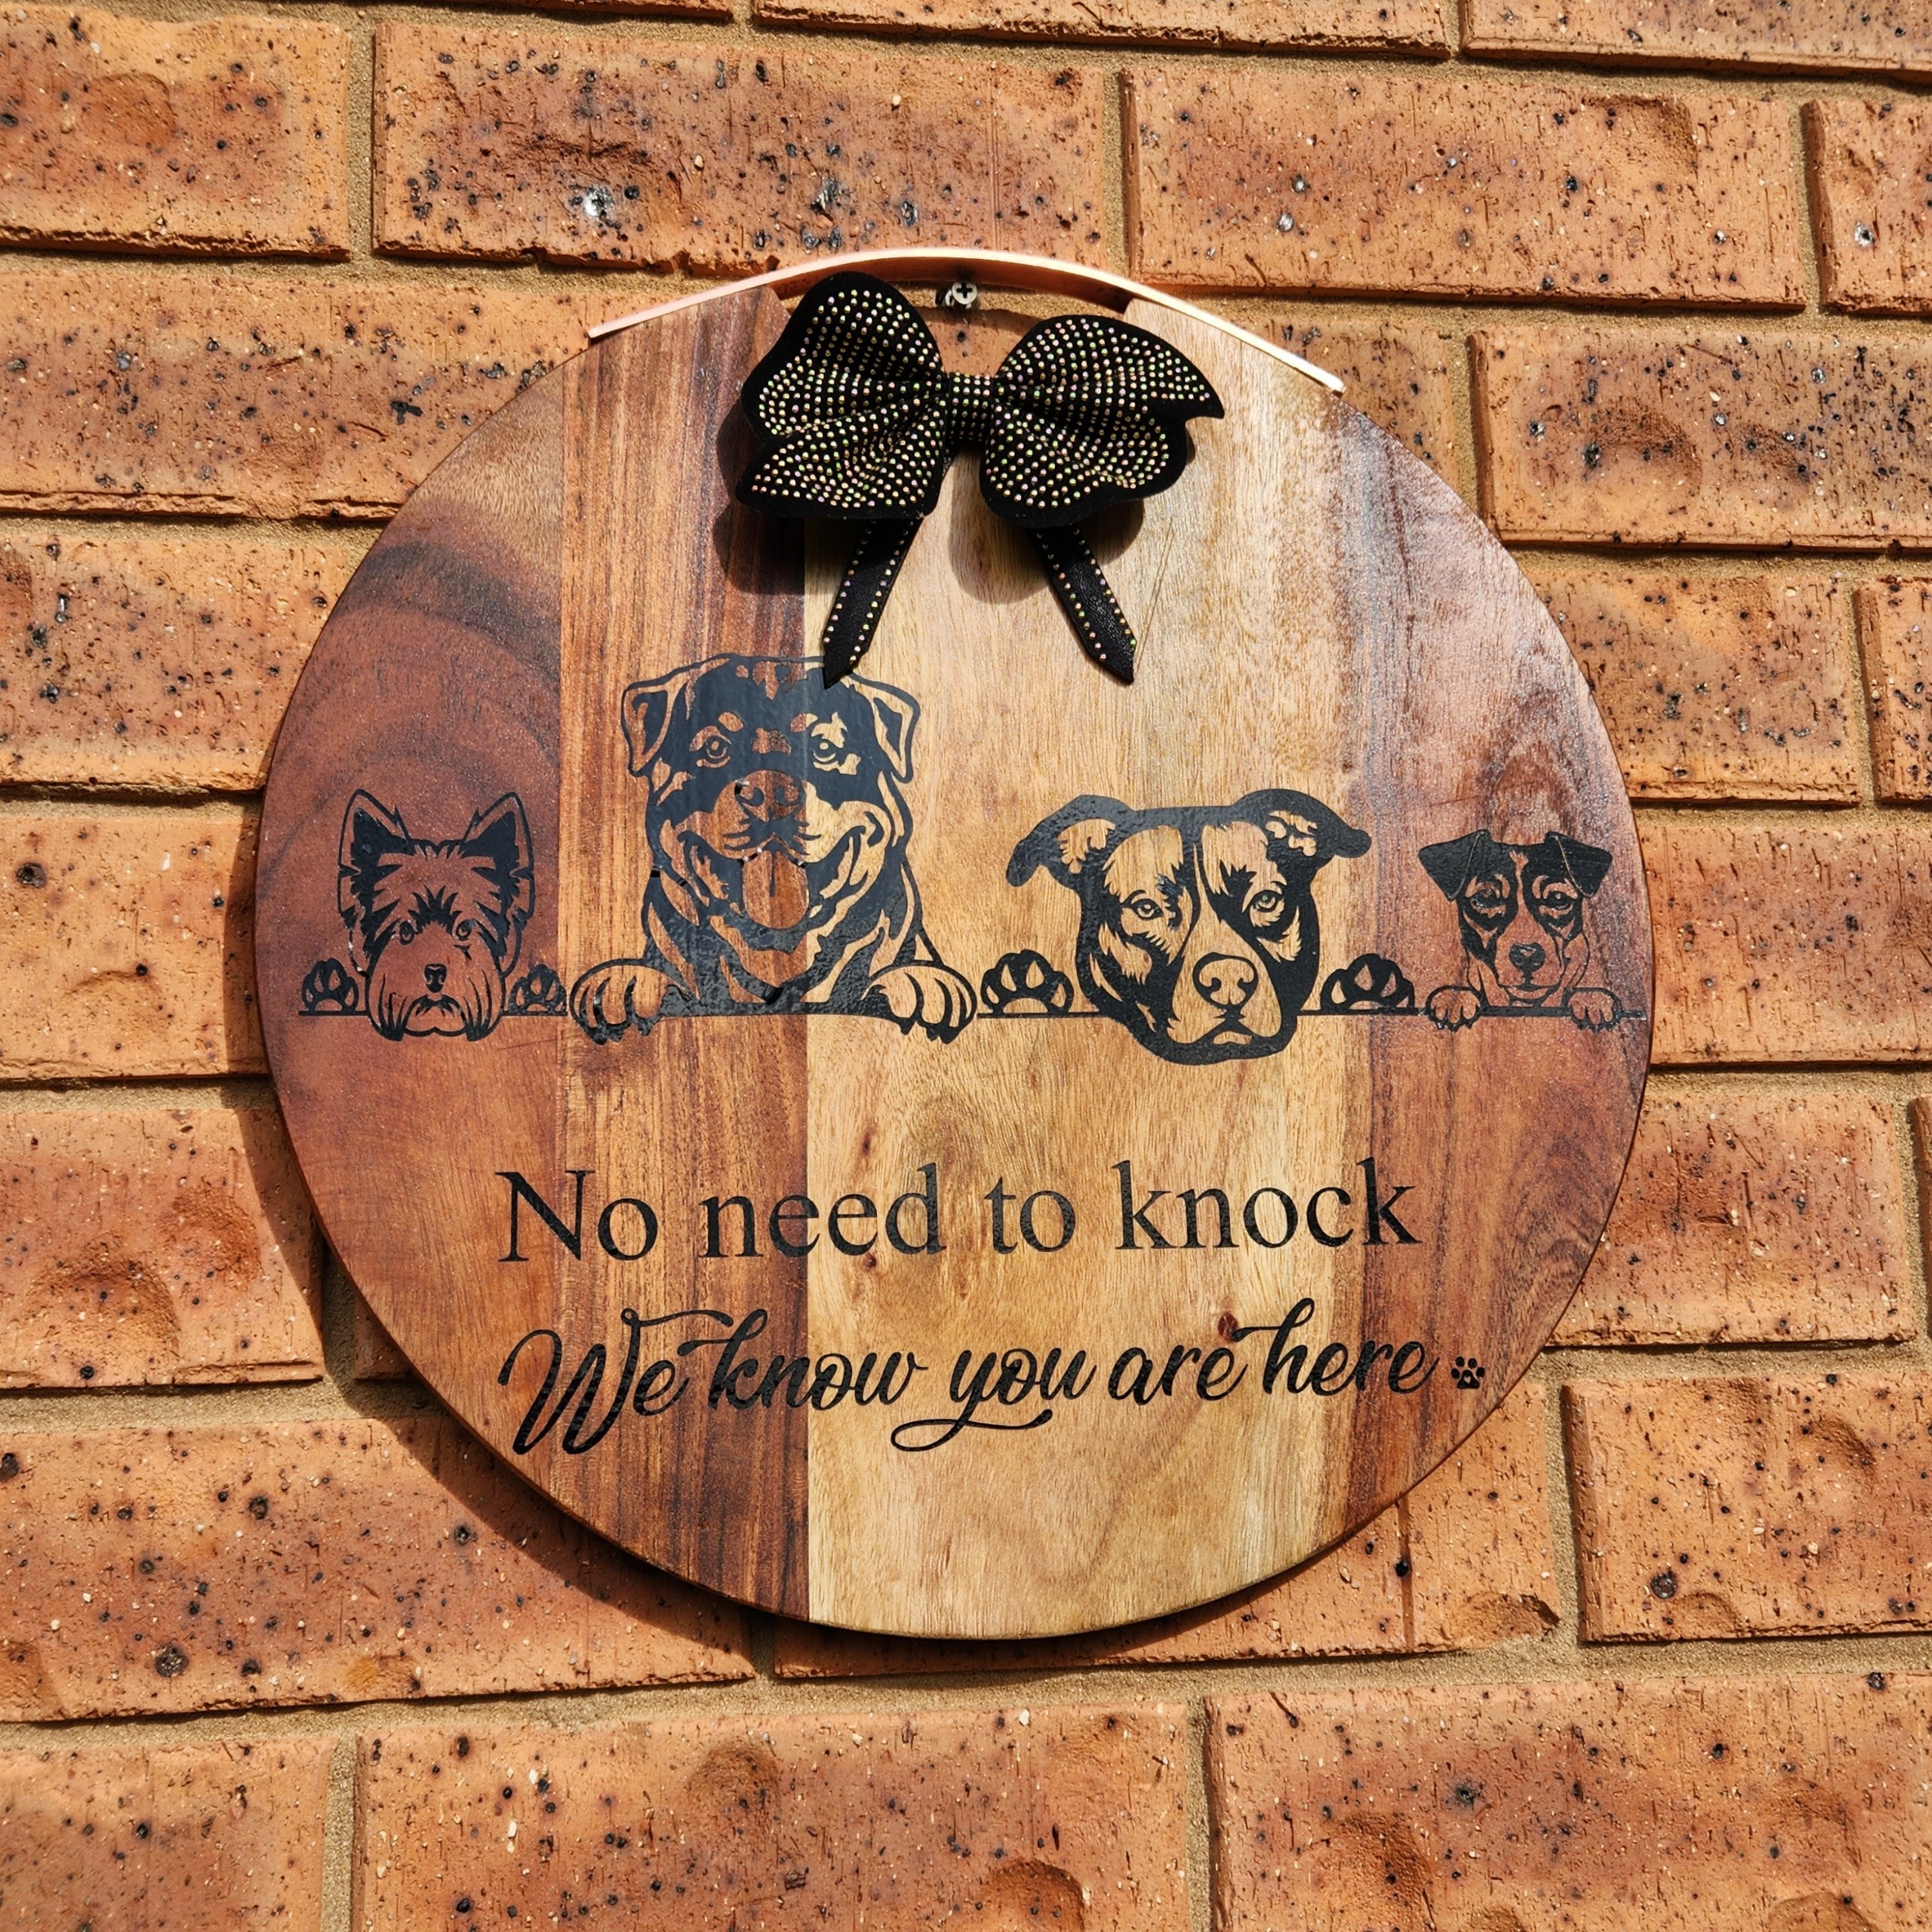
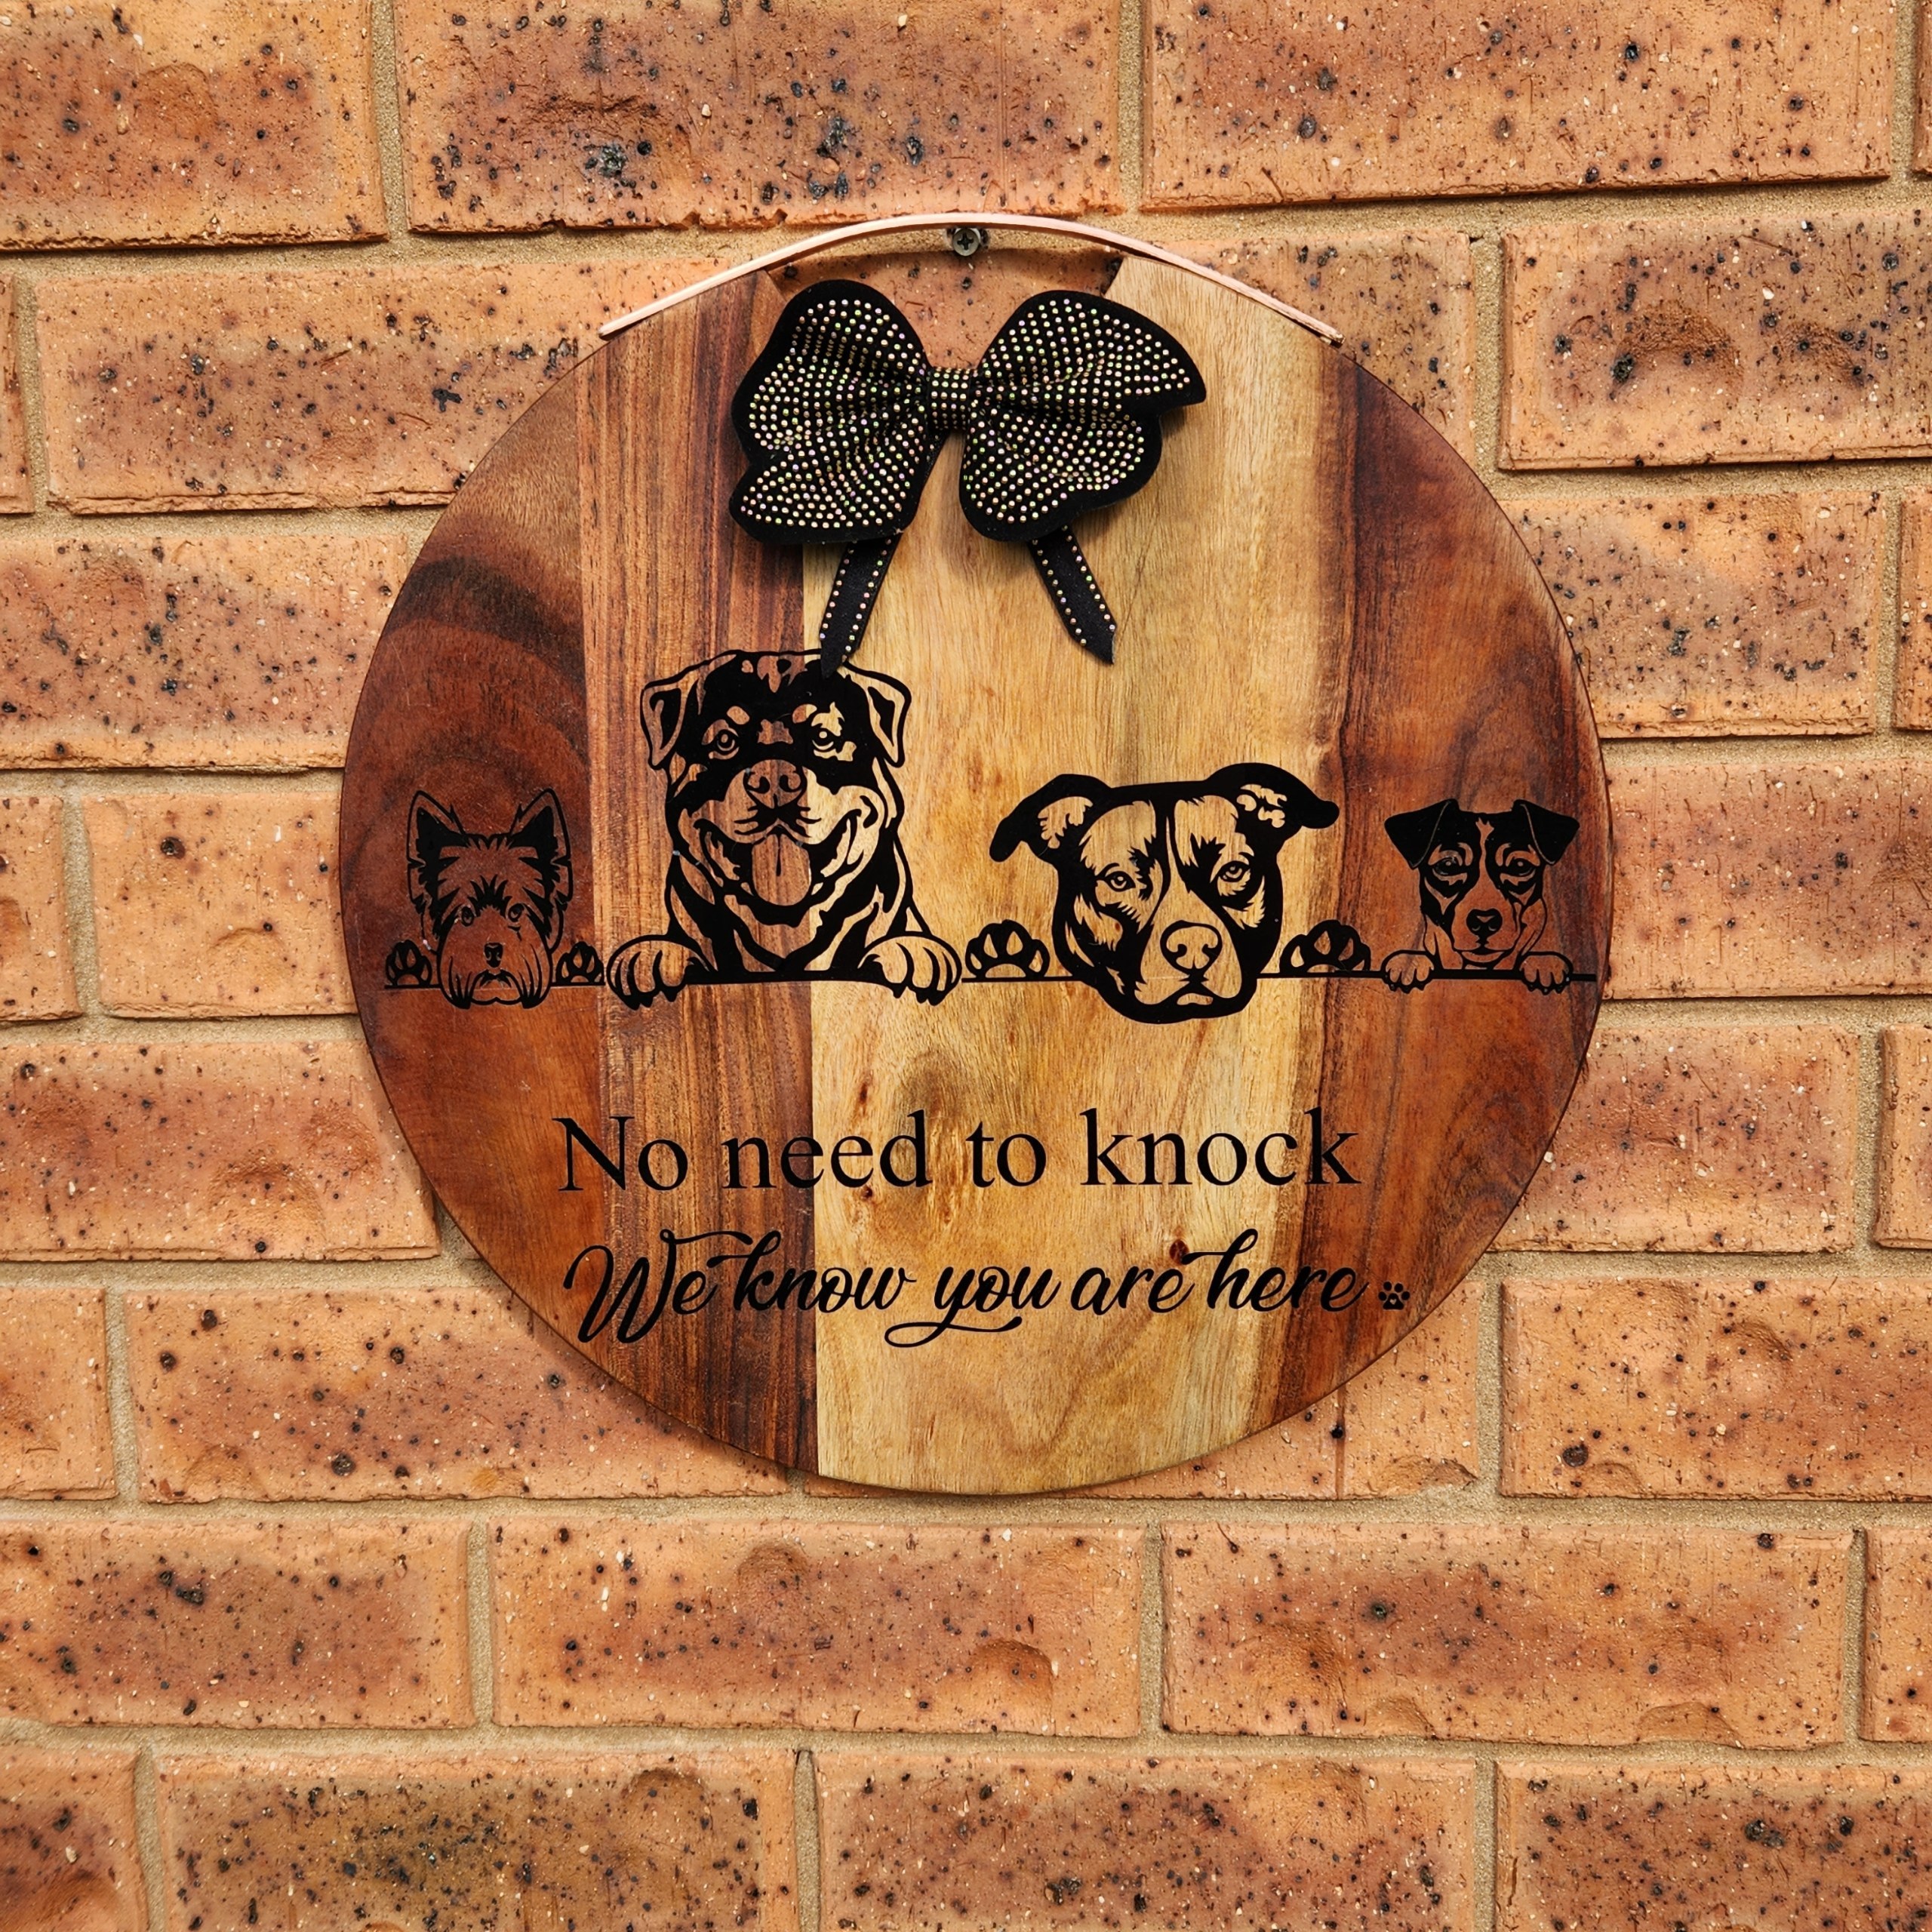
This week’s project was a special request from my daughter, who asked me to make a porch welcome sign for her front door. As a passionate dog lover and owner of four very excitable pups, she wanted something that reflected her furry family. I decided to create a custom porch sign with a silhouette for each of her dog breeds, using my Cricut vinyl cutting machine.
Aside from being decorative, this personalised welcome sign may also work as a deterrent for would-be thieves, though in reality, these dogs are far more likely to lick visitors to death than scare them away!
This project also ties perfectly into the ‘Do It Over’ Designers Blog Hop, where a group of talented bloggers share their latest recycled, upcycled, or DIY creations. You’ll find links to their inspiring projects at the end of this post.
DIY Porch Welcome Sign with Dog Silhouettes – Perfect for Pet Lovers
*This post may contain affiliate links. This means I earn a small commission on links used at no extra cost to you. Please see my disclosure policy for more information.**
Materials Needed
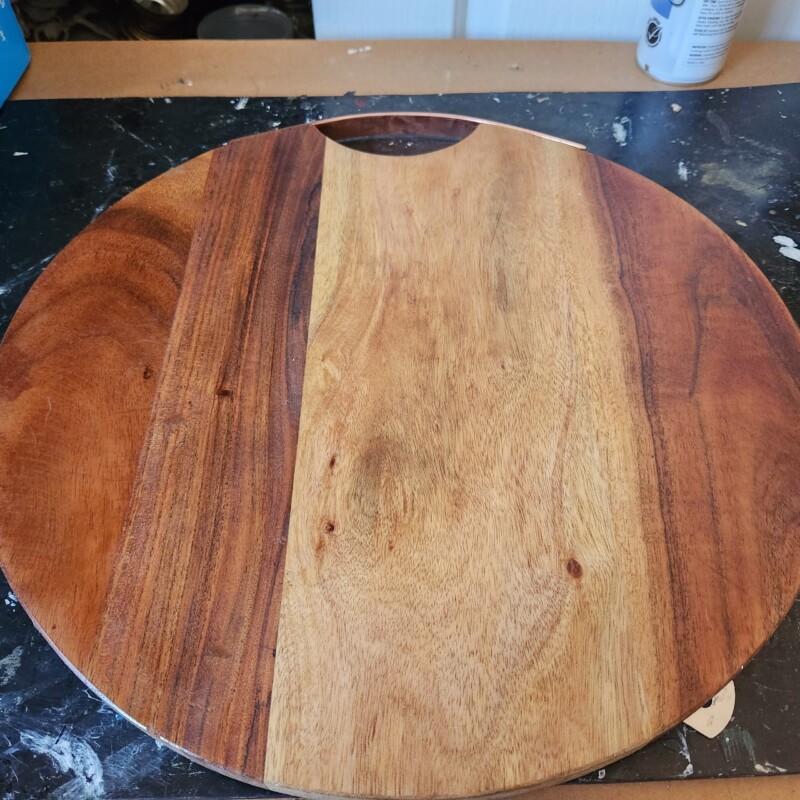
- Wooden board or upcycled wooden surface (I used an old cheese board from a charity shop)
- Sandpaper
- Clear polyurethane sealer
- Cricut or Silhouette vinyl cutting machine (I used a Cricut Explore Air 2)
- SVG dog silhouette images (purchased from Etsy)
- Outdoor permanent vinyl (I recommend Oracle 651)
- Transfer film
- Brayer or scraper tool
- Weeding tools or a craft knife
- Bow or embellishments (mine was made from a recycled belt)
- Strong craft glue
Preparing the Wooden Board
I found my board at a charity shop for just $3. It had a few surface marks, so I sanded it until smooth. I prefer sealing my wood surfaces with clear polyurethane before applying vinyl—this helps the vinyl last longer outdoors and prevents lifting. Any smooth wooden surface will work, so don’t be afraid to upcycle an old cutting board, plank, or scrap timber.
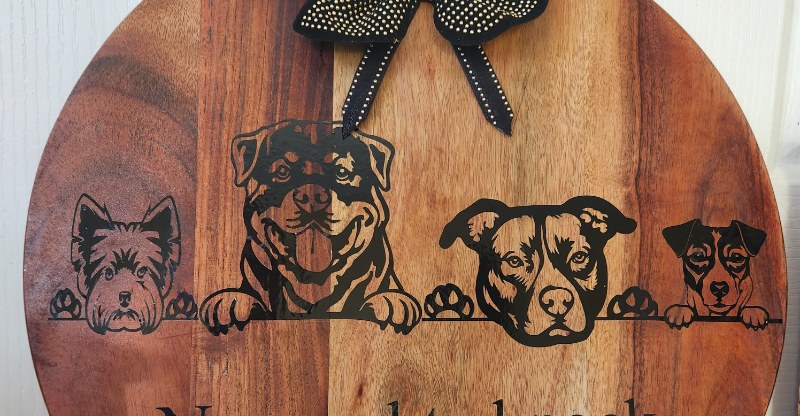
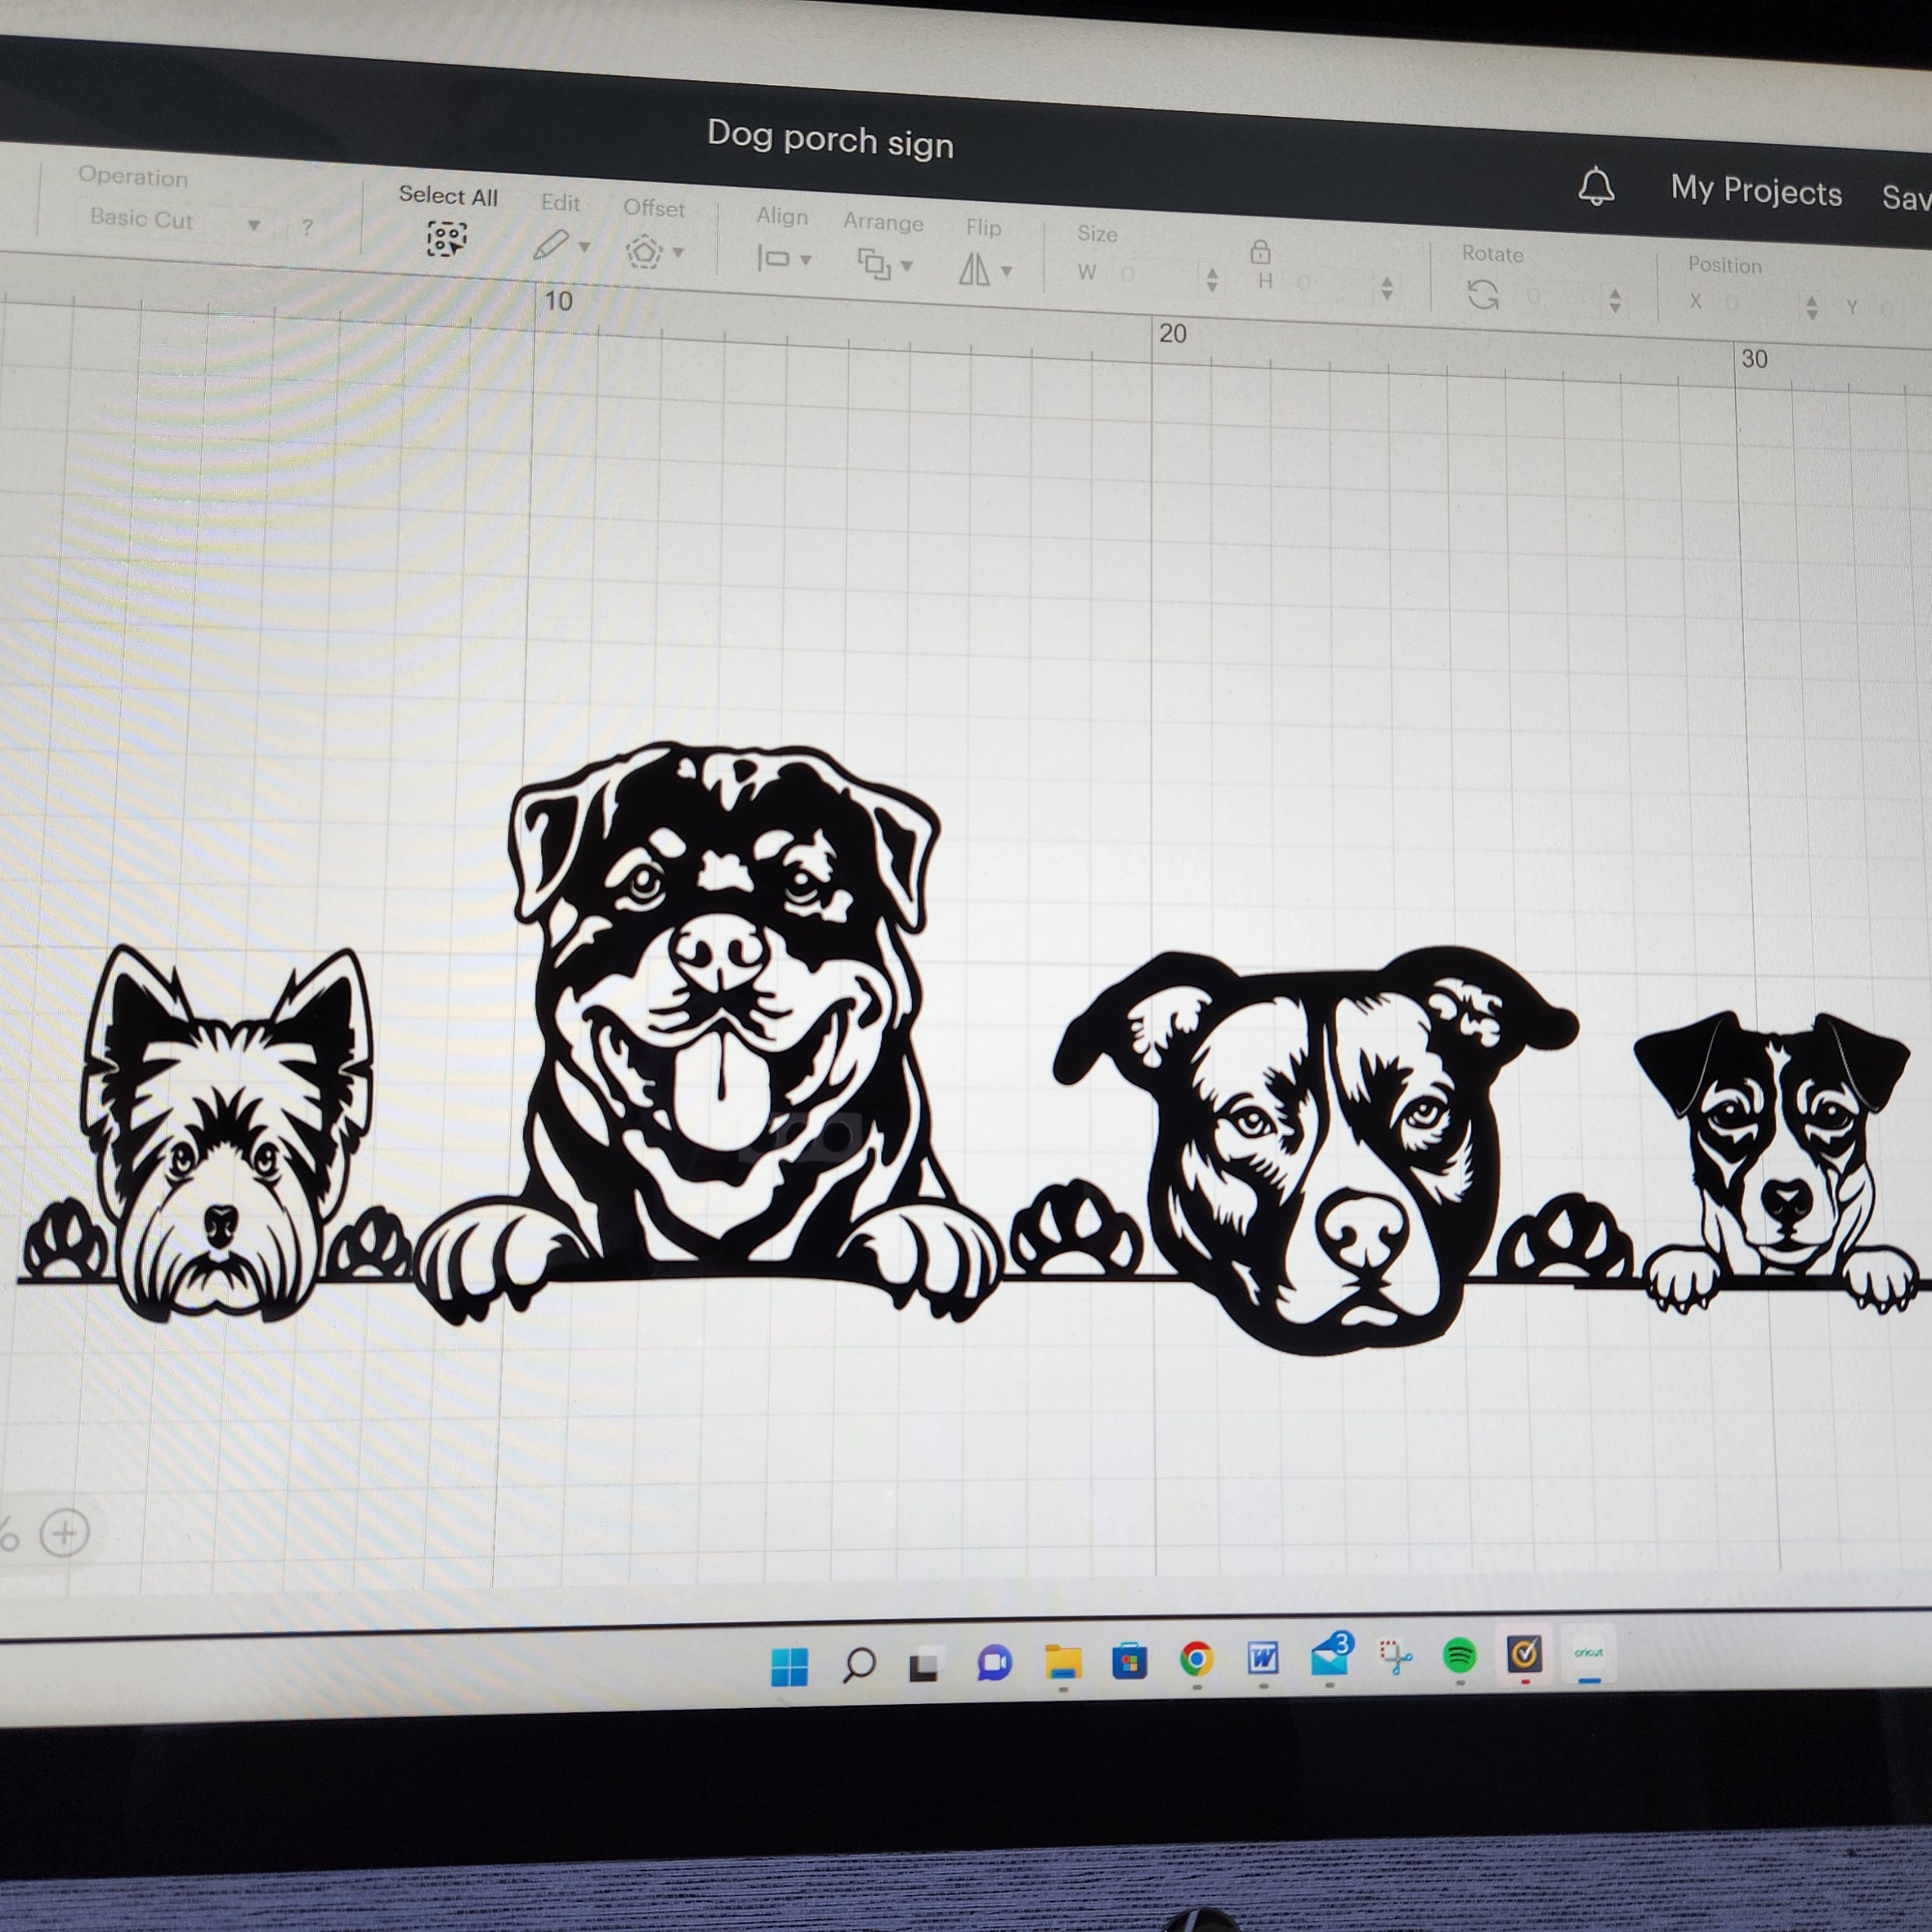
Choosing the Dog Silhouettes
For this project, I purchased a dog breed SVG bundle from Etsy, which included 100 silhouette images for under $10. Silhouettes work best for porch signs because they’re bold and easy to see from a distance. If you’re tech-savvy, you can create your own silhouettes from photos.
Tip: Always ensure the files you purchase are in SVG format to ensure they work correctly with your cutting machine.
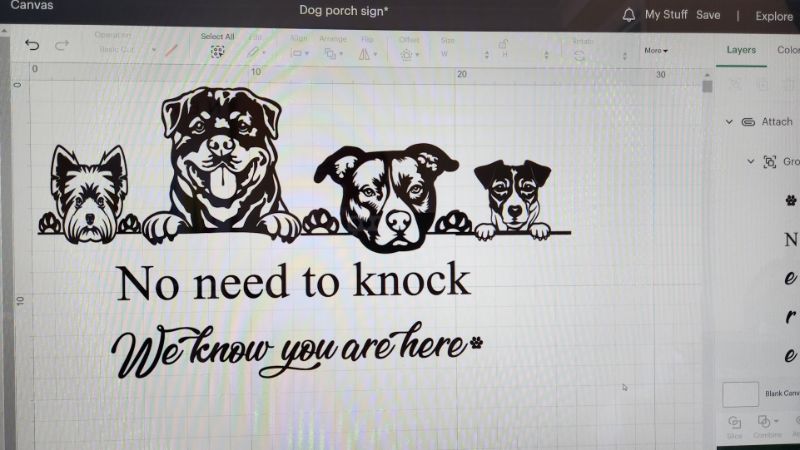
Designing in Cricut Design Space
Design Space is the software that comes with the Cricut machine. It is very simple to use once you get the hang of it.
Open Cricut Design Space and start a new project.
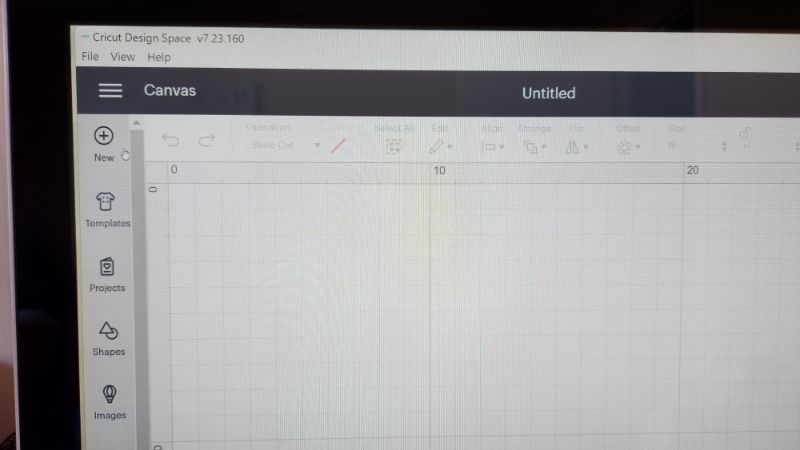
Next, select upload and find the images you are using in your design and add them to the design space.
Move your images around until you are satisfied with the layout.
Select a text box and enter your wording. You can choose your preferred font from the options at the top of the page. If you’re using a script font, make sure to select all the text and weld it together. Without welding, the Cricut will cut each letter individually instead of as one continuous word. You’ll find the weld button on the right-hand side of the screen under the “Combine” tab.
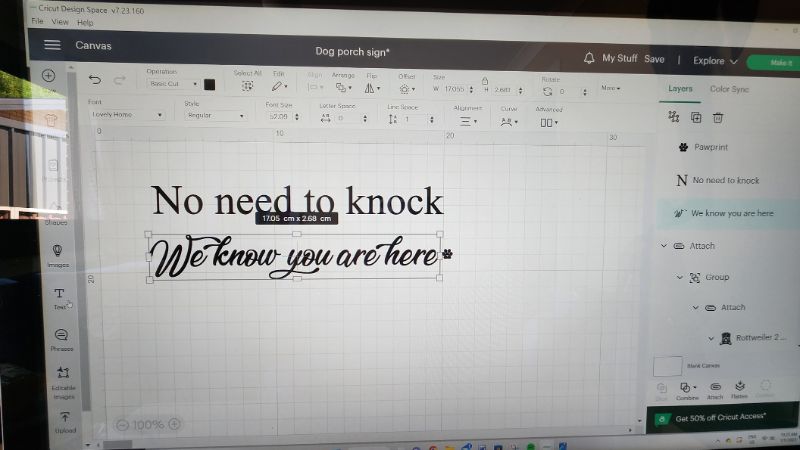
Select the text and group it by clicking the group button on the right-hand side. If you don’t group your text, the Cricut will rearrange it to save vinyl. For example, the text “No need to knock” in my design was grouped, while the other text was not. The same thing happens with images—the machine will move them around to fill the vinyl space. While this does save material, I find it makes the project take twice as long to complete.
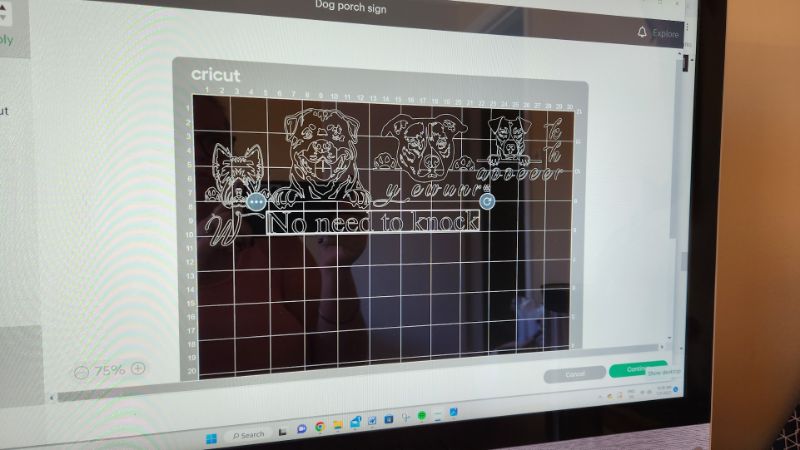
Once you’re satisfied with the layout, click “Select All” at the top of the screen, then choose “Attach” in the bottom right-hand corner. This locks your design in the exact arrangement you see on the screen. I forgot to do this with the dog silhouettes, but they were easy enough to realign—text, however, would have been a nightmare to fix. When everything is ready, click the “Make It” button at the top of the screen.
Cutting the vinyl
For all outdoor projects, I use Oracle 651 vinyl, as it’s a durable, permanent outdoor vinyl. Place the vinyl onto the Cricut mat with the vinyl side facing up. Set the machine’s dial to the “Vinyl” setting, load the mat, and press the ‘C’ button to begin cutting.
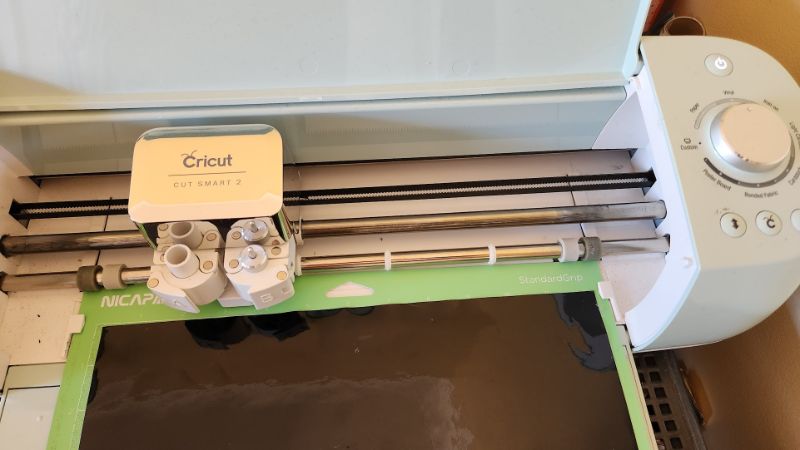
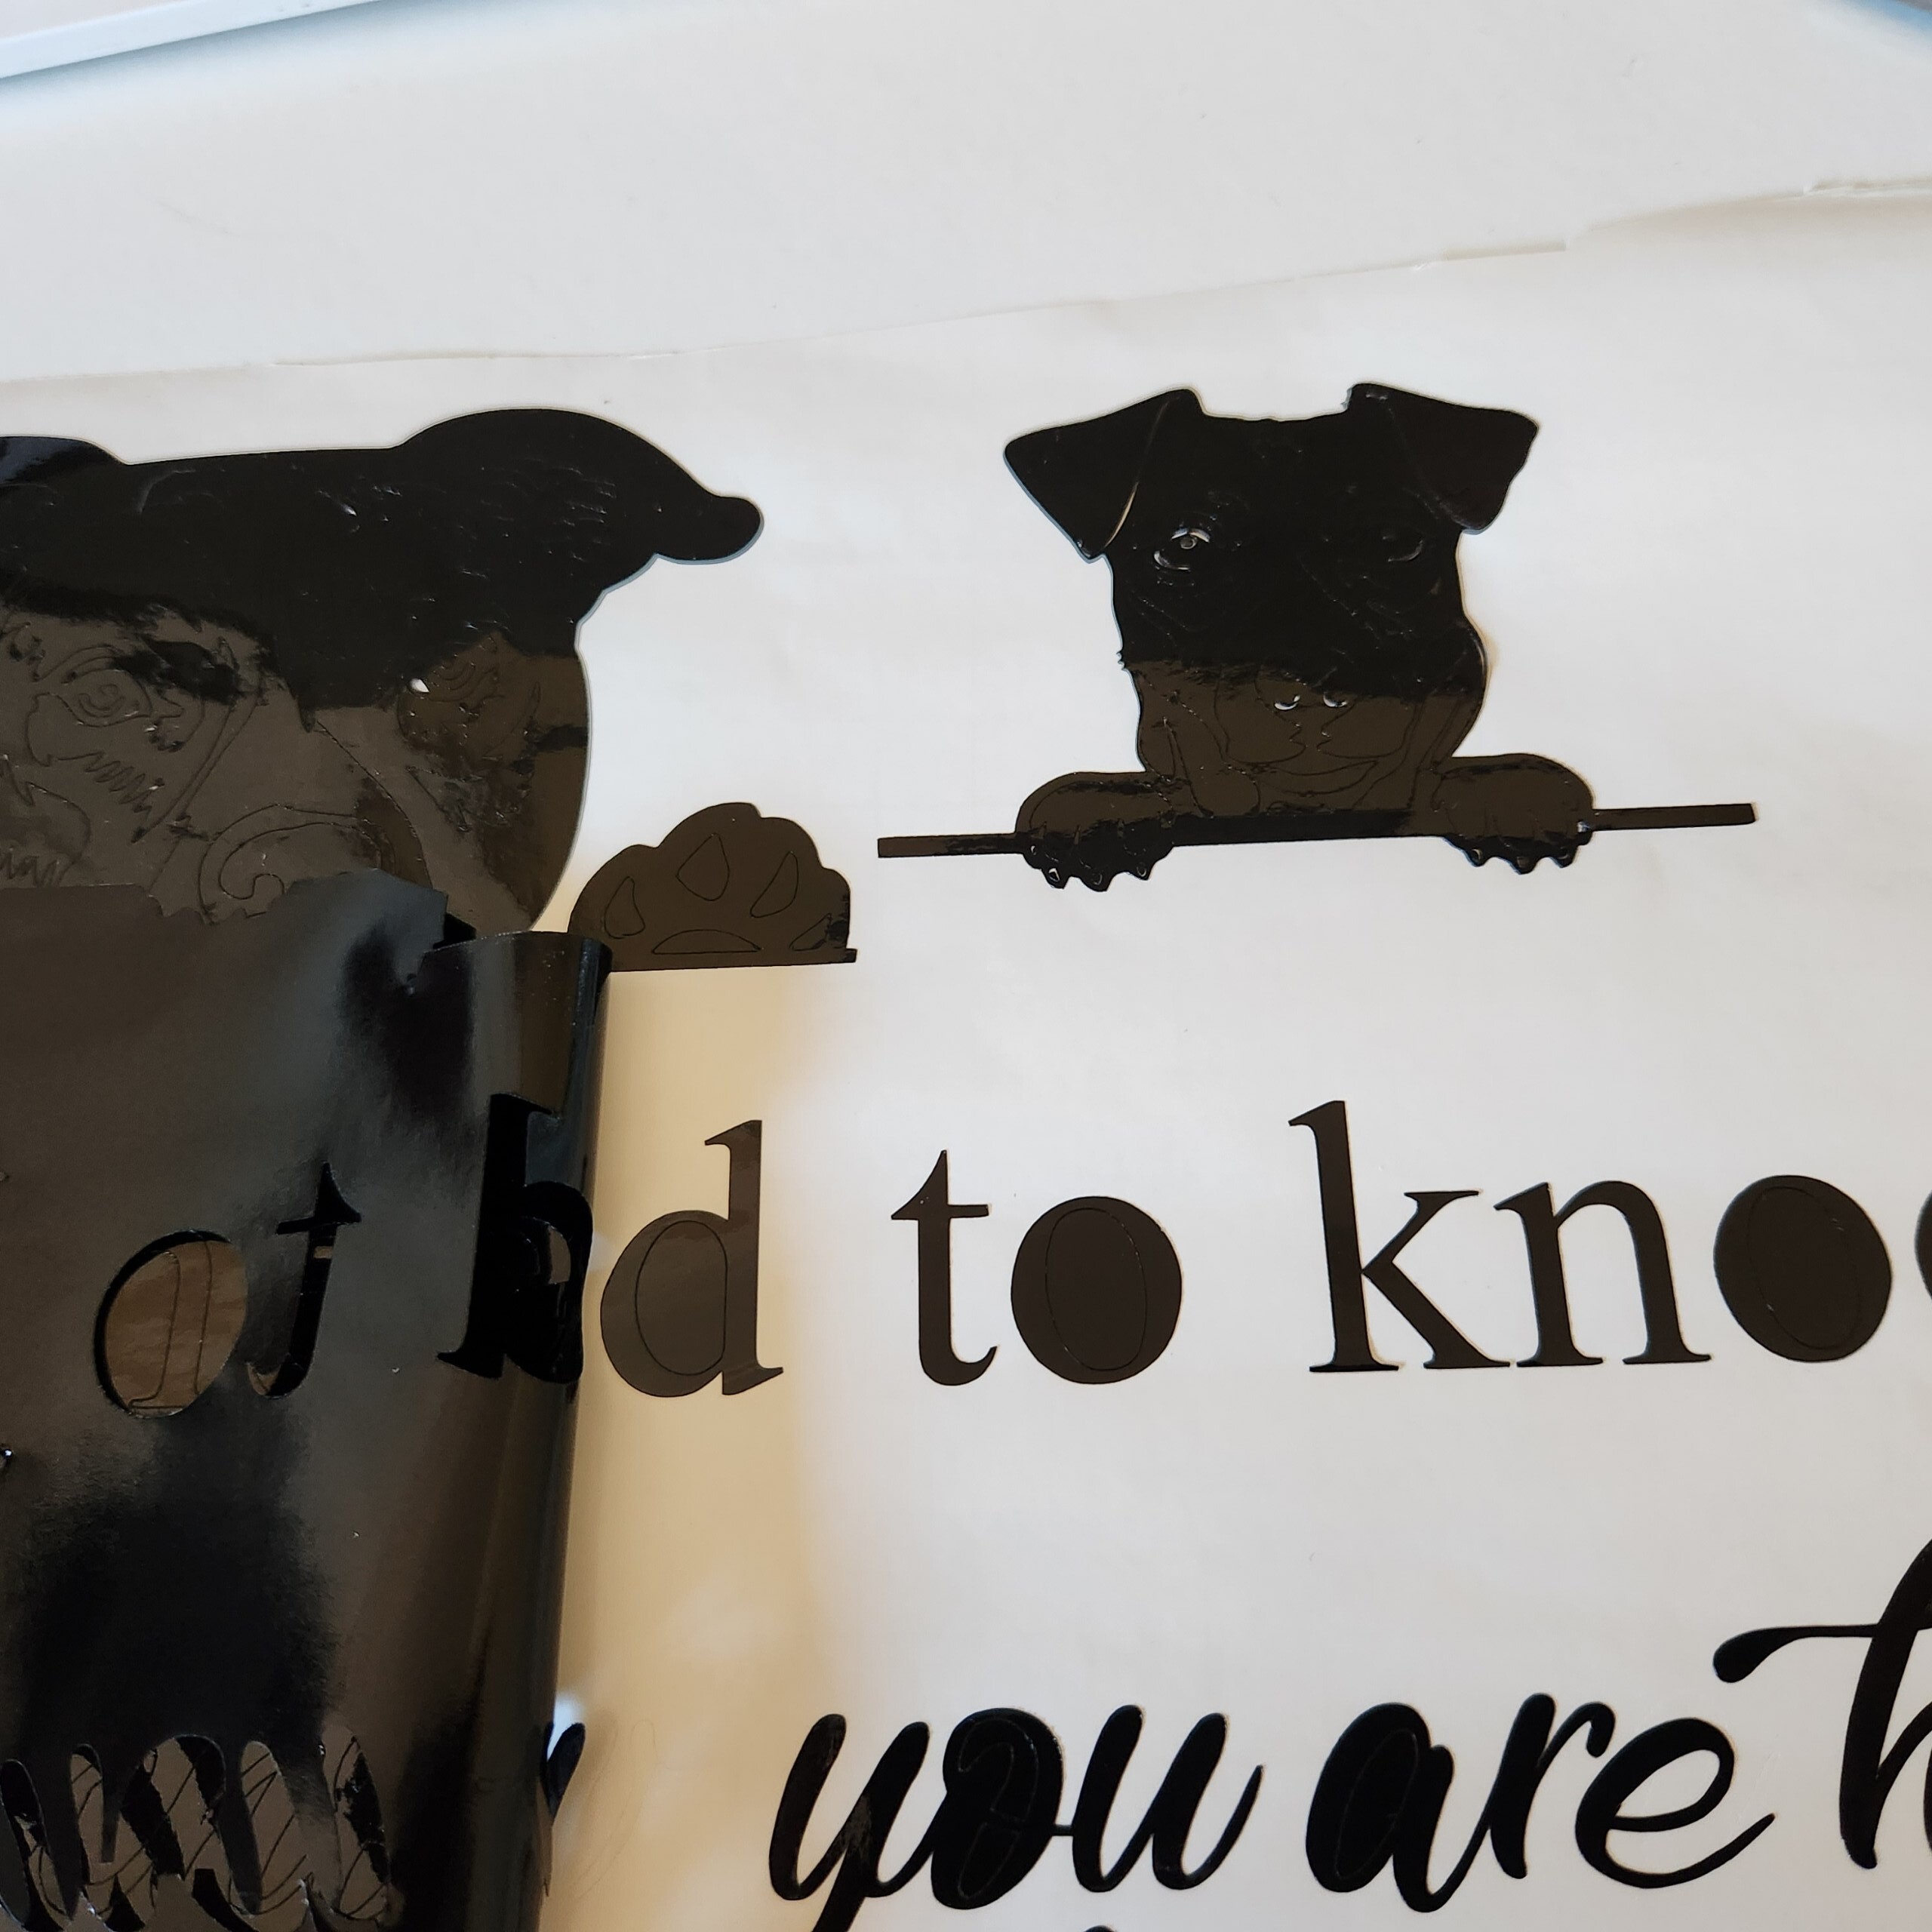
When the machine finishes cutting, press the arrow button to release the mat. The next step is to weed the vinyl, which means removing all the excess vinyl so only your design remains. Using Cricut weeding tools or a craft knife, carefully take out the unwanted vinyl, including the pieces inside the letters.
Transferring the image

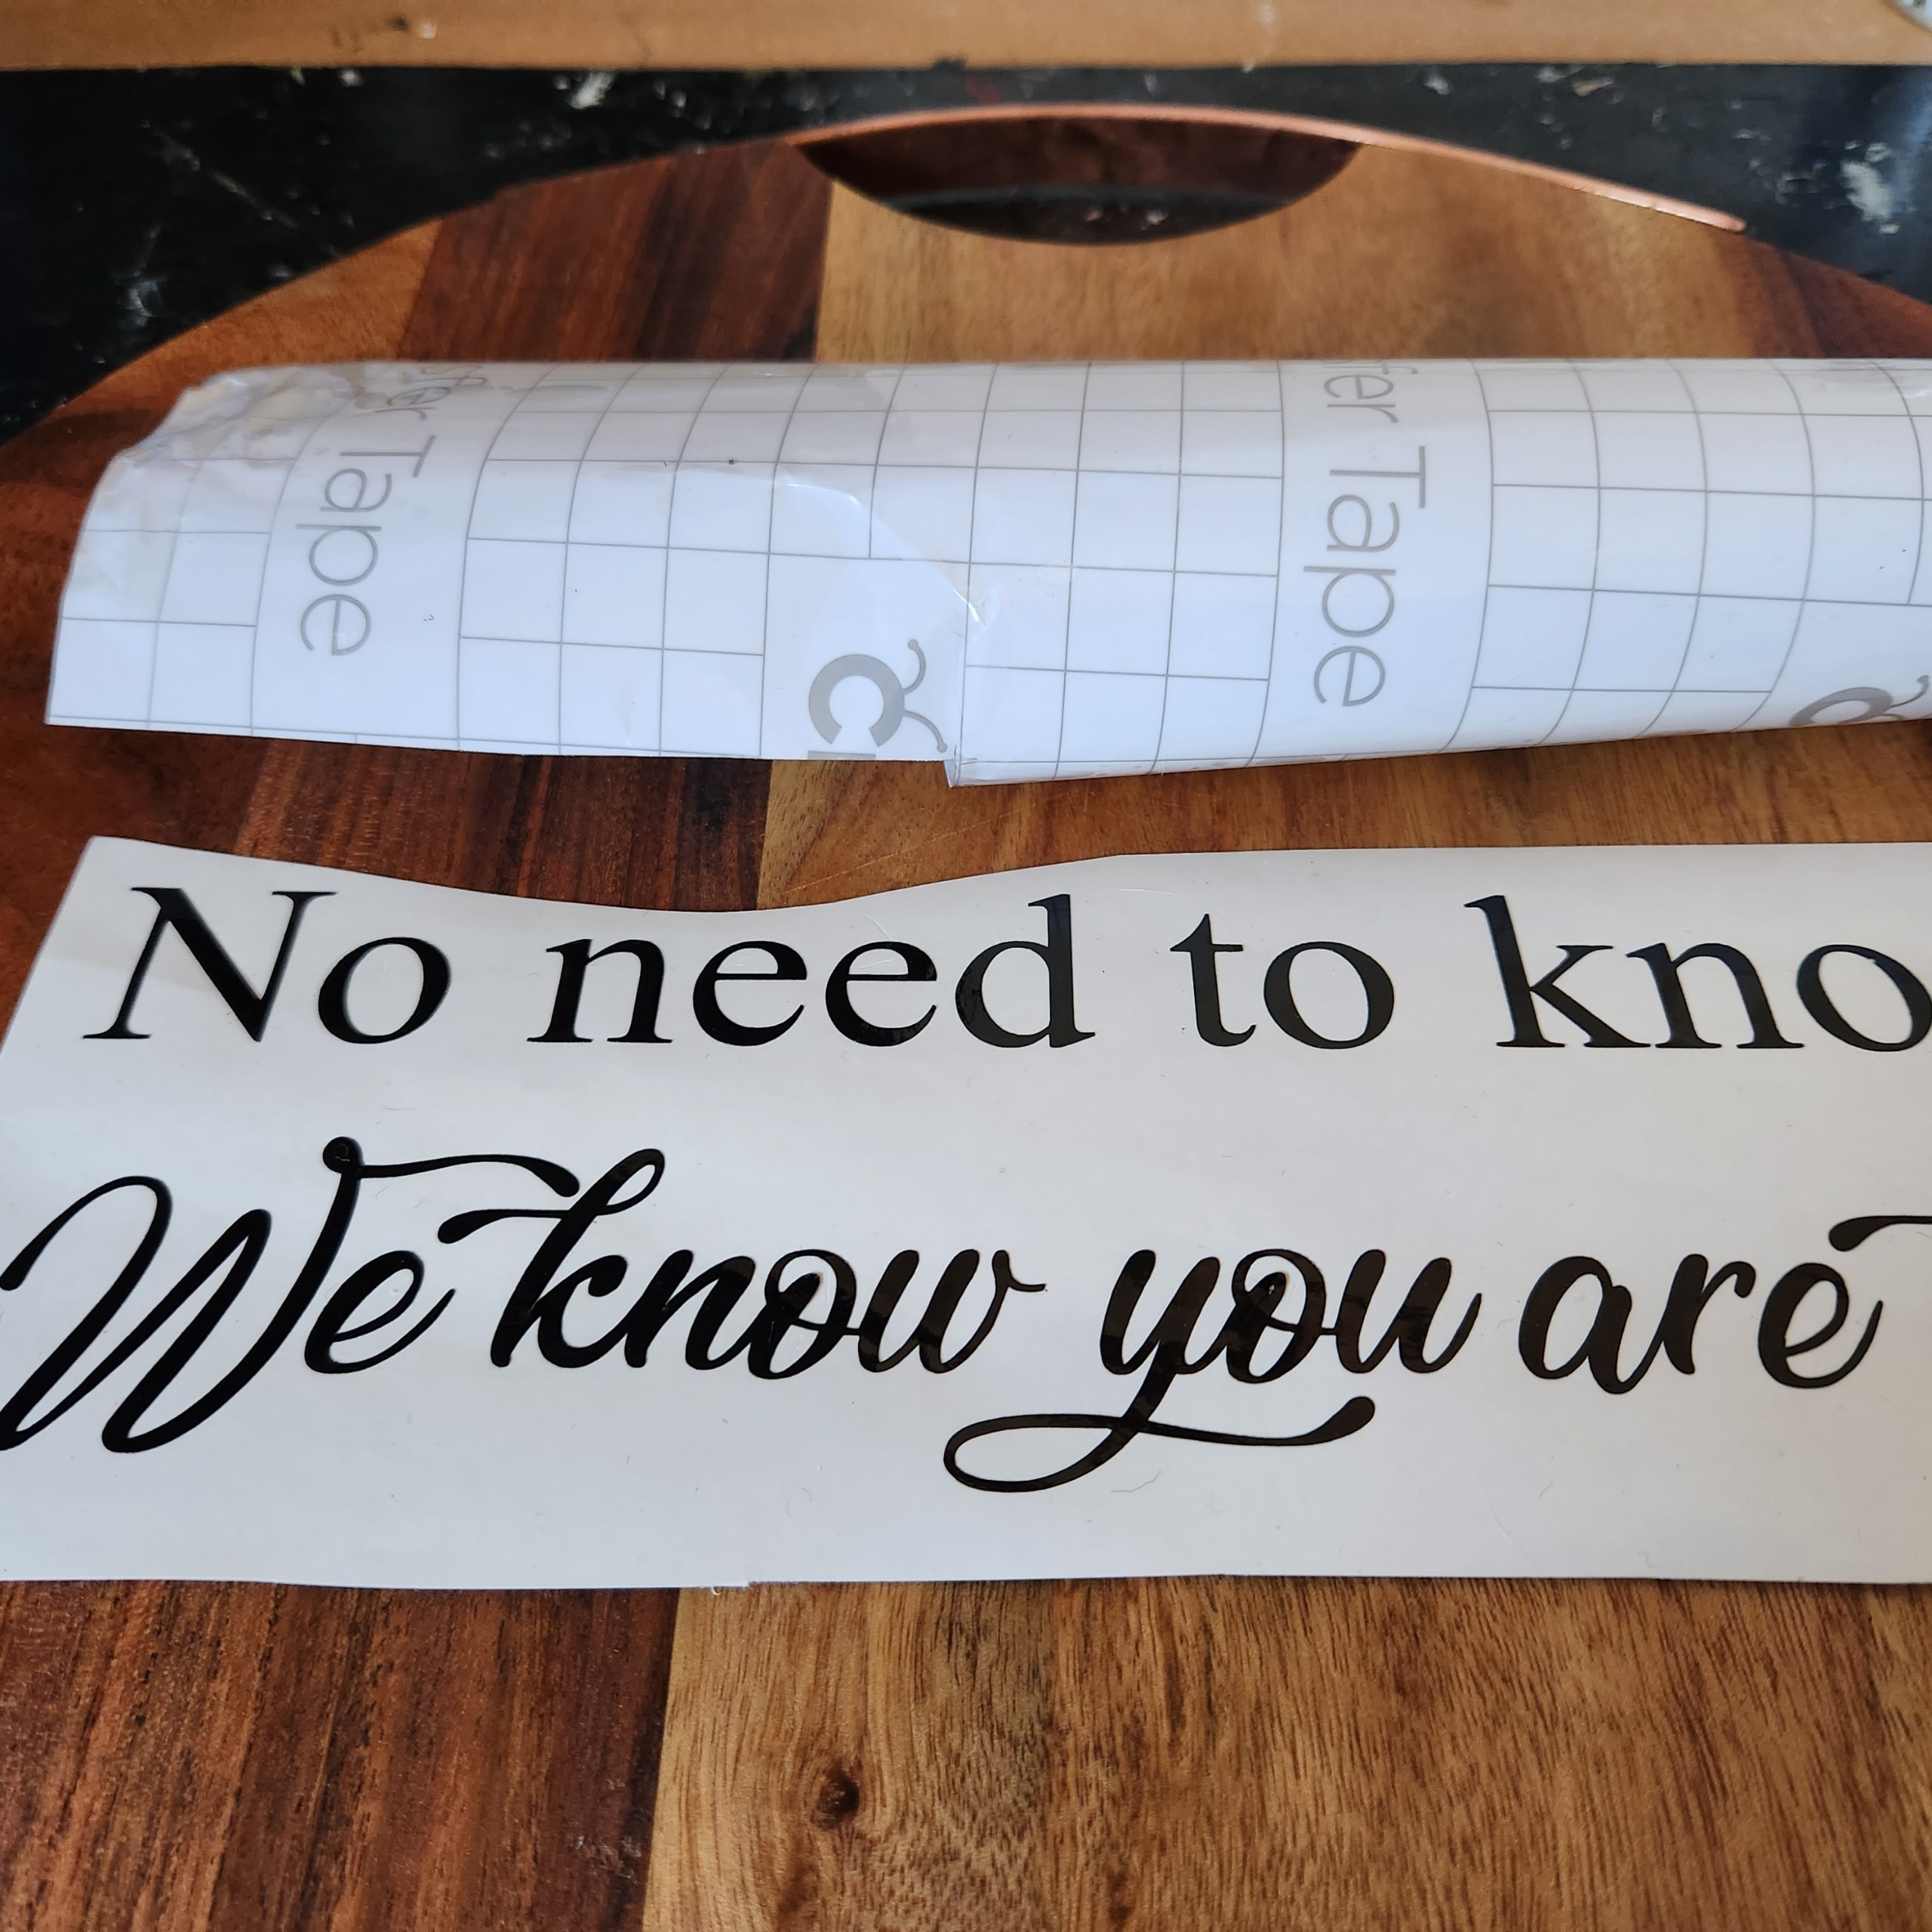
Peel away the backing from the transfer film—your design should now be adhered to it. Position the design where you want it on the wooden board, then firmly rub it down with a scraper to ensure it sticks. Slowly peel back the transfer film, leaving the vinyl design in place. For a design this large, it’s easier to apply it in two sections. To finish my porch welcome sign, I made a bow from a recycled belt and glued it to the top of the board.
More Cricut project ideas
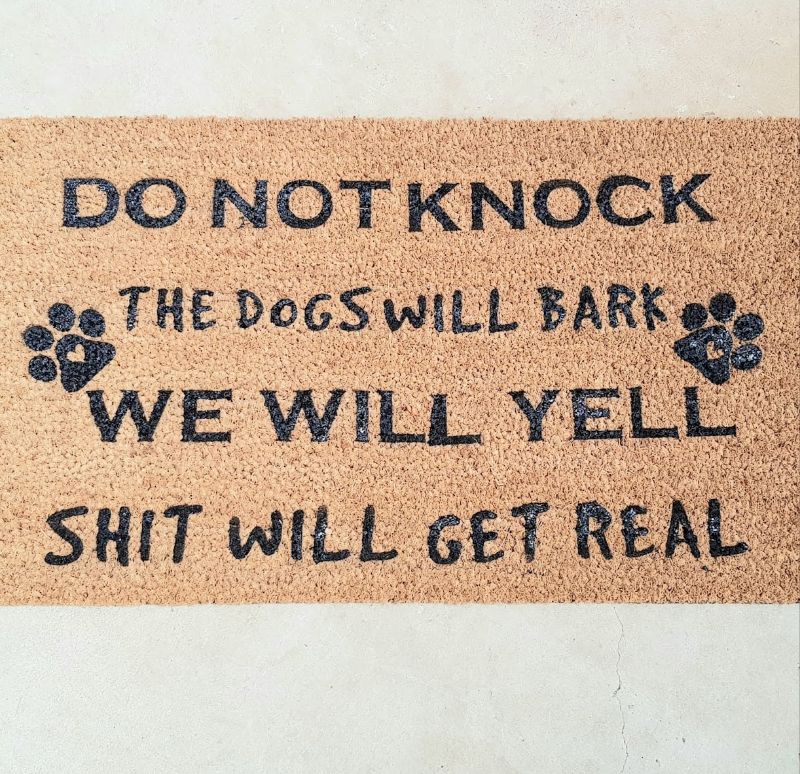
This novelty doormat was made with Cricut vinyl and rubber spray.
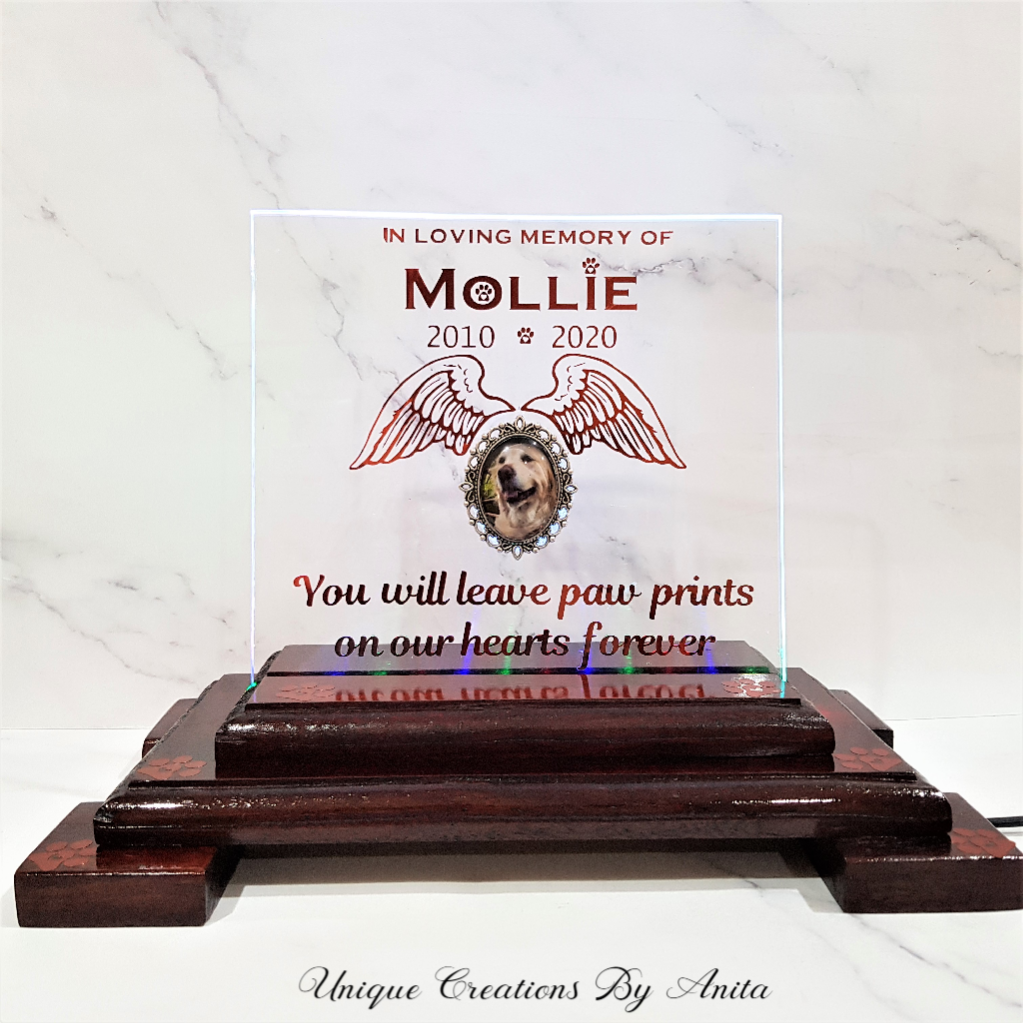
I made this pet memorial plaque for my daughter-in-law, who lost her beloved pet. There are so many ways you can use your Cricut besides making signs and adding names to bottles. You can find my creations here.
Do over designers’ blog hop
As I mentioned, this is the ‘Do It Over’ Designers Blog Hop, and there are some amazing projects! Be sure to click on the links below for inspiration.

Southern Sunflowers
If you’re interested in any of the items used in this project, we’d appreciate it if you used our affiliate links. Clicking these links earns us a small commission at no extra cost to you, helping us create more inspiring and exciting projects to share. We’d also love to hear your thoughts—feel free to leave a comment or share this post!


19 Comments
Kim
January 28, 2023 at 11:17 pmWhat a great (and totally adorable) upcycle! The board makes a perfect sign and even comes with its own hanger! Perfect.
Anita Holland
January 30, 2023 at 10:07 amThanks Kim, she loved it and the handle was a bonus.
sara allen
January 28, 2023 at 11:28 pmHa ha, this is so perfect for your household! Love it. I need to open up my Cricut machine and give it a go.
Anita Holland
January 30, 2023 at 10:08 amThanks Sara, there is so many projects you can do with a Cricut it deserves to come out of its box. lol
Ann
January 29, 2023 at 1:06 amI absolutely love this project, Anita – those sweet faces!! I’m sure your daughter loves it!
Anita Holland
January 30, 2023 at 10:08 amThanks Ann, she does love it and the faces look just like her dogs.
Gail @Purple Hues and Me
January 29, 2023 at 1:59 amThis is so cute and adorable, Anita! I smiled when I first saw it! Perfect for a household with fur babies! You did great using the cutting board!
Anita Holland
January 30, 2023 at 10:09 amThanks Gail, cutting boards are always available in our thrift stores and cheap too.
Tania
January 29, 2023 at 2:17 amTeehee, that’s so cute!
Tania
Anita Holland
January 30, 2023 at 10:09 amThank you Tania.
Julie
January 29, 2023 at 3:58 amYou’d never know this used to be a cheeseboard, what a clever transformation. I love how personal it is.
Anita Holland
January 30, 2023 at 10:10 amThanks Julie, we are the the cheese and wine family so this was the next best use for the cheeseboard, lol
Allyson @ Southern Sunflowers
January 30, 2023 at 11:42 amYour porch sign is so cute and funny! I bet your daughter loved it. Your tip for sealing before applying vinyl is good to know, thanks!
Anita Holland
February 18, 2023 at 10:15 amThanks so much Allyson.
Rachel - Tea and Forget-me-nots
January 30, 2023 at 11:45 amI love this! Will it stand up to being outside or is it for inside?
Anita Holland
February 18, 2023 at 10:16 amThanks Rachel. I think it will because I used permanent outdoor vinyl and it will be under the porch.
Marie B
February 2, 2023 at 5:42 amI laughed out loud at the sentiment on your adorable porch sign. What a cute idea for recycling/repurposing a wooden cheese board!
Anita Holland
February 18, 2023 at 10:18 amThanks Marie, It was a true reflection on what happens in there home with 4 dogs.
Michelle Leslie
February 18, 2023 at 8:00 pmOh lordy, we need one of those signs here at home too. How cute. Every time I see one of your Cricut projects I get closer to buying one.