
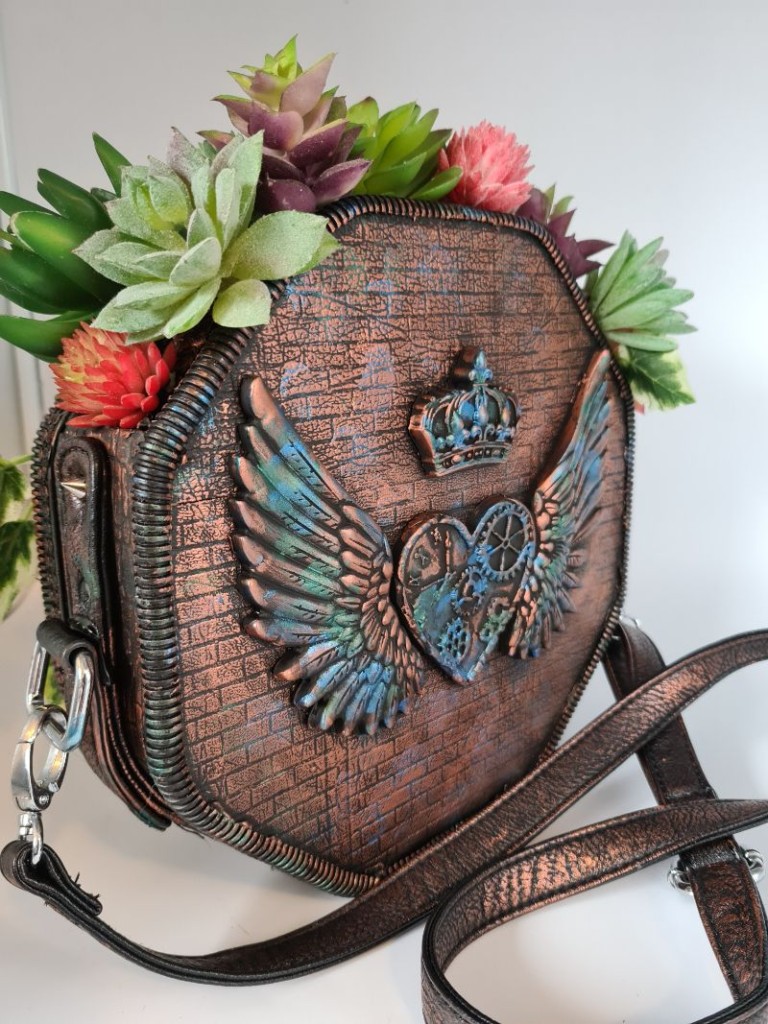
I wanted a planter that didn’t require watering and my dogs couldn’t wreck, so I made this Upcycled Chocolate Tin Handbag Planter with Secret Storage. It hangs like a handbag, looks chic with embossed faux leather and steampunk details, and hides a secret compartment inside. I used recycled materials wherever possible, artificial succulents for zero maintenance, and quick-drying UV resin so the whole project stays fast and fun.

This post is part of the IBC Blogger Challenge — this month’s theme is Funtabulous Planters. More about IBC at the end of this post.
Before we dive into this tutorial, be sure to subscribe to my bimonthly newsletter to be the first to see my latest projects. You can also follow me on Pinterest and Facebook, where I also include my unique mixed-media art projects

Upcycled Chocolate Tin Handbag Planter (With Secret Storage)
**This post may contain affiliate links. This means I earn a small commission on links used at no extra cost to you. Please see my disclosure policy for more information.**
Materials Needed
- Recycled chocolate tin (I used a Quality Street tin)
- Craft knife and tin snips/metal shears
- Pliers (for folding sharp edges)
- Cardboard sheets (to smooth the tin’s sides)
- Strong craft glue (I use “The Ultimate”)
- Faux leather sheets
- Embossing machine and embossing folders (brick, cobblestone, steampunk designs)
- Split conduit or flexible tubing (for rim edging)
- Hot glue gun and glue sticks
- Silicone moulds (steampunk set; I love Stamperia)
- UV resin and UV lamp (or standard 2-part resin)
- Black gesso or black acrylic paint
- Copper wax paste
- Acrylics: emerald green and deep waters (blue)
- Old handbag straps and hardware (studs/screws)
- Artificial succulents
- Floral foam or recycled styrofoam packaging
- Fabric or decorative paper (to line the compartment)
Safety First
You’ll cut metal and smooth sharp edges, so wear gloves and eye protection. If you heat a butter knife to cut foam, work with care, ventilate well, and keep children and pets away.
Cut the Opening and Prep the Tin
Choose a tin with a shape you like. Mark a neat opening around the top lip so the planter reads like a handbag. Pierce a starter hole with a craft knife, then cut the opening with tin snips.

Fold any sharp edges inward with pliers. Dry-fit the lid and opening to make sure the “handbag” silhouette works.

Smooth and Shape for a Clean Wrap
Decorate the tin to suit your décor. If you want to duplicate mine, this is how I did it. I recently embossed aluminium soda cans for wall art and loved the effect, so I tried embossing faux leather to cover this planter. I first glued cardboard to both sides of the tin to smooth the surface.

Emboss the Faux Leather and Paper
Run faux leather through the embossing machine with a brick folder for the back panel. Use a cobblestone folder on thick brown paper for the sides. For the front panel, go full steampunk with gears and cogs. Test placements before glueing so the patterns flow nicely.

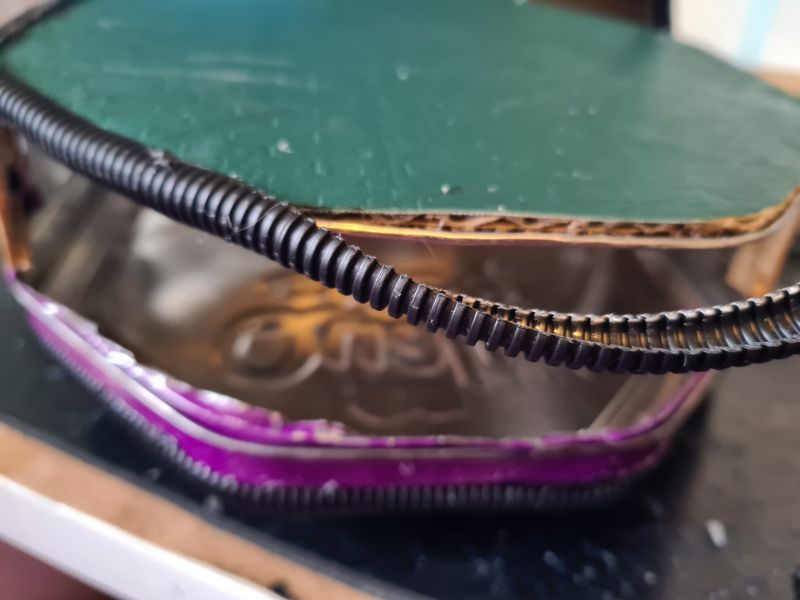
Wrap and Edge the Body
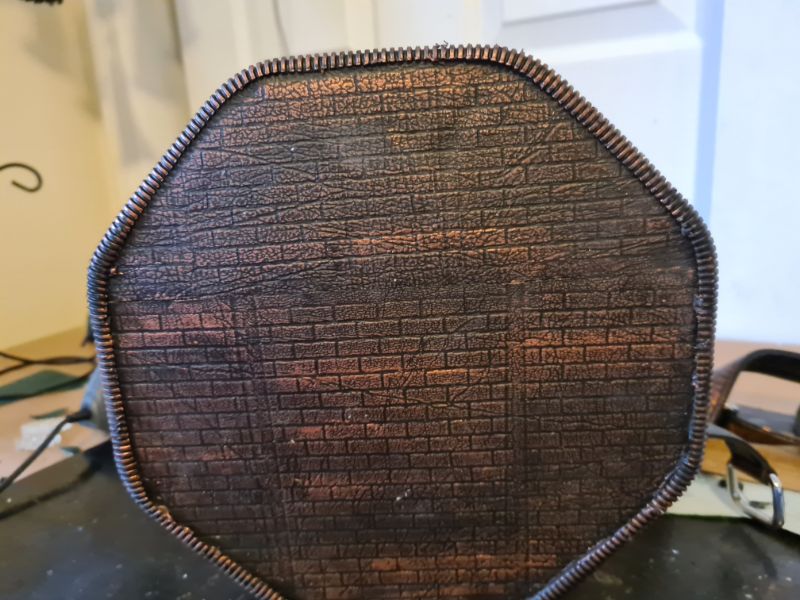
I embossed enough leather to cover the back in a brick design and glued it to the cardboard with the crafters’ pick, “The Ultimate” glue.

I embossed thick brown paper with a cobblestone design for the sides.

Anyone who follows my blog knows steampunk is my weakness. This time the aim was to steer clear, yet a few subtle touches still slipped in. The front faux leather features embossed steampunk motifs, and the edges are neatly finished with split conduit borrowed from my husband’s toolbox.

I cut it in half again and hot-glued it around the rim.
Cast and Add Steampunk Embellishments
Pour UV resin into steampunk silicone moulds (gears, gauges, plates). Cure under the UV lamp for fast results. Arrange pieces on the front and back like hardware on a handbag.

I used hot glue to attach the resin mould.

If any gaps remain, you can fill or paint over them. It looks like a mess now, but with mixed media assemblage, you have to trust the process.

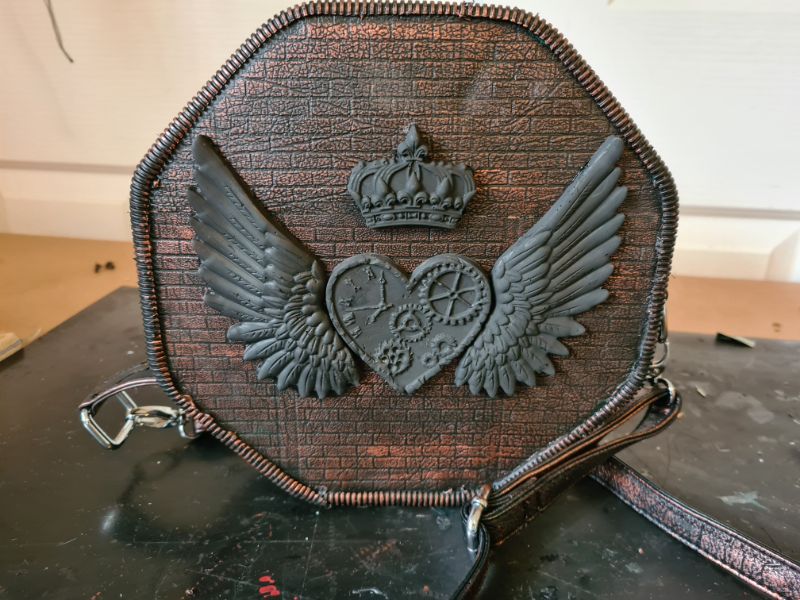
Painting the planter
I painted everything black with gesso (black acrylic works too). To bring out the detail, I rubbed on copper wax paste with my fingertip, skimming the raised areas. If you don’t have copper wax paste, you likely already have the ingredients to make some at home. This post shows you how.

I wasn’t happy with the look yet, so I added a few more embellishments to the front and back. The beauty of mixed media assemblage is that you can keep building layers.

If you’re not happy, paint it black again and start fresh. My original plan was a copper-only finish, but it felt a bit flat, so I added colour. If you want more tips and tricks for adding embellishments to assemblage art, this post has it all.

To add colour, I used a small make-up sponge, dipped just the tip into paint, and dabbed colour randomly over the surface.

I used Art Alchemy Emerald Green and Deep Waters (blue).

Fit the Handbag Straps
Raid an old handbag for straps and hardware. Screw or stud the strap ends into the top, then secure the rest with hot glue. Soften the strap colour with a touch of copper wax so it blends with the body.

Create the Secret Storage Insert
Cut floral foam or recycled styrofoam to form a snug “plug” under the open top edge — just thick enough to anchor the faux succulents while leaving the tin hollow below.

Carefully heat a butter knife on the stove and slice the foam to shape; it cuts like butter.

You can paint the styrofoam black for a better cosmetic look. Once the paint is dry, you glue the styrofoam inside the tin and put the planter back together. The rest of the gap will become the secret compartment.

Adding the succulents
I used fake succulents so I wouldn’t have to look after the planter. Arrange them by pushing the stems into the foam. Add a dot of hot glue if needed.

Lining the tin
Line the interior with fabric or decorative paper so the secret compartment looks more appealing.

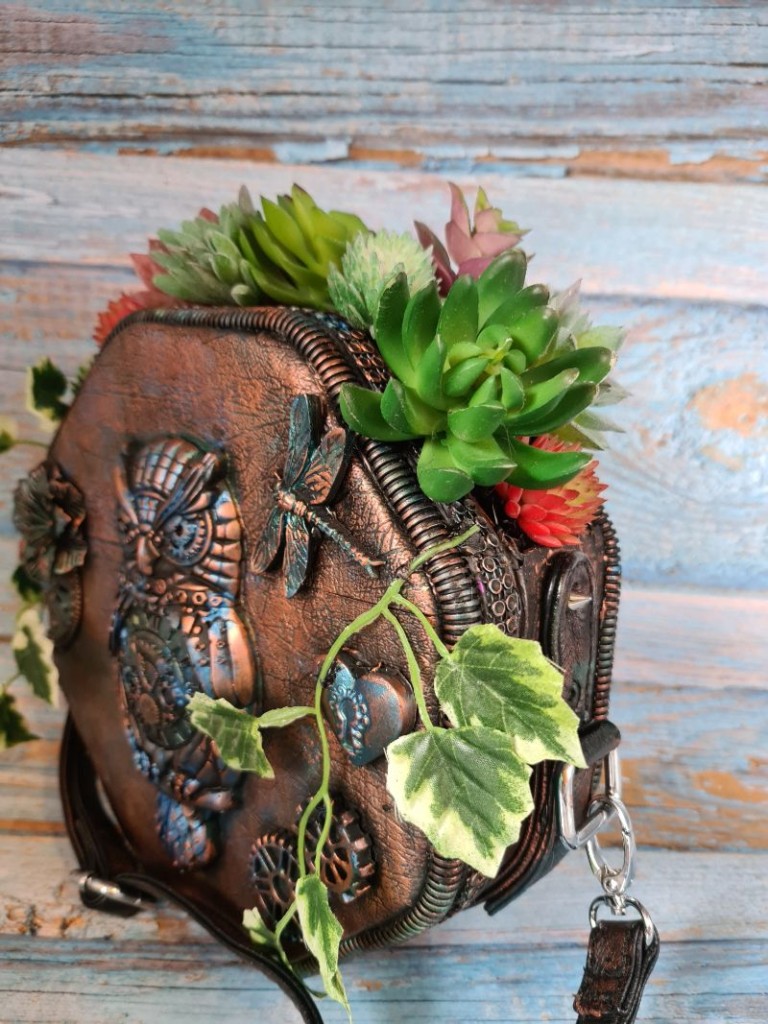
Completed planter with secret storage
The finished piece looks like a handbag planter bursting with succulents — and it hides a discreet storage space for little keepsakes.


More planter project ideas for you
These super-cute PVC pipe photo planters make a perfect gift.

More about IBC
If you follow my blog, you will know that I am part of the IBC (International Bloggers Club), a group of talented bloggers from around the world. We have members from Spain, South Africa, Australia, the United States, and Canada. Each month, we come together and create a project with a common theme.
If you missed last month’s “I can upcycle ” theme, here is the link to my Aluminium can wall hanging. The “Funtabulous planter” contributions from my fellow bloggers for this month’s challenge are listed below. Please feel free to jump over and give them some love.
A Crafty Mix|Oversized Teacup

Birdz of a feather |Basketball Planter


If you’re interested in any of the items used in this project, we’d appreciate it if you used our affiliate links. Clicking these links earns us a small commission at no extra cost to you, helping us create more inspiring and exciting projects to share. We’d also love to hear your thoughts—feel free to leave a comment or share this post!


28 Comments
Sara
June 21, 2021 at 10:44 pmThis is just so fantastic Anita! The additional metallic colours you used look spectacular. And the secret storage is brilliant; forget the teenagers, I would use that! One question though: how do you gain access to the secret compartment? Is it the back or front that lifts off?
Anita Holland
June 24, 2021 at 4:50 pmThanks Sara, the whole front still lifts off as it did as a chocolate tin.
Linda Johnston
June 21, 2021 at 11:37 pmimpressive creativity!
Anita Holland
June 24, 2021 at 4:50 pmThank you so much Linda.
Rosemary Palmer
June 22, 2021 at 12:00 amAnother amazing project. I’m not so good with plants either, but can grow a few on the patio. But I also mix in some faux too, especially for color.
Anita Holland
June 24, 2021 at 4:51 pmThanks Rosemary, I am into the faux ones now, you can get some really realistic ones now.
Michelle Leslie
June 22, 2021 at 12:29 amHow awesome, it looks like a proper handbag. When you mentioned the secret compartment I couldn’t for the life of me think why anyone would want a hidey-hole in a planter and then seeing the image with your stash, I immediately wanted one too. That’s so cool
Anita Holland
June 24, 2021 at 4:52 pmThanks Michelle, I had one as a kid to hide my cigarettes from my parents. lol
Marie - Interior Frugalista
June 22, 2021 at 12:46 amGirl, you know how much I love your steampunk creations and this did not disappoint. What a fabulous…ahem…funtabulous and clever planter creation! The secret compartment idea is brilliant.
Anita Holland
June 24, 2021 at 4:53 pmThank you so much Marie, the compartment was a last-minute addition seemed a waste of space. I sure some people do have items to hide. lol
Michelle James
June 25, 2021 at 6:03 amI LOVE your creative ideas. They are so fun and unique.
Anita Holland
June 28, 2021 at 4:24 pmThank you so much Michelle, that is a lovely compliment.
Carolina E Gonzalez
June 29, 2021 at 12:32 amAnita, you never fail to impress me. Forget the planter, I would use it as a purse. Great creation. Love it. You are always inspiring me. Hope you saw my night lamps I made inspired by your steampunk ideas.
Anita Holland
June 29, 2021 at 2:29 pmThank you so much for the great comment. I am really glad I could offer some inspiration. I did pop across to your website to check out your lamps, but I could not find them. I would love to see them.
Christina Woodcock
June 29, 2021 at 2:38 amThis is absolutely amazing! Do you sell your crafts? I want it haha!
Anita Holland
June 29, 2021 at 2:30 pmThank you, Christina, I want to open an Etsy shop because everything just gets shoved into a cupboard and they are getting full now. lol
Loretta Champagne
June 29, 2021 at 5:26 amThis is beautifully brilliant!
Anita Holland
June 29, 2021 at 2:31 pmThank you so much Loretta, and thanks for stopping by.
Olga
June 29, 2021 at 6:01 amFabulous, just love it. Wish i had the patience to work this out.
Anita Holland
June 29, 2021 at 2:32 pmThanks, patience is something I have plenty of as well as time. lol
Rebecca Payne
July 1, 2021 at 3:37 amAWESOME! Great Job!
Anita Holland
July 2, 2021 at 8:00 amThank you Rebecca.
Decor Craft Design
July 12, 2021 at 7:03 pmBeautiful and amazingly creative! Your upcycled planter is my favorite and you will be featured on You’re The Star Blog Hop this week – Creative Features! Congratulations!
Anita Holland
July 14, 2021 at 2:48 pmThank you so much for the great comment and the feature on my project. I really do appreciate it.
A Crafty Mix | Oversized Teacup and Saucer Planter – DIY - A Crafty Mix
January 23, 2022 at 11:15 pm[…] You’ll never guess what Anita used to make her gorgeous handbag planter. […]
TD Creedy
April 4, 2022 at 8:07 amI really like the idea of this. If I were to replicate this our sweets now come in the plastic hexagonal containers what do you use to glue items to plastic? Would you papier-mâché/decoupage onto it first or create a base to paint? Or do you have a go to/favourite paint for plastic? I normally use what I have but not sure with plastic and durability.
Anita Holland
April 4, 2022 at 6:23 pmI do have a glue of choice for all my surfaces called “The ultimate crafter’s glue”. It is brilliant stuff and I use hot glue for all the large items. As for paint I always use black acrylic and highlight with wax pastes. I find them more fun to work with.
Oversized Teacup and Saucer Planter – DIY - A Crafty Mix
September 6, 2024 at 7:22 pm[…] You’ll never guess what Anita used to make her gorgeous handbag planter. […]