
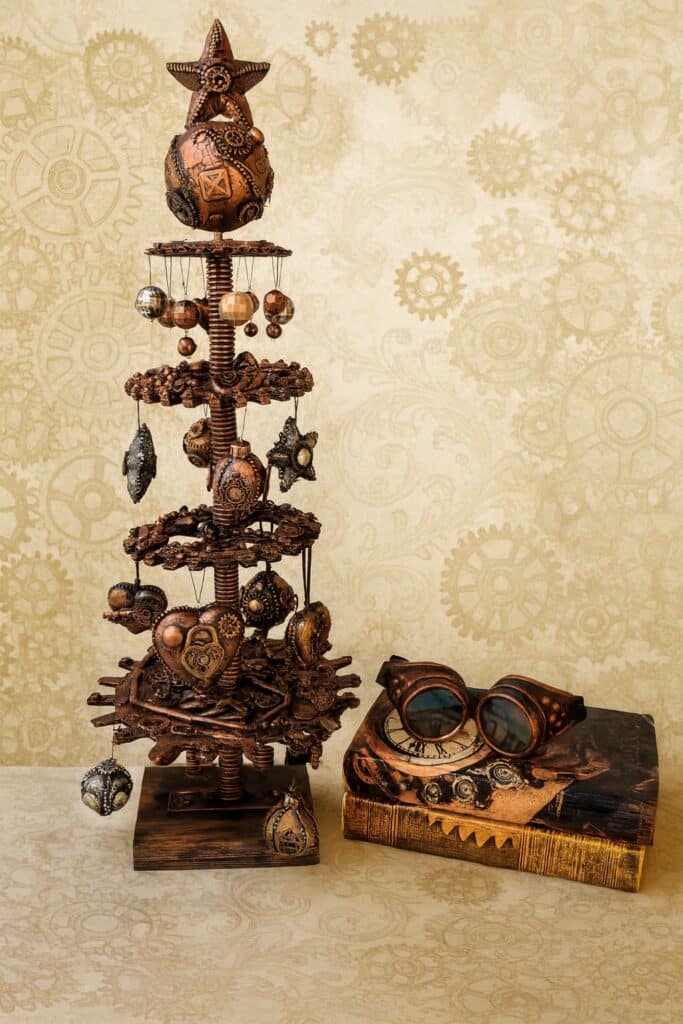
I’ve been steampunk mad all year, so creating this DIY Steampunk Christmas Tree: Upcycled Recycled Mixed Media Holiday Decor was inevitable. A reader’s comment on one of my previous projects—“I hope you make a steampunk Christmas tree!”—sparked the challenge, and I couldn’t resist. In true upcycling fashion, I built the entire structure from recycled cardboard, timber offcuts and found trinkets before giving it a mixed-media, industrial-chic makeover that’s sure to spark conversation this festive season.
Our next International Blogger Club (IBC) challenge is here, and fittingly, this month’s theme is Christmas! Keep reading to the end of this post to learn more about the IBC and how you can join in the festive fun.

Before we dive into this tutorial, be sure to subscribe to my bimonthly newsletter to stay up-to-date with my latest projects. You can also follow me on Pinterest and Facebook, where I also include my unique mixed-media art projects

DIY Steampunk Christmas Tree: Upcycled, Recycled Mixed Media Holiday Decor
**This post may contain affiliate links. Which means I earn a small commission on links used at no extra cost to you. Please see my disclosure policy for more information.**
Materials Needed
- Cardboard sheets or a cardboard box
- Homemade compass or a large round object (up to 25 cm in diameter)
- Craft knife and cutting mat
- Texture paste and various stencils
- Fine sand or modelling sand
- Hot glue gun and glue sticks
- Turbo Tacky glue (or similar craft glue)
- Black gesso
- Metallic copper wax paste or homemade wax paste
- Threaded metal pole (length to suit your space)
- Scrap timber block for base
- Metal plate or flange to fit the pole
- Bolts and nuts (to secure the plate to the timber)
- Plastic pipe section (to cover pole)
- Clear acrylic spray (2 coats)
- Protective gloves and dust masks
Making the Steampunk gears
To make the gears, I used a regular cardboard box and my homemade compass to draw circles of various sizes. The largest measured 25 cm in diameter, and each successive circle was reduced by 5 cm.

Using a craft knife, you can cut out all the circles.

Next, choose simple gear images for your tree and print each at the exact size you need. Glue your prints onto the cardboard, then use a craft knife and the printed shapes as templates to carefully cut out each gear.

Adding Texture
To disguise the plain cardboard, apply texture paste through stencils. For more tips and tricks on items you can use to add texture to your assemblage projects, this post has it all.

Lay a stencil over a gear, spread paste with a spatula, then lift straight away and rinse off the residue. Vary stencils on each gear for a layered effect.

I accidentally cut away the centre of one gear, so it wouldn’t slide onto the pole. To fix it, I glued a small base plate over the gap. Then I spread texture paste across the gear’s surface and pressed fine sand into it while it was still wet to build that gritty finish.

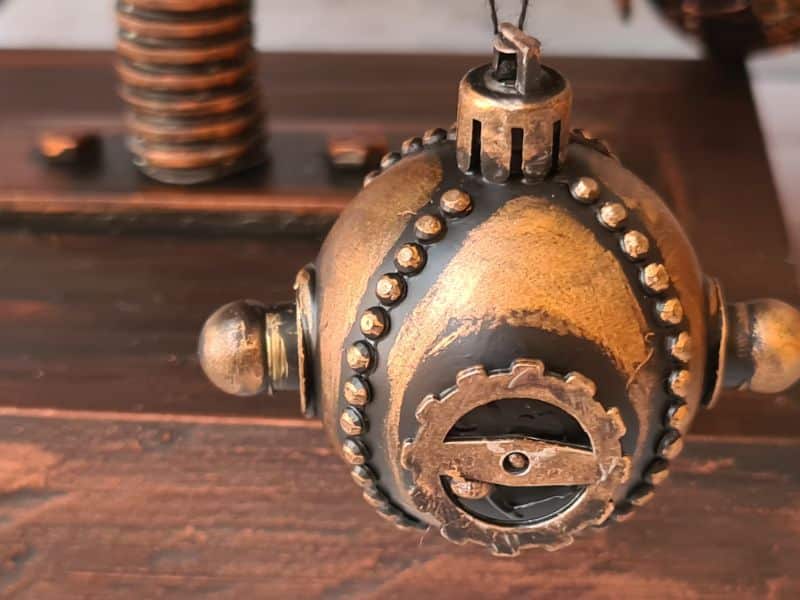
Adding the embellishments
Most of these materials are easy to source at home, and your local second‑hand shop is perfect for bargain beads and jewellery finds. You’ll also need a hot glue gun for attaching heavier embellishments and a strong craft adhesive for the rest—my go‑tos are Turbo Tacky Glue and The Ultimate by Crafter’s Pick.

Randomly layer your embellishments across the gear surfaces, placing steampunk‑themed bits—cogs, watch parts and small hardware—wherever they fit. Aim to cover most of each gear; any exposed areas will still reveal the textured base underneath.

I’ve included close‑up photos so you can see my selections. There are far too many items to list—most were thrifted or salvaged from junk—but if you spot something you can’t identify, leave a comment and I’ll gladly tell you what it is.

If you’re new to mixed media, simply pile on your embellishments across the gears without fretting over perfect placement. The black gesso and metallic wax will blend everything—any rough edges or gaps become part of the texture and highlight.


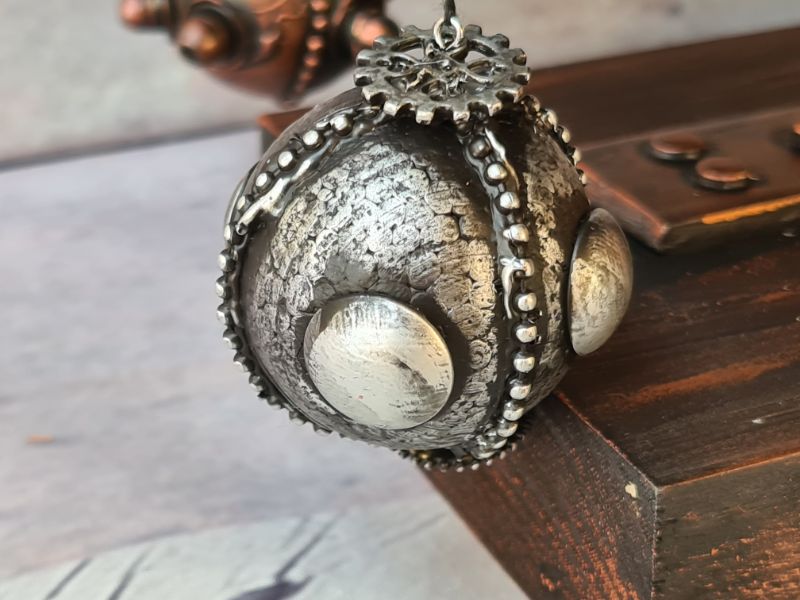
Painting and Waxing
Coat every gear in black gesso, working the brush under embellishments to seal all surfaces.

Once dry, dip your fingertip into metallic copper wax paste and rub over raised areas. Keep some black exposed for contrast. If you don’t have copper wax paste, you likely already have the ingredients to make some at home. This post shows you how.

These close‑up photos highlight how the stencilled texture adds incredible depth and dimension—no image truly does it justice.

After you’ve highlighted all the raised areas, it’s time to gently tint the black base with a whisper of colour. I use a soft makeup brush—lightly dip just the tip into the wax, then feather it across the flat surfaces so that you still see plenty of black beneath.

You can see how all the messy hot glue around the studs adds more character to the gears.

It’s only after you add the wax that you truly appreciate the benefit of layering all those textures.


Assembling the Stand
Select a sturdy timber block for the base and attach a metal plate or flange that fits your threaded pole.

Drill pilot holes, countersink nuts so the base sits flat, then bolt the plate securely.

Slip the textured and painted gears onto the pole in your chosen order, locking them in place with nuts above and below each gear.

Cover any plain metal with a painted plastic pipe sleeve.

Sealing and Finishing
Allow the wax paste at least 12 hours to cure, then spray two light coats of clear acrylic. This seals the wax and protects against fading.

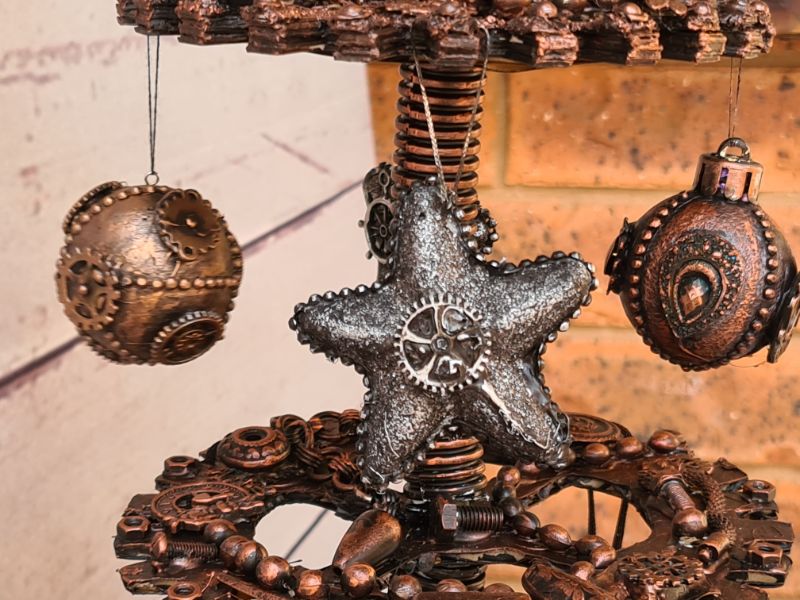
Making the steampunk baubles
If you like, add a few tiny steampunk baubles or gear‑shaped ornaments for extra festive flair. I reused old baubles from my Christmas tree and transformed them with the same process—coating them in black gesso, applying texture paste, then highlighting the raised details with metallic wax, just like the gears on the tree. You can see more of my steampunk creations here.


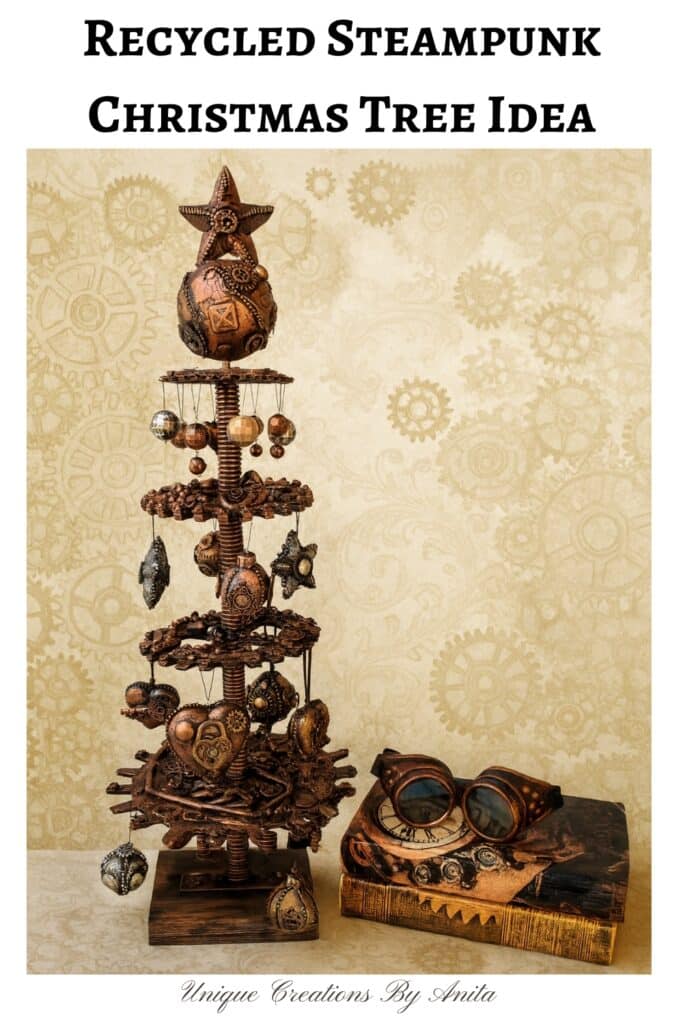
Completed Steampunk Christmas Tree

")


More unique Christmas tree ideas
Here’s another take on the steampunk Christmas tree, crafted from reclaimed wood and upcycled broken jewellery for a rustic yet industrial holiday statement.

This rustic wooden Christmas‑tree shelf doubles as a festive display stand during the holidays and then transforms into a stylish everyday shelf once the tinsel comes down—perfect for showcasing seasonal décor now and your favourite treasures year‑round.

About IBC (International Bloggers Club)
If you follow my blog, you will know that I am part of the IBC (International Bloggers Club), a group of talented bloggers from around the world. We have members from Spain, South Africa, Australia, the United States, and Canada. Each month, we come together and create a project on a common theme.
If you missed last month’s “Halloween ” theme, here is the link to my Halloween Flower arrangement. The contributions from my fellow bloggers for this month’s challenge are listed below. Please feel free to jump over and give them some love.
Projects
- Me Unique Creations By Anita
- A Crafty Mix| Bottle light swappable art insert
- Birdz of a feather|Christmas sleigh decor
- Interior Frugalista|Scandinavian village scrap wood houses
- Raggedy bits |Easy wooden farmhouse Christmas ornaments
- Meegan Makes| Vintage style Christmas wreath


If you’re interested in any of the items used in this project, we’d appreciate it if you used our affiliate links. Clicking these links earns us a small commission at no extra cost to you, helping us create more inspiring and exciting projects to share. We’d also love to hear your thoughts—feel free to leave a comment or share this post!


57 Comments
Sara
November 23, 2020 at 11:11 pmDon’t you just love when readers give you a challenge? They’re always full of great ideas and this turned out absolutely awesome Anita!!
Anita Holland
November 25, 2020 at 8:50 amYes Sara, I take on any challenge. Some work and some don’t but that is the nature of the game. lol
Maureen
November 24, 2020 at 12:47 amOh my gosh!! You really rose to the challenge! That is brilliant 🙂 I never ever would have guessed it all started with cardboard! Truly awesome!
Anita Holland
November 25, 2020 at 8:51 amThank you so much Maureen. I did try hard to disguise that fact. No one wants a cardboard Christmas tree. lol
Michelle Leslie
November 24, 2020 at 1:19 amSTUNNING!!!! You know how much I love your steampunk creations Anita and this one takes the cake. Never in a million years would I have thought you could make a gear-filled, nut-encrusted, pipe-draped Christmas tree and that it would look so amazing.
Anita Holland
November 25, 2020 at 8:52 amThank you, Michelle, I had no idea if it would work either. I get these mad ideas and this one paid off junk and all. lol
Marie-Interior Frugalista
November 24, 2020 at 4:27 amI was so excited to see you did a steampunk creation for our Christmas challenge, Anita. How amazing is this tree!!! Seriously, you’d never guess the gears started from cardboard. I could stand there over a pot of coffee deciphering each bit and bob for hours!
Anita Holland
November 25, 2020 at 8:53 amThank Marie, I think you were all kind of expecting something steampunk after the year I have had. So a Christmas tree was the most logical.
Maria
November 24, 2020 at 8:28 amIts just amazing how real it looks! You are a true artist.
Anita Holland
November 25, 2020 at 8:56 amThank you, Maria, that is truly a lovely comment.
Michelle
November 24, 2020 at 1:22 pmThis is sooooo cool! I really had no idea how steampunk things were made. This fascinates me!
Anita Holland
November 25, 2020 at 8:57 amThank you so much Michelle. I have no idea if this is how they are made, it was just what I came up with. I agree steampunk is very fascinating.
Meegan
November 24, 2020 at 5:19 pmYou blow my mind with your creative ideas. The steam punk tree is fascinating and beautiful. Your attention to detail is over the top amazing!
Thanks for sharing.
Anita Holland
November 25, 2020 at 8:58 amThanks Meegan. I love making steampunk I find it so relaxing and fun to do.
Deana Landers
November 25, 2020 at 4:59 amAnita, I love all your steam punk creations, but this my favorite! You are so talented 💙
Anita Holland
November 25, 2020 at 8:59 amThank you Deana, I would say this is by far my most unusual one.
Janet
November 25, 2020 at 7:42 amI always love your steampunk creations…so original Anita!
Anita Holland
November 25, 2020 at 8:59 amThank you so much, Janet. I find it more fun to try and create something different.
Anita Holland
November 25, 2020 at 8:55 amThank you so much for the invite, but I got there too late. My PC was playing up.
Michele Michael
November 25, 2020 at 6:35 pmA great addition to the Christmas Decor. A keepsake.
Anita Holland
November 28, 2020 at 11:20 amThank you so much, Michele.
Dee | Grammy's Grid
November 27, 2020 at 7:57 pmOh, WOW! You’re really into steampunk creations, huh? I love it!! Thanks so much for linking up with me at my party #UnlimitedMonthlyLinkParty 19, open until December 26 at 12:05 am. Shared on social media.
Anita Holland
November 28, 2020 at 11:27 amthank you so much, Yes I am steampunk mad at the moment.
Patti @ Pandora's Box
November 29, 2020 at 12:20 amWow, what a project! Very clever and unique!
Rhonda Steelman
November 29, 2020 at 12:29 amThank you for capturing the step by step instructions! I normally skim read blog posts, this one held my attention til the end! ( and I don’t even do steampunk)
Anita Holland
November 29, 2020 at 9:31 amThank you so much, Rhonda, I will take that as a compliment. I am fairly new to steampunk, I got hook a year ago I find it so interesting.
Chas Greener
November 29, 2020 at 2:11 amWhat a fun and great upcycle! Love how it turned out and it’s so unique. Thanks for sharing and wonderful crafting with you.
Anita Holland
November 29, 2020 at 9:32 amThank you so much Chas, that is very kind of you to say. I look forward to being part of the group.
Kim
November 29, 2020 at 2:30 amWell that’s amazing and perfect for the season! I’ve been loving your steampunk creations this year.
Anita Holland
November 29, 2020 at 9:33 amThank you so much Kim, I have gone a bit mad this year with steampunk. And doing a Christmas tree just seemed fitting.
Our Hopeful Home
November 29, 2020 at 5:06 amWow I’ve never seen how something like this was actually made. Your final product is gorgeous! I have a ton of jewelry bits and bobs (I design vintage jewelry) so this is one other way to use the stash! xo Kathleen
Ann
November 30, 2020 at 2:42 pmAbsolutely perfect for Christmas and how fun to be part of an international club! Thank you for sharing at Party In Your PJ’s.
Julie Briones
November 30, 2020 at 3:15 pmOkay… so I have to disagree with you on one point. I don’t think you need to be a steampunk fan to appreciate this unique Christmas tree! I love this creation, Anita… I’m amazed by the process, too! I hope you plan on sharing some of your ornaments in a future post, too! I’m happy to be featuring you at Tuesday Turn About this week! Pinned!
Julie Briones
November 30, 2020 at 3:17 pmOh, and the disagreeing was supposed to be a joke. Hehe!
kristie
November 30, 2020 at 10:03 pmThis tree is amazing. The corner shelf tree is awesome as well. You’re being featured on the Little Cottage Link Party today!
Naush Samama
December 1, 2020 at 9:57 amAnita, I am completely blown away by your Christmas Tree !! Could not have IMAGINED a stempunk Christmas tree, let alone actually see the tutorial. Its absolutely brilliant. Your attention to detail and where to place what and how to layer the paints, is all too brilliant !
Thank you so much for sharing it with us at Meraki Link Party
Naush
Anita Holland
December 2, 2020 at 3:23 pmThank you so much Naush, It was a learning curve because I had nothing to use as inspiration. That is why I used cardboard because I had no idea how it would turn out. I really appreciate your awesome comment.
Carol
December 4, 2020 at 1:29 amSo when does your your book of Amazing Steampunk Creations come out? Because you totally need to write one. This is AMAZING! Featuring when my link party opens up tonight!
Anita Holland
December 4, 2020 at 10:04 amAWW Carol that is the best comment and compliment I have ever had. Thank you so much you have boosted my confidence no end. xx Thank you so much for the feature.
Anita Holland
December 7, 2020 at 1:16 pmThe base is a scrap of wood from my workshop and the hearts are styrofoam shapes you buy at the craft store that I painted and decorated.
Anita Holland
December 11, 2020 at 4:16 pmThank you so much Michelle. Have a great Christmas and new year.
Rick Thorpe
December 24, 2020 at 5:43 amI am drawn to the steampunk motif and I am not sure why. Your creations are very appealing. I suspect that learning the light color dry brush technique is going to make all the difference. Perhaps a video addressing and demonstrating some of he techniques would be widely watched. Thank you for your effort.
Anita Holland
December 25, 2020 at 12:18 pmThank you so much for stopping by and leaving a great comment. I can see the appeal in steampunk, I have only been doing it a year and I am tottally addicted. I and trying to build up my confidence to make a video, because I have had so many requests. Keep popping in I have more steampunk comming.
Dee | Grammy's Grid
December 26, 2020 at 3:49 pmCONGRATS! Your post is FEATURED at my #UnlimitedMonthlyLinkParty 20, open until January 26 at 12:05 am.
Anita Holland
December 26, 2020 at 11:16 pmThank you so much for the awesome feature.
Jeanne
December 31, 2020 at 3:24 amThis tree is beautiful! I love the ornaments as well. Thank you for sharing it in tutorial form – it inspires others to see what they can create as well.
My son is a races bikes, (used to at least before he got his adult job), and I wanted to mention that an old gear bike, (or replaced parts at a bike shop) might be a cool source for gears of metal without sharp edges. I have parts here from old bikes that I think someday I would turn into something cool. Perhaps you might look into it… Once again, great project!
Anita Holland
December 31, 2020 at 10:48 amThank you so much. I got a welder for Christmas and I am now teaching myself to weld so I can try more ambitious projects. I already have a few bike wheels ready to take apart to try this.
Jeanne
December 31, 2020 at 3:27 amP.S. great, I just realized I should have proofed the comment above. I meant to have it say “My son races bikes, (or used to…”
Anita Holland
December 31, 2020 at 10:49 amThat is all good, I knew what you meant.
Debra
January 14, 2021 at 11:24 pmLove this, Anita! I pinned it to my Steampunk Tendencies board!
Anita Holland
January 15, 2021 at 12:21 pmThank you so much, Debra, I really do appreciate any shares.
Lori J Gutenberg
June 17, 2022 at 2:28 amOMG, this is truly amazing! I love steampunk! I am a beginner in every sense of the word and not really crafty, but I really want to try this!
Anita Holland
June 17, 2022 at 5:19 pmThanks so much Lori, It is a very interesting genre.
Cindy
August 3, 2022 at 4:37 amBeautiful!!!! I have a question — actually a couple of questions. What kind of copper wax? And then, after the copper wax, do you coat with a clear adhesive spray coat of paint?? Love your work!!!
10 Beautiful Christmas Tree Ideas
December 4, 2023 at 7:55 pm[…] 8 – Steampunk Christmas Tree […]
DIY - Decorative Bottle Light With Swappable Art - A Crafty Mix
September 6, 2024 at 4:21 pm[…] One of a kind steampunk Christmas tree by Unique Creations by Anita […]
10 Beautiful Christmas Tree Ideas
November 8, 2024 at 11:21 pm[…] 8 – Steampunk Christmas Tree […]