Welcome to our next Int’l Bloggers Club challenge, “Don’t Sweater the Small Stuff,” and I’m thrilled to present Steampunk Sweater Doorstop: Don’t Sweater the Small Stuff, where a recycled sweater and a broken cement bottle transform into a striking, functional piece of Victorian-inspired home décor. In this tutorial, you’ll learn how to turn project “fails” into a flourish, layering lace, leather and gears to create a doorstop that’s as practical as it is eye‑catching.

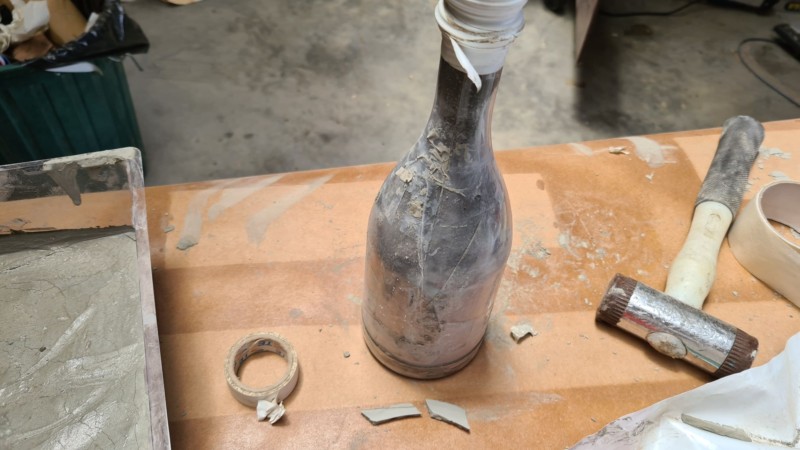
In our recent concrete challenge, I had high hopes for a cement‑filled bottle, but it cracked the moment I tried to remove the mould, so off it went to the “failed” corner of my shed. Around the same time, my sock gnome meant to be a little lady just wouldn’t cooperate; her hair turned into a styling disaster, so she ended up a he in a rather fetching hat instead. That’s when inspiration struck: why not combine the broken cement bottle and the gnome concept to fashion a feminine steampunk doorstop?

Before we dive into this tutorial, be sure to subscribe to my bimonthly newsletter to be the first to see my latest projects. You can also follow me on Pinterest and Facebook, where I also include my unique mixed-media art projects
Steampunk Sweater Doorstop: Don’t Sweater the Small Stuff
*This post may contain affiliate links. This means I earn a small commission on links used at no extra cost to you. Please see my disclosure policy for more information.**
Materials Needed
- Recycled plastic bottle (500–750 ml)
- Rapid-setting cement
- Old wool sweater (preferably a neutral colour)
- Fabric stiffener
- Thin lace trim
- Scrap leather (for corset)
- Steampunk charms (gears, clock hands, cogs)
- White Mongolian fur (for hair)
- Pearl beads
- Bronze wax paste or homemade bronze wax paste
- Sharp craft knife
- Hot-glue gun and glue sticks
- Gloves
- Masking tape
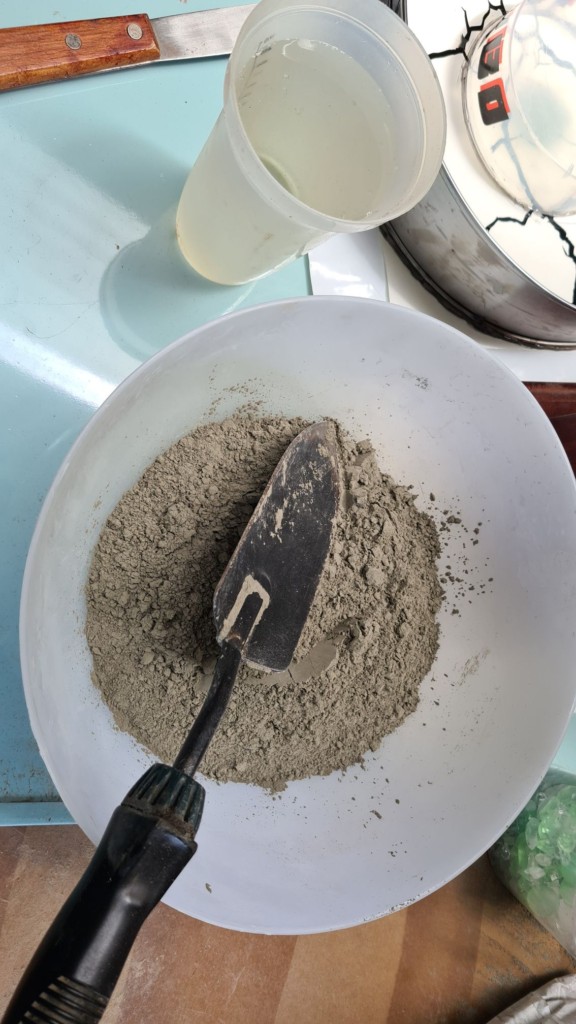
- Mixing bowl and stir stick
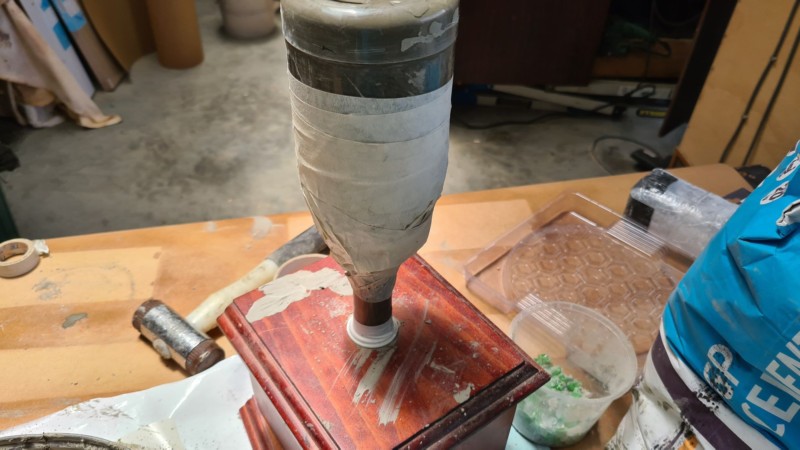
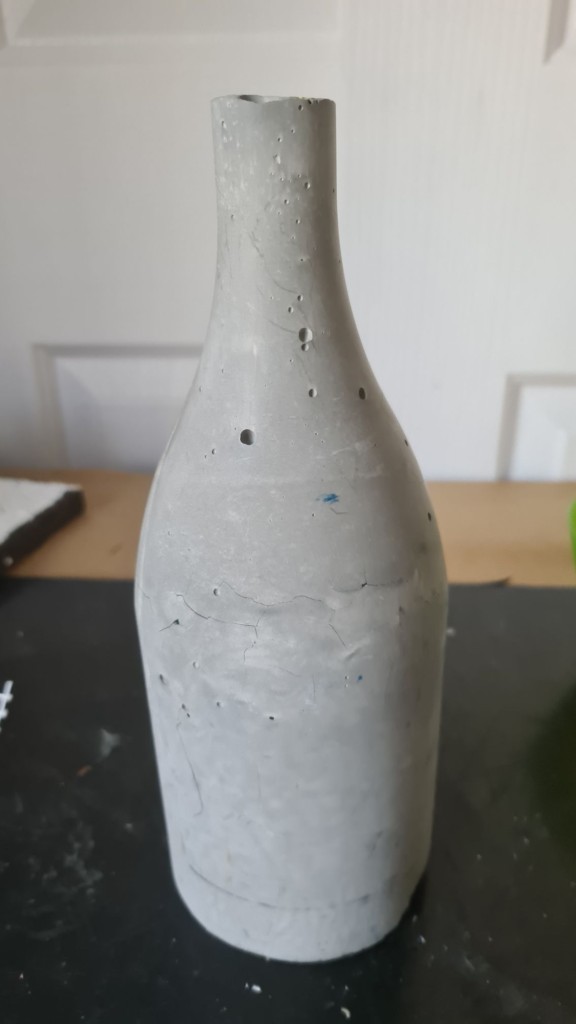
Prepare the Cement Base
To create the doorstop base, start with a recycled plastic bottle—you’ll be able to slice the plastic away once the cement has set. In a bowl, mix cement and water until the blend pours smoothly but still holds its shape. Carefully pour the mixture into the bottle, then tap the sides gently to release any trapped air bubbles. Leave it to cure overnight in a well‑ventilated spot, and once the cement is fully hardened, peel or cut away the plastic to unveil a sturdy, ready‑to‑use doorstop.
Stiffen the Sweater Sleeve
Cut a section from the sleeve of your old wool sweater.

In a seal‑lock bag or bowl, mix fabric stiffener and water, then add the fabric.

Wear gloves and massage until fully coated.

Wring out excess moisture, then drape the sleeve over the cement form, shaping it into a dress and shawl. Allow to dry in the sun or under a fan until firm.

Create the Steampunk Corset
I drew inspiration from the leather corset on the steampunk mannequin I’d built and knew it would add the perfect flourish to my doorstop. Glue a strip of thin lace around the waist of the stiffened sweater form. Cut scrap leather into a corset shape and adhere it over the lace, tucking the edges under the shawl for a seamless finish. Accent with tiny steampunk charms inside the shawl and around the waist.

Add the Hair and Headpiece
To make her hair, I used white Mongolian fur. I prefer it over regular craft fur because it’s of far higher quality and delivers much better results.
")
Using a sharp craft knife, cut the backing from white Mongolian fur.
")
Hot‑glue the fur to the top of the bottle and style into a French braid, securing with pearl beads at intervals for a Victorian flair.

Apply Finishing Touches
Rub bronze wax paste lightly over the sweater‑dress to highlight the texture. If you don’t have bronze wax paste on hand, you can find the DIY recipe right here.

Craft a mini felt top hat following my gnome‑hat tutorial, then attach it with hot glue. If you don’t want to make the hat, you can purchase it on Amazon.

Glue additional cogs and clock hands to the bodice. Sculpt a petite clay nose and fix it in place. Your steampunk doorstop now blends industrial toughness with soft textile elegance.

Completed steampunk doorstop
For more steampunk inspiration, explore my other creations here.
")
More about IBC
If you follow my blog, you will know I am part of the IBC (International Bloggers Club), which is a group of talented bloggers from around the world. We have members from Spain, South Africa, Australia, the United States, and Canada. Each month we come together and create a project with a common theme.
If you missed last month’s “Concrete ” theme, here is the link to my Zen-style garden decor. The contributions from my fellow bloggers for this month’s challenge are listed below. Please feel free to jump over and give them some love.
IBC Projects
- Meegan Makes |Handmade drop cloth and recycled sweater tote
- Interior Frugalista|Easy Easter Egg Sweater Wreath Ideas
- Me| Unique Creations by Anita
- Birdz of a feather |Needle Felted VW Beetle
- A Crafty Mix| Sweater into a Handbag


If you’re interested in any of the items used in this project, we’d appreciate it if you used our affiliate links. Clicking these links earns us a small commission at no extra cost to you, helping us create more inspiring and exciting projects to share. We’d also love to hear your thoughts—feel free to leave a comment or share this post!


34 Comments
Sara
March 22, 2021 at 11:17 pmWow, she is so fabulous. Especially love how you did her hair; you didn’t miss a single detail!
Anita Holland
March 24, 2021 at 8:22 amThank you Sara, the hair was a bit OTT but I have the time so why not. lol
Cat Michaels
March 23, 2021 at 12:51 amThis would be such a cool gift for steampunk-lovin’ tweens and teens especially! Appreciate the detailed tut!
Anita Holland
March 24, 2021 at 8:22 amThank you so much, Cat.
Christy Little
March 23, 2021 at 12:52 amSo cool! You are so talented and creative!
Anita Holland
March 24, 2021 at 8:22 amThank you so much Christy, that is very kind of you to say.
Michelle Leslie
March 23, 2021 at 12:57 amShe is sooooooo gorgeous, Anita. I can’t tell you how much I enjoyed seeing all the small, intricate details you added, from the tiny bottle on her top hat down to the metallic handbag. If all my failed projects turned out like this little lady I would be over the moon.
Anita Holland
March 24, 2021 at 8:23 amThank you, my friend, I always hang onto my failed ones in case I can repurpose them in the future.
Rosemary Palmer
March 23, 2021 at 1:01 amYou are so creative – I bet your stash of stuff in unbelievable. I really like this.
Anita Holland
March 24, 2021 at 8:24 amThank you so much, Yes i do have a big staff from back in the day when china was so cheap and I used to buy in bulk. I am just short on storage now. lol
Maria
March 23, 2021 at 2:06 amI truly enjoyed reading this project. It’s just amazing how you created it! I love concrete or that tuff you used to create the body!
Anita Holland
March 24, 2021 at 8:31 amThank you so much Maria.That is very nice of you to say.
Deana Landers
March 23, 2021 at 2:27 amAnita, Your work is awesome She is stylish and a little sassy. I can just imagine a Steampunk store with you work in the windows.
Anita Holland
March 24, 2021 at 8:32 amThank you so much Deanna, I am going to open an Etsy store to sell my Steampunk project because my house is now full. lol
Marie B.
March 23, 2021 at 2:46 amYou and Miss Steampunk rocked this challenge, Anita! Your attention to detail with your steampunk creations is impeccable. I love her french braid!
Anita Holland
March 24, 2021 at 8:32 amThank you so much Marie, I felt really sill doing her hair but she turned out really cute.
Kim Purvis
March 23, 2021 at 3:35 pmYour creativity never ceases. he is adorable. Love his hair.
Anita Holland
March 24, 2021 at 8:34 amThank you so much Kim, that is an awesome compliment.
Brooke
March 24, 2021 at 12:11 amWhat a fun project. This turned out so cool. Love all the details. Thank you for sharing.
Anita Holland
March 24, 2021 at 8:35 amThank you Brooke.
Maureen Reynolds
March 24, 2021 at 1:08 amThat is the coolest door stop I have ever seen! Thank you for the easy to follow tutorial!
Anita Holland
March 24, 2021 at 8:35 amThank you Maureen, I am glad you found the tutorial easy to follow.
Meegan
March 28, 2021 at 10:29 amAnita! She is such a gorgeous piece. From the lovely hair to the steampunk accessories, you have outdone yourself. So very impressive! Thanks for inspiring me to DIY out of my comfort zone.
Have a great week, my friend!
Anita Holland
March 28, 2021 at 2:10 pmThank you so much Meegan for the awesome comment. I thought I was over steampunk after last year, but I don’t think so. lol
Cecilia
March 28, 2021 at 10:44 amAnita, your attention to detail is meticulous! Thanks for sharing your creative doorstop at Vintage Charm!
Anita Holland
March 28, 2021 at 2:11 pmThank you so much, Cecilia, she was lots of fun to make.
Michelle
March 30, 2021 at 4:49 amAnita, this is absolutely fabulous! So adorable! It will be featured in next week’s Traffic Jam Weekend party.
Michelle
https://mybijoulifeonline.com
Anita Holland
March 30, 2021 at 1:04 pmThank you so much Michelle for the feature.
Anita Holland
April 3, 2021 at 5:26 pmThank you so much, I feel very honoured.
Carol
April 2, 2021 at 12:25 amLOVE!!! I’m still serious about you needing to do a book. Featuring when my link party opens up!
Anita Holland
April 3, 2021 at 5:27 pmThank you Carol, I might have enough one day to give it a go.
Traffic Jam Weekend #276 – View From The Beach Chair
April 15, 2021 at 8:36 am[…] chose Steampunk Doorstop from Unique Creations by Anita. “Anita’s creativity never ceases to amaze […]
A Crafty Mix | How to Turn a Sweater Into a Handbag - Easy Sew - A Crafty Mix
November 22, 2022 at 1:46 am[…] cutest Steampunk doorstop by Anita. This one deserves a close-up to see all the […]
How to Turn a Sweater Into a Handbag - Easy Sew - A Crafty Mix
September 6, 2024 at 7:24 pm[…] cutest Steampunk doorstop by Anita. This one deserves a close-up to see all the […]