
I’ve recently discovered the traditional Japanese wood-burning technique known as Shou Sugi Ban, and I’ll be honest—I’m hooked. The textures, the contrast, and especially the unpredictable colour shifts when you layer vibrant stains like Unicorn Spit turn simple timber into art.
In this tutorial, I’ll show you how to make a colourful Shou Sugi Ban wall hanging from scrap wood—the perfect statement piece to display under my pergola and a brilliant way to use up those off-cuts cluttering the workshop.

What Is Shou Sugi Ban (Yakisugi)?
Shou Sugi Ban (also called Yakisugi) is a centuries-old Japanese method where timber is charred to preserve and waterproof it. Traditionally done with Japanese cedar and finished with natural oils, the deep, crackled char resists rot, pests and weather. Modern makers also use it decoratively. By controlling the burn, brushing back the char, and adding vibrant stains, you can transform ordinary off-cuts—even budget pine—into striking wall art with dramatic grain and colour.
How to Make a Colourful Shou Sugi Ban Wall Art from Scrap Wood
*This post may contain affiliate links. This means I earn a small commission on links used at no extra cost to you. Please see my disclosure policy for more information.**
Materials Needed
- Scrap wood (various sizes and types)
- Map gas blowtorch
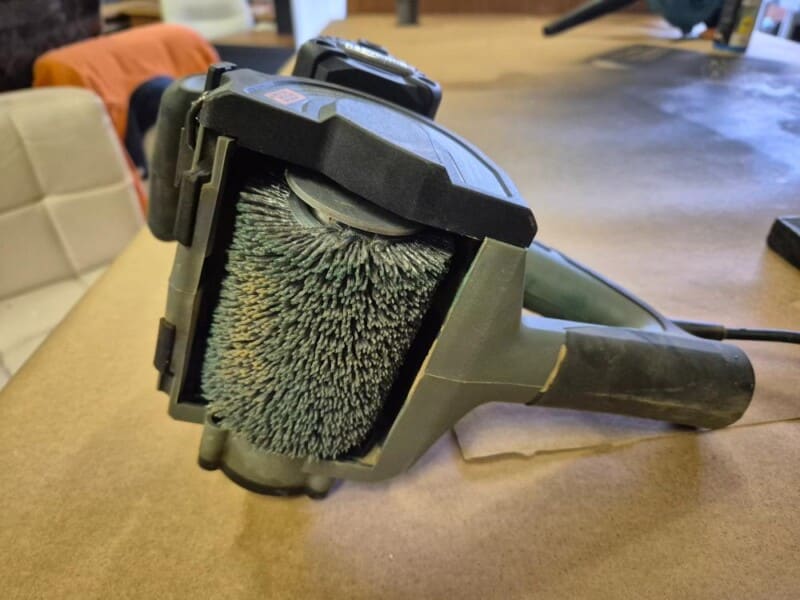
- Wire brush and coarse nylon flap brush (for a drill or drill press)
- Safety gear – gloves, respirator, glasses
- Unicorn Spit or other wood stains
- Spray bottle (filled with water)
- Foam sponges
- 12mm plywood sheet (for the base)
- Wood glue
- Hot glue gun and full glue sticks
- Oil-based clear varnish or tung oil (to seal)
- mitre saw
- Drum sander with nylon brush
- Jig saw
Step 1 – Burn the Wood
Start by choosing a mix of scrap timber in different sizes and species. Using varied thicknesses adds dimension and interest.

Burn each piece with a blowtorch until the surface blackens and begins to crack. Make sure to do this in a safe, fireproof area. I used a metal sheet on my workbench

Step 2 – Clean Off the Char
This part is messy, so wear old clothes and protective gear. Begin with a wire brush, brushing along the grain to remove the charred layer.

For a deeper texture, use a coarse nylon flap brush attached to a drill or drill press. This saves your arms from aching and gives great detail.

The goal is to expose the woodgrain while keeping the burnt lines dark.

The result? A gorgeous contrast between the black grain and light timber below. Leave some darker areas for added depth.

This image shows how much dust this technique creates, so using a respirator and safety glasses is important. The goal is to sand each piece until you reach the pale, raw timber beneath the charred surface. The woodgrain will remain dark, creating a striking contrast. Using a coarse flap wheel brush makes this process much easier and gives the wood a beautifully textured finish. For more depth and colour variation, you can choose to leave some darker, lightly charred areas untouched.

Keep in mind, this isn’t a quick job. Depending on the wood species and how deep your burn is, the sanding can take several hours. But the end result is absolutely worth the effort.

If you have a restorer’s sander, it cuts the sanding time down dramatically. Fit a coarse nylon abrasive drum (around 80–120 grit) to strip the loose char without gouging. Keep the tool moving with the grain, and wear a respirator—this step throws a lot of dust.

Step 3 – Add Colour to the Wood
To colour the wood, I tried several methods and products. There are so many variables that affect the final result, I decided to create a separate post just for that. It covers all the techniques I used and how different factors, like burn depth, wood type, and application, can completely change the colours.

This is where the magic happens. I used Unicorn Spit stain and glaze, which works best on damp wood. Mist the timber lightly with water, then apply colour using a wet foam sponge. Swipe it across the wood in patches—don’t overdo it or you’ll lose the textured effect.

Let the stain sit for a minute, then wipe off the excess. The colours will appear dull at first, but once sealed, they’ll come to life in the most vibrant way.

Step 4 – Create your design
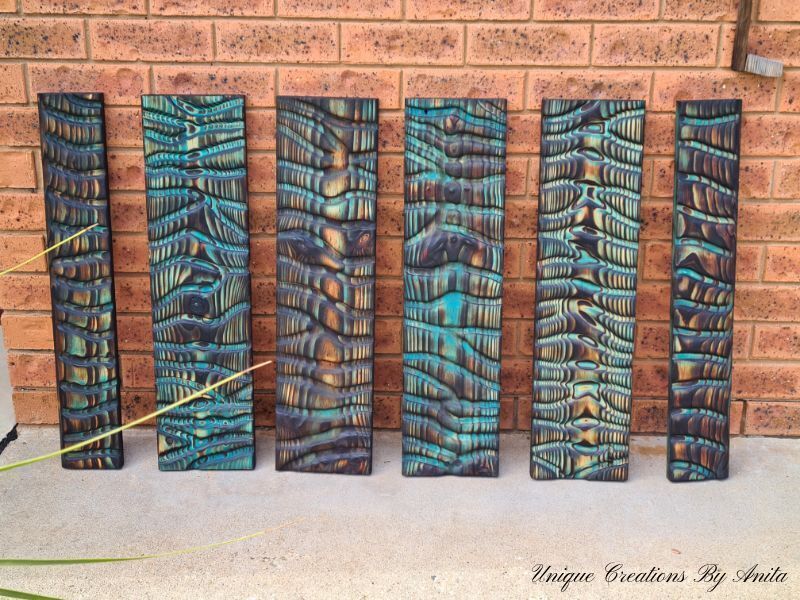
Cut a sheet of 12mm plywood to your desired size. Mine was a 1m square. I cut the wood into small pieces and arranged the layout as I worked, fitting everything together like a colourful, textured puzzle. Mixing different shapes, sizes, and colours gave the design a more dynamic and eye-catching look.

I originally cut some pieces at a 45-degree angle to add more interest to the design. But I ended up with too many small gaps that were difficult to fill, so I scrapped that idea and switched back to straight cuts for a cleaner finish.

Once you’re happy with your layout, use a marker to trace the outline directly onto the base. This will give you the exact shape you need to cut. Before removing the pieces, take a quick photo of the design so you can easily recreate the layout later. Then, carefully slide the pieces off the base.

Now you can cut along the traced outline using a jigsaw. It’s also a good idea to burn the base before attaching the pieces—this helps hide any small gaps where the lighter wood might otherwise show through.

Step 5 – Attach the wood
Glue each piece to the plywood backing using wood glue. I added two dots of hot glue to each end to hold them in place while the wood glue dried. Avoid using nails—they spoil the finish.

Step 6 – Seal and Finish
Once your wall art is assembled, it’s time to seal it. I used an oil-based clear varnish, which made the colours from the Unicorn Spit really pop. Don’t use a water-based sealer, or it will reactivate the stain and smudge the colours. Tung oil is a good alternative.

The transformation is incredible once sealed. The wood glows with colour, depth, and texture.

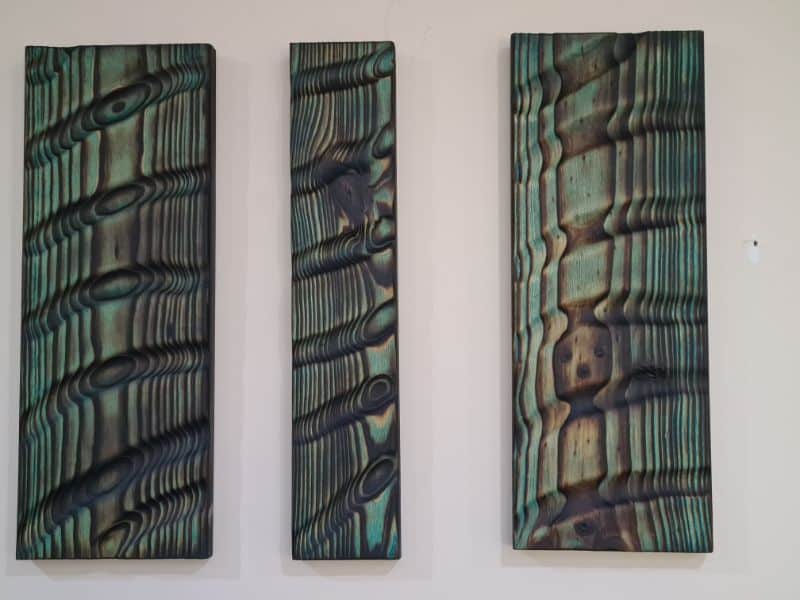
Finished Shou Sugi Ban Wall Hanging
Here’s a close-up of the final piece. Depending on the light and angle, the colours shift and change—almost like looking at stained glass made of wood.


Depending on the angle and the light, the colours will look different.

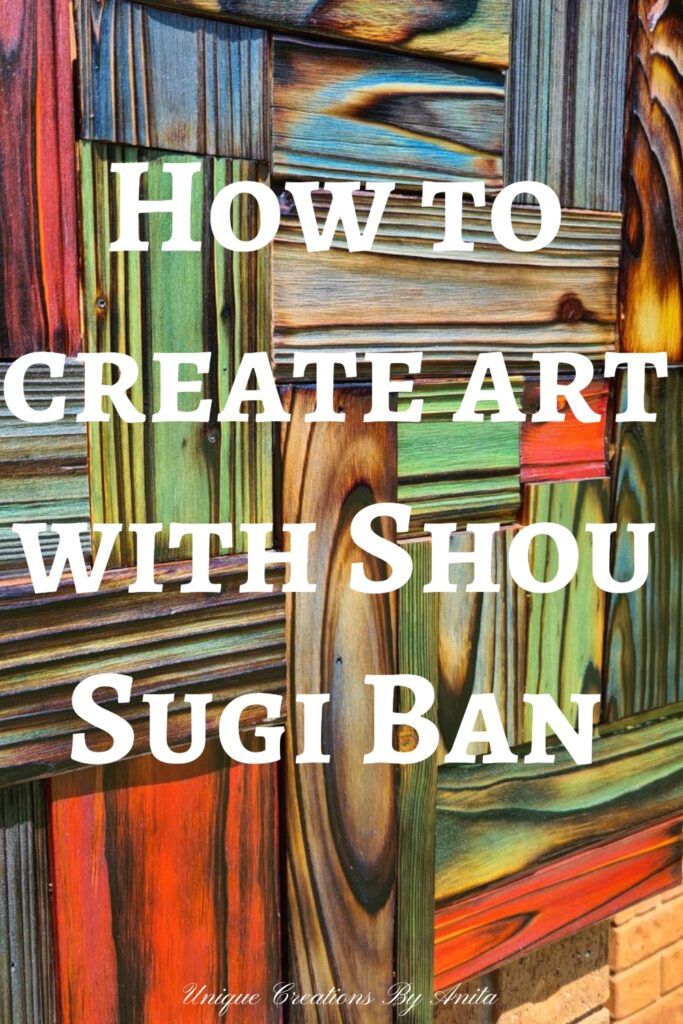
More Ideas Using Shou Sugi Ban
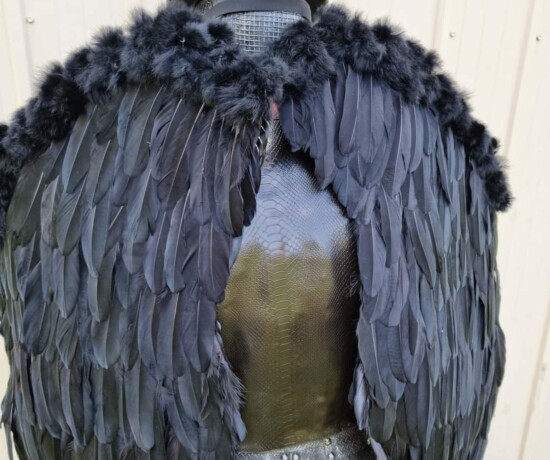
This project ended up with a striking snakeskin effect, thanks to the combination of the Shou Sugi Ban burn and grooved carving technique.
This is another Shou Sugi Ban project where I used a gouge ball to carve deeper patterns into the wood, adding even more texture and detail to the design.


If you’d like to find any of the items used in this project, we’d greatly appreciate it if you used our affiliate links. These links provide us with a small commission at no extra cost to you, allowing us to continue creating and sharing more inspiring projects. We’d also love to hear your thoughts—feel free to leave a comment or share this post!


66 Comments
SusanD
July 5, 2021 at 3:16 pmAbsolutely stunning!
Anita Holland
July 5, 2021 at 3:25 pmThank you so much for the awesome comment.
Glenda Tanya Morgan
July 5, 2021 at 3:19 pmIt looks beautiful. I like the style and I love doing wall art. Different kinds
Anita Holland
July 5, 2021 at 3:26 pmThank you so much Glenda, I would love to see some of your projects. If you like you can send them to my facebook.
Glenda Tanya Morgan
July 5, 2021 at 3:24 pmI made pictures out of drawers three of them and I put it on my wall. I carved grooves in it with a wood iron gun it looks amazing then I polyurethaned it.
Anita Holland
July 5, 2021 at 3:29 pmI would love to see them.
Michelle Leslie
July 5, 2021 at 5:46 pmHoly Moly, Anita, I literally gasped when I saw that first picture. How incredibly lovely. We made a Shou Sugi Ban window frame thingy a few weeks back and it’s such a fun technique to play around with, but darn girl those colors…… OMW, in love!!!
Anita Holland
July 6, 2021 at 9:35 amThank you so much Michelle. I love the finish that shou sugi ban gives. I have a post coming up where I was testing lots of different colours and products to see the results.
Carolina E Gonzalez
July 6, 2021 at 2:55 amOnce again Anita, you never fail to impress me with your creativity and artistic visions. This is stunning!!! a piece of art worthy of a gallery showing. Wow. Love it.
Anita Holland
July 6, 2021 at 9:36 amThank you so much Caroline, your comments always make my day. Thanks so much for your support.
Maria
July 6, 2021 at 4:33 amYou have the most unique ideas. Love this.
Anita Holland
July 6, 2021 at 9:36 amThanks Maria, my mind never seems to shut off. lol
Meegan
July 6, 2021 at 6:18 amI love this technique of creating a Shou Sugi Ban piece of art! Your colors and style are definitely one of a kind and gorgeous!
Anita Holland
July 6, 2021 at 9:37 amThanks Meegan, they always end up unique because I make them up as I go along. I am as surprised as you in the end sometimes. lol
michelle
July 6, 2021 at 8:12 amThis is gorgeous. You really took it to the next level with the Unicorn Spit. Beautiful!
Anita Holland
July 6, 2021 at 9:38 amThanks, Michelle, I did you some other products and the results were just as stunning.
Julie
July 6, 2021 at 10:31 pmI’m so out of the loop with things, I’d never even heard of Shou Sugi Ban but I love it! This looks fabulous 🙂
Linda Kilsdonk
July 7, 2021 at 3:03 amThis is just exquisite! You did a fantastic job. Smiles, Linda at Paper Seedlings
Anita Holland
July 7, 2021 at 10:32 amThank you so much Linda, so kind of you to say.
Lauren Renee Sparks
July 8, 2021 at 3:38 amThis is gorgeous. I love it so much.
Anita Holland
July 12, 2021 at 1:28 pmThank you so much.
Debbie-Dabble
July 8, 2021 at 7:34 amAnita,
This is so unique, so colorful and so pretty!! I love it!! Thanks so much for stopping by!! Stay safe, healthy and happy!!
Hugs,
Debbie
Anita Holland
July 12, 2021 at 1:28 pmThank you so much Debbie, it turned out so much nicer than I expected.
creativejewishmom/sara
July 8, 2021 at 8:35 pmWow, amazing original project! Thanks for sharing on craft schooling Sunday as always!
Anita Holland
July 12, 2021 at 1:29 pmThank you so much
Jo (A Rose Tinted World)
July 10, 2021 at 6:15 amWhat a fabulous hanging and such an interesting process. Thank you for sharing this!
Anita Holland
July 12, 2021 at 1:29 pmThank you Jo, It was my first try and it was so much fun but super messy.
Rosemary Palmer
July 11, 2021 at 8:23 amI love this – I could see it with so many other colors, or just one.
Anita Holland
July 12, 2021 at 1:30 pmThank you Rosemary, I am doing one with just one colour at the moment. I think it will look just as great.
Michele Morin
July 11, 2021 at 11:35 pmWhat a gorgeous way to showcase the beauty of wood!
Anita Holland
July 12, 2021 at 1:31 pmThank you Michelle. I had to giggle because it was all junk wood. Most were recycled knotty pine wall panelling.
Tracy Schneider
July 11, 2021 at 11:43 pmYou indicated you used oil-based Spar Urethane for final coat. It is hard to find the oil-based here in Alberta but there are a lot that are water based. Would I get the same coverage and protection or is oil-based the better choice. Thanks
Anita Holland
July 12, 2021 at 6:16 amYou can use any oil based polyurethane, just not watermarked as it will reactivate the unicorn spit.
Anita Holland
July 12, 2021 at 1:33 pmHi Tracy, You don’t have to use the product I used as long as it is an oil-based product. You can use an oil-based polyurethane or for indoor an oil like tung oil. Water-based products will reactivate the unicorn spit and ruin the surface.
Essa
October 17, 2023 at 9:16 amVery wonderful work with harmonious colors. Thank you for teaching us how to work
Anita Holland
October 20, 2023 at 4:31 pmThank you and you are very welcome
Carolina E Gonzalez
July 15, 2021 at 12:22 amHi Anita, I have a question. I noticed that you had first cut some pieces at angles but you did not use them for the final piece, why? I cannot stop looking at it, I am so in love with how it turned out. I am thinking of maybe making a headboard with this technique. Wouldn’t it be stunning?
Anita Holland
July 15, 2021 at 2:56 pmHi Carolina, I have lots of pieces still left over that I am using for other projects. I will be posting more projects using them soon. Thanks for the awesome comments.
Marcelle Williams
September 6, 2021 at 4:02 pmYou are an inspiration for me to start some projects that I have had in mind as well as trying out some of yours. Thank you soo much
Anita Holland
September 6, 2021 at 5:46 pmThank you so much, that is very kind of you to say.
Pamela Hebert
April 8, 2022 at 12:10 amAwesome work! Your instructions were very helpful. Have you tried to mix your steampunk bottle technique and your burning wood technique? I know that you can get some steampunk wood pieces to use on your wood. Just thinking out loud but I absolutely love your work.
Anita Holland
April 8, 2022 at 9:25 amThat is a really cool idea Pamela. I will have a think and see what I come up with. Thanks for the great suggestion.
Morné Kühn
July 7, 2022 at 7:59 pmDid you know: You can use food coloring to stain the wood after it is burned. I diluted it with water to make it lighter in color but you can use it without water to get more vivid color.
Anita Holland
July 9, 2022 at 8:34 amThanks for the info, I do believe it works but being not very domestic in the kitchen it was something I did not have at home. lol
Jennifer Williams
February 27, 2025 at 8:53 amI know this is an old message / reply, but I was curious about using something else besides unicorn spit because its expensive!! So just food coloring & water?
Anita Holland
March 16, 2025 at 7:05 pmYou can use any watered down acrylic paint or food colouring. Here is a post I done showing other methods. https://uniquecreationsbyanita.com/how-to-add-colour-to-shou-sugi-ban/
Donna
September 16, 2022 at 10:26 amMy son does professional woodwork for high-end customers in Austin, TX. He does this technique, but does not burn it all the way, just enough to highlight the grain. It certainly is not as messy! Is there a benefit to charring it all the way like that?
Anita Holland
September 16, 2022 at 11:02 amHi Donna, the only reason to burn so deep is to get the texture on the surface. The pictures don’t really show the effects of the texture but to see it in reality it is stunning to see all the ridges and grains. I would not burn deep for furniture either because the surface would be too uneven.
Jane Small
November 13, 2022 at 7:56 pmBrilliant tutorial, thank you. I have have been burning my pieces to darken the grain but didn’t realize you could burn so heavily and then sand away the soft wood between the grain. I am going to give it a go!
Off to look at all your other projects.
Anita Holland
November 19, 2022 at 11:40 amThanks Jane it is a really great technique with stunning results.
CARLOS EDUARDO ANDRADE
April 7, 2023 at 7:39 amun placer escribirte desde Venezuela, eres una gran artista y agradezco hayas compartido tus conocimientos, los cuales son fuente de inspiración, felicidades
Anita Holland
April 8, 2023 at 12:24 pmThank you so much for the awesome compliment.
Tonya Edwards
April 24, 2023 at 6:28 amHow did you determine the lengths to cut the wood? Did you already have a pattern in mind? I love this project and drew a design on graph paper then cut and stained the wood. It did no fit together like the design at all!! LOL But I put it together then custom cut a few left over pieces to fit the gaps. I did not burn my wood dark enough but it was my first attempt and I am pleased with it. Now to seal the pieces and mount it..
Anita Holland
April 25, 2023 at 6:36 pmI just made the design up as I went along. I did change it around a few times until I was happy with it. Towards the end I did cut the pieces to fit into the design. I would love to see yours once complete.
Tonya Edwards
May 15, 2023 at 12:21 pmI finished my piece and got it hung on my porch today and I promised to show you the finished project. Thanks for the inspiration and additional information.
Well……, now that I have written this reply I find I don’t know how to add the picture to it.
Treeve
May 10, 2023 at 8:25 amhi Anita
your inspiration has got me hooked on shou sugi ban and thanks to you ive created some great pieces im very proud of i cant thank you enough, many thanks
Treeve
Anita Holland
May 18, 2023 at 7:11 pmThat is really awesome, I know how addictive it can be. I would love to see some of your work. If you have a Facebook page I can see them or you can email me anita_holland2410@hotmail.com
Mitzi Jones
September 5, 2023 at 10:47 amI love this wall hanging!!!!! thanks for sharing and for the ideas!
Anita Holland
September 10, 2023 at 3:18 pmThank you so much.
Glyn Roseden
October 3, 2023 at 4:18 amHi there ….from St Albans. UK
Beautiful results. I especially like the turquoise and green hues. So calming.
Thankyou for the finer tips for achieving great results.
Glyn……..Ageing construction artisan.
Anita Holland
October 11, 2023 at 6:46 amThank you so much and you are very welcome.
Kathye
October 15, 2023 at 2:25 amAmazing!! Thank you for the tutorial. I have some questions:
I am struggling on how you used the flapbrush on the drill press. Do you hold the wood piece to the side of it or pull the press down on the wood laying flat below?
Can you just use a sander to do this part?
Thanks. You are a talent!!!
Anita Holland
October 16, 2023 at 5:38 amThank you, I clamp the wood to the table and lightly push down on the wood going with the grain of the wood. A sand will not wood because it will just take off the surface. The idea is to remove the soft burnt wood between the grain to create texture.
Anita Holland
November 20, 2023 at 8:42 amThank you so much.
Melinda Revai
November 10, 2024 at 12:48 amHi there, I can`t seem to find the info what wood you used. What can I upcycle to create a new piece?
Anita Holland
November 26, 2024 at 6:32 pmHi used all types of scrap wood from pine to pallet wood. The soft wood work better. I found pine to be the best.