
Scrunchies are back! And if you’re like my daughter, you’ve probably built up quite the collection. She recently asked me to create a cute but practical display stand for her scrunchies to sit neatly in her beauty bar. I designed one from scrap wood, and it now doubles as a jewellery organiser too. Best of all—it didn’t cost a thing! This easy DIY is perfect for using up leftover materials and makes a fun, functional piece of décor.

How to make a Jewellery/Scrunchie Stand
**This post may contain affiliate links. This means I earn a small commission on links used at no extra cost to you. Please see my disclosure policy for more information.**
Materials Needed
- 1 x wooden dowel (cut to size)
- 1 x wooden curtain rod or similar
- Scrap timber for base (mine was 200 mm x 100 mm x 20 mm)
- Epoxy glue
- Paint (acrylic)
- Old doorknob (optional)
- Felt pads or adhesive felt
- 25 mm spade drill bit
- Power drill or drill press
- Orbital sander or sanding block
- Wood router with round-over bit
- Ruler and square
- Clamps
Step 1: Choose Your Wood
I always start by raiding my scrap wood pile. I used a leftover curtain rod and a piece of dowel for the arms. The base came from a chunky offcut in my timber stash. Hoarding wood pays off!

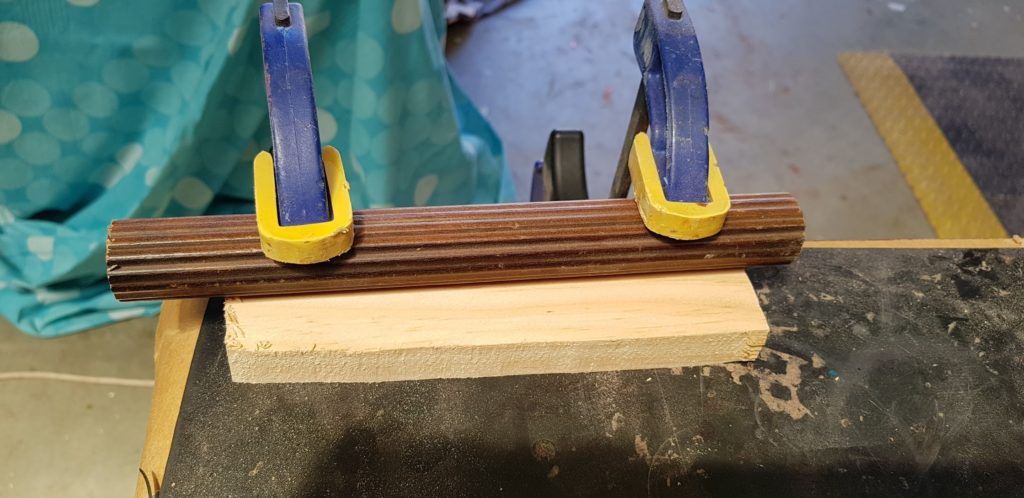
I cut the dowel and curtain rod to around 250 mm in length. I clamped them down firmly while drilling to avoid movement.
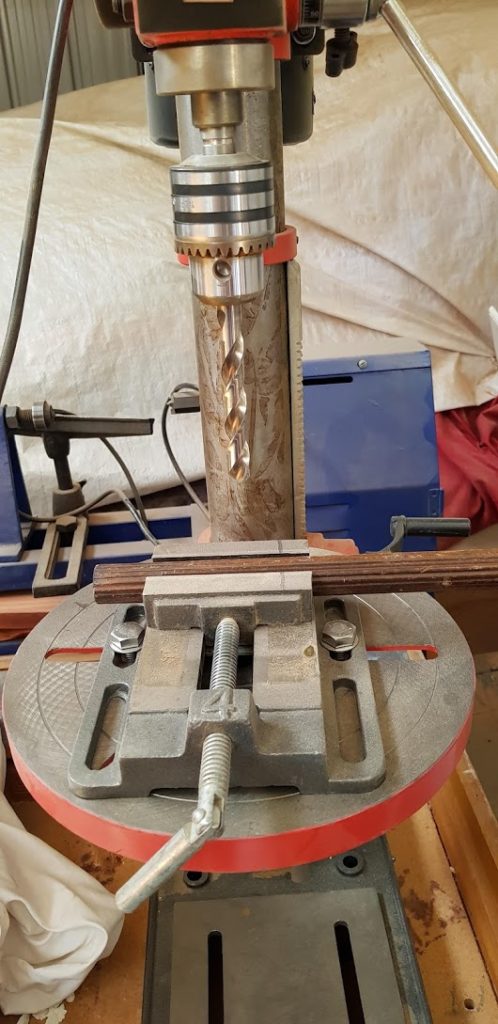
Step 2: Drill the Holes
Using a drill bit that matched my dowel size, I carefully drilled straight through the curtain rod to form crossbars.

Tip: Use a drill press if you have one. I went skew on my first attempt and had to adjust my dowels later.
Step 3: Build the Base
Cut your base piece to size. I used a piece 200 mm long, 100 mm wide, and 20 mm thick. Find the centre and mark it for drilling. Use a 25 mm spade bit to drill a hole halfway through. Once I tested the fit, I realised it needed more support. I flipped it and drilled from the underside to create a full-depth hole for added strength.
Step 4: Shape and Sand

Using a round-over router bit, I smoothed the edges of the base. This gives a professional, polished look. I then sanded all surfaces with an orbital sander to remove splinters and rough edges.
Step 5: Glue and Assemble
Mix your epoxy glue thoroughly. This is important—it won’t set correctly otherwise.

Apply glue to the hole in the base and insert the vertical pole. Use a square to make sure it’s straight while drying.

Because my drilled holes were slightly off, I cut the cross dowels in half and glued them into position instead of sliding them through.

Step 6: Paint and Decorate
I painted the entire stand in acrylic paint. You can use any colour that matches your décor.

To protect my daughter’s dresser, I added self-adhesive felt to the bottom of the stand.

For a finishing touch, I glued a decorative old doorknob to the top of the pole.

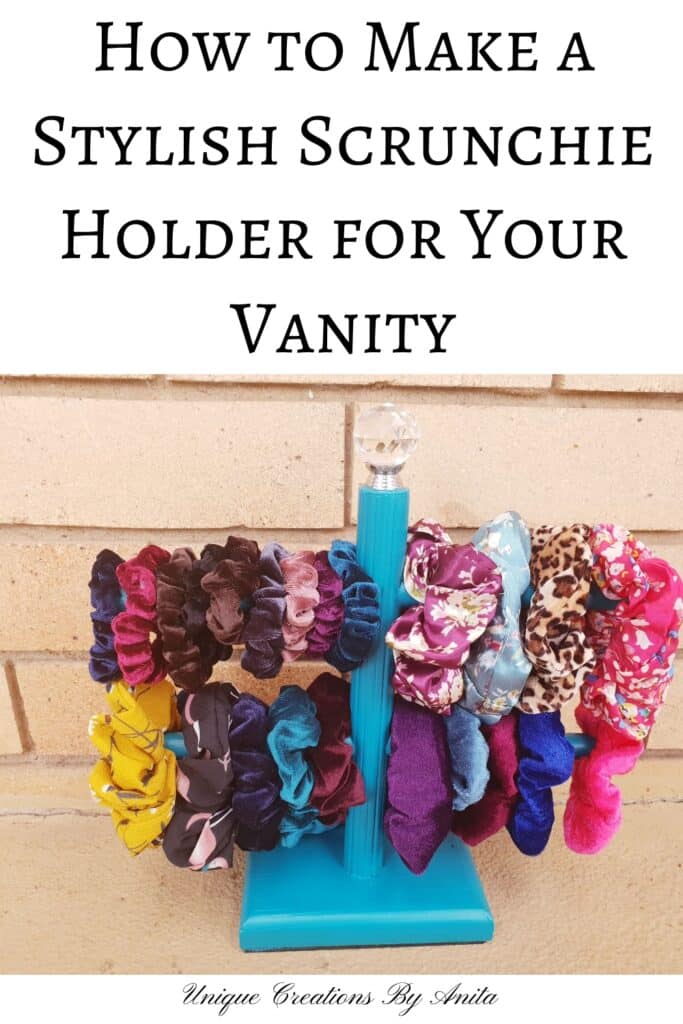
Finished Look
And that’s it! A beautiful, handmade scrunchie stand that also works perfectly as a jewellery organiser. It fits neatly on a vanity, and the layered design makes scrunchies easy to grab. It also works great for bracelets, bangles, and hair ties.


Other Jewellery Stand Ideas
I transformed an old pair of high heels into a one-of-a-kind ring stand, using mixed media techniques to give them a vibrant, artistic makeover.

This is another style of jewellery stand made from recycled material.


If you’d like to find any of the items used in this project, we’d greatly appreciate it if you used our affiliate links. These links provide us with a small commission at no extra cost to you, allowing us to continue creating and sharing more inspiring projects. We’d also love to hear your thoughts—feel free to leave a comment or share this post!


21 Comments
myreviewcenter
February 24, 2019 at 8:29 amWow, How amazing it is? Love this Jewellery scrunchies stand. You are truly a genius. Can’t wait to make this as mine. Thank you so much for sharing this with all of us.
Anita Holland
February 26, 2019 at 4:17 amThank you so much, it is great to hear how others like my projects. I have a few new projects to put up I just never seem to find the time to type them out.
Anita Holland
February 26, 2019 at 4:18 amYou are very welcome and thank you for taking the time to reach out it really does mean alot.
Joni
September 23, 2019 at 10:56 amGreat idea for a product many women could use. You should market these, perhaps in different colors ! They’re very well made.
Anita Holland
September 24, 2019 at 1:59 amThank you so much, this was my daughter’s request and now her friends want one too. lol
Sylvia | Grace for a Gypsy
October 27, 2019 at 2:47 amHow cute! and a great tutorial! These would be so useful for craft show setups as well! Found you at #omhgff
Anita Holland
October 27, 2019 at 9:49 pmThank you so much, It makes a great jewellery stand too.
Julie
October 28, 2019 at 5:39 pmBrilliant and so versatile! I’m finding it hard to believe scrunchies are really back, I had so many that I’d made for myself back in the 80’s – I loved them so much!!
Katie Mansfield
October 30, 2019 at 12:58 amThis is fabulous. I’ve noticed scrunchies everywhere again.
Anita Holland
October 30, 2019 at 9:02 pmThank you, who would have thought they would come back in fashion again.
Teresa
October 30, 2019 at 5:56 pmSo cool, I need one of these for my daughter’s room.
Thank you for sharing at The Really Crafty Link Party. Pinned.
Anita Holland
October 30, 2019 at 9:02 pmThank you so much.
Create With Joy
November 2, 2019 at 9:45 pmLove this idea Anita – all of my scrunchies are lying around in drawers – thanks for sharing with us at Inspire Me Monday at Create With Joy! 🙂
Anita Holland
November 6, 2019 at 12:26 amThank you, who would have thought they would make a comeback.
Michelle
November 5, 2019 at 6:48 pmThis is totally awesome! Thank you linking up to Creative Compulsions!
Anita Holland
November 6, 2019 at 12:20 amThank you, Michelle.
Dee | Grammy's Grid
November 6, 2019 at 5:47 pmEvery girl needs one of these!! Thanks so much for linking up at the #UnlimitedMonthlyLinkParty 6. Shared.
Anita Holland
November 7, 2019 at 8:31 pmThank you, they are very handy.
Robin
November 6, 2019 at 6:24 pmI could definitely use this! Thanks so much for sharing your talent with us at the Creative Muster. Looking forward to seeing what you’ll be sharing next week. Pinning!
Robin😊
Anita Holland
November 7, 2019 at 8:31 pmThank you, Robin.
Cecilia
November 11, 2019 at 1:37 amFun idea! Thanks for sharing at Vintage Charm!