
This chaise lounge, made entirely from recycled materials, was inspired by a friend’s request. When she asked if I could build one, I doubted I had the skills to pull it off. I can’t work from plans—I only make projects up as I go. That’s why I choose recycled materials: if the build fails, I haven’t lost any money. Amazingly, it turned out so well that it now takes pride of place in my front-room window.

Since this was meant as a test run, I didn’t document every step. After a year of use, I discovered the cushion lacked support, and one of the frame’s wooden supports sat too high, making it uncomfortable to sit on. Back to the workshop it went for a teardown and repair. It was then that I took the photos you’ll see throughout this guide, so you can confidently craft your own recycled-materials chaise lounge. My website focuses on creating fresh home-decor projects using mostly recycled materials. This post will show you how to find them for free.

Before we dive into this tutorial, be sure to subscribe to my bimonthly newsletter to be the first to see my latest projects. You can also follow me on Pinterest and Facebook, where I also include my unique mixed-media art projects
How to make a Chaise lounge from recycled materials
**This post may contain affiliate links. This means I earn a small commission on links used at no extra cost to you. Please see my disclosure policy for more information.**
Updated: 5/8/2025
Materials Needed
- Recycled timber
- 10 mm plywood (for arch supports)
- 20 mm scrap wood (for arch cross-supports)
- Reclaimed table legs (cut to 45 cm height)
- High-density foam mattress (minimum 50 mm thickness)
- wadding (for smoothing curves)
- Heavy-duty upholstery fabric
- Sheeting (old bed sheet to hold foam)
- 50 mm jute webbing and webbing stretcher
- Pocket-hole screws and pocket-hole jig
- Upholstery tacks & tack strips
- tack strip (attach fabric under arch)
- Self-adhesive felt pads (for feet)
- Wood glue, wood screws
- Tools: jigsaw, router, electric sander, staple gun, drill, handsaw, hammer
Building the Base
With AI’s help, I generated the base shape so you can see the simplicity of the design. I did miss one measurement, which is that the depth of the base is 18cm.

I began by glueing two layers of recycled timber into a rectangular box roughly 160 cm long, 70 cm wide and 18 cm deep. After clamping it overnight, I added cross-beams for extra rigidity—but a year later, I removed the top beam because I could feel it pressing through the cushion.

To keep the timber layers from shifting over time, I secured them with a few heavy-duty metal plates.

The legs came from an old table—I even repurposed its tabletop into a personalised wine-barrel table. I trimmed the legs to the perfect height with a handsaw, then sanded, stained and varnished them for a smooth, durable finish.

The scratches and dents on the legs didn’t matter, since they’re hidden once assembled. I glued each leg and then screwed it into a sturdy triangular timber block fitted inside the frame for extra strength.

Making the arch
The arch was the hardest part of building this chaise. I used the guide image to sketch the curve, then cut out two matching pieces from 10 mm plywood. For the supports between the arches, I used 20 mm-thick scrap wood—these pieces stay hidden, so you don’t need prime timber. I attached each support to the arches with a pocket-hole jig and pocket-hole screws.

Attaching the arch
I routed a 10 mm groove along the top edge of the timber frame, then slid the arches into it and screwed them in from underneath so they sat flush. Next, I stapled a layer of foam covered with an old sheet to the arch to smooth out the curve before adding the final upholstery.

Covering the base
When I stripped down an old couch, I found this edge foam already tacked around its wooden frame—and I knew it would be perfect for my chaise lounge. FoamFlex Edge Trim is a high-density, closed-cell foam strip that you staple along the wood before adding your fabric. It creates a smooth, shaped finish around arms or the front edge of sofas and chairs, preventing bumps or ripples.

Next, I stapled 20 mm foam all around the base and wrapped it in a white sheet to keep it in place. This extra layer smooths out bumps so the final fabric lies nice and even.

Adding Support Straps
Errors in the original build. I used just one layer of webbing across the base, but over the years, it sagged when the kids flopped down on it. I hadn’t used enough webbing or pulled it tight enough. Plus, some of the staples pulled out—probably because they weren’t long enough.

During the rebuild, I used a webbing stretcher to tension two intersecting layers of jute webbing, stapling and folding the ends for extra strength.

I added upholstery tacks along each strap for a reinforced finish.


This image shows what’s under the fabric: first, the foam roll is attached to the wood, then a layer of foam, covered by a white sheet, and finally the world-map fabric.

Making the back support
I repurposed the top of an old desk for the back support. First, I sketched the curve in pencil until I was happy with it, then cut it out with a jigsaw. I stapled a layer of wadding to the back support only down to where the cushion sits, so the cushion would fit flush against it.
Using the wooden back as a template, I cut two fabric panels and sewed them together. I then stapled the front edge of the fabric to the base, screwed the back support into place, pulled the fabric down over it, and stapled the excess underneath the base. Covering the base was surprisingly easy. I cut the fabric to fit and stapled it along the top and bottom edges. Then I used a thrift-store bed sheet—only a couple of dollars—to hide all the staples and webbing underneath.

Upholstering under the arch
The last panel goes under the arch. Tuck all the excess fabric from the back and sides behind this panel to keep it hidden. To keep the seams neat and stop the fabric sagging, staple a strip of cardboard under the arch.

Then secure the sides with tacking strips—wrap the fabric around each strip and hammer it into the wood. If you’re new to tacking strips, search “Sailrite tacking strip tutorial” on YouTube. Their step-by-step video clearly shows how to use them. I can’t link directly here, but a quick Google search will bring it right up.

Making the arch padding
This is the padding that will hide all the staples and fabric ends at the front and back of the arch. You need to cut some thin plywood to the shape of the arch.

I covered the arch with a thin layer of foam, then stretched the upholstery fabric over it. Finally, I added piping around the edges to hide any gaps between the arch and the back support.

I cut the tacking strips to match the wood’s size and glued them on with hot glue. Then I placed the padded wood against the arch frame and gently tapped it in with a mallet so the strips gripped the wood.


I repeated the same steps for the front panel.

Making the piping for the cushion
Cut your fabric into 20 mm-wide strips, joining them until you have the length you need. Lay your rope or piping cord along the centre of the strip, then use a zipper foot on your sewing machine to stitch it in place. Finally, sandwich this piping between the two fabric pieces for your cushion, sewing along the edge so the cord sits neatly in the seam. I added a zipper to make it easier to remove for washing.

Crafting the Seat Cushion
For the cushion, you’ll need fairly firm foam. I used an old mattress that was too soft by itself, so I added a few layers of polyester wadding to firm it up. Before covering the foam, wrap it in a sheet to hold the wadding in place—this makes the final fabric cover much easier to fit.

In hindsight, I shouldn’t have added piping to the base—it was too hard to align properly.

Pad the feet
Stick self-adhesive felt pads to each leg to protect your floors and carpets from scratches. Then staple weed mat across the underside of the chaise to close it off and keep the frame hidden.

I know it will not be easy for everyone to make this, I just wanted to show that it could be done with basic woodworking skills.

The lighting in my home isn’t great, so these photos don’t really show the fabric’s true colours and texture. So I got AI to create my opening photo so you could see it in a proper setting.

If you want to try and make a mini version first, they make great beds for your lazy cats.


More great project ideas
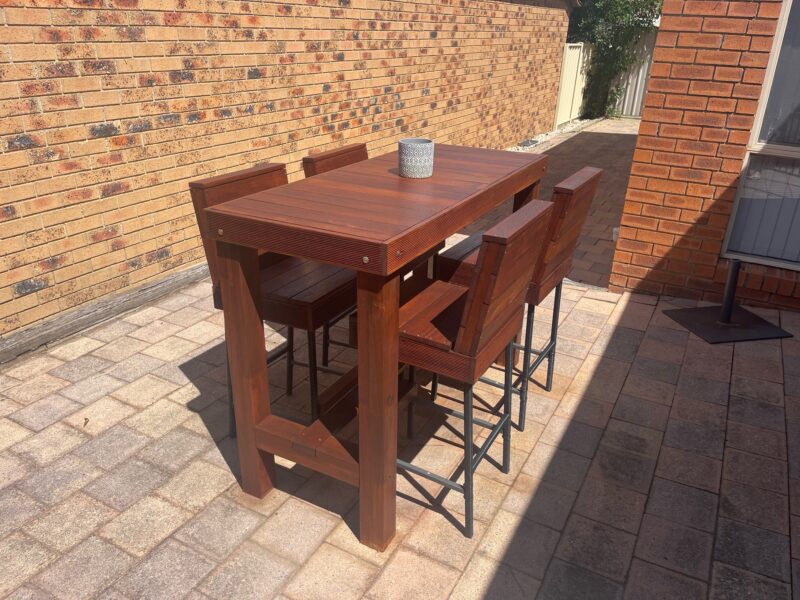
I built a rustic outdoor bar table from recycled decking planks.
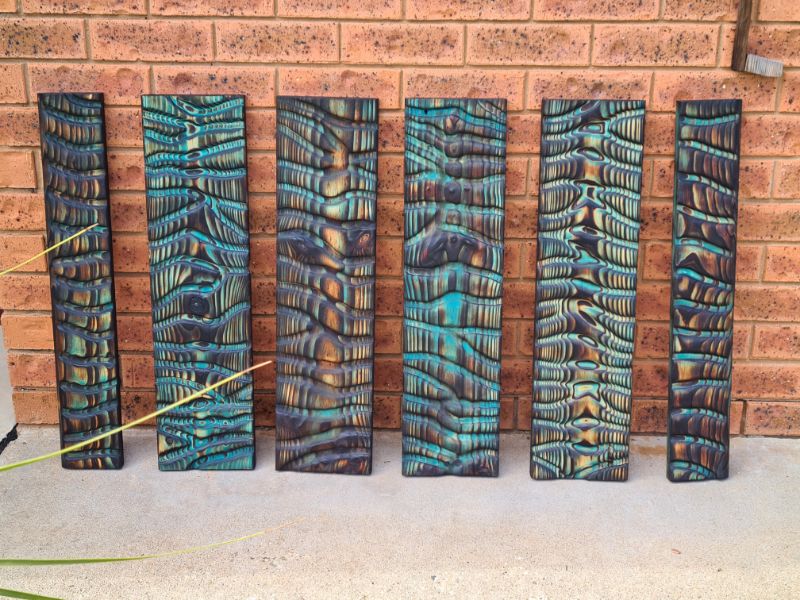
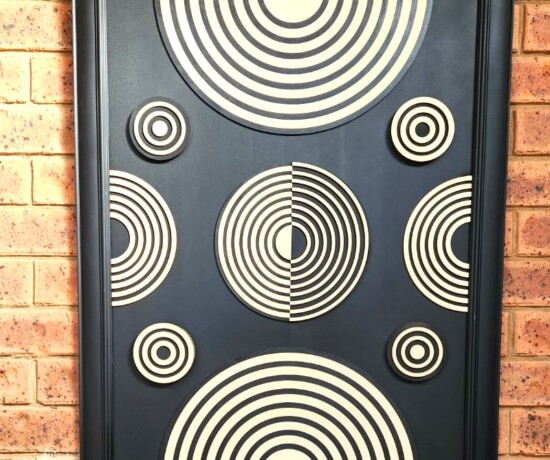
I made these wall-art panels from recycled timber and finished them with a Shou Sugi Ban technique. You can find all my woodworking projects here if you are looking for inspiration.


If you’re interested in any of the items used in this project, we’d appreciate it if you used our affiliate links. Clicking these links earns us a small commission at no extra cost to you, helping us create more inspiring and exciting projects to share. We’d also love to hear your thoughts—feel free to leave a comment or share this post!


60 Comments
Michelle
November 2, 2016 at 3:38 pmBrilliant, brilliant!!!! I’m at a loss for words. Stunning. I don’t care how good you are with photography, you did and amazing job with this Anita. You should be proud, I’d be over the moon. Love it!!!
Terry Pheasant
September 26, 2019 at 10:11 amYes Anita! I agree with Michell! You must have the patience of a saint! Lol. Absolutely Beautiful and Amazing work!
Anita Holland
September 26, 2019 at 1:11 pmThank you so much, It is one of my best projects.
Samantha Eguia
October 4, 2017 at 2:10 pmGREAT JOB! I’m interested in designing and building furniture. This is on my list but on the difficult side. I know I’ll need a good time window to start and stay focused to finish. Love the cat chaise too. I have a 5lb chihuahua who I think will love it too!
Anita Holland
October 6, 2017 at 2:27 amThanks you Samantha, It was not that difficult to do, looks harder than it was. It took more time to sew the cushion than it took to build the whole thing. I have no training, just a home DIYer so worth having ago. Maybe start with a little one for the chihuahua. Good Luck!
Nancy
October 4, 2017 at 2:30 pmWow! Great job!
Anita Holland
October 6, 2017 at 2:17 amThank you Nancy
Tina GAllagher
October 4, 2017 at 3:03 pmThat’s beautiful. Well done.
Anita Holland
October 5, 2017 at 4:57 amThank You Tina
Cricket Rose
October 4, 2017 at 3:07 pmWow. So great
Anita Holland
October 5, 2017 at 4:56 amThank You
Dianne Elliott
October 4, 2017 at 3:58 pmDamnnnnn . . . you certainly have earned your bragging rights; an absolutely stunning piece of furniture.
Anita Holland
October 5, 2017 at 4:54 amThanks it turned out greater than I thought it would for a beginner.
Dianne Yonan
October 4, 2017 at 4:08 pmAbsolutely love that chaise. It is just what I need for my corner.
Anita Holland
October 5, 2017 at 4:52 amThank you, Looks good in my front window.
Deidre Wasyliw
October 4, 2017 at 4:54 pmWow! you certainly should be proud of yourself. I have thought of trying to make a chaise, and I think now it will actually get done. You did throw me off a little, though, with your picture of the bare-wood frame. The arch seems to be in the wrong place, on the side instead of the back, and there is no pattern for the side/back (lower) arch. I can figure that out, but maybe clarify for others. Again, this is absolutely beautiful, and I adore it. I admire your talent & abilities!!
Anita Holland
October 5, 2017 at 1:19 amThank you for your kind words. The bare frame image was not mine, I just used it as a guide to make my arch. I did not have any plans just made it up as I went along. Sorry for the confusion I put that information on the photo above by mistake. I only wanted the arch on the one side and just used an old plywood desktop to cut a flat piece for the back. It was really not that hard once I started. And knowing it was all recycled materials made it so much easier, because I knew if I made a mistake it would not cost lots of money.
Joni
October 4, 2017 at 8:28 pmI love it! (And love that no cats were harmed in the making! LOL)
Anita Holland
October 5, 2017 at 1:08 amThanks, The cats love to hang out in the shed while I build.
Stephanie Bennett
October 5, 2017 at 11:31 amThis is amazing Anita! I adore chaise lounges. I’m blown away by your talent, you definitely should be proud of yourself! You should sew a tag on somewhere stating it was handmade by you and when. This is the kind of piece that gets handed down for generations!
Anita Holland
October 6, 2017 at 2:16 amThanks you, very kind of you to say. I did not sell these piece, one of the few I have made that I kept for myself. The kids can fight for it later lol
Marce
March 20, 2018 at 8:25 amWow, really good work for a beginner. Most won’t attempt something like this because it LOOKS so hard. I have been picking up dumped furniture at the side of the road for years. Take it home redo it like you did and then find a home for it to help keep stuff out of the dump.
You can get good bones cheap at thrift stores too. Bought a white microfiber covered parsons chair for $2 at Goodwill. It was clean and in great shape. Only thing wrong was that the insufficient padding on the seat had shifted which made it hard to sit on. Just took seat off, shift foam back, tack down with a LITTLE more padding and reattach seat cover. Like you, I have a cat (had to laugh at yours under the foam – my cat does that too), so made a fabric cover for it that I can throw in washer periodically. White and cats are not a good mix.
You can redo anything. Get books from library, dismantle piece in reverse order it looks like it was put on (refer to books for help with this). They say to make a pattern from the old fabric but that never works for me because like you, I always add more foam.
Tip: sometimes you will see furniture at side of road or next to a dumpster that you would not want or can not redo. Check the cushions, grab them, take off fabric and batting. If foam is not shredded or does not have black mold, you can wash it in tub and reuse. Foam is so expensive. Put hottest soapy water you can stand in to just cover foam. Work it in with feet – think grape vats for wine. Drain tub, kneel on foam as you roll it up like a sleeping bag to get water out. (From back end of tub facing drain helps ) Repeat two to three times with clear water till no soap or dirty water comes out. I stand it on an end on a tub chair for a couple of days to dry with a fan blowing on it. Flip it front to back periodically for better air circulation. Do NOT flip it top to bottom ( water will stay in middle and mold), don’t use bleach, alcohol or peroxide! To check to see if it is dry, lay on floor (the cushion, not you), place paper towels on top and step on it. If still wet inside it will show on the paper, just give it more time. If it is a sunny, warm day you can put in sun to help dry.
I also like to look through drapery and old comforters at thrift stores. You can sometines get good fabric for covering, and when washed, comforters make good batting. No one is going to see the ugly fabric no one else wants!
This may sound like I am some kind of expert, but not so. I have lived on less than a thousand a month my whole life, now 66. Husband was military and after divorce I worked as a bookkeeoer. So I have always bought on sale, used, made it myself or did without.
All that said, I would like to thank you for encouraging me to go after my chaise. Picked it up at a yard sale. It has just the end, no back and I hate the fabric. Went through three years fighting cancer and now in remission and rebuilding my strength. Think I am about ready to tear that thing apart and put a back on it. Picked up some great fabricat a yard sale I want to use.f
Rima featherstone
March 1, 2019 at 10:02 pmYou are incredibly talented. I am absolutely stunned by what you do. I always thought that I was good at refurbishing and creating things, but now, after seeing the work of someone truly gifted, I’m rethinking that!
Amazing work!
Anita Holland
March 4, 2019 at 4:50 amWow Thank you so much, that is truly a lovely compliment. I think we all have different ideas in our heads some work out and some don’t. My husband wishes I would learn to cook rather than playing in my workshop all day. I am sure you are very gifted too.
Lisl
March 1, 2019 at 11:50 pmWow, you SHOULD be proud, this is absolutely stunning! That you used all (or even near all) recycled materials is simply tremendous! And cherry on top – the pattern. I love maps and I know I’m not alone, so this will surely be admired by many.
Just gorgeous!
Anita Holland
March 4, 2019 at 4:46 amThank you so much Lisl, it really does mean a lot to hear how others enjoy my projects. I think I will always stay building from recycled materials now because I think it takes away the pressure to succeed, I find I will try new things because if I fail I just turn it into something new.
Jeanne Vogel
August 4, 2019 at 4:47 pmSuch a fabulous chaise! The fabric is really spectacular too! I would have used it as well. Great instructions on how to build even though you didn’t have the pictures of the project as you were making it, I think anyone could figure it out. I have many projects where I didn’t take progress pictures and when I write about them, it takes longer to recreate the steps in my mine so KUDOS for being able to explain this to us 🙂
Anita Holland
August 4, 2019 at 9:40 pmThank you so much. I was asked by one of the websites to try and make some sort of tutorial. It was only that I had to add more support that I did a reserve one. It was a very basic design, which turned well.
Debbie-Dabble
September 28, 2019 at 1:50 amStunning!! Thanks so much for stopping by!!
Hugs,
Debbie
Anita Holland
September 29, 2019 at 9:24 amThank you Debbie
Dee | Grammy's Grid
October 2, 2019 at 3:46 amVery creative!! Thanks so much for linking up at the #UnlimitedMonthlyLinkParty 5. Shared.
Anita Holland
October 4, 2019 at 5:20 amThank you so much.
Autumn is here! WW
October 9, 2019 at 8:11 pmI noticed someone called you a beginner!?! I surely don’t think so. Girlfriend, you are a pro for sure. I mean you could probably sell that for $300 starting point! I mean dang absolutely so professional. Great job. Thank you so much for sharing! CONGRATS. Oh, and thank you for sharing!
Anita Holland
October 10, 2019 at 8:17 amThank you, I was my first ever build from scratch. I have played around with upholstering furniture and seemed to get it right.
Anita Holland
October 10, 2019 at 8:13 amThank you so much, it was a labour of love.
Rebecca Jones
October 12, 2019 at 6:50 amI really like this. Your pattern looks like it would be good for an office or den. I love those old Victorian ones that look like velvet too, it looks great.
Anita Holland
October 14, 2019 at 10:36 pmThank you, I made it up as I went along.
Cecilia
October 14, 2019 at 4:46 pmWOW–I am so impressed! Brilliant! Thanks for sharing your gathered repurpose at Vintage Charm!
Anita Holland
October 14, 2019 at 10:32 pmThank you so much for the lovely comment.
Michelle
October 14, 2019 at 4:48 pmYou are so talented! Fabulous!
Anita Holland
October 14, 2019 at 10:32 pmThank you so much Michelle, very kind of you to say.
Katie Mansfield
October 15, 2019 at 9:29 pmHoly cow! Great job. This is amazing. Thanks for linking to Keep In Touch.
Anita Holland
October 16, 2019 at 6:20 amThank you so much for the lovely compliment.
Julie Briones
October 20, 2019 at 11:07 pmThat is one amazing project, Anita… and it’s just lovely! So blessed to see you at Tuesday Turn About!
Anita Holland
October 21, 2019 at 12:05 amThank you so much, It was one of the few pieces I made that I kept for myself.
Debbie-Dabble
October 22, 2019 at 12:13 pmAnita,
Just stopping by to thank you for your visit!!
Hugs
Debbie
Anita Holland
October 24, 2019 at 4:21 amYou are very welcome.
Carol
October 25, 2019 at 10:38 amYour skills are amazing – I’m at a loss for words.
Anita Holland
October 26, 2019 at 8:21 pmThank you so much Carol, I surprised myself with this project.
Marti
October 28, 2019 at 3:59 pmThis is fantastic! I wish I had the special tools needed to do upholstery. You made it look do-able for a beginner like me.
Anita Holland
October 28, 2019 at 9:15 pmThank you Marti, I have been doing DIY for about 5 years now so have built up my tools over the years from the sales of my projects.
Debbie-Dabble
November 5, 2019 at 3:08 amThanks so much for taking the time to stop by again!!
Hugs,
Debbie
Anita Holland
November 6, 2019 at 12:21 amYou are very welcome, I love the parties.
Debbie-Dabble
November 6, 2019 at 2:08 pmThanks again for your visits!! The red trucks are really big here in the US and are a big part of the Farmhouse decorating Trend. I liked them for the Fall but that is about the extent of it…I am a Victorian soul…
Hugs,
Debbie
nancyc
November 11, 2019 at 2:50 amThis is such a great up cycling project!
Anita Holland
November 11, 2019 at 7:56 amThank you so much, it is one of my favourite projects.
Karren Haller
November 19, 2019 at 12:25 amI would never attempt to make a piece of furniture, your chaise turned out beautiful!!
Thank you for sharing on #ohmyheartsiegirl
Hope to see you again soon!
Anita Holland
November 19, 2019 at 4:07 amThank you Karen, I thought the same a few years back, but using free materials makes you brave. You have nothing to loose if it does not work out.
Maria
March 19, 2020 at 3:19 amOmg you are son talented amazing job.
Anita Holland
March 21, 2020 at 11:37 amThank you so much, that is very kind of you to say.