
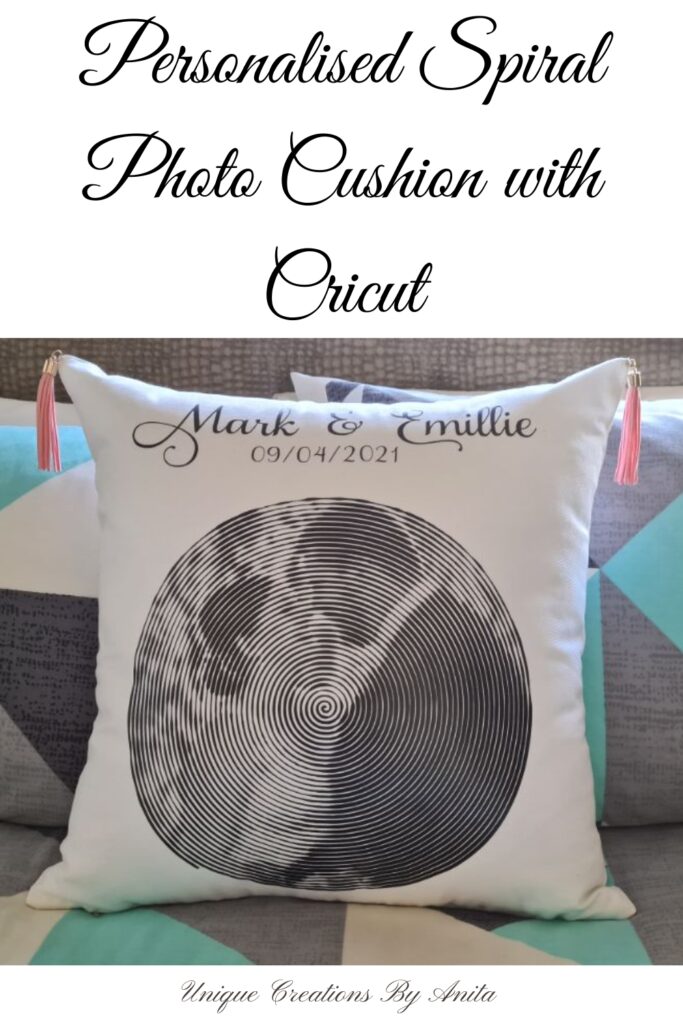
I wanted to create a unique memento for my son’s wedding day, so I designed a Spiral Betty Wedding Keepsake Cushion to honour their special moment. In this Spiral Betty tutorial, you’ll see how to turn any high‑resolution photo into a captivating spiral design and press it onto a 45 cm cushion cover using your Cricut (or Silhouette Cameo). I’ll share every trick I learned—so you can avoid the mistakes I made and achieve perfect results first try.

Before we dive into this tutorial, be sure to subscribe to my bimonthly newsletter to be the first to see my latest projects. You can also follow me on Pinterest and Facebook, where I also include my unique mixed-media art projects.
Spiral Betty Wedding Keepsake Cushion: A Step‑by‑Step Cricut Tutorial
**This post may contain affiliate links. This means I earn a small commission on links used at no extra cost to you. Please see my disclosure policy for more information.**
Materials Needed
- Digital photo (JPEG or PNG, at least 300 DPI)
- Spiral Betty
- Tassels
- Vinyl cutter (Cricut or Silhouette Cameo)
- Iron‑on vinyl (HTV)
- Standard cutting mat
- Washi tape (to secure vinyl)
- Weeding tool
- Transfer tape
- Iron or heat press
- Old pillowcase or Teflon sheet (barrier fabric)
- Plain cushion cover (45 cm × 45 cm / 18″ × 18″)
Create Your Spiral Betty Design
To create your Spiral Betty design, start with a clear, digital photo (JPEG) saved to your desktop—close‑up headshots give the best results. Open the Spiral Betty website and click Upload to add your image. Use the slider below the preview to adjust the spiral count: on my first try, I pushed it to the maximum for extra detail, but the fine lines snapped when I weeded. For iron‑on vinyl, set the slider to around ¾ full—this gives a crisp design that’s far easier to weed. Feel free to explore the other tabs to see how each setting alters your final image.

Click the second black‑and‑white thumbnail from the left in the row below your preview, then download the final image to your computer.

Add your image to the Cricut Design Space
Whether you’re in Cricut Design Space or using Silhouette Studio, the process is the same. Open your software and start a new project, then upload the Spiral Betty file you saved to your desktop.

Select the Erase tool and click on a white corner to clear the background—this leaves you with a clean spiral graphic ready for cutting.

On the following screen, choose Cut Image and then click Next.

Your spiral graphic will now appear in your uploads library. Simply click on it, then hit Insert Images to add it to your project canvas.

When your spiral appears oversized, adjust its dimensions using the resize fields at the top toolbar. Since my cushion was 45 × 45 cm, I scaled the design to 30 × 30 cm to leave space for the text above. Then click Make It to proceed.

Cut your Iron-on (HTV) vinyl
Place the HTV shiny‑side down on your cutting mat. If your mat’s grip is weak, secure the edges with washi tape to prevent any shifting.

Before cutting, toggle on the Mirror setting—otherwise, your design will flip horizontally. That’s fine for most graphics, but any text will end up reading backwards.

Rotate the dial to the Iron‑On setting, then press the double‑arrow Load button to feed in the mat. Finally, hit the C button to start cutting.

Weed your vinyl
When you weed your Spiral Betty design, resist the urge to start at the centre spiral—it’ll snag and tear. Instead, begin at the corner farthest from the spiral and work inward toward that point. Because the entire pattern is one continuous piece, this method makes weeding quick and frustration‑free.

I found it very satisfying to weed this project.

Creating the text
Adding text is simple. Open the Text tool, type your message, and choose a font—you might like Samantha Upright. Position your text on the canvas, then click Select All and Group in the bottom‑left corner to lock in your layout. Finally, toggle Mirror on and cut the HTV as before.

Transfer your Spiral Betty
If you have a heat press, use it—if not, a regular iron set to its highest dry‑heat, no‑steam setting works just as well. Pre‑press the cushion cover to smooth out any wrinkles, then centre the Spiral Betty design, leaving enough room above for your text. Apply firm, even pressure to ensure a clean transfer.

Place a heat‑transfer barrier—like an old pillowcase—over your vinyl design before applying heat. Press down firmly with your iron for 30 seconds on each section, covering the entire image. After pressing, lift a corner of the transfer film to test adhesion.

Avoid sliding the iron as you would on clothing. Instead, lift and press straight down; dragging the iron back and forth can smear or distort your design.
If the vinyl lifts with the film, reheat in 10‑second intervals until it sticks. When using a heat press, follow the manufacturer’s recommended time and temperature settings. Once the carrier sheet peels away and the vinyl stays on the cushion cover, your transfer is complete. Peel off the plastic and repeat the process for the text.

Add the tassels
I purchased two tassels from Amazon and hand‑stitched one into each corner of the cushion cover.

Spiral Betty tips
To make a Spiral Betty using regular vinyl, it’s best to weed on the transfer paper. I had two failed attempts because the spirals sat so close together. Even the slightest piece of debris on the cutting mat prevented a full cut, so when you began to weed, it pulled up the adjacent spiral and ruined the image.
When I tried to transfer the design onto a placemat with a brand‑new piece of transfer tape, it proved too sticky and would not release. I even pushed the spirals back down, but they stretched and distorted because they were so thin. With this in mind, reuse an old piece of transfer tape or reduce its stickiness by pressing it onto your clothing a few times.

I also recommend using a very smooth, non‑porous surface—my placemat needed a coat of spray polyurethane first to get the vinyl to stick properly. When you’re weeding, trim off the scrap vinyl as you go; if the cut‑away pieces get too long, they’ll cling to the remaining spirals and spoil your design. Despite these hiccups, I loved this project and can’t wait to make more.

More Cricut ideas
I made this memorial plaque for my daughter-in-law after her beloved dog passed away. This would make a great gift for a grieving friend or family member.

Your Cricut is also great for making stencils to add some character to your furniture.


If you’d like to find any of the items used in this project, we’d greatly appreciate it if you used our affiliate links. These links provide us with a small commission at no extra cost to you, allowing us to continue creating and sharing more inspiring projects. We’d also love to hear your thoughts—feel free to leave a comment or share this post!

30 Comments
Michele Morin
May 2, 2021 at 9:48 pmA fantastic gift for your son and his bride!
Anita Holland
May 4, 2021 at 12:48 pmThank you Michelle, they did love it.
Marie B.
May 3, 2021 at 5:36 amThat’s really cool, Anita! I’ve never heard of spiral betty before. Now I’m very intrigued and want to give it a whirl, thanks to your awesome tutorial. Great gift idea, your daughter and SIL must have been thrilled with their gift.
Anita Holland
May 4, 2021 at 12:49 pmShame on you Marie, you have a Cricut and a maker you could be making these. lol Maybe this will give you some inspiration to play with your machines.
Deana Landers
May 3, 2021 at 9:24 pmThis is a sweet gift for son and daughter in law. It’s also an amazing piece of art. Your tutorial is great.
Anita Holland
May 4, 2021 at 12:49 pmThank you so much Dianna, it is something different.
Maria
May 3, 2021 at 9:39 pmWhat a beautiful idea for your sons wedding. I definitely will pin this.
Anita Holland
May 4, 2021 at 12:50 pmThanks Maria.
Michelle Leslie
May 3, 2021 at 9:48 pmThat’s so freaky cool, Anita. Those spirals make it look like the picture is moving. Love it!!!
Anita Holland
May 4, 2021 at 12:50 pmThanks, Michelle, I totally agree, they make you dizzy after a while.
Nancy Sargent
May 4, 2021 at 3:22 amI had never heard of the Spiral Betty! Its really cool! What a special gift you made for your son and daughter-in-law!
Anita Holland
May 4, 2021 at 12:51 pmThanks Nancy, It looks like it only came out this year.
Libbie@alifeunfolding
May 4, 2021 at 3:48 amWhat a lovely keepsake gift!
Anita Holland
May 4, 2021 at 12:51 pmThank you Libbie.
Lydia C. Lee
May 4, 2021 at 6:43 amWow! I had no idea you could even do that. What a lovely thoughtful gift!
Anita Holland
May 4, 2021 at 12:52 pmThank you Lydia, it makes a nice personal gift.
Sherry Denise Cole
May 5, 2021 at 12:07 amThis pillow is so unique and a keepsake. Thank you for sharing how you did it!
Anita Holland
May 9, 2021 at 11:58 amThank you sherry
Meegan
May 6, 2021 at 8:39 pmWhat a unique and beautiful way to make a cherished date. Your family will certainly be impressed. The pattern is so fascinating to look at.
Anita Holland
May 9, 2021 at 11:59 amThank you Meegan, it does mess with your eyes.lol
Carol
May 7, 2021 at 12:24 amI’ve seen these Spiral Betty projects trending but your tutorial is one of the easiest to follow! Thank you. Sharing when my link party opens. What a BEAUTIFUL project!
Anita Holland
May 9, 2021 at 11:59 amThank you so much.
Debbie-Dabble
May 7, 2021 at 11:23 amWell, isn’t that interesting!!! Thanks so much for stopping by and for your kind words!! Stay safe, healthy and happy!!
Hugs,
Debbie
Anita Holland
May 9, 2021 at 12:17 pmThank you so much Debbie, I always seem to be drawn to your projects.
Rosemary Palmer
May 8, 2021 at 8:28 pmI love this. When I first saw it, I thought it was a record. But my mind will go there as my husband is a collector. Thinking it might make a good project for his music room.
Anita Holland
May 9, 2021 at 12:17 pmI think it will be great in a music room.
Linda Primmer
May 10, 2021 at 12:30 amFantastic idea Anita. Congrats to your son. I have always been curious about cricut. Thanks for sharing. I am happy to feature your lovely creation at Love Your Creativity. Happy Mother’s Day.
Anita Holland
May 11, 2021 at 7:14 amThak you linda
Linda Johnston
May 12, 2021 at 12:14 amWow Antia. what a wonderful gift for them!
Anita Holland
May 12, 2021 at 9:52 pmThank you Linda, they did love it.