
Yes, you guessed it, I’m back again with another steampunk project, and this time I’m showing you how to create a DIY Mixed Media Steampunk Hat. I’d been hoarding this empty plastic bucket in my shed, waiting for inspiration—and once I realised its potential, a steampunk hat popped into my head. I’ll guide you step by step through adding layered textures, crafting resin gears and rubbing on copper highlights to turn an ordinary bucket into a bold steampunk hat—and then into a show‑stopping lamp.

Before we dive into this tutorial, be sure to subscribe to my bimonthly newsletter to be the first to see my latest projects. You can also follow me on Pinterest and Facebook, where I also include my unique mixed-media art projects.
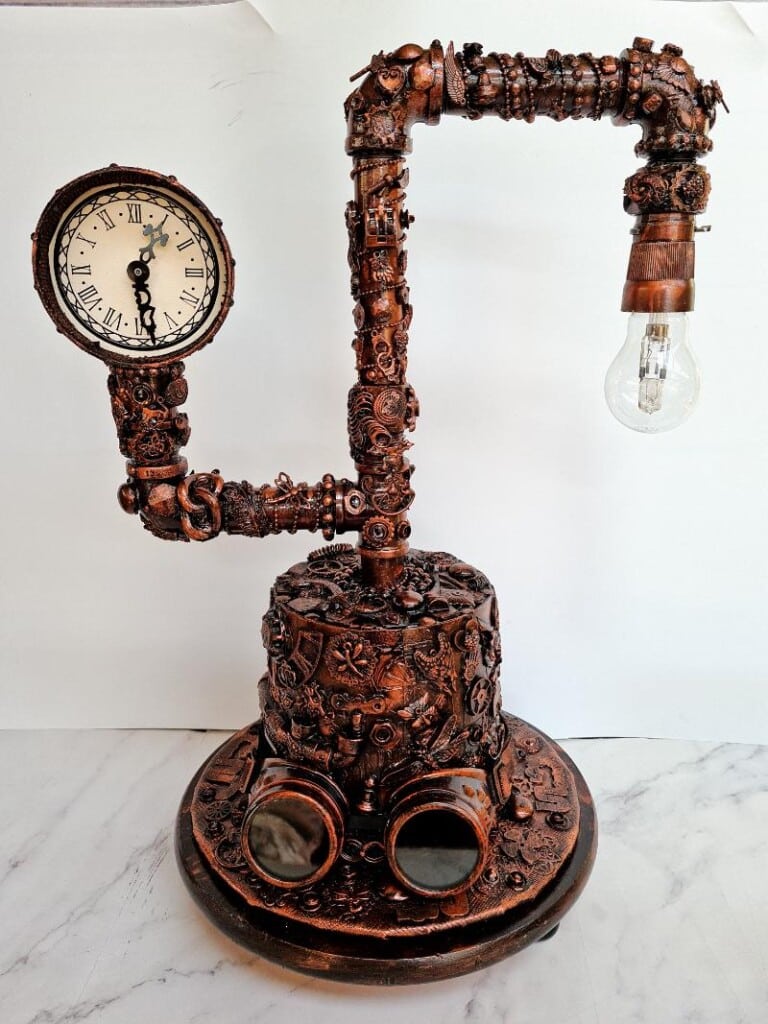
After crafting a mixed-media steampunk lamp I was thrilled with, I decided to merge it with my hat design to create one spectacular piece.
DIY Mixed Media Assemblage Steampunk Hat
**This post may contain affiliate links. This means I earn a small commission on links used at no extra cost to you. Please see my disclosure policy for more information.**
Materials Needed
- Small plastic bucket (or similar container)
- Cardstock (cut into 5 cm squares)
- Mod Podge or craft glue
- Texture paste and spatula
- Mixed media stencils (various patterns)
- Mesh (from vegetable sacks)
- Corrugated cardboard
- Christmas beads and bead chain
- Paper packaging scraps
- Braid trim tape and burlap fabric
- Silicone moulds and epoxy resin
- Hot glue gun + sticks
- Faux leather or heavy fabric for brim
- Black gesso (or black acrylic paint)
- Metallic copper wax paste
- Small detail brushes
- Acrylic spray sealer
- Lazy Susan or turntable base
- Old drawer pulls or decorative knobs (for stand legs)
- Steampunk goggles & feathers (optional)
- Hole saw (if making lamp combo)
- Scissors, craft knife, ruler
Step 1: Prepare the Bucket Base
I built this hat almost entirely from recycled bits I already had at home. Start with a small plastic bucket or similar container, then give it a mixed‑media makeover by layering on texture. Cut 5 cm cardstock squares and adhere them to the bucket with Mod Podge—this patchwork of paper creates a strong, uneven surface for all your embellishments to grip. Don’t worry about perfect placement; a little overlap adds character and depth.

If you’d like to turn your hat into a lamp, simply use a hole saw to cut a circular opening in the centre of the bucket; otherwise, you can skip this step.

Step 2: Add Mixed Media Texture
There are many ways to add texture to a mixed media assemblage project. This post will show you how.

Randomly position stencils over the bucket and spread texture paste with a spatula.

Remove each stencil immediately and rinse to keep it reusable.

Embed mesh, corrugated cardboard, beads, packaging and braid tape with tacky glue or hot glue.

Layer burlap strips for extra depth. Use tacky glue for lighter pieces and hot glue for heavier bits, layering them in a random, overlapping fashion to build rich texture and detail—no need for perfect placement. At this stage, don’t stress over the chaos—it may look messy now, but trust that the layers will come together beautifully.

Step 3: Create Resin Gear Embellishments
With the base complete, it’s time to add your embellishments. To keep costs down, I use silicone moulds to cast my resin pieces. Once cured, a quick blast of a hairdryer makes the resin pliable, so you can easily mould each piece around curves and contours.

Design and cut gear shapes with your Cricut on thick cardstock, and glue layers together for a 3D effect.

This is a view from the other side of the steampunk hat.

Finally, finish by scattering small charms and beads into any gaps or layering them over larger pieces to achieve a rich, dimensional effect.

Embellishment Supplies
Here’s a list of some of the small charms and beads I used to finish off the hat:
- Steampunk charms
- Craft charms
- Decorative buttons
- Bead chain
- Decorative studs
- Peacock beads
- Filigree charms
- Hinges
- Clock mechanisms

These tiny pieces can be tucked into gaps or layered over larger embellishments to create a richly detailed, three‑dimensional look.

Here’s a close‑up of the detailing—before I paint, I always trim away any stray hot‑glue strands to ensure a clean, polished finish.

Step 4: Assemble the Brim
Trace the bucket onto cardboard, leaving a 5 cm outer lip. Cut “pizza” slices toward the centre, fold up the inner circle to fit..

Cover the brim with faux leather using Mod Podge or craft glue, trimming slits to fold edges neatly.

This is the bottom view of the hat brim.

Decorate the brim in the same way you did the top.

Glue the brim inside the bucket base with hot glue at intervals.

Step 5: Paint and Highlight
Coat the entire hat—including brim—with black gesso; let fully dry.

I applied a metallic copper wax paste to accent the black gesso, lightly dipping my fingertip into the wax and gently working it into the raised details. Leave patches of the matte black exposed so the copper pops and adds depth. If you don’t have copper wax paste, you likely already have the ingredients to make some at home. This post shows you how.

Use a fine brush for tight gaps, moving in gentle circular strokes.

The wax paste will now need about 12 hours to cure. To seal the hat, you can use acrylic spray. This will make the copper paste stand out and prevent any fading in the future.

Step 6: Build the Stand
While applying the acrylic sealant, I perched the hat on a retired Lazy Susan, which just happened to become its stand.

Drawing from my stash of reclaimed hardware, I attached old drawer pulls as legs, then coated the stand in gesso and gently rubbed on copper wax highlights to echo the hat’s finish.

For more steampunk inspiration, explore my other projects here!

Step 7: Assemble and Optional Accessories

To merge the hat and lamp, I removed the lamp’s base and secured its mounting plate to the new stand. Then I guided the lamp column through the hat’s centre hole and re‑attached it to the plate, slipping off the plug first made threading it through much easier.


If you’d like to find any of the items used in this project, we’d greatly appreciate it if you used our affiliate links. These links provide us with a small commission at no extra cost to you, allowing us to continue creating and sharing more inspiring projects. We’d also love to hear your thoughts—feel free to leave a comment or share this post!

55 Comments
Tania
September 5, 2020 at 11:56 pmThis is SO COOL!! Pinned!
Tania
Anita Holland
September 6, 2020 at 9:48 amThank you so much, that is very kind of you to say.
Craft Attic Resources
September 7, 2020 at 4:14 amGreat project
Anita Holland
September 8, 2020 at 9:23 pmThank you so much
Tamar A Strauss-Benjamin
September 7, 2020 at 9:02 pmThat is amazing!
Anita Holland
September 8, 2020 at 11:33 amThank you so much, that is very sweet of you to say.
Michelle Leslie
September 7, 2020 at 9:25 pmNooooooooooooooooooo, I can’t believe the hat started out as a bucket!!!!! Flippin amazing Anita and I love how you took it to a whole new level and combined it with the lamp. Van Helsing would be proud to have that as part of his decor.
Anita Holland
September 8, 2020 at 11:35 amThank you so much Michelle, I loved both projects but only had room for one. So a boer maak a plan. lol
Sara
September 7, 2020 at 9:58 pmWow, you are the master of steam punk! I enjoyed seeing the process; it’s incredible how it all comes together in the end! The hat alone is fantastic, but that lamp? So incredible 🙂
Anita Holland
September 8, 2020 at 11:37 amThank you so much Sara, I think it is the process that puts people off. It is really a big mess all the way through and at the end Poof, it is all good. lol
Lori Nell
September 7, 2020 at 10:19 pmThat is an impressive DIY. Amazing that you took a plastic bucket and turned into that steam punk lamp! So talented
Anita Holland
September 8, 2020 at 11:38 amThan k you so much Lori, I seem to have an eye for junk that is why I do all my projects using recycled materials.
Meegan
September 8, 2020 at 12:36 amfascinating, unique and amazing! It’s always fun to see what your creativity comes up with.
Anita Holland
September 8, 2020 at 11:39 amThank you so much Meegan, that is such a great comment. I do come up with some really strange ideas that seem to works most of the time.
Deana Landers
September 8, 2020 at 12:38 amThis is so cool. I didn’t know what Steampunk was, so I looked up the history and era! Great job!
Anita Holland
September 8, 2020 at 11:40 amThank you Deana, it is a trend that has become very popular again now. I love the uniqueness of the look.
Jasmine Goodwin
September 8, 2020 at 6:12 amWow, this is pretty amazing. You have such creative ideas and are a master at Steampunk!
Anita Holland
September 8, 2020 at 11:41 amThanks Jasmine, it was something I tried about a year ago and just seemed to have a knack for it. I do need to try some new styles because I have become steampunk mad.
Anita Holland
September 8, 2020 at 11:42 amThank you, it is a great cheap and easy way to decorate if you can see past the messy process.
Maria
September 8, 2020 at 10:10 pmWow such a creative project! I love how your mind works!
Anita Holland
September 9, 2020 at 11:16 amThank you so much Maria, That is such a nice compliment.
Marie
September 9, 2020 at 12:03 amLike I’ve said before, Anita, you’re the Queen of Steampunk! Wow, the hat alone is amazing and to think it started as a plastic bucket. Turning it into a lamp, seriously girl you are so clever and talented.
Anita Holland
September 9, 2020 at 11:17 amThank you so much Marie, I always go to steampunk when I am stuck for ideas because it is so easy for me.
Tracy King
September 9, 2020 at 2:54 amThis is amazing!! I haven’t tried any of these crafting techniques but you really did a super job explaining everything. Thank you 🙂
Anita Holland
September 9, 2020 at 11:18 amThank you so much Tracy, it looks harder than it is. When you see it all broken down it is easy to follow.
Leyla
September 9, 2020 at 6:14 pmOMG, this is just amazing!
Anita Holland
September 10, 2020 at 9:09 pmThank you so much xx
Anita Holland
September 11, 2020 at 12:11 pmThank you so much
Debbie-Dabble
September 9, 2020 at 9:36 pmOMG!! This is absolutely amazing!! I have a friend who wrote a book on Steampunk Fashions, International Steampunk Fashions by Lisa Griffiths…Thanks for sharing how you made this!!
Thanks too for stopping by and for your sweet comment!!
Stay safe, healthy and happy!!
Hugs,
Debbie
Anita Holland
September 11, 2020 at 12:12 pmThank you so much Debbie.
Karen the next best thing to mummy
September 9, 2020 at 9:37 pmSteampunk is really popular now, I love this idea #alittlebitogeverything@_karendennis
Anita Holland
September 11, 2020 at 12:15 pmThank you so much, I have had a steampunk mad year lol
Kristi
September 10, 2020 at 12:45 pmSuch a cool project!!!
Anita Holland
September 11, 2020 at 12:12 pmThank you so much, Kristi.
Mrs Tracey A Abrahams
September 11, 2020 at 1:25 pmI would never have believed that started life as a bucket. Being a steampunk myself I amin awe of the creativity of my fellow steampunks, myself I can only craft thinga out of yarn 😁
Anita Holland
September 15, 2020 at 7:07 amThank you so much, I am a bit steampunk craft mad at the moment. lol
Two Chicks and a Mom
September 11, 2020 at 3:32 pmThat is awesome! Whenever we have gone to Salt Lake Fan X, I love to see those dressed in steampunk costumes. Thanks for sharing at Funtastic Friday tonight!
Jo (A Rose Tinted World)
September 13, 2020 at 6:48 amThis is incredible! Love the effect of the bronzing wax paste! #MMBC
Anita Holland
September 15, 2020 at 7:09 amThank you so much, I love the bronze wax as you can tell I have used it a lot lately.
Naush Samama
September 14, 2020 at 3:31 amAnita, your steam punk hat is a DREAM !!!!! I absolutely LOVE IT ! The base, the paint work, the details – everything is FABULOUS. Thank you very much for sharing your post at Meraki Link Party. We hope you join us again.
Naush
Anita Holland
September 15, 2020 at 7:13 amThank you so much Naush. This project was so much fun to do.
Cecilia
September 14, 2020 at 7:57 amThis is so creative, Anita! Thanks for sharing at Vintage Charm!
Anita Holland
September 15, 2020 at 7:14 amThank you so much, see you next week.
Anita Holland
September 15, 2020 at 7:10 amThank you so much for the great feature Michelle, I really do appreciate it.
Sim @ Sim's Life
September 15, 2020 at 10:42 pmOh wow!!! The steam punk hat is absolutely amazing! You are so creative – fab to see the different stages of making this! Sim x #TrafficJamWeekend
Anita Holland
September 18, 2020 at 6:46 amThank you so much, it was really fun and easy to make.
Anita Holland
September 18, 2020 at 6:50 amThank you so much for the feature on my steampunk hat.
T'onna | Sew Crafty Crochet
September 19, 2020 at 11:53 amWow! You are a really talented crafter! I love all the embellishments you added! This steampunk hat is so crafty, cute, and clever!!! Thanks so much for sharing your marvelous creation at the Snickerdoodle Create Bake Make Link Party! I’m featuring this at tomorrow’s party. Have a lovely weekend!!
Anita Holland
September 21, 2020 at 9:49 pmThank you so much for the awesome comments and for the bonus feature.
Michele Michael
September 19, 2020 at 11:18 pmHi Anita This is fantastic. I adore the lamp. Pinned to my mixed media board.
Anita Holland
September 21, 2020 at 9:50 pmThank you so much, Michele.
Shelbee on the Edge
September 20, 2020 at 10:11 pmAnita, this is such a cool project! I love the hat as a decorative piece but I also really love it combined in a utilitarian way with the lamp. I love Steampunk things! What a cool genre for home decor, too! Michelle of My Bijou Life recommended I pop over because I just did a Steampunk/Cosplay style challenge and I had to go the way of Cosplay because I don’t know how to do Steampunk!
Shelbee
http://www.shelbeeontheedge.com
Anita Holland
September 21, 2020 at 9:55 pmThank you so much, I will pop over and check out your steampunk outfit.
Thomas Edwards
June 29, 2022 at 1:05 amI used your technique and made sure to order through your links. I do hope you still reap the rewards as it turned out amazing! Thanks for the insight and to making me look like a superstar!
Tutorial for a Steampunk Mannequin Style mannequin crafted from aluminum cans -
March 31, 2025 at 10:57 am[…] with the steampunk theme, this steampunk hat was made using a plastic bucket and […]