
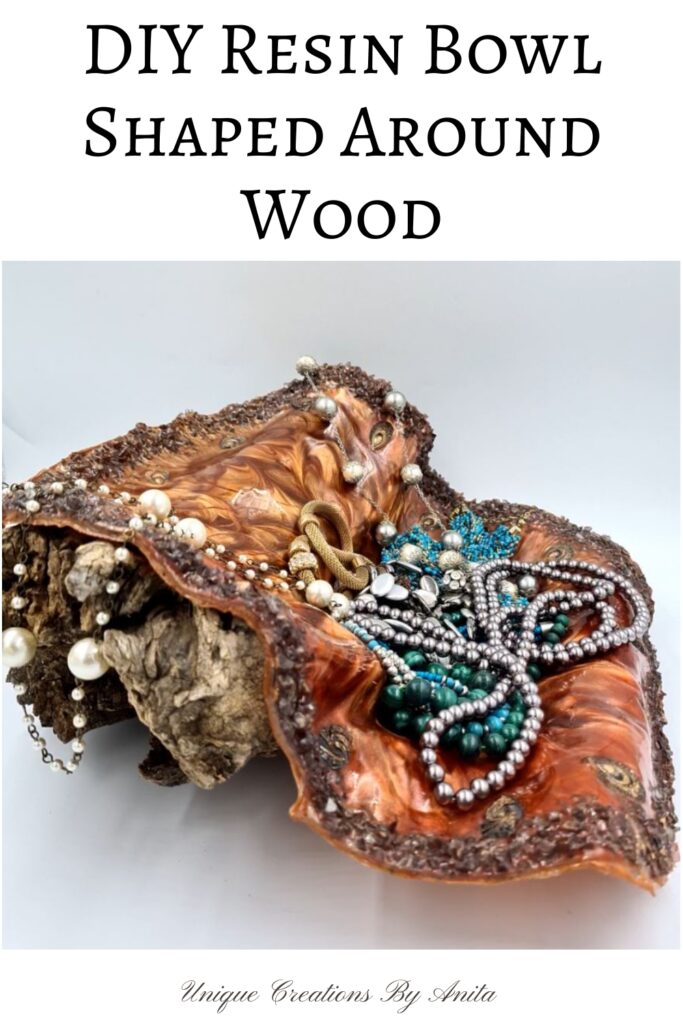
In this DIY Resin Bowl: Shape Resin Around a Wooden Stump tutorial, I’ll guide you through moulding colourful epoxy resin into a unique bowl that hugs a wooden base. Our International Bloggers Club challenged us to work with resin, and although my first bowl’s colour didn’t excite me, the technique inspired this project. Choose your pigments and create a bespoke bowl that suits your style.

Before we dive into this tutorial, be sure to subscribe to my bimonthly newsletter to be the first to see my latest projects. You can also follow me on Pinterest and Facebook, where I also include my unique mixed-media art projects

DIY Resin Bowl: Shape Resin Around a Wooden Stump
*This post may contain affiliate links. This means I earn a small commission on links used at no extra cost to you. Please see my disclosure policy for more information.**
Materials Needed
- Epoxy resin kit (2:1 mix ratio)
- Colour pigments or mica powders (e.g. bronze, silver, gold)
- Disposable mixing cups and stir sticks
- Hair dryer or crème brûlée torch
- Plastic wrap
- Damp sand (for mould)
- Wooden stump or similarly shaped wood off‑cut
- Silicone sealer (to build a dam)
- Disposable gloves and protective eyewear
Prepare Your Wooden Stump
You’ll need an object with a unique shape, like the wooden stump shown below. I wasn’t completely happy with the result because I didn’t leave enough of the stump exposed on either side of the resin. For a more striking result, be sure to reveal more of your chosen object when you recreate this project.

Build a Sand Mould
I used the sandpit desk I built for my niece to form my resin mould. First, I dampened the sand for easier sculpting, then positioned the wooden stump and packed sand firmly around its base. Finally, I carved out a bowl shape by hand, adding a slight lip in the sand for extra detail.

Construct a Silicone Dam
Cover a board with plastic wrap and secure the edges. Trace a circular wall with silicone sealer inside the wrap, matching your sand bowl’s diameter. Allow the silicone to cure until it forms a firm dam. I forgot to take a photo, but the image further down will show you.
Mix and Colour the Resin
Always follow the manufacturer’s mixing ratio, as each resin differs. I start by stirring a large batch thoroughly in a big cup, then divide it into smaller cups.

In each cup, I blend in my chosen mica powder—bronze, silver and gold.

Pour and Blend the Resin
I pour the coloured resin in alternating concentric rings against the silicone wall, then wave a hairdryer over the surface to pop bubbles and coax the pigments to swirl and merge.

When I first poured the resin, the colours formed an amazing design, and I was ecstatic.

Unfortunately, they eventually bled into each other, probably because the base wasn’t perfectly level. After a few minutes, tiny bubbles often rise to the surface. To eliminate them, gently sweep a crème brûlée torch flame across the resin until the bubbles pop.

I rescued the finish by gently swirling the surface with a stir stick, which created a marbled effect. Before the resin began to gel, I also dropped in a few decorative beads for extra sparkle. I let it cure for about eight hours—long enough that it was firm to the touch but still slightly flexible. At this stage, you can apply light pressure to mould it around your form without cracking.

Demould and Final Shape
Slide the resin (still on its wrap) off the board. Position it over your sand‑moulded stump, then press gently to form the bowl shape.

Leave to cure for 24 hours before removing the wrap and unpacking. Polish the resin lip with fine sandpaper for a smooth finish if desired.

Finishing and Uses
Once cured, you’ll have a one‑of‑a‑kind resin bowl fused to natural wood. Use it as a decorative fruit dish, jewellery tray or sculptural centrepiece.

More resin project ideas
Discover how to craft customised resin doorknobs—embedding unique items into the resin so they perfectly match your décor.

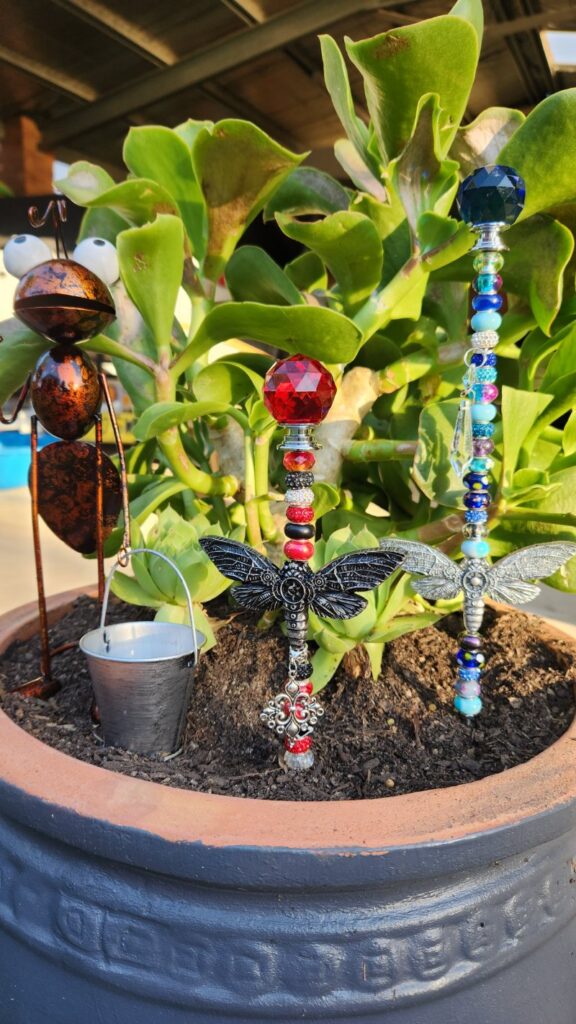
Craft beaded garden stakes with embedded resin accents to give your planters a unique, decorative flair.

If you’re interested in any of the items used in this project, we’d appreciate it if you used our affiliate links. Clicking these links earns us a small commission at no extra cost to you, helping us create more inspiring and exciting projects to share. We’d also love to hear your thoughts—feel free to leave a comment or share this post!

28 Comments
Sue
March 9, 2021 at 2:25 pmSuch a cool project. I’ve always wanted to learn how to work with resin!
Anita Holland
March 12, 2021 at 8:15 amThank you so much Sue, I have only just started playing around with it.
Kasia
March 10, 2021 at 4:30 amThis is such a cool idea. I’d never thought of a way to work with resin this way without any special gear. I just started to experiment with resin recently, so your tips will definitely come in handy. Thank you, Anita!
Anita Holland
March 12, 2021 at 8:15 amThank you Kasia for the awesome comment, and you are very welcome.
Robin
March 10, 2021 at 9:03 amThis is just amazing Anita!
What a wonderful creation you made out of resin!
Anita Holland
March 12, 2021 at 8:16 amThank you so much Robin.
Michelle Leslie
March 10, 2021 at 6:57 pmIt’s such an awesome project, Anita. For the life of me, I can’t see why you didn’t like the colors or patterns. I think they’re beautiful. It looks like metallic lava. Stunning and thank you so much for the tutorial on shaping resin. My head is buzzing with ideas.
Anita Holland
March 12, 2021 at 8:16 amThank you so much Michelle, I think I wanted the original pattern before it all blended together.
Maureen Reynolds
March 11, 2021 at 1:11 amI have always admired resin projects, but never been brave enough to try myself! Love how yours turned out!
Anita Holland
March 12, 2021 at 8:17 amThank you so much Maureen, you should just dive in and have a go. You could be at Wizz at it.
Marie B.
March 11, 2021 at 2:08 amI love the colors, Anita! I think it’s a stunning resin pour and ditto Michelle that it looks like lava. I love it as a jewelry bowl! So glad you decided to pull it out of the shed and share it with us. It deserves to be seen and on display.
Anita Holland
March 12, 2021 at 8:19 amThanks Michelle, I think if I get an idea in my head and it does not turn out how I imagined it is a fail. But this one just kept staring at me.
Esmé Slabbert
March 11, 2021 at 4:27 amWOW – just love this – it’s absolutely stunning and love the shapes and colors. Thanks for sharing at #Senisal Will RT
Anita Holland
March 12, 2021 at 8:19 amThank you so much Esme.
NINA LEWIS
March 11, 2021 at 5:54 amWow! I’ve never thought of using resign to make a shape! (Maybe because nobody has challenged me??) You did an amazing job. Thanks so much for sharing this at our Party in Your PJs link party.
Anita Holland
March 12, 2021 at 8:20 amThank you so much Nina, the good thing about doing it like this is you can do your own shape and design.
Angela Grasse
March 12, 2021 at 11:02 pmCool idea!
Anita Holland
March 13, 2021 at 2:23 pmThank you so much Angela.
Kaycee
March 15, 2021 at 2:08 amThat is so cool! Thank you for sharing! We have leftover epoxy from our house remodel, I’m definitely going to try this out! Really admire your talent! Thank you so much for sharing at the Wonderful Wednesday Linky Party! I co-host and am choosing this post for a feature!
Anita Holland
March 15, 2021 at 11:11 pmThank you so much, you should give it a try.
Debbie-Dabble
March 16, 2021 at 12:03 amAnita,
You are a true artist! Just beautiful!! Thanks so much for stopping by!! You asked about where I store everything. Even though we do not have a basement, our attic is floored so almost all inside decorations are stored up there. We do rent a storage shed for all the outside thins and other things that we have in storage. Stay safe, healthy and happy!!
Hugs,
Debbie
Anita Holland
March 16, 2021 at 6:13 pmThank you so much Debbie, I would have thought you must have storage because you have so much great stuff for each season.
Naush Samama
March 16, 2021 at 5:17 amAnita, I love how you are constantly experimenting with so many mediums, Quite inspirational. The art work is quite impressive. Thank you for sharing with us at Meraki Link Party. We’re delighted that you joined the party.
Much love
Naush
Anita Holland
March 16, 2021 at 6:18 pmThank you so much Naush, I love trying new ideas to keep my hobby interesting.
Leslie
May 12, 2021 at 7:36 pmHi Anita, Your resin bowl is unique, very beautiful and well done. The addition of the piece of weathered wood for interest in genius. The color if it is showing up on my Mac properly is gorgeous. Please keep experimenting. you have a wonderfully imaginative brain. Thank you so much for sharing your project with us. 🙂
Anita Holland
May 12, 2021 at 9:53 pmYou are very welcome and thank you for stopping by.
Sue Peck
May 13, 2023 at 1:57 amSuch a beautiful piece. The colours and the shape look fabulous. I will certainly be following and trying this procedure.
Anita Holland
May 18, 2023 at 7:09 pmThank you so much 💓