
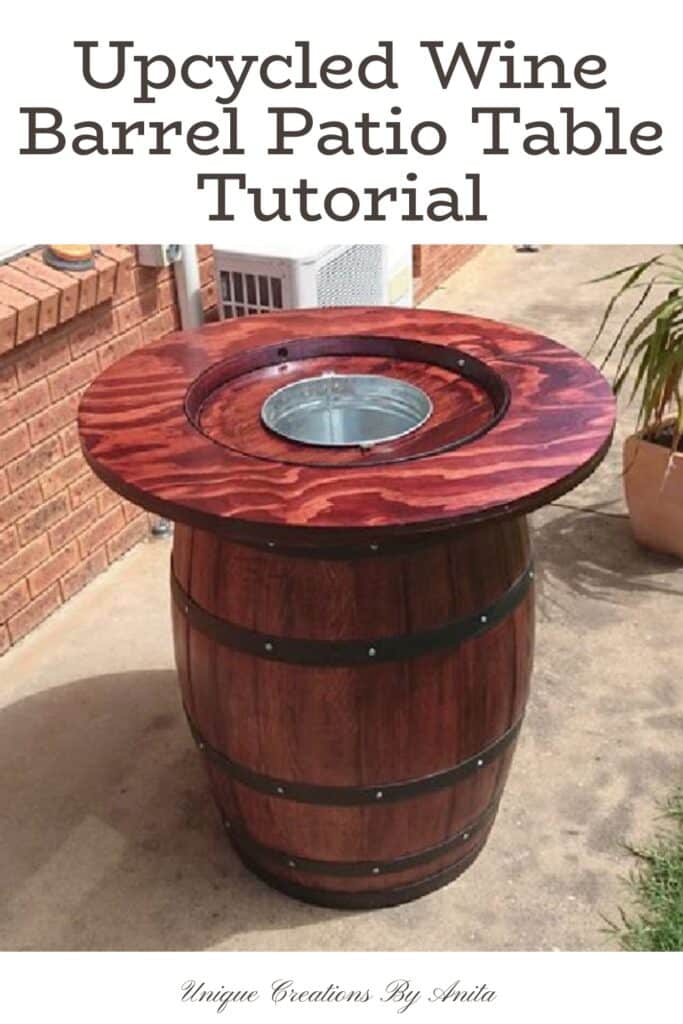
Transform your outdoor entertaining area with this DIY Wine Barrel Table with Built‑In Wine Bucket—a chic upcycle project that keeps your drinks on ice while you and your mates catch up. After scoring five reclaimed barrels from a local university’s winemaking course for just $50 each, I experimented with several designs before landing on this versatile table.
Combining rustic charm with a hint of glamour, this build features a stainless steel bucket insert, a removable lid. After four prototypes, I’m sharing key tips to ensure your barrel table is both stunning and sturdy.

Before we dive into this tutorial, be sure to subscribe to my bimonthly newsletter to be the first to see my latest projects. You can also follow me on Pinterest and Facebook, where I also include my unique mixed-media art projects.
DIY Wine Barrel Table with Built‑In Wine Bucket
**This post may contain affiliate links. This means I earn a small commission on links used at no extra cost to you. Please see my disclosure policy for more information.**
Materials Needed
- 1 wine barrel (reclaimed or purchased)
- 1 stainless steel wine bucket (25 L minimum, with a top lip)
- Scrap timber tabletop or thick plywood (approx. 1.2 m diameter)
- Aluminium or timber strip (to hide plywood edge)
- Flat‑black spray paint
- Cedar or outdoor wood stain
- Marine varnish (for tabletop finish)
- Flush latch and screws
- Countersink and carriage bolts (long enough to secure tabletop)
- Wood screws (for band stabilisation)
- Belt sander and orbital sanders (80–240 grit)
- Router with jig plate or jigsaw
- Drill with large bit and pilot bits
- Compass or circle‑drawing jig
- Hammer, chisel, clamps, protective eyewear, gloves
Clean and Swell the Barrel
After years in the elements, some barrels still reeked of red wine. To remove the odour, I filled each barrel with water and a cup of bleach. The solution leaked through gaps in the shrunken staves, but I persisted. Topping up the water every few hours allowed the wood to swell under the sun’s heat and seal the cracks. I let the bleach solution sit for a few days before draining the barrel. Finally, I left each barrel to dry in the sun for a week.

Remove Bands and Sand the Wood
Removing the bands proved surprisingly simple. I wedged a block of timber under each band’s rim and tapped it with a hammer, and they popped off effortlessly. Be sure to number them so you can refit each band in its original position—and never remove the top or bottom band, or the barrel will collapse. With the bands off, I quickly smoothed the staves using a belt sander fitted with 80‑grit paper, then refined the surface with an orbital sander, working from 120‑grit discs up to 240‑grit for a flawless finish.
Over the years I’ve tried two sanding approaches. First, I left the bands on and used an orbital sander—but the metal hoops kept catching and tearing the discs, and progress was glacial. Next, I popped the bands off and ran a belt sander over the staves, which was much faster. I always finish with an orbital sander and 240‑grit discs to achieve a glass‑smooth surface.

Paint Bands & Stain the Barrel
With the bands off, now’s the perfect moment to give them a fresh coat. I sprayed two smooth layers of flat‑black paint, then slid each band onto a pole to dry evenly. While they cured, I brushed cedar‑toned stain onto the barrel and sealed it with two coats of oil‑based outdoor varnish. To refit the bands, I simply slipped them back over the staves and tapped the thin edge with a wooden block and hammer. Finally, I pre‑drilled and screwed each band to its stave—both to guard against future shrinkage and to add a crisp, finished look.
Cut the Wine Bucket Opening

Adding a hole for the wine bucket.
First, choose a stainless‑steel bucket at least 25 L in size—most wine buckets are too small—and make sure it has a pronounced lip so it can’t slip through the tabletop. Remove the handle if you prefer a cleaner look. Although I don’t have photos of this step (I’ve done it four times now!), the process is simple: find and mark the exact centre of the barrel top, then use a compass to draw a circle the same diameter as the bucket just beneath its lip. Drill a pilot hole inside the line, slip in your jigsaw blade, and cut carefully around your circle. Finally, sand any rough edges until the bucket drops in snugly and sits perfectly flush.

Craft the Tabletop Apron
I source free tabletops from Facebook Marketplace—most only need a light sand to look great. When a slab is too thin, I bond a sheet of plywood underneath until the assembly reaches about 60 mm thick. I then cut the apron to roughly 1.2 m in diameter. I learned the hard way that thickness counts: my very first top snapped under weight. Now, reinforced laminates ensure a solid, durable surface every time.

Early on, I cut the tabletops with a jigsaw, only to end up with uneven, sloping edges that took hours to correct. Then I discovered a router‑jig method that produces flawless circles every time. Simply remove your router’s base plate and screw it onto a sheet of plywood.

Mark the centre point of your workpiece, drill a countersunk hole for a pivot nail or screw, then anchor the jig at that point. As you guide the router around the pivot, you’ll rout a perfect circle—more time‑consuming than a jigsaw, but the crisp, clean edge makes it well worth the effort. You can buy the jigs.

Secure Tabletop to Barrel
Because the barrel top slopes, the apron’s inner edge must be beveled to sit flush. My first tables meant hours of grinding that bevel with a coarse flap disc and endless test‑fits—truly back‑breaking work. Now I tilt the jigsaw blade to match the barrel’s slope and rout the bevel in one smooth cut. A quick pass with the grinder then tidies up any high spots and works around the top‑band rivets for a perfect fit.

After scrutinising countless photos and still coming up blank, I devised my attachment method—one that even a commercial barrel‑furniture maker gave a thumbs‑up to!

I placed the levelled tabletop on the barrel, then drilled straight through the barrel’s rim into the tabletop’s centre using a large bit. Next, I switched to a countersink bit to carve out recesses for the bolt heads so they’d sit flush. Finally, I drove heavy‑duty carriage bolts through the staves into the tabletop, pulling everything tight and locking the top firmly in place.

Build the Lid
I repurposed the centre off‑cut as a removable lid—lift it off during drinks and snap it back for a polished finish. My first lid simply rested on the barrel’s inner rim and wobbled, since barrel interiors aren’t perfectly even. Rather than spend hours sanding the inside, I refined later lids to fit snugly without extra grinding.

On my next barrel, I used a router and removed the excess wood just under the lid, which would catch on the sloping part of the barrel. And 4 barrels later and I still did not take a picture of the inside of the lid. Once the excess is removed, the lid should just sit on the rim of the wine barrel. This is a far better look (See image below).

I added a flush latch so the lid lifts off easily. I chiselled out a recess with a hammer and chisel until the latch sat flush. Then I took the top apart and sanded it with 180‑grit, then 240‑grit, using an orbital sander. After sanding, I stained the wood and brushed on three coats of marine varnish. To hide any exposed plywood edges, I screwed an aluminium strip around the apron.

On one build, I applied a wood‑grain veneer over the plywood for its beautiful pattern, but it dented too easily. To strengthen and protect it, I poured a clear epoxy resin over the top—giving it a durable, high‑gloss finish that looked fantastic.

More Wine Barrel Table Ideas
I built a wine‑barrel coffee table, added a custom vinyl family‑name logo, and sealed the surface with a glossy liquid‑glass epoxy coating.

I enhanced this wine barrel coffee table by carving a classic Greek‑key pattern into the tabletop, giving it a timeless, elegant touch.


If you’d like to find any of the items used in this project, we’d greatly appreciate it if you used our affiliate links. These links provide us with a small commission at no extra cost to you, allowing us to continue creating and sharing more inspiring projects. We’d also love to hear your thoughts—feel free to leave a comment or share this post!

23 Comments
Bruce Gamble
April 7, 2017 at 10:26 amGreat job ! I have some experience with working with wine barrels and think your table is better than anything I came up with. I would like to know where and how you placed the large anchor bolts so that the heads did not spoil the great looking top you placed on the barrel.
Your finish work is also stellar.
Bet you get lots of complements from your guests when you have them over for an event.
Hope to hear from you, and again, job very well done.
Bruce
Anita Holland
April 7, 2017 at 12:38 pmHi Bruce
Thanks for your kind words very nice to hear. The anchor bolts are drilled through the top lip of the barrel and straight into the center of the counter top. I have learnt from doing a few of these that it is better to have the lid sitting on the top of the barrel rather than sitting inside because the insides are not always level. The bolts are also counter sunk into the top and to get my lid to sit nice and tidy and not catch on the lid, I also routered out a section under the lid to make sure the lid does not catch on the bolt heads. Hope this answers your question if not let me know.
Cheers
Anita
Lyra
May 29, 2018 at 1:43 amI like the idea of using the aluminum band. Where did you purchase it and does it have a specific name?
Anita Holland
May 30, 2018 at 7:21 amI bought it from a company that sells glass and aluminium. I am not too sure what they used it for. I saw it by chance when I went to get a mirror cut. It was just a strip of aluminium which they cut to size for me. It cost me $8 which I thought was good. It was thin so it moulded to the sides really easy.
Lyra Stroud
May 30, 2018 at 1:33 pmThanks for responding. Gives the table a nice finished look.
Anita Holland
June 3, 2018 at 12:22 amThank you!
Lydia C. Lee
March 31, 2020 at 7:23 amYOu’ve been busy!
Anita Holland
March 31, 2020 at 1:48 pmI made a few on these, but the phase has passed. lol
Karen, the next best thing to mummy
April 2, 2020 at 7:56 pmLove this, my husband makes his own wine, but not enough to need a barrel#,alittlebitofeverything@_karendennis
Anita Holland
April 5, 2020 at 5:01 pmThank you so much, I tend to stick to bottles too. The wine barrels were sourced from the university that makes wine. lol
Dee | Grammy's Grid
April 3, 2020 at 7:18 pmGreat job! Thanks so much for linking up with me at my #UnlimitedMonthlyLinkParty 11, open April 1 to 26. All entries shared on social media if share buttons installed. I’d like to invite you to check out my other current link parties too!
Anita Holland
April 5, 2020 at 5:01 pmThank you.
Chas Greener
April 4, 2020 at 1:44 amHow fun is this! Great idea, and looks absolutely beautiful. Thanks for sharing.
Anita Holland
April 5, 2020 at 5:02 pmThank you so much, Chas.
Martha
April 5, 2020 at 9:48 amWhat a creative idea and we love wine this will be perfect for our yard happy I saw your link at fortheloveto thanks for sharing
Anita Holland
April 5, 2020 at 5:05 pmThank you so much Martha, very kind of you to say.
Cecilia
April 6, 2020 at 1:42 amWhat a clever project–love it! Thanks for sharing at Vintage Charm!
Anita Holland
April 8, 2020 at 9:57 amThank you so much, Cecilia.
Julie Briones
April 7, 2020 at 11:42 amWhat a ‘cool’ table, Anita! 😉 Love the built-in ice bucket! Thanks for sharing a Tuesday Turn About! Pinned!
Anita Holland
April 8, 2020 at 9:58 amThank you, I thought I was being clever. lol
Renata Lopes Sanches
May 9, 2020 at 2:59 amWhat a Great idea!!! This table looks absolutely beautiful and cool. Do you have all the detail instructions on how to make it that you could email me with? I would love to make this table. The site as so many advertisement, I was wondering if you can send me the details used so I can try to make it. Thanks for sharing.
Des
August 19, 2021 at 12:50 pmLove your barrel. Could you tell me what brand and color you used to stain the barrel?
Desiree Sullivan
August 22, 2021 at 2:34 amHi Anita. One more question. How did you clean the inside of your barrel? I recently sanded mine and got it ready for staining. I left it outside in the rain before staining and now it’s purple and black:( I never cleaned the inside of it. Any suggestions? I want to keep it outside after I stain and seal it