
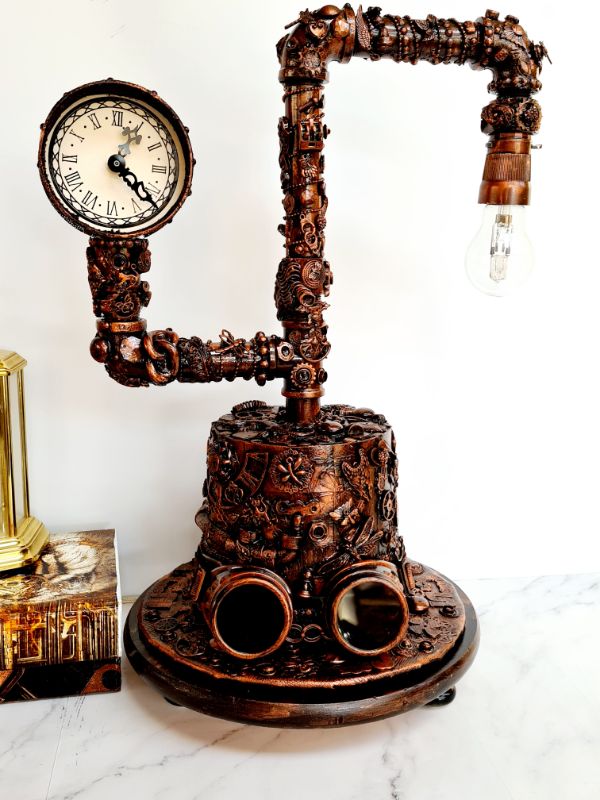
Immerse your spare room in industrial charm with the DIY Mixed Media Steampunk Gauge Clock Lamp. This project blends galvanised pipe fittings, a handcrafted gauge clock and a layered mixed media makeover for a one‑of‑a‑kind lighting feature. Each glance reveals new textures—from thrifted jewellery embellishments to copper‑wax highlights—so you’ll never tire of spotting fresh details. Follow this step‑by‑step guide to build your steampunk lamp using upcycled materials and basic tools.
")
Before we dive into this tutorial, be sure to subscribe to my bimonthly newsletter to be the first to see my latest projects. You can also follow me on Pinterest and Facebook, where I also include my unique mixed-media art projects.

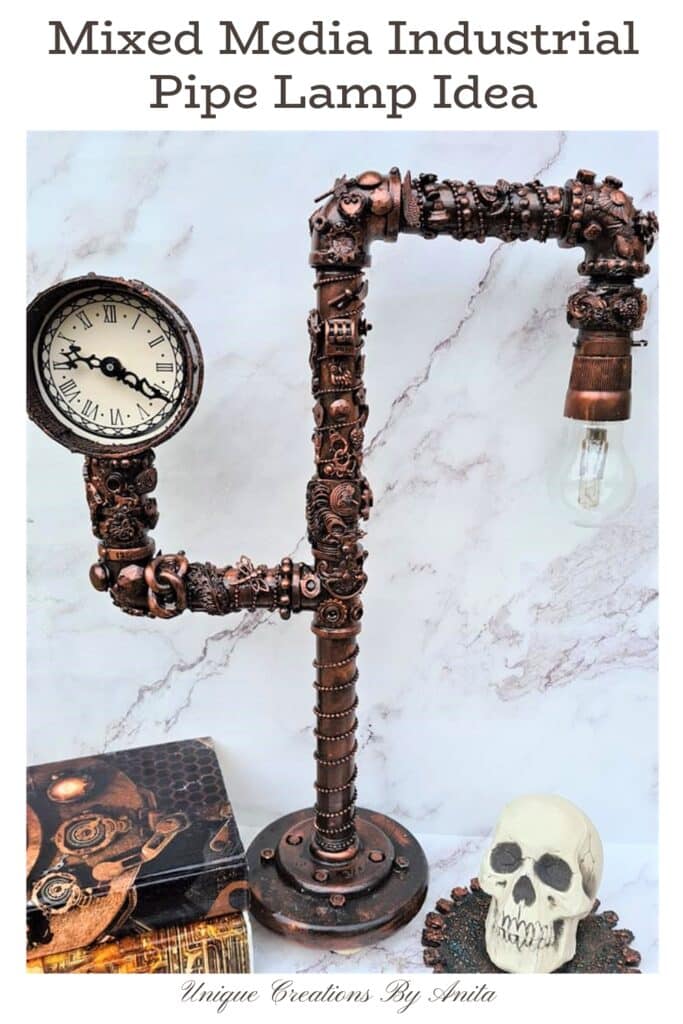
DIY Mixed Media Steampunk Gauge Clock Lamp
**This post may contain affiliate links. This means I earn a small commission on links used at no extra cost to you. Please see my disclosure policy for more information.**
Materials Needed
- ¾ inch galvanised or brass pipe fittings (standard lengths available from hardware stores)
- 1 × floor flange
- 2 × nipples (100 mm)
- 1 × nipple (150 mm)
- 1 × T‑piece
- 3 × elbows
- 1 × socket reducing
- 1 × socket hex
- Lamp fitting
- Wooden base (130 mm diameter circle or shape of your choice)
- Nuts, bolts and washers for stand
- Clock mechanism (battery‑powered)
- Thrifted jewellery bits: charms, studs, half‑pearls, filigree pieces, gears
- Resin‑cast clear charms (optional)
- Black gesso primer
- Copper metallic wax paste or homemade wax pastes.
- Clear acrylic spray sealer
- Epoxy glue or turbo tacky glue
- Faux leather or fabric for clock cover
- Burlap scrap (optional)
- Craft knife, hot glue gun, sandpaper
1. Design and Pipe Assembly
Sketch your lamp layout, then thread together the pipe fittings dry (no glue yet) to ensure the electrical wire feeds snugly through each bend. Adjust until the form pleases you.
")
Once happy, coat all the pipes with black gesso—this base colour makes copper highlights pop later.
")
2. Make the Gauge Clock
")
Find a plastic container with a screw‑on lid (approx. 90 mm diameter). Trim it to 50 mm tall using a craft knife. Smooth edges by briefly pressing them against a hot surface (e.g. sandwich toaster plate).
")
Wrap the container in faux leather or fabric, securing with glue.
")
Cut a cardboard circle slightly smaller than the container’s opening, poke a centre hole, and mount the clock mechanism. Add a printed clock face or vinyl decal for authentic gauge styling.
")
3. Decorate the Clock
Glue half‑pearls, studs or split peas around the rim to mimic rivets. Use broken necklace chains for trim. Line the interior with burlap for contrasting texture. Remember: thrift stores are gold mines for cheap embellishments. The back of the clock is removable to allow for the battery to be changed.
")
4. Apply Embellishments to Pipes
Using a hot glue gun, randomly attach gears, charms, studs and resin pieces to the pipes. Cover most surfaces to create visual interest, but keep some negative space so textures breathe. For more tips and tricks on items you can use to add texture to your assemblage projects, this post has it all.

I used so many miscellaneous items that naming each one would be impossible, so I’ve included close‑up photos of the embellishments arranged before painting.
")
")
Your project becomes even more captivating when you layer in a few charms. I also raided my husband’s toolbox for authentic hardware pieces that perfectly complement the steampunk vibe.
")
")
")
It may seem a little chaotic at first, but it all comes together beautifully as you add more layers.
")
5. Paint Embellishments
Prime all glued pieces with black gesso, ensuring every nook and cranny is coated. Messy application is fine—imperfections add character.
")
6. Add Copper Wax Highlights
Dip your fingertip in copper metallic wax and lightly rub over raised areas. Avoid covering all the black; let some dark shadows remain.
")
Blend sparingly with a soft brush for a weathered patina. If you don’t have copper wax paste, you likely already have the ingredients to make some at home. This post shows you how.
")
7. Seal with Acrylic Spray
After 12 hours’ wax curing, apply two light coats of clear acrylic spray. This locks in your finish and prevents future fading.
")
8. Wire the Lamp
Feed the lamp cable through pipe joints, reassembling elbows and fittings with a dab of epoxy glue for stability. Install the lamp fitting at the top and test before adding it to the stand.
")
9. Build and Attach the Base
Cut and sand your wood base, then prime and wax‑highlight to match.
")
Drill holes for the floor flange, secure with nuts and bolts, then touch up paint and highlights on exposed threads.

Mount the pipes to the flange, then glue the clock in place on the front.

10. Final Assembly
Screw in the battery, set the clock time, and place your lamp on a bedside table or desk. Admire how every detail—from thrift‑store treasures to metallic sheen—creates a mesmerising steampunk statement.
")
Completed lamp Close-up view
")
")
")
")
")
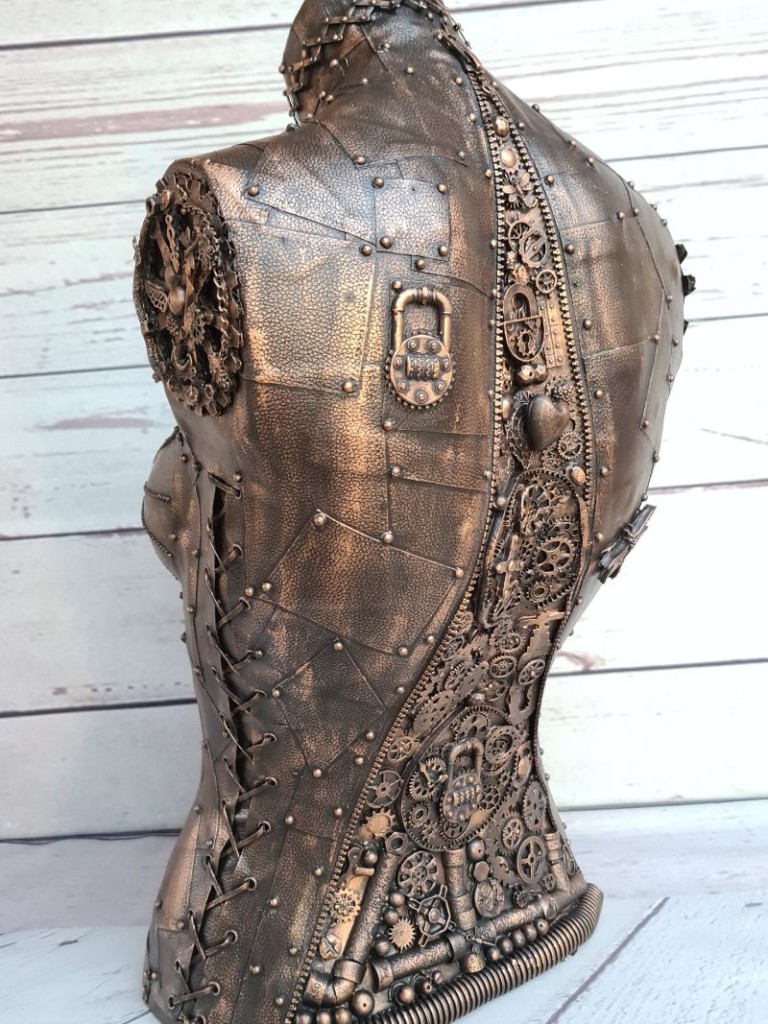
I loved the finished lamp so much I wanted to keep it for myself. With no space for more steampunk projects, I attached it to a steampunk hat I’d made. Now it’s a single showpiece featuring two of my favourite creations.
More steampunk project ideas
I crafted this steampunk mannequin the same way, incorporating a variety of recycled materials scavenged from around the house.

If you’d like to find any of the items used in this project, we’d greatly appreciate it if you used our affiliate links. These links provide us with a small commission at no extra cost to you, allowing us to continue creating and sharing more inspiring projects. We’d also love to hear your thoughts—feel free to leave a comment or share this post!


58 Comments
Marie-Interior Frugalista
June 28, 2020 at 10:57 pmSeriously, Anita, you ARE the Queen of Unique Mixed Media Steampunk! Wow, this lamp is so cool. Pinned (a couple of times)
Anita Holland
July 2, 2020 at 2:17 pmThank you so much Marie, I love it when you say that it makes my day. It is my wintertime craft when it is too cold to play outside.
Michelle Leslie
June 29, 2020 at 9:51 pmWHAT!!!!!!! All the cogs in my little Steampunk heart are going into overdrive. 😀 So cool Anita. I’m crazy about how you made the clock. Brilliant!!!
Anita Holland
July 2, 2020 at 2:19 pmThanks Michelle, I have another one coming up soon that will get your cogs going. I have so many projects on the go, I never know which one to do first.
Deana Landers
June 29, 2020 at 10:20 pmThis is an amazing work of art, Anita. I love how you detailed the work you put into this. It is beautiful.
Anita Holland
July 2, 2020 at 2:23 pmThank you so much Deana, I like to add lots of detail makes it more interesting.
Sara
June 29, 2020 at 10:55 pmYour steampunk creations are so incredible. Pinned!
Anita Holland
July 2, 2020 at 2:23 pmThank you so much Sara, that is very kind of you to say.
Anne
June 30, 2020 at 7:16 amI am so utterly impressed by your lamp, it really is amazing, especially when you look at where you started from. I loved reading through your details even though I don’t have the skills to make one myself. You really are talented.
#mmbc
Anita Holland
July 2, 2020 at 2:25 pmThank you so much Anne for the lovely comment and the compliment. It honestly is very straight forward not much skill involved at all. I watch a couple of youtube videos and then just jumped in and had a try. You should try it, you could surprise yourself.
Allyson
June 30, 2020 at 10:17 amWow, your lamp is such a very unique piece of art! It’s so nice that your thrift store collects the bits and pieces for you.
Anita Holland
July 2, 2020 at 2:27 pmThank you so much Allyson for the lovely comment. Having a good relationship with our thrift store is one of the perks of country life. And I am in there all the time looking for treasure I can upcycle.
Lori Nell
July 1, 2020 at 12:25 amSuch a fun detailed DIY. Love all the details on your lamps
Anita Holland
July 2, 2020 at 2:28 pmThank you so much Lori, that is very nice of you to say.
Barbara Chapman
July 1, 2020 at 8:10 amAnita, this clock lamp with its pressure gauge look to it is awesome!!! Pinned several photographs because it fits a lot of different places (diy/crafts/lighting etc.). <3 This would make an awesome bedside lamp with a little shade and a great reading lamp!
Enjoy your fun new lamp!!! I saw some cool lamps and clocks at High Point Market several years ago that you would have gone nuts for…
Hugs,
Barb 🙂
Anita Holland
July 2, 2020 at 2:31 pmThank you Barbara for sharing my photos, I really do appreciate it. I do have a cage coming for the light bulb and I want to change the base. So watch this space lol
Kristi
July 1, 2020 at 2:48 pmSuch a cool piece! Love it! Pinned!
Anita Holland
July 2, 2020 at 2:32 pmThank you Kristi, and thanks for the share. x
Loren
July 1, 2020 at 11:32 pmWow! This is so unique and pretty. You are really creative.
Anita Holland
July 2, 2020 at 2:33 pmThanks, Loren for the great comment.
rosemary palmer
July 2, 2020 at 10:10 amI love seeing such unique pieces. So creative.
Anita Holland
July 2, 2020 at 2:34 pmI do try to do my projects a little different from the norm. keeps it interesting.
Anita Holland
July 2, 2020 at 2:16 pmThank you so much, Michelle.
Dee | Grammy's Grid
July 2, 2020 at 7:04 pmNow that’s a very unique lamp!! Thanks so much for linking up with me at my #UnlimitedMonthlyLinkParty 14, open July 1 to 26. All party entries shared if social media buttons installed.
Anita Holland
July 2, 2020 at 10:46 pmThank you 😁
Christine
July 2, 2020 at 11:49 pmThis is fabulous. So inventive but a great tutorial to allow us to make one too! Thanks for sharing this.
Anita Holland
July 3, 2020 at 8:50 amThank you for the lovely comments, I am really happy that my tutorial will help.
Julie
July 5, 2020 at 1:10 amWow Anita, this looks like it was SO much fun to make. It’ll be one of the features at Handmade Monday this week 🙂
Anita Holland
July 6, 2020 at 9:36 amThank you so much Julie, I find them so much fun to do because they all turn out so differently.
Antionette Blake
July 5, 2020 at 2:33 pmThank you for sharing your post at this week’s #TrafficJamWeekend Linky Party.
Have a wonderful weekend!
Ann
July 5, 2020 at 11:02 pmThis is amazing, Anita. Thank you for sharing at Party In Your PJ’s, you are being featured on my blog Tuesday evening.
Cecilia
July 6, 2020 at 4:42 amVery whimsical! Thanks for sharing at Vintage Charm!
Kristie Schubert
July 6, 2020 at 11:29 pmWhat a gorgeous lamp! This is one of my features on the Little Cottage Link Party today. i hope you can drop by.
Anita Holland
July 7, 2020 at 11:25 amThank you so much, I will definitely be popping over this week.
Claire
July 8, 2020 at 7:40 pmWhat a fun way to use up junk. I bet you enjoyed making this it looks like a fun craft.
Anita Holland
July 8, 2020 at 7:48 pmI love doing this style of mixed media, it really is so much fun because you can do whatever you like and it still turns out good. lol
Carol
July 10, 2020 at 3:25 amThis is so cool! I’ve seen pieces like this at art fairs for $$. Featuring when my party opens tonight!
Anita Holland
July 14, 2020 at 9:16 amThank you so much Carol, your comment has made my day.
Jeanne
August 4, 2020 at 1:09 amYour lamp came out beautiful! I’ve done mixed media on canvas but not on anything else. I love the process and the unique results you get with mixed media. Thanks for sharing!
Anita Holland
August 4, 2020 at 8:29 amThank you so much, I have only been doing mixed media for a year but I have stuck to decorating objects until now. I will be trying more on canvas.
Jeanne
August 6, 2020 at 2:09 amYou’ll love this results!
Anita Holland
August 6, 2020 at 11:11 amThank you.
Mari Jo
August 5, 2020 at 9:21 pmSo beautiful, whimsical and just FUN! I truly appreciate all the step by step directions, and how it all comes together! Love it! going to follow you! Thank you for showing and sharing!
Anita Holland
August 6, 2020 at 11:07 amThank you so much, Mari Jo, for the lovely comment and for following my blog. I really do appreciate it.
Laura Kelly Walters
August 11, 2020 at 3:32 pmThe details on this are amazing!! Thanks for sharing!
Anita Holland
August 12, 2020 at 12:42 pmThank you so much, I have just started doing mixed media and I am totally addicted. lol
Beth Watson
August 13, 2020 at 12:16 amThis is so beautiful!
Anita Holland
August 13, 2020 at 11:52 amThank you Beth, that is so kind of you to say.
Meg Daves
August 14, 2020 at 1:59 amThis makes me think of the Little Mermaid! I absolutely love it!!
Anita Holland
August 14, 2020 at 6:35 amThank you so much.
Ann Butler
August 14, 2020 at 2:03 amThis is so beautiful! Does the wax paste come in different metals?
Anita Holland
August 14, 2020 at 6:36 amThank you Ann. The wax pastes do come in lots of different colours. I just keep using the same few because I already have them at home.
How to make a recycled mixed media steampunk lamp and clock – Recycled Crafts
August 15, 2020 at 10:43 am[…] Most of the time I like my recycled craft and art projects on the quick and easy side but this one looks like a fun relaxing one that could take some “zen” time. This mixed media steampunk lamp has been made using mainly recycled materials. This project is easy to follow and you will have a unique piece of useful art. Pop on over to the blog for the step by step tutorial on how to make a recycled Steampunk material clock and lamp. […]
Anita Holland
August 18, 2020 at 8:01 amThank you so much for the feature on my lamp.
Steampunk Ideas
August 17, 2023 at 10:55 pmI love stuff like this, our house has so many quirky things made out of metal . Every car boot we go too I’m always grabbing a bargain with the metal men.
You post was a great read, and most likely going to inspire me to take a trip to amazon now and buy some more lol.
Anita Holland
August 18, 2023 at 11:19 amThank you so much.
Ali
September 30, 2025 at 4:40 pmWow, this tutorial is absolutely inspiring! I love how you’ve shown each step so clearly, especially the way you blended thrifted finds into the design. Immerse your spare room in industrial charm with the DIY Mixed Media Steampunk Gauge Clock Lamp—that line alone perfectly sums up the uniqueness of this project. The combination of copper wax highlights, gears, and repurposed materials really makes it a one-of-a-kind creation. Definitely bookmarking this to try out with some upcycled pieces I have at home. Thanks for sharing such a detailed guide!
Anita Holland
October 7, 2025 at 12:02 pmThanks so much Ali!