
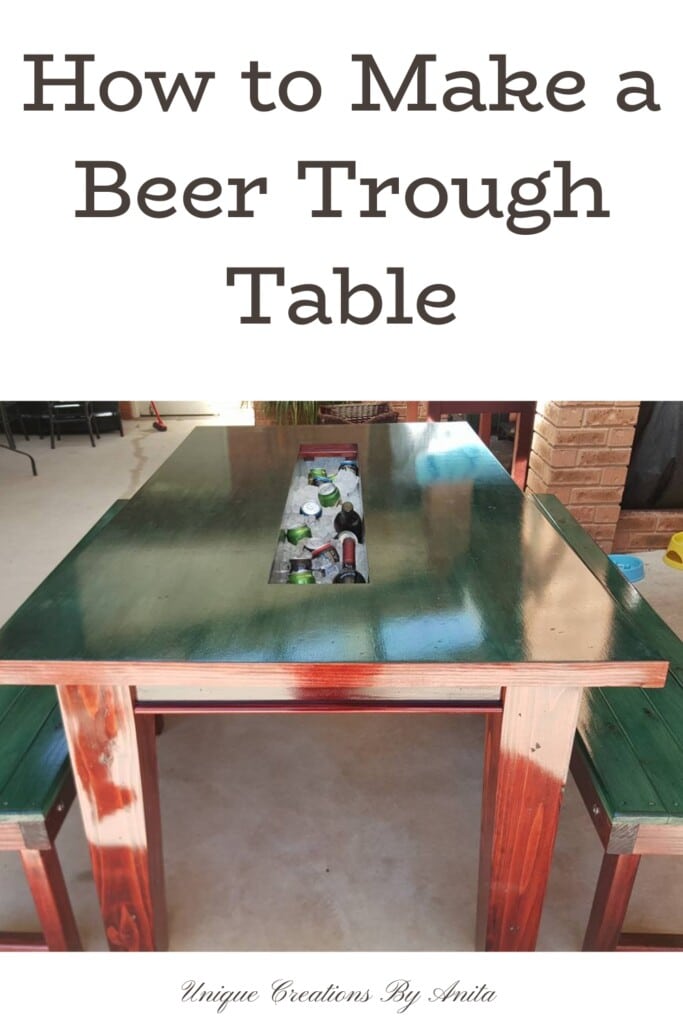
The Rustic DIY Beer Trough Table with Built‑In Ice Cooler transforms a battered tabletop into a stunning outdoor centrepiece. It eliminates constant fridge runs, letting guests serve themselves cold drinks and enjoy every moment of the party. The generous ice trough doubles as a cooler and conversation starter, creating a relaxed, festive atmosphere for family gatherings. Everyone can grab a drink without missing out on laughter or conversations.

Before we dive into this tutorial, be sure to subscribe to my bimonthly newsletter to be the first to see my latest projects. You can also follow me on Pinterest and Facebook, where I also include my unique mixed-media art projects.
Rustic DIY Beer Trough Table with Built‑In Ice Cooler
**This post may contain affiliate links. This means I earn a small commission on links used at no extra cost to you. Please see my disclosure policy for more information.**
Materials Needed
- Damaged wooden table (approx. 2 m long)
- Custom aluminium ice trough (with lip)
- Scrap wood and 2×4 timber for supports
- Flush‑mounted ring‑pull handles
- Wood veneer tape
- Wood glue and wood filler
- Screws and rivets
- Drainage cork plug
- Dark mahogany wood stain
- Oil‑based gloss varnish
- Unicorn Spit Stain & Glaze (optional)
- Orbital sander and discs
- Router with straight bit
- Drill
- Grinder with cut‑off disc
- Step drill bit
- Heat gun and iron
- Circular saw
- Chisel
Distress the Tabletop

I turn existing scratches and gouges into a deliberate, textured finish by striking the tabletop with a modified drill‐chuck key. First, I grind off the chuck’s taper, then clamp it in vise grips and tap it randomly across the surface. Its ridged pattern leaves a series of decorative dimples that both camouflage imperfections and lend the table a rustic, intentional character. I will address the cut section of the table later.

For added texture, I lay a large dowel screw flat on the tabletop and tap it randomly with a hammer—its threaded surface imprints irregular, rustic dimples into the veneer that blend seamlessly with the distressed finish.
")
Create and Fit the Ice Trough
My first party trough table used two plastic planters as the ice basin—they kept drinks cold but looked out of place against the timber. This time, my son fabricated a custom aluminium trough that fits perfectly and complements the rustic finish. If you don’t have access to a metalworker, shed‑building companies often fabricate them to order, and even repurposed guttering can serve as an inexpensive, DIY alternative.
Begin by marking the exact location for your ice trough on the tabletop. Position it so the trough’s lip will rest flush against the surface—this flange locks the trough securely in place. Carefully measure and transfer the trough’s internal dimensions (excluding the lip) onto the wood to ensure a precise, snug fit.

Cutting the trough hole
Using a wood router instead of a jigsaw gives you a crisp, professional‑grade opening for your ice trough. Lay two long scrap‑wood rails along your marked cut lines to serve as fences, and secure them temporarily with a nail gun—extra nail holes simply blend into your distressed finish—or hold them in place with double‑sided tape. Fit a straight‑cutting bit to your router, then make a series of shallow, overlapping passes, gradually deepening the cut until the centre section drops away, leaving a clean, precise opening ready for your trough.

Even budget routers work beautifully—just slide the base plate along your fence for flawless, straight cuts.

Support the Ice Trough
Flip the table over and seat the trough so its lip rests flush against the underside of the tabletop, creating a clean, integrated look. Cut two hardwood strips to the exact length of the trough lip and screw them in place—this clamps the lip securely since a handful of screws alone can’t bear the weight of ice and drinks. For even more rigidity, build U‑shaped braces from 2×4 timber, position them around the trough, and fasten them to the table’s underside as shown below.

Install Lid Support
To secure the lid, rivet two L‑brace plates inside the trough. Cover these with a timber block so they stay hidden. Drill and countersink screws to sit flush. This creates a sturdy shelf for the lid to rest on.

This creates a sturdy shelf for the lid to rest on.

Reinforce lid and Add Handles
The full-length 20 mm lid proved too heavy to span the 2 m table without sagging (see below).

To rigidify it, I glued and screwed a 40 mm‑square timber beam along the underside, effectively creating a built‑in spine that kept the lid perfectly flat.

To keep the tabletop looking neat when the trough isn’t in use, I fitted flush‑mounted ring‑pull handles to the lid. I chiselled shallow recesses in the wood until each handle sat perfectly flush, then secured them in place. Any veneer that chipped during the chiselling was repaired with wood filler, leaving a smooth, seamless surface.

Repair Ends and Add Supports
I used a circulr saw to straighten the edge that had been cut. The table felt fragile when lifted, thanks to the central hole and missing end and the weight of the leg’s. I filled the gap with custom scrap‑wood supports and added a support beam both above and below to prevent flex.

Add veneer tape to the sides and trough opening
To give the trough a polished, solid‑wood look, I covered the plywood edges with wood veneer tape. First, I softened the old veneer with a heat gun and peeled it away cleanly using a paint scraper. Then I measured and cut the veneer tape to the exact length, pressed it firmly onto the edge, and trimmed the excess—resulting in a seamless, natural‑wood finish.

Repair Ends and Add Supports
Once I’d squared off the shortened end with my circular saw, I tried lifting the table and discovered its strength had been seriously compromised by cutting out the centre and trimming one side. With those hefty legs bearing down, it felt like the whole thing might buckle. To shore it up, I crafted support blocks from scrap timber to fill the gap (see below) and then added a stout beam both above and below the tabletop—eliminating any wobble or sag whenever it’s lifted.

Sand, Stain and Seal
I began by sanding the tabletop smooth, clearing away any old finish so the new stain would absorb evenly. The solid‑timber legs already showed off a gorgeous grain, so I wiped on a rich mahogany stain until they glowed with a deep, warm tone. Once that dried, I sealed them with two coats of oil‑based gloss varnish for a sleek, durable shine. With the legs finished and the tabletop primed, the stage was set for a stunning two‑tone effect.

Unicorn Spit Stain and glaze
I tried a Pinterest‑inspired recipe with Unicorn Spit Stain & Glaze on the tabletop, aiming for a soft sky‑blue finish. When it dried, however, the hue skewed greener than expected—resulting in an unexpected but charming aquamarine patina.

Add Drainage Plug
To add drainage, flip the table and use a step‑drill bit to bore a hole in the bottom of the trough just large enough to accept a tapered cork. Push the cork in to create a watertight seal, then when you’re ready to empty it, simply place a bucket underneath, pull the cork, and let the water drain into the bucket.

Finish with Matching Benches
Build simple benches using the same stain and varnish for a cohesive set. Place them on either side of the table for extra seating. Now your Rustic DIY Beer Trough Table stands ready for any gathering


This is the table when not in use.

In my first version of the party trough table, I simply repurposed plastic planters to serve as the ice troughs.


More outdoor entertainment furniture ideas
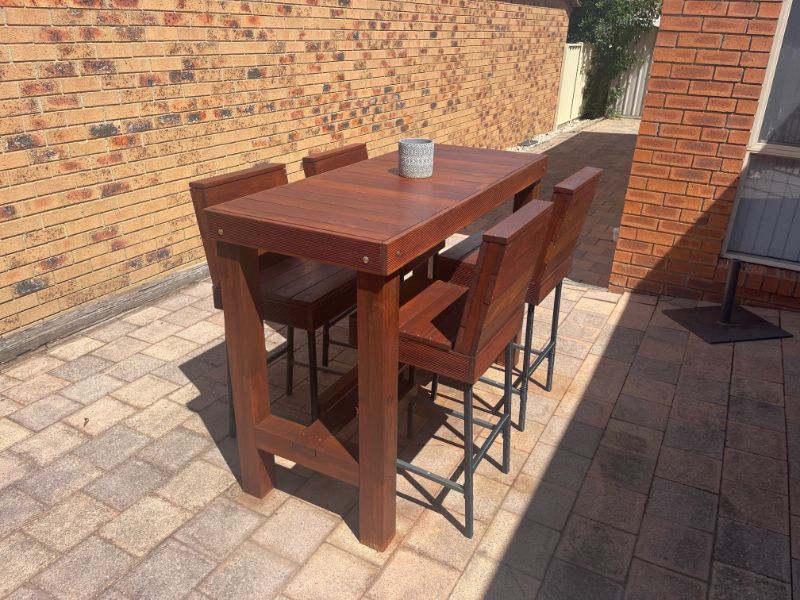
This outdoor table was crafted from reclaimed decking boards and built at bar‑height, so guests can either stand and mingle or pull up stools to sit.
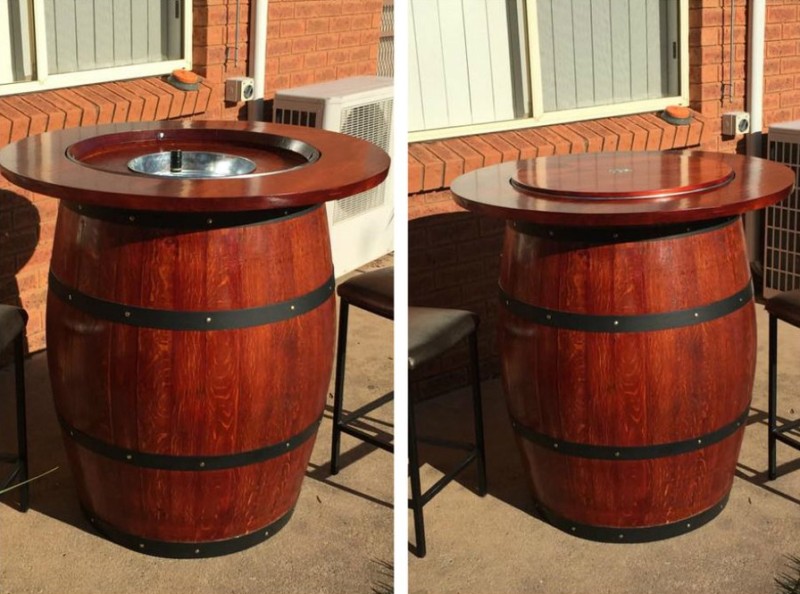
I repurposed an old wine barrel into a stylish bar‑height table by cutting a recessed well into the top and fitting a built‑in wine bucket—keeping bottles chilled and within easy reach for guests.

If you’d like to find any of the items used in this project, we’d greatly appreciate it if you used our affiliate links. These links provide us with a small commission at no extra cost to you, allowing us to continue creating and sharing more inspiring projects. We’d also love to hear your thoughts—feel free to leave a comment or share this post!


16 Comments
Jake
May 17, 2018 at 7:35 pmGreat project, thanks for sharing the tips and build.
Julie
December 17, 2019 at 11:11 amYou know what I love about this project? That you just kept on solving the issues you had as they came up! No quitting! And just as well because you’ve ended up with a table that will be just perfect for summer parties. Well done, I think you deserve a nice cold drink after al that work!
Anita Holland
December 19, 2019 at 6:39 amThank you so much Julie, because I always make up my projects as I go along I always have issues.🤣 I always say to myself that I am in too deep to quit🤣
Virginia
December 18, 2019 at 2:04 pmYour table is awesome!
Anita Holland
December 19, 2019 at 6:34 amThank you so much😉
Cecilia
December 30, 2019 at 2:42 amGreat tutorial, Anita! Thanks for sharing at Vintage Charm!
lisa lombardo
December 30, 2019 at 3:52 pmThis is a great idea! I love how you take old things that others might throw away and make them into something new! Thanks so much for sharing on Farm Fresh Tuesdays! I can’t wait to see what you’re up to this week!
Teresa
January 9, 2020 at 3:44 pmYou did a great job, I love the color! Thank you for sharing at The Really Crafty Link Party. Pinned.
Ann
January 13, 2020 at 12:57 amBeautiful project! Thank you for sharing at Party In Your PJ’s.
creativejewishmom/sara
March 12, 2020 at 9:18 pmWow, amazing table, thanks for sharing on craft schooling Sunday!
Anita Holland
March 16, 2020 at 3:15 pmThank you so much.
jeffrey scroggs
December 14, 2020 at 7:27 pmEverybody here owes you some money ! If I could do what you do , I’d do it too ! You should put it all in a book and publish it ! If you dont need the money then donate it to ..poor children living in rough neighborhoods . You are an Ocean of Motion, and a Lava of ideas erupting and flowing down upon us all ! Like a quiet and crisp , Early Saturday Morning .you awake with eager ,anxious energy …..etc…etc..
Anita Holland
December 16, 2020 at 1:22 amThank you so much Jeffrey, that must be the best comment I have ever had. Thank you so much. I would love to make money from my hobby one day, but no luck yet. lol
Michelle Leslie
January 4, 2021 at 11:41 pmI don’t know what I love more, that gorgeous, rich green or the fact that this table is the best idea ever. Our beers get hot so quickly and when you’re parking on your butt by the pool the last thing you want to do is wander around with a wet bottom to get the next round 😀 So perfect.
Anita Holland
January 7, 2021 at 1:43 pmThank you so much Michelle. Why walk to the kitchen when you can stay put and enjoy a cold one.
30 Inexpensive & Easy Backyard Patio Ideas on a Budget
April 29, 2021 at 4:01 am[…] This next table is so clever. Anita created an ice trough in a discarded table. She shares how she distressed it and created the aluminum trough. You’ll find all the details at Unique Creations by Anita. […]