
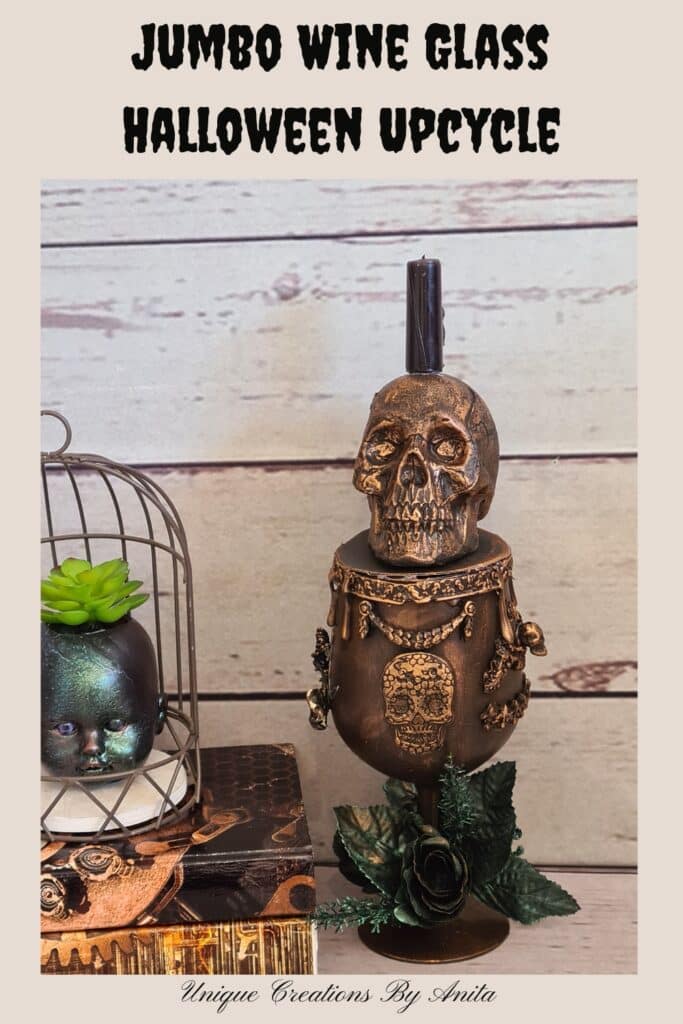
I always joke that I love wine so much they don’t make a glass big enough for me, which is exactly why I created this Upcycled Halloween Skull Goblet into a Spooky Table Centrepiece for your next Halloween celebration. A few years back, my friends gifted me two of these jumbo 1-litre wine glasses as a joke—but they were too heavy to hold, so they ended up tucked away in a cupboard. With Halloween on the horizon, I decided to breathe new life into one of them by turning it into a skull-themed goblet that doubles as creepy table décor.

If you’re not a die-hard Halloween fan and only want decorations for a couple of parties, you’re in luck—all the products I used can be washed off or sealed for future use. I love the idea of temporary themed glassware that vanishes when the party’s over. No more cupboards full of novelty glasses that sit unused!

Before we dive into this tutorial, be sure to subscribe to my bimonthly newsletter to be the first to see my latest projects. You can also follow me on Pinterest and Facebook, where I also include my unique mixed-media art projects.
Upcycled Halloween Skull Goblet: Transform a 1-Litre Wine Glass into a Spooky Table Centrepiece
**This post may contain affiliate links. This means I earn a small commission on links used at no extra cost to you. Please see my disclosure policy for more information.**
Materials Needed
- 1-litre wine glass goblet
- Black gesso primer
- Hot glue gun + glue sticks
- Silicone moulds (skulls, roses, bones)
- Metallic wax paste
- Cheap fabric roses or faux blooms
- Shimmer spray (optional)
- Cardboard circle (for skull platform)
- plastic skull
- Battery-operated tealight (optional)
- Small paintbrush
- Silicone border mould
1. Prep Your Goblet
Begin by cleaning the surface of your goblet so that paint adheres properly. Cover your workspace with a newspaper. Paint the entire goblet in one or two coats of black gesso—this primer gives a smoother finish than acrylic paint and makes embellishments stick better. Don’t worry about perfection; those little flaws will catch the metallic wax later and add to the eerie vibe.

2. Create and Attach Embellishments
Using your hot glue gun, fill silicone moulds with glue to form skulls, roses or bone shapes. While still hot, lightly wet your fingertip and smooth any ridges—water prevents burns.

Once cooled, press these glue shapes onto your goblet in a creepy arrangement, adding extra skeleton bits where you like.


For a drippy effect, hold the glue gun at a slight angle and let fresh glue run down the rim before it sets.

3. Highlight with Metallic Wax
Painting projects black, then waxing, enriches the texture. Dip your finger into the metallic wax paste and rub it over raised embellishments until they gleam.

For subtle highlights on flat areas, use a small paintbrush to apply a very light coat of wax—this catches the light without obscuring the black background. Leave some sections unwaxed to maintain depth and shadow.

4. Add Floral Accents
Transform budget-store fabric roses by painting them black with gesso first to mask any bright colours. After the gesso dries, take your shimmer spray outdoors (it stains!) and mist the blooms lightly.

Once I started using shimmer sprays and wax pastes, I realised I could make my own at home. If you’d like to try crafting your own waxes and shimmer sprays, check out this post on making homemade mixed media supplies – as a crafter, you may already have all the items needed in your stash!

Use hot glue to attach these flowers around the goblet’s stem or rim.

Finish by rubbing wax paste onto petal edges for a gilded look.

")
5. Build the Skull Platform.
To make a platform for the skull to sit on, I cut some cardboard and glued it to the rim. The skull was then glued to the top of the cardboard. You could add some battery-operated lights to the inside if you wanted to, or just glue a candle to the skull’s head.
")
")
")
More Halloween projects for you
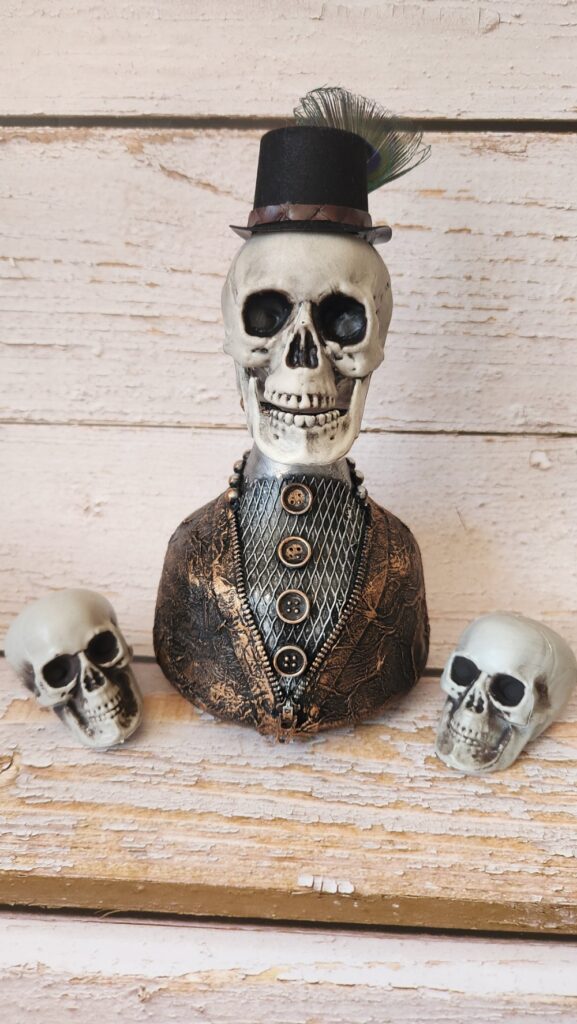
I love using this technique for Halloween decorations—here are a couple more ideas to inspire you. This skull bottle was crafted primarily from recycled materials you likely already have at home.
This Halloween table centre piece was also made from a recycled bottle and decorated using the same mixed media technique. You can find all my mixed media projects here.

Create spooky outdoor Halloween décor with a simple Grim Reaper made from cement and an old towel.


37 Comments
Jasmine Goodwin
September 13, 2020 at 11:57 pmHello Anita, I had to come back and see your creations, you are so creative and this skull goblet is truly amazing. What a talent! Pinned.
Anita Holland
September 15, 2020 at 7:12 amThan k you so much Jasmine, that is very kind of you to say. And thank you for visiting.
Michelle Leslie
September 14, 2020 at 8:57 pmYou’re an absolute master when it comes to making Steampunk styled creations. I can’t even begin to tell you how much I love this skull goblet Anita. All the details makes you want to llo again and again, just in case you miss something. So Stunning!!!
Anita Holland
September 15, 2020 at 7:15 amThank you Michelle, I love doing creepy Halloween projects even though we don’t do Halloween.
Maureen
September 14, 2020 at 9:20 pmFirst time visiting, and I am blown away by your talent! These are amazing creations!
Anita Holland
September 15, 2020 at 7:15 amThank you so much Maureen for the lovely comment and thanks for visiting. Hope to see you again soon.
Sara
September 14, 2020 at 9:37 pmI never do anything for Halloween, but these are so creepy and fun. And the fact that it can wash right off is perfect for someone like me 🙂
Anita Holland
September 15, 2020 at 7:17 amThank you Sara, we dont do Halloween either I just love making the projects. That is why I use recycled materials. That way I can make the projects at no big cost.
Sherry
September 15, 2020 at 12:30 amThis is such a great and easy idea for Halloween decor.
Anita Holland
September 15, 2020 at 7:18 amThank you Sherry, it is a quick and easy craft to do.
Lori Nel
September 15, 2020 at 12:33 amThis is such amazing work! Love the realistic details !
Anita Holland
September 15, 2020 at 7:18 amThank you so much Lori.
Lori Nell
September 15, 2020 at 12:34 amThis is such amazing work! Love the realistic details !
Anita Holland
September 15, 2020 at 7:19 amThank you for the lovely comment.
Deana Landers
September 15, 2020 at 12:36 amAnita, I love your creations and especially how you think to include everyone by making it easy to wash off and do different things with the goblet. Thank you for sharing your talents and good ideas.
Anita Holland
September 15, 2020 at 7:19 amThank you Deana. I love to recycle everything even my projects.
Lydia C. Lee
September 15, 2020 at 6:38 amWow! That’s incredible! #TheRandom
Anita Holland
September 15, 2020 at 7:20 amThank you so much Lydia for the great comment.
Nancy
September 15, 2020 at 8:50 amWow! This is so creative! I have decor mold but haven’t really used them to their full potential. Thanks for the inspiration!
Nancy
Anita Holland
September 18, 2020 at 6:43 amThank you Nancy, It is really great stuff, the gift that keeps on giving.
Marie-Interior Frugalista
September 16, 2020 at 2:52 amLike I say, your the Queen of Steampunk ideas! Very clever idea for repurposing the unused wine glasses for Halloween.
Anita Holland
September 18, 2020 at 6:46 amThanks Marie, really a bit big for wine. lol
Kim
September 16, 2020 at 3:21 amLove these skull projects! The snake too! I love the pieces of skeleton you added to the wineglass. Super creepy cool.
Anita Holland
September 18, 2020 at 6:47 amThank you Kim, I can’t seem to make the cute Halloween projects. lol
Cecilia
September 17, 2020 at 6:25 amAnita, this is eerily elegant! Thanks for sharing at Vintage Charm!
Anita Holland
September 18, 2020 at 6:48 amThank you Cecilia, cute and fluffy just don’t come to me.
Kristi
September 17, 2020 at 12:16 pmSo cool and very creative! Love seeing how you made this!
Anita Holland
September 18, 2020 at 6:49 amThank you so much Kristi, so simple to make.
Esther Rosalinde
September 19, 2020 at 3:55 pmI’m a Pink Saturday Newbie. I’m a bit blown away by this on a early saturday morning haha (Hi!)
Anita Holland
September 21, 2020 at 9:49 pmThank you so much for the great compliment. xx
Marilyn
September 20, 2020 at 9:31 amCongratulations! Your post was my feature pick at #OverTheMoon this week. Each Hostess displays their own features so be sure to visit me on Sunday evening and to see your feature! I invite you to leave more links to be shared and commented upon. Please don’t forget to add your link numbers or post title so we can be sure to visit!
Anita Holland
September 21, 2020 at 9:51 pmThank you so much, Marilyn, I will be back each week gatecrashing your party. lol
Naush Samama
September 21, 2020 at 2:45 pmAnother remarkable creation !! Absolutely love the details and the tutorial. You are awesome.
Naush
Meraki Link Party
Anita Holland
September 21, 2020 at 9:55 pmThank you for the awesome comment.
Carol
September 25, 2020 at 3:16 amThis is so amazing! I love everything about it and it is so my style! Gorgeous. Featuring when my party opens up tonight!
Anita Holland
September 25, 2020 at 7:25 amThank you so much for the lovely comment and the feature. I really do appreciate it.
Maria
October 1, 2020 at 4:05 amYou definitely have the creep factor in this. Great job