
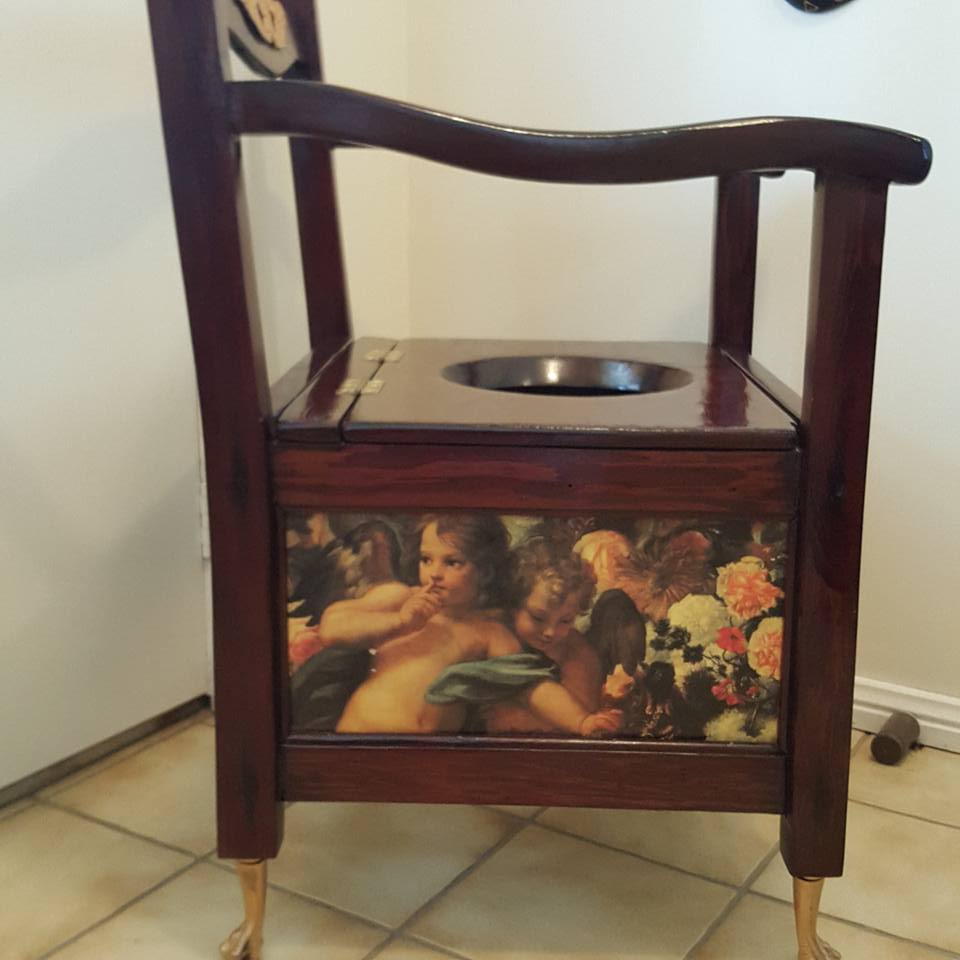
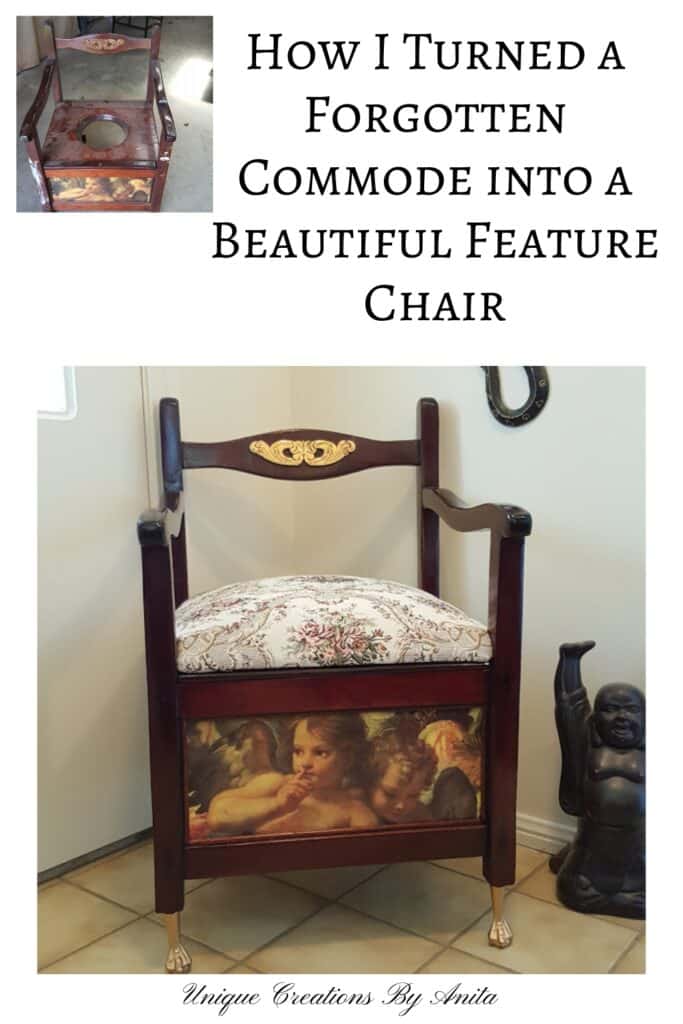
While scrolling online, I saw a local lady advertising a stack of vintage furniture she could no longer restore. Curiosity got the better of me, and when I arrived to take a look, something special caught my eye peeking out from the top of the pile — an antique wooden commode chair.
")
One glance at the decorative artwork on the front, and I knew this piece had to come home with me. While these chairs have long fallen out of use for obvious hygiene reasons, I saw the potential to bring it back to life. Not as a toilet, but as a beautifully restored feature chair — complete with gold accents and its own unique story. She told me they called it “the throne” in their home, and I knew it deserved to be one again.
Before we dive into this tutorial, be sure to subscribe to my bimonthly newsletter to be the first to see my latest projects. You can also follow me on Pinterest and Facebook where I also include my unique mixed-media art projects.
Antique Commode Chair Restored and Repurposed into a Feature Chair
**This post may contain affiliate links. This means I earn a small commission on links used at no extra cost to you. Please see my disclosure policy for more information.**
Materials Needed
- Orbital sander + 180 grit discs
- Scrap wood for repairs
- Wood glue
- Ratchet straps or long clamps
- Countersink drill bit
- Cleaning pad for sander
- Gold spray paint
- Epoxy glue
- Mahogany wood stain
- Oil-based polyurethane
- Paint stripper
- Size adhesive (for gold leaf)
- Nail foil or real gold leaf
- Foam (old mattress foam works)
- Spray adhesive
- Batting
- Staple gun
Step 1: Strip the Finish

I started by sanding off all the old stain and varnish with my orbital sander and 180 grit paper. This step revealed hidden flaws and showed me the original wood grain. It also exposed water damage and missing parts that would need replacing.

Step 2: Repair the Structure
The back supports had been cut to fit over a toilet, which weakened the structure.

I reinforced it using wood salvaged from an old dresser drawer. The match was surprisingly close!

After cutting it to size with a table saw, I glued it into place and used ratchet straps to hold everything tight while it dried.

Step 3: Fix Rotten Screw Holes
Rust stains and soft wood around the screws showed the chair had been wet in the past. I drilled out the soft wood and filled the holes with glue and toothpicks so new screws could grip properly.

Step 4: Patch Broken Wood
One leg had a chunk hanging off. I tried using clamps, but they wouldn’t grip. Instead, I used zip ties to hold it firmly while the glue dried. This trick works great for awkward angles.

Step 5: Fill and Countersink Screw Holes
To fill visible holes, I used a DIY wood filler made from sawdust and glue. I always overfill slightly in case of shrinkage. Once dry, I sanded them flat and used a countersink drill bit to neaten every hole for a uniform look.

Step 6: Restore the Artwork
The beautiful printed panels were the soul of this chair. They were buried under cracked varnish, so I used a cleaning pad on my sander for the bulk and finished the rest by hand. I avoided paint stripper to protect the images.

Step 7: Paint the Legs
The cast iron legs were worn and patchy. I tried cleaning with Brasso and vinegar, but nothing worked.

In the end, I sprayed them gold, which brought them back to life. The leg sockets were loose, so I secured the legs with epoxy glue.

Step 8: Stain and Seal
I chose a dark mahogany stain to help mask some remaining water marks. It took two coats to get the coverage I wanted. Once dry, I sealed the whole chair with two coats of oil-based polyurethane, hand-sanding in between with 240 grit.

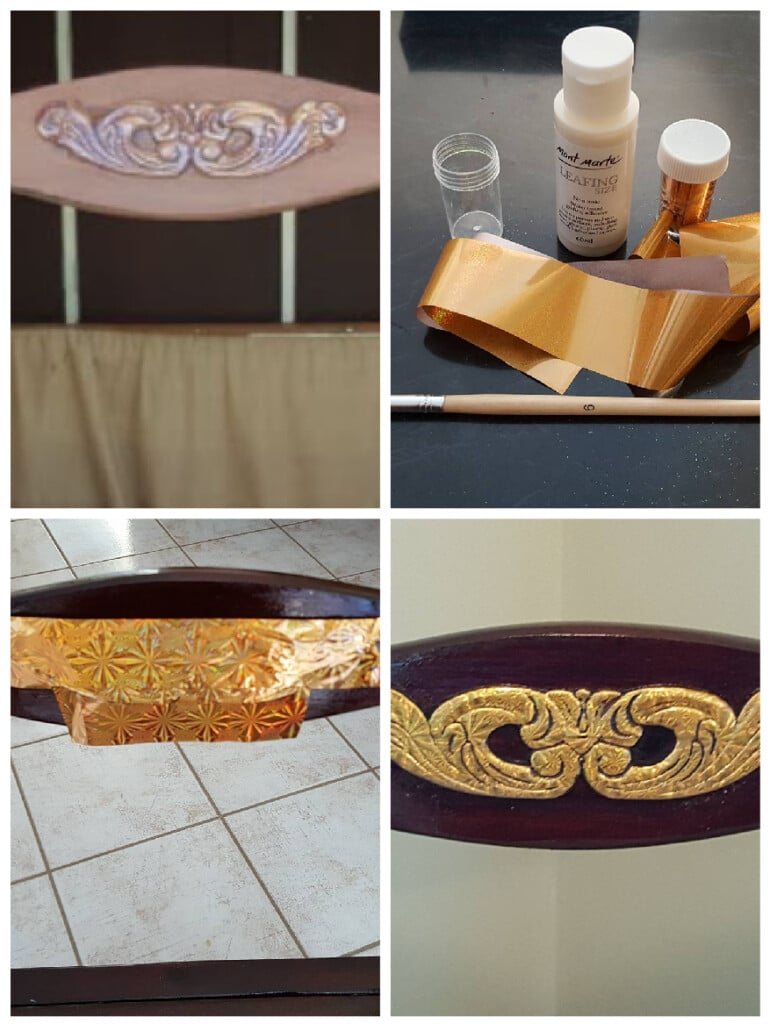
Step 9: Highlight the Appliqué
The decorative wooden appliqué didn’t take stain after using stripper, so I highlighted it using nail foil as gold leaf. After brushing on adhesive size and letting it turn tacky, I applied the foil — it worked beautifully!
Step 10: Create a Removable Seat
To make the chair functional, I made a new seat to sit over the commode hole. I cut a plywood base and foam from an old mattress, then glued it with spray adhesive.
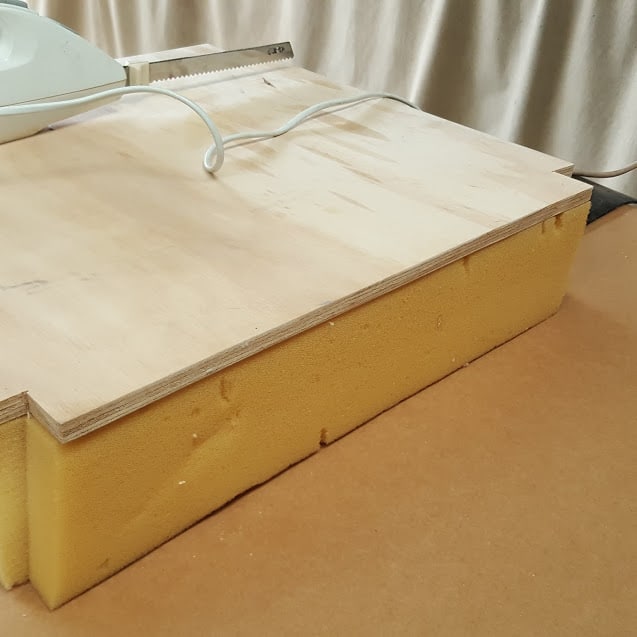
To soften the look, I pulled the top corners of the foam down before adding batting and fabric. A staple gun secured everything neatly.

Final Reveal
After hours of sanding, gluing, staining and upholstering, I had transformed this forgotten “throne” into a striking accent chair with antique charm. It now lives as a conversation starter and a stunning restored piece of history.


More great restorations
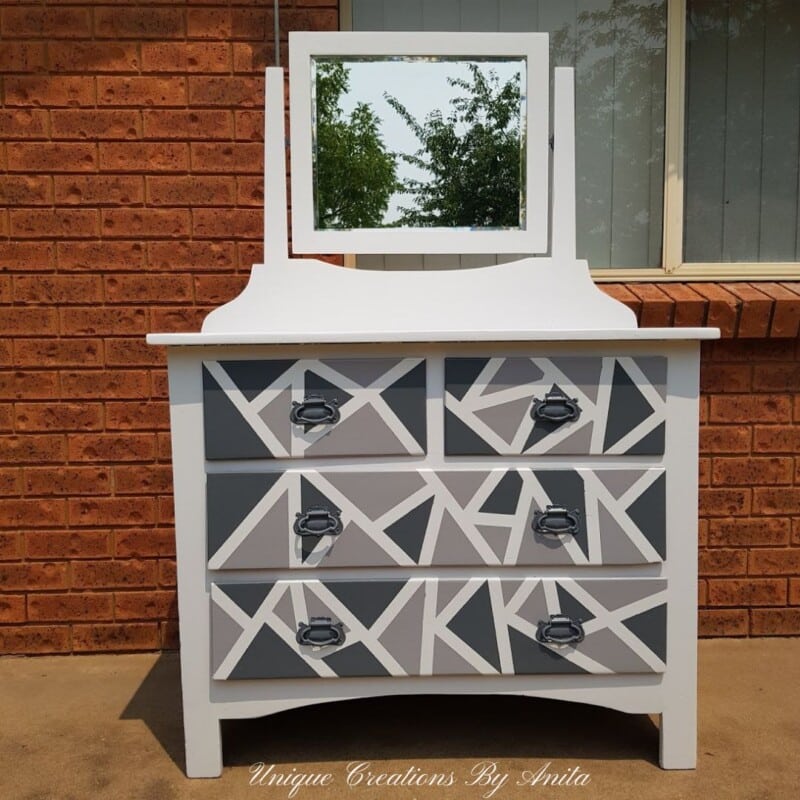
Since completing this restoration so successfully, I’ve gained the confidence to tackle even more challenging projects. These dressers, for example, were in worse condition than the commode — but I couldn’t wait to bring it back to life.

Painted geometric-design dresser


If you’d like to find any of the items used in this project, we’d greatly appreciate it if you used our affiliate links. These links provide us with a small commission at no extra cost to you, allowing us to continue creating and sharing more inspiring projects. We’d also love to hear your thoughts—feel free to leave a comment or share this post!

17 Comments
Stacystone
June 2, 2018 at 5:58 amI am a regular follower of your blog. And the points you have mentioned over here are very essential in my point of view.
Anita Holland
June 3, 2018 at 12:26 amThank you, I di like to share little tips and cheats that I have picked up while doing my projects.
Audra @ Renewed Projects
October 10, 2019 at 2:05 amWhat a fun chair! If I owned this I’d put it in the guest bedroom without the pad and tell them its the guest bathroom. hahaha! Beautiful refinishing!
Anita Holland
October 10, 2019 at 8:20 amOMG, your comment gave me a good laugh. The previous owner used it and called it the THRONE.
Marie
October 10, 2019 at 1:42 pmA gal who knows how to rock the power tools and build stuff – love it! Great tips here too.
Anita Holland
October 10, 2019 at 10:41 pmOh yes, I love my power tools. Thanks to my generous husband and family I have them all. Which opens the door to different projects which I love.
Karen, the next best thing to mummy
October 10, 2019 at 2:08 pmI love the transformation#alittlebitogeverything@_katdndennis
Anita Holland
October 10, 2019 at 10:41 pmThank you so much.
Julie
October 12, 2019 at 12:02 pmI love how you made this a lovely little chair again. So often I see these in the garden as planters which is cute but they are not going to last much longer that way! You;ve made this back into a lovely piece of furniture. I think I’d love to sit on this particular throne!!!
Michelle
October 13, 2019 at 5:58 pmAmazing! Another fantastic restoration, Anita!
Anita Holland
October 14, 2019 at 10:33 pmThank you, it was a really pretty chair.
Cecilia
October 17, 2019 at 6:43 pmThis looks like quite the undertaking, and you did a beautiful job! Thanks for sharing at Vintage Charm!
Anita Holland
October 19, 2019 at 3:24 amThank you, Cecilia. It was a lot of work that paid off.
Sharon
October 20, 2019 at 12:23 pmWhat a brilliant re-purpose! I love the new life you gave that unique piece!
Thank you for linking up w us at Creative Muster! Blessings to you xoxoxo Sharon
Anita Holland
October 21, 2019 at 12:09 amThank you so much Sharon, I love restoring furniture.
Michelle Leslie
November 4, 2020 at 12:47 amI have to remember your ratchet straps and cable tie tricks Anita. They’re brilliant and are going to make me look so clever 😉 Love all the attention to detail and care you took in restoring this beauty.
Anita Holland
November 9, 2020 at 9:51 amThank you so much Michele. You know the old saying ” A boer maak a plan” lol