
Have you ever restored a piece of furniture, only to struggle finding doorknobs to match your vision? That’s exactly what happened to me. I was left with a stunning upcycled buffet but couldn’t find the right knobs to finish the look. That’s when I decided to make my own—and this DIY project turned out better than I expected!
With leftover epoxy resin from another project, I made stunning custom doorknobs using steampunk charms and a few supplies from around the house. In this post, I’ll show you exactly how to make epoxy resin doorknobs or drawer pulls that are both practical and beautiful.

Before we dive into this tutorial, be sure to subscribe to my bimonthly newsletter to be the first to see my latest projects. You can also follow me on Pinterest and Facebook, where I also include my unique mixed-media art projects
How to Make Epoxy Resin Doorknobs with Steampunk Charms
**This post may contain affiliate links. This means I earn a small commission on links used at no extra cost to you. Please see my disclosure policy for more information.**
Materials Needed
- Epoxy resin (I used a 2:1 ratio)
- Silicone moulds (cake moulds work great)
- Steampunk charms
- Nuts and bolts (recycled or new)
- Wooden chopsticks (or pencils)
- Painter’s tape or masking tape
- Measuring jugs or a digital scale
- Small plastic containers to support the chopsticks
- Colour pigment (optional)
- Unicorn SPiT stain and glaze (optional)
- Crème brûlée torch (or straw for bubbles)
- Sandpaper (100-grit and 240-grit)
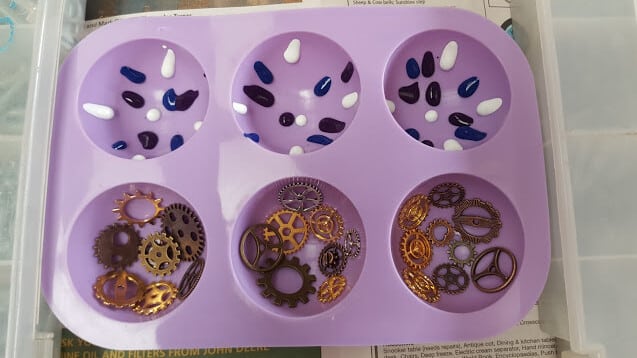
Step 1: Choose Your Moulds
I found some silicone cake moulds in the cupboard—unused because, frankly, I’m a terrible baker! They were perfect for this project. You can find moulds in various shapes and sizes online, or reuse what you already have at home.
")
Step 2: Set Up Your Bolt Supports
To hold the bolts upright, tape together two chopsticks and place your bolts between them. Secure the bolts so they stay centred and stable. Support the chopsticks with containers on either side so the setup stays balanced while the resin cures.
To keep the bolts upright while the resin sets, tape together two chopsticks—or any similar straight items—and sandwich the bolts between them. This keeps the bolts stable and centred. Rest the chopsticks across two level containers or supports of equal height on either side of the mould. This setup ensures the bolt heads sit about one-third deep in the resin and remain in place while it cures. Keeping everything level is essential to avoid crooked or uneven knobs.
")
Step 3: Add Your Decorative Elements
For the steampunk knobs, place the gears and charms flat inside the moulds. For the colourful ones, drop small amounts of Unicorn SPiT directly into the mould and swirl the colours gently. If you don’t want to see as much of the clear resin, add more charms.
Step 4: Mix and Pour the Epoxy Resin
I mixed 200 ml of resin with 100 ml of hardener, based on my 2:1 ratio product. Be sure to follow the instructions on your resin kit. Mix thoroughly—scraping the sides and bottom—to avoid sticky or soft finishes.
")
Pour the resin slowly down the back of a spoon. This helps protect your arrangement of charms from shifting. For the Unicorn SPiT moulds, give the colours a gentle swirl with a toothpick.
")
Step 5: Add Pigment and Insert Bolts
To deepen the colours, you can add a few drops of resin pigment. In my test, I added it too late and didn’t mix enough. For better results, blend it with the Unicorn SPiT before pouring.
")
Now lower your bolts into the resin, held in place by your chopstick support. Make sure the bolt heads are submerged at least one-third into the resin for strength.
Step 6: Remove Bubbles from the Resin
As the resin settles, bubbles will rise to the surface. Blow gently through a straw or pass a crème brûlée torch over the surface to pop the bubbles. Avoid holding the flame too long in one spot to prevent scorching.
")
Step 7: Let the Resin Cure
Drying times vary, so follow your resin’s instructions. I let mine cure for 24 hours. Once hardened, turn the mould inside out to pop the knobs out.
")
If the backs are rough, use 100-grit sandpaper wrapped around a wooden block to level them. Finish with 240-grit to smooth it out.
")
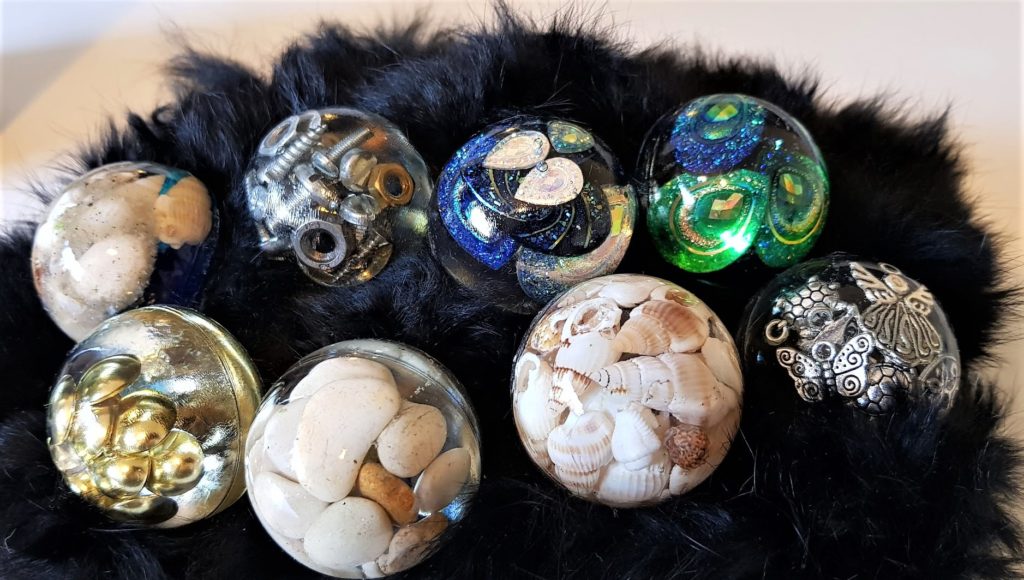
My Results: What Worked and What Didn’t
The steampunk knobs turned out amazing! I was thrilled with the clarity and placement of the charms. The Unicorn SPiT version didn’t work as well. Fine holes appeared on the surface—probably due to poor mixing.
")
This project opens up endless creative possibilities. I had so many people asking what else you could embed, I decided to experiment with a few different styles. Truth is, you can add almost anything—charms, beads, dried flowers, glitter, or even fabric scraps—making each knob truly one-of-a-kind.
Where You Can Use Your DIY Resin Knobs
These knobs aren’t just for drawers and cupboards. You can:
- Attach them to a coat rack for quirky hooks
- Use them as necklace hangers
- Add them to custom storage boxes
")
I used mine on a buffet unit and simply shortened the bolts at the back to fit.
")
")

More Resin projects you may like
See how I shape resin into a unique-shaped bowl.
This sun catcher was made from a hollow slice of wood, featuring a hand-crafted African scene to create a striking garden focal point.


If you’d like to find any of the items used in this project, we’d greatly appreciate it if you used our affiliate links. These links provide us with a small commission at no extra cost to you, allowing us to continue creating and sharing more inspiring projects. We’d also love to hear your thoughts—feel free to leave a comment or share this post!


23 Comments
Debra
April 23, 2018 at 7:26 amVery cool way of making door knobs to suit your decor. I may just do this for my
own home. Put sea shells on them for a bathroom to hang towels in them. Do you think using ice trays to make smaller ones for cadint doors and drawers would work?
Kind regards,
Debra
Anita Holland
April 24, 2018 at 5:36 amThank you, Debra, I think using icetrays might be hard to get the doorknob out if they are the hard plastic ones, not to sure if it will get stuck. I have heard of a release agent you can spray into the mold first but have also read that some release agents can make the resin go off color. I would advise if you are looking for smaller ones to use chocolate molds. At the bottom of this project, I have added some molds I believe will work.
Sylvia | Grace for a Gypsy
July 22, 2019 at 1:53 amOh my gosh! I love love LOVE this! I need to try this, my head is spinning with all sorts of ideas!
Dee | Grammy's Grid
July 22, 2019 at 5:24 amOh WOW! How unique! Pinned ♥
Anita Holland
July 24, 2019 at 3:23 amThank you so much, they have proved very popular and what you can add to them is endless.
Marie
July 22, 2019 at 2:54 pmAs a furniture upcycler who is always on the hunt for interesting furniture knobs, your post just rocked my DIY world! Love these and appreciate the tutorial. This is so happening in my workshop! Pinned 🙂
Anita Holland
July 24, 2019 at 3:22 amI have just finished some new one using bits and bobs I found around the house and my workshop. I will post it soon.
Michelle
July 23, 2019 at 4:55 pmI love, love, love the steampunk door knobs! Fantastic!
Anita Holland
July 24, 2019 at 3:17 amThank you so much, I have just made different ones using ping pong balls. I added bits and bobs I could find around the house to them to give people ideas. I will post that one soon.
Lirtea
July 24, 2019 at 3:04 pmGran idea¡¡
Anita Holland
July 25, 2019 at 1:21 amThank you!
Sylvia | Grace for a Gypsy
July 27, 2019 at 2:07 amHi again Anita! Thanks for linking this post to the GATHERING OF FRIENDS LINK PARTY 3. I love this idea!
Anita Holland
July 27, 2019 at 9:50 amThanks, and that you for hosting.
Vanessa
July 28, 2019 at 2:53 amThose steampunk knobs are so cool!
Julie Briones
July 29, 2019 at 12:01 amThese are so cool looking! Love how you used them on a hanger… they would definitely make great dresser knobs, too! So glad to have you at Tuesday Turn About!
Anita Holland
July 29, 2019 at 1:53 amThank you so much, they can be used for so many things
.
Ann
July 29, 2019 at 10:34 pmThese are amazing and will be featured tomorrow night on my blog. Thank you for sharing at Party In Your PJ’s!
Anita Holland
July 30, 2019 at 4:08 amThank you so much.
Michele Michael
July 30, 2019 at 10:18 amThanks for posting at Funtastic Friday. I’m so digging these. I have some ideas up my sleeve.
T'onna | Sew Crafty Crochet
August 3, 2019 at 5:58 pmThis is a really cool idea! I love these steam punk knobs! Thanks for sharing at the Snickerdoodle Create Bake Make Link Party!
Anita Holland
August 4, 2019 at 9:45 pmThank you so much
Kelly
August 19, 2019 at 7:08 amHow did you attach them to cabinet doors? Redoing my kitchen cabinets and this would be great.
DIY Epoxy Drawer Pulls – Steampunk – Home and Garden
April 22, 2024 at 12:43 pm[…] See the full epoxy resin tutorial here. […]