
In this DIY Boho Mixed Media Cow Skull Wall Art Tutorial, I got a Facebook message one day from a friend asking if I could breathe new life into a couple of sun‑dried cow skulls. It sounded odd until I remembered the Instagram‑worthy painted skulls I’d seen on Pinterest. As much as I love painting walls and furniture, detailed skull art was new territory—yet my knack for mixed media transformed a rustic skull into a fashion‑forward statement perfect for a boho‑style home.
Whether you opt for a genuine dried skull or a resin replica, this step‑by‑step guide covers cleaning, texturing, embellishing and finishing touches. I wanted this project to be truly unique, so I added a custom vinyl design to the leather. Since my friend who gifted me the skull is a cattle farmer, a farm‑themed motif felt like the perfect gift.

Before we dive into this tutorial, be sure to subscribe to my bimonthly newsletter to be the first to see my latest projects. You can also follow me on Pinterest and Facebook, where I also include my unique mixed-media art projects
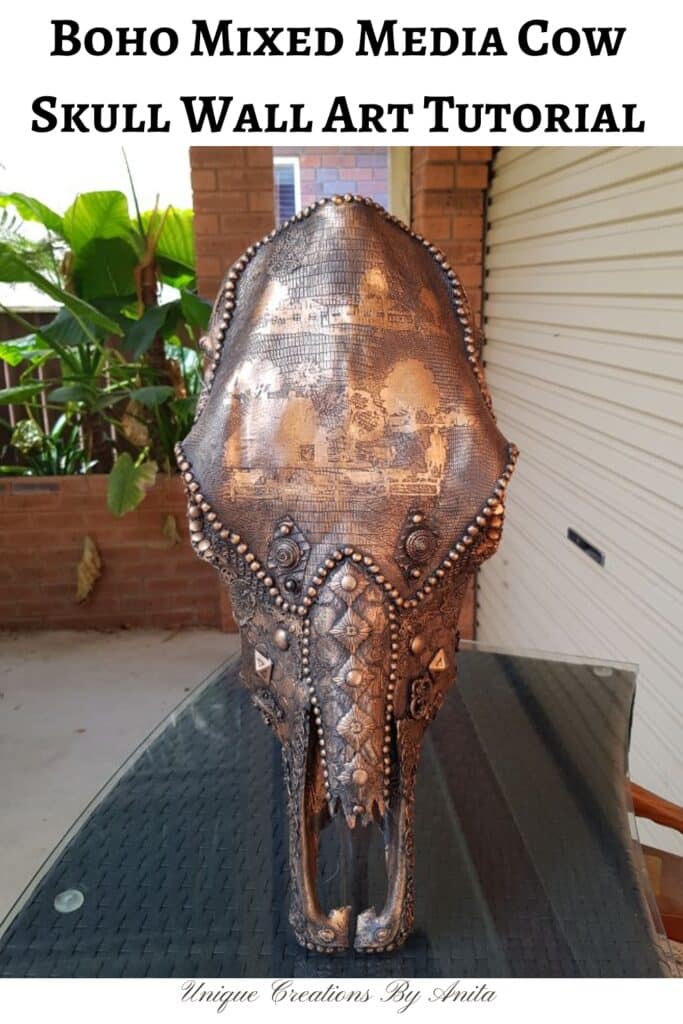
DIY Boho Mixed Media Cow Skull Wall Art Tutorial
**This post may contain affiliate links. This means I earn a small commission on links used at no extra cost to you. Please see my disclosure policy for more information.**
Materials Needed
- Real sun‑dried cow skull or resin skull replica
- Pliers
- Epoxy glue and super glue
- White gesso primer
- Faux leather off-cuts
- Multipurpose glue or tacky glue
- Mylar stencils and texture paste
- Spatula or palette knife
- Dried peas or small beads
- Cricut machine (or vinyl cutter) with mylar film to make a stencil
- Oracle 651 permanent vinyl and transfer tape
- Hot glue gun
- Burlap fabric scraps, corrugated cardboard, buttons
- Mixed charms, old keys, studs, filagree charms
- Epoxy resin feathers and a hairdryer
- Black gesso
- Bronze wax paste– store bought or handmade
- Aluminium foil and paper towel
- Polymorph plastic beads
- Wooden dowels and a cone drill bit
Step 1: Clean and Prepare the Skull
I had to do some research (yes, I googled it) on how to prepare these cow skulls, and I was genuinely surprised by how little information was available. Here’s how I prepped mine: according to my friend, the cow died years ago, so the skull had already been naturally sun‑dried. If working with a real cow skull isn’t your cup of tea, resin skull replicas are readily available.

First, put on gloves and eye protection. Use pliers to pull out any dried tissue and clear away spider webs or nests. Fill your tub with water and add bleach, then submerge the skull for several hours—turn it over halfway to reach hidden pockets. Rinse thoroughly and leave it to dry in the sun for two to three days. Once bone‑dry, reattach any loose nasal bones with epoxy glue and secure teeth with super glue.

Step 2: Add Texture with Leather and Stencils
Prime the entire skull with a coat of white gesso to create a smooth, neutral canvas and tone down the natural bone colour. Cut faux snakeskin leather to fit your chosen area—typically the forehead or centre panel—and adhere it with multipurpose glue.

Position stencils randomly and apply texture paste with a spatula knife, then flatten peaks slightly with your fingertip for an organic, handcrafted look.

Once dry, frame the leather’s edge by gluing dried peas around the seam. I used dried peas because I did not have any half pearl beads at the time.

Step 3: Create and Transfer Vinyl Design
Open Cricut Design Space and import free SVG images of cows, barns and farmhouse silhouettes from sites like Pixabay. Adjust sizes, rotate elements and duplicate until you achieve a balanced composition.

Cut your design from Oracle 651 permanent vinyl and apply it to transfer tape.

For best results, adhere vinyl to flat leather first, then glue the leather panel onto the skull. Press firmly with a scraper tool, then peel off the tape carefully to reveal crisp lines. I had used this technique to create my Halloween Shadow boxes.

Step 4: Embellish with Mixed Media Layers
Browse your craft stash for vintage keys, metal charms, studs and broken jewellery. Layer these embellishments over your textured leather using hot glue for heavier pieces and E6000 for smaller items. This tutorial will inspire you with creative ways to add texture to your mixed media art.

Add scraps of burlap and corrugated cardboard beneath charms for extra depth.

If you look closely, you’ll spot everyday items: I glued buttons onto scraps of corrugated cardboard, decorated the nose with workshop studs, and finished it off with a thumbtack on top.

Add a variety of shapes and textures, and layer them generously for a richer, more engaging finish.

Fill eye sockets with burlap scraps and trimmed thumbtacks to soften the skull’s expression.

Don’t forget to decorate the back, cover every surface. I’d made some epoxy resin feathers earlier, so I gently warmed them with a hairdryer to soften the resin and then moulded them to follow the skull’s contours.

Step 5: Paint and Highlight with Wax Paste
Once you’re happy with your embellishments, coat the entire piece in black gesso. Don’t worry if you spot areas that need more detail after painting—you can always add extra embellishments and touch up with another layer of gesso.

Cover the entire skull—including leather, vinyl and embellishments—with black gesso, working paint into every crevice. Use a hairdryer to speed drying between coats.

This is where the magic truly shines: use your fingertip to gently sweep bronze wax paste across the raised details. Leave some of the recesses bare—overfilling them will flatten the texture and dull the effect.

If you don’t have bronze wax paste on hand, you might already have the ingredients to make your own—this tutorial will show you how.

Here’s a close‑up of the embellishments as you apply the bronze wax paste. When you wax the vinyl decal, be generous—cover every inch so the design pops against the leather. At this point, I realised I wanted to craft horns to complete the cow skull.

I have included some close-up photos so you can see all the details.


Step 6: Sculpt and Attach Polymorph Horns
To start, roll tin foil into the size you want your horn to be, crushing it tightly so it holds its bend. Next, wrap the foil in layers of tissue paper or newspaper—taping as you go—to build up a thicker shape. Finally, bend the horn to your desired curve and secure everything with a final strip of tape.

Begin by tightly rolling a length of aluminium foil into your desired horn core. Wrap the foil in layers of paper towel—securing each layer with tape—to build up the horn’s thickness. Bend the wrapped core into a natural curve. Meanwhile, bring a pot of water to the boil and add Polymorph beads; once they turn clear and pliable, fish them out with tongs. Carefully press the soft Polymorph over your foil-and-paper base, then smooth the surface with a damp fingertip.

Using long‑nose pliers, I pulled away a bit of the foil core to create a hole for the wooden dowel. I then inserted the dowel and packed the gap solidly with Polymorph to secure it.

Apply the same mixed‑media textures and embellishments to the horns, then coat them in black gesso and swipe bronze wax paste over the raised details to make them pop.


Use a cone drill bit to bore into the skull, gradually widening each hole until the dowel fits snugly and securely.

To secure the horns in place, I used the polymorph again.

To make sure the horns were not going to move at all, I added more Polymorph to the outside, pushing it firmly into the cow skull. I then painted it with gesso to hide the white. The horns were by no means perfect in shape or size, but they were better than nothing. And that was the cow skull complete.

Up close view of the farm scene.


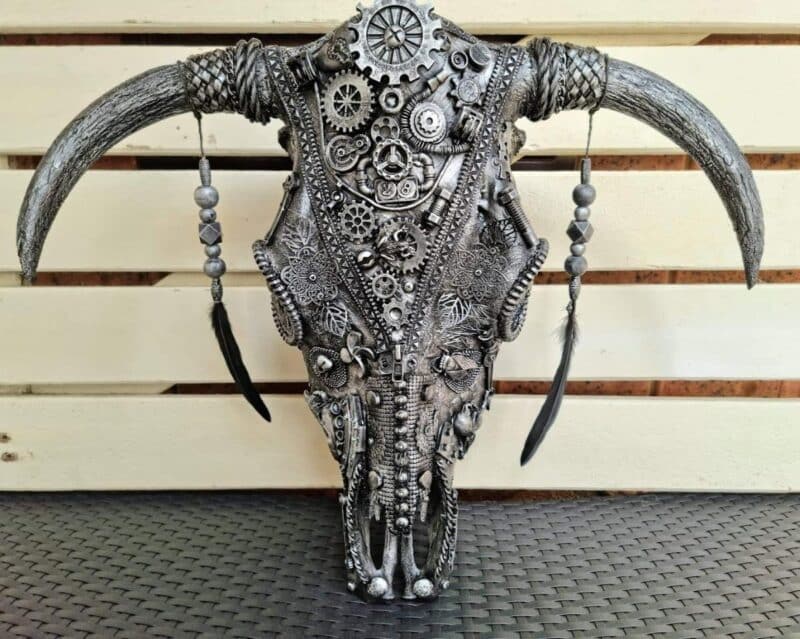
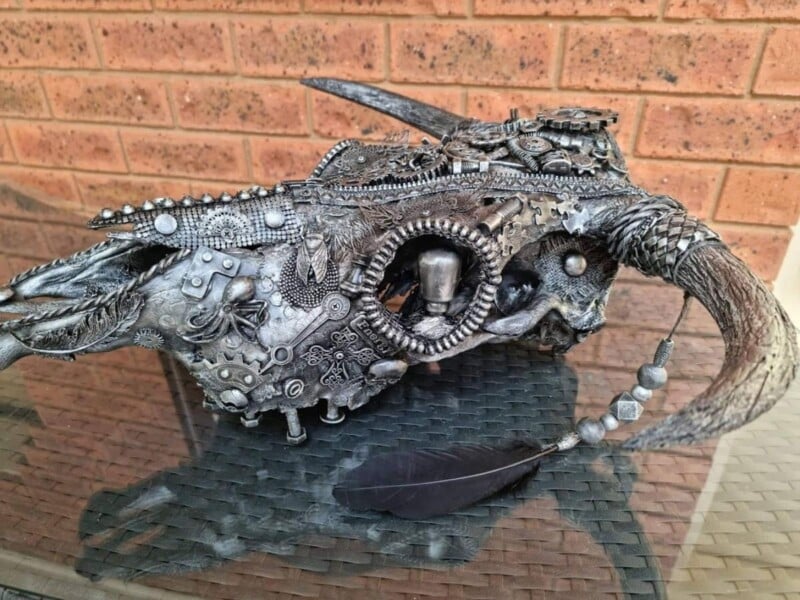
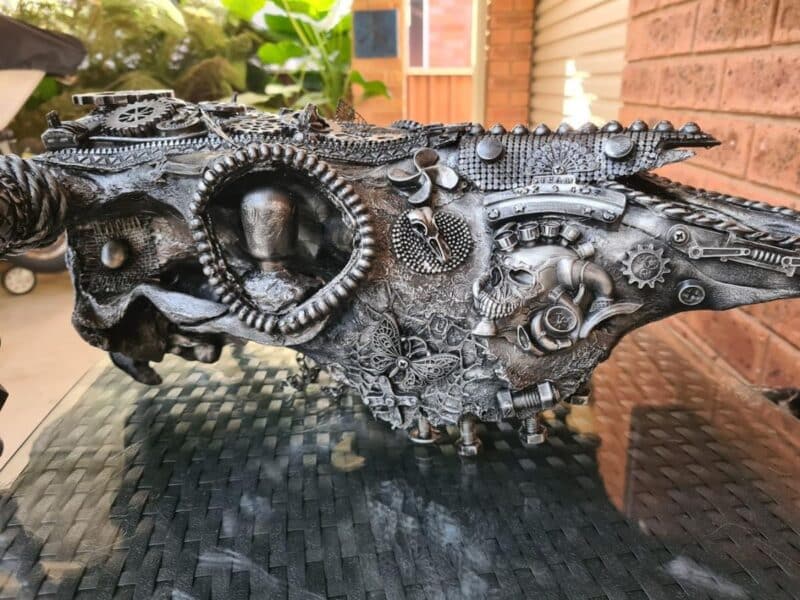
I was so excited when my friend returned with a cow skull still bearing its horns, and I decorated this one in a steampunk theme. You can apply this technique to just about any item—here are some more mixed media art projects for inspiration.

If you’re interested in any of the items used in this project, we’d appreciate it if you used our affiliate links. Clicking these links earns us a small commission at no extra cost to you, helping us create more inspiring and exciting projects to share. We’d also love to hear your thoughts—feel free to leave a comment or share this post!

44 Comments
Judith C Austin
October 10, 2019 at 12:26 pmAnita:
This is simply amazing. I am trying to do the bottles like you did,mine are just in the beginning stage, my bottle doesn’t look as nice as yours. But it is getting there. Thank you so much for the inspirations.
Anita Holland
October 10, 2019 at 10:38 pmThank you so much, once you get the hang it is so simple and you want to give everything in sight a makeover.
Willie
October 10, 2019 at 12:56 pmSo beautiful and soooo much work. Congratulations!
Anita Holland
October 10, 2019 at 10:39 pmThank you so much, I honestly surprised myself how pretty it turned out.
Michelle Leslie
October 15, 2019 at 3:13 pmI am blown away by your talent Anita. It’s STUNNING!!! Gorgeous, beautiful. WOW!!!
Anita Holland
October 16, 2019 at 6:20 amThank you so much Michelle, I have become a mixed media addict lately and this cow was my latest victim.
Carol
November 11, 2019 at 9:26 pmYour skull is quite beautiful but I don’t think I’d want to work with a real skull. It strikes me as somehow odd. But I would love having something decorated like yours.
Anita Holland
November 12, 2019 at 9:28 amI kind of agree, I would not have it in my house. I sold it, not my kind of decor. I just wanted to try and see if I could. But thank you anyway. 🤣
sassycoupleok
February 15, 2020 at 4:20 pmThat definite has a whole lot of WOW factor to it. !!! Great project and idea with beautiful results.
Anita Holland
February 15, 2020 at 8:16 pmThank you so much for the great comment your feedback is really appreciated. x
Pam
February 15, 2020 at 8:46 pmWOW!!!! This is AMAZING and Very time consuming!!!! I could not imagine where you were going with this until the very end. LOVED THIS and now I am going to go look at more of your designs!!!
Anita Holland
February 16, 2020 at 11:49 pmThank you so much for the lovely comment. These type of projects never come together until the end. I do have lots of great project on my website so feel free to have a browse.
Gayle Stafford
February 16, 2020 at 11:03 pmIf you had googled cleaning deer skulls you would have find how to clean the cow skull. My husband does this for for people that want the horns but can’t for whatever the reason have them mounted. They are called European mounts.
Anita Holland
February 16, 2020 at 11:47 pmThank you for the information.
Anita Holland
April 13, 2020 at 10:45 amThank you so much, I think the different colours is what makes the design pop out.
Shirley Parran
April 19, 2020 at 10:41 amWow! What intricate work and a wonderful job. But, I guess I won’t ever be a cow skull kind of person.
Christina Woodcock
April 20, 2020 at 9:20 pmWow! Absolutely gorgeous! I love the end result 🙂
Joyce Ornelas
October 18, 2020 at 2:01 amVery creative and I love the end product.
Anita Holland
October 20, 2020 at 11:10 pmThank you so much, I was pretty unique.
Elaine
October 18, 2020 at 6:20 amAn absolute transformation! Very classy & rich looking. I’m not a skull type of gal but this made me stop and consider🤔! Nice job!
Anita Holland
October 20, 2020 at 11:11 pmThank you so much, Elaine. I am not a skull person, it was just something I wanted to have a go at.
Rosemary Palmer
April 12, 2021 at 9:35 pmThis is so many things – maybe weird to some, but I love animal skulls. BUT – so creative and artsy. I can see this in a high end art gallery. SOOOOOOOOOOOOOO craeative.
Anita Holland
April 13, 2021 at 11:12 amAww thank you that is such an amazing compliment, I am working on a new one at the moment.
Brooke
April 12, 2021 at 10:03 pmYou’ve got Skull Skills. Love this project. Your transformation on this is amazing. Thank you for sharing.
Anita Holland
April 13, 2021 at 11:13 amThank you Brooke that is very kind of you to say. It was something I recently tried and found I had a knack for it.
Cat Michaels
April 12, 2021 at 10:24 pmJust. WOW! You hit it out of the creativity ballpark this time. Agree with early commenters….add this to a fine art gallery!
Anita Holland
April 13, 2021 at 11:13 amThank you Cat, your comment has made my day.
Deana Landers
April 12, 2021 at 11:39 pmYou know you kept the beautiful animal look and turned into a work of Art💙
Anita Holland
April 13, 2021 at 11:15 amThank you Deanna, A friend bought it as a gift for her husbands bar room.
Maria
April 13, 2021 at 6:49 amYou are so gifted these projects of yours belong in a art gallery!
Anita Holland
April 13, 2021 at 11:16 amThank you Maria, that is an awesome comment. I always thought of it as crafting but people seem to see it as art.
Meegan
April 14, 2021 at 4:28 amYou never cease to amaze me, Anita. I love your vision and creativity. The layers and thought it takes to make your beautiful art are so impressive. I can’t imagine the HOURS it must take to put everything together.
Thanks for inspiring me.
Anita Holland
April 16, 2021 at 9:21 pmThank you so much Meegan, I am going to try and sell some of my creations now instead of throwing them in the cupboard.
Libbie@alifeunfolding
April 16, 2021 at 9:42 amAnita,
I am as always blown away by your creativity! Beautiful job, my friend.
Anita Holland
April 16, 2021 at 9:23 pmThank you Libbie that is an awesome compliment. I have so many ideas in my head I have no idea where they come from. lol
Saturday Snapshots Week Six - My Home and Travels
April 17, 2021 at 9:40 pm[…] artsy mixed media cow skull from Unique Creations by […]
Linda
May 19, 2021 at 12:47 amHi Anita,
I did not see this post until a couple of months ago.
WOW you have changed my outlook on ways to create!
I have never worked (or even had any interest in) mixed media, and I am a total addict now. Nothing is safe from me!
Thank you for sharing not only your talent and ideas, but enthusiasm for creating outside the box, my favorite place to be!
Anita Holland
May 20, 2021 at 9:04 amThank you so much for the awesome comment Linda.I was the same as you when I started, nothing is safe I mix media everything I can get my hands on.
Kate Hanley
December 4, 2021 at 11:32 amHi Anita,
I came to your website after seeing your steampunk mannequin – absolutely gorgeous. I am working on my second mannequin for a show in the spring. But then I found your skulls – I have been doing mixed media mosaic skulls for several years and you have inspired me to try some new ways. I love to see someone with such creative ideas and artistic skills share their process. Bravo!
Anita Holland
December 4, 2021 at 9:14 pmThank you so much Kate, I only started 2 years ago and found I have a knack for it. I love to add it to different items. If you look on my website under mixed media you can find more ideas.
Nina
April 9, 2022 at 6:57 amWow! Awesome. I have one of those with the horns. It’s been sitting in my garage for years. 👍🏻👍🏻👍🏻❤️
Anita Holland
April 11, 2022 at 11:02 amThank you so much, I am in the process of doing another one. You should have a go.
Ashlee Ward
June 17, 2026 at 6:55 amOn the skull at the bottom, steam punk theme, how did you get it the metallic color instead of the bronze? Love it!!
Anita Holland
June 17, 2026 at 7:36 amI used silver wax paste instead of the bronze. The wax comes in all the metalic colours.