
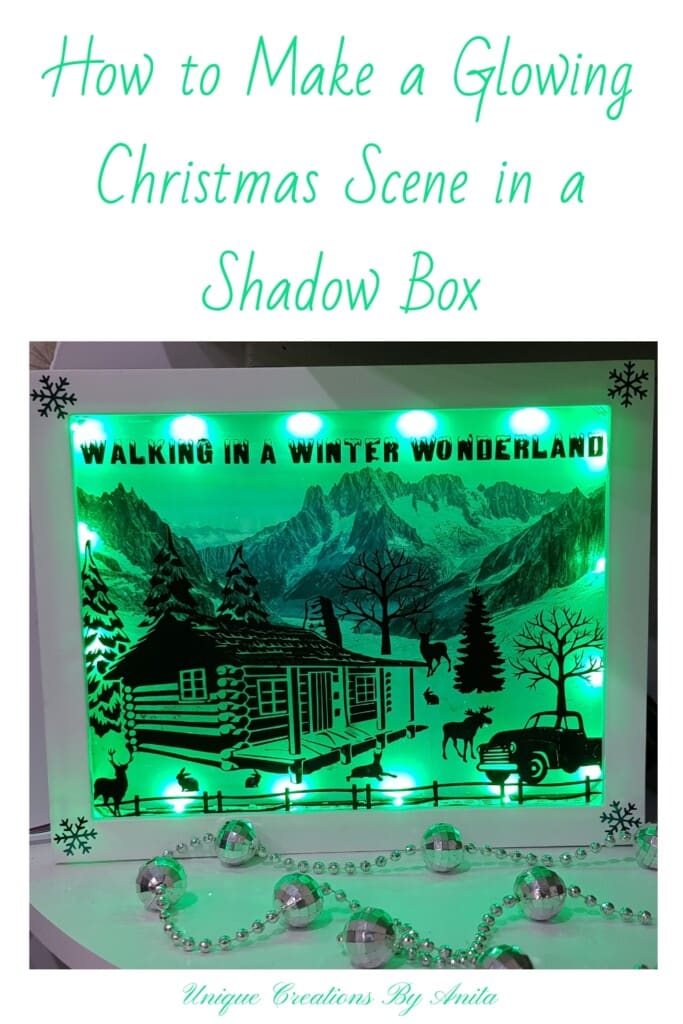
If you’re searching for a unique Christmas decoration this year, this DIY Christmas Shadow Box with Lights is a stunning way to bring magic into your home. With a Cricut or Silhouette machine, a few simple materials, and some creativity, you can make a glowing festive display that looks beautiful on a mantel, shelf, or window ledge. The remote-controlled LED lights add a colourful glow behind your vinyl silhouette design, creating a Christmas scene that truly comes to life.

Before we dive into this tutorial, be sure to subscribe to my bimonthly newsletter to be the first to see my latest projects. You can also follow me on Pinterest and Facebook, where I also include my unique mixed-media art projects.
How to Make a Christmas Shadow Box with Lights – DIY Cricut Tutorial
**This post may contain affiliate links. This means I earn a small commission on links used at no extra cost to you. Please see my disclosure policy for more information.**
Materials Needed
- Cricut Explore Air 2 or Silhouette Cameo
- Plastic shadow box frame
- Oracle 651 permanent vinyl
- Cricut Transfer Tape
- LED strip lights with remote (colour-changing)
- Free silhouette clipart images
- Free stock photo for background image
- Isopropyl alcohol wipe
- Cutting mat and scraper
- Weeding tools or a craft knife
- Sellotape for the guideline
- Optional: Cricut adhesive foil for frame
Design Your Christmas Shadow Box
Start by choosing a plastic shadow box. I used Cricut Design Space to create my Christmas scene. Search online for free silhouette images—Clipart Library is a good place to start. Gather and upload your images to Design Space.

Arrange the images into your desired layout. I used a cabin silhouette as my centrepiece and added trees and reindeer separately. If any of your images touch or overlap, select and weld them. This merges them into one cuttable shape. Always save your design before welding because you won’t be able to move parts afterwards.

If your image needs to be converted to SVG, free programs like Inkscape work well, and YouTube has helpful tutorials.

Cut the Vinyl Design
I recommend Oracle 651 permanent vinyl. It’s reliable and sticks well to glass. Load the vinyl onto your mat and smooth it flat using a scraper. Set your cutting dial and start cutting.
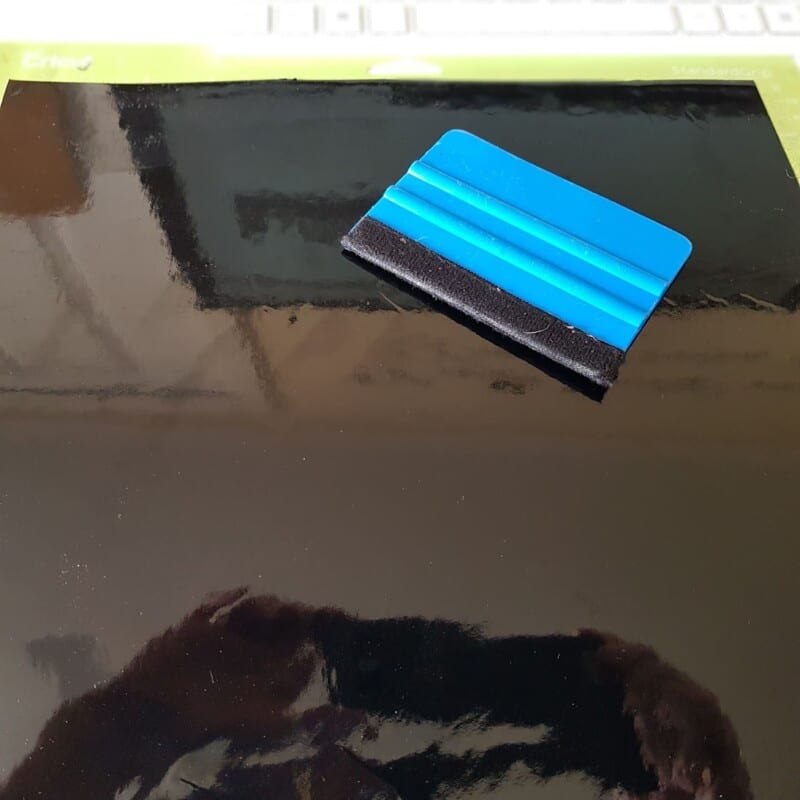
After cutting, weed out your design by removing excess vinyl. This can be done with a weeding tool or a craft knife. If you skipped welding, weeding becomes much harder, as every element cuts separately.

Transfer the Design to Glass
Use Cricut Transfer Tape for best results. I prefer using older, less sticky tape when transferring vinyl to glass. New transfer tape can be too strong and may pull up the design.

Use a scraper to smooth the design onto the tape. Clean the glass with an alcohol wipe to remove grease and dust.

Mark a guideline using Sellotape to ensure your design aligns properly. Apply the transfer tape using the line as a guide, then peel the tape back flat against the glass.

Add a Background Image
Download a free background image from stock sites. Make sure to credit the photographer if required. I used a Northern Lights image for the Christmas village and a snow scene for the winter wonderland version. Trim the image to fit your shadow box and glue it to the inside back panel.

Install the LED Lights
I bought colour-changing LED strip lights with a remote from my local discount store. Peel off the backing and stick the strip around the inner frame of the shadow box. Read the instructions to know where to cut the LED strip—usually marked with a GRB line.

I used a small cutter to remove a section of the frame so the cable would fit easily. You can also drill a hole into the bottom of the frame.

Final Assembly
Pop the glass and the backing into the shadow box frame. For a festive finish, I decorated the frame with Cricut adhesive foil.

Plug in your lightbox and adjust the settings using the remote. The glowing colours shine beautifully through the Christmas scene. A few of the different light settings.

More Christmas Project Ideas
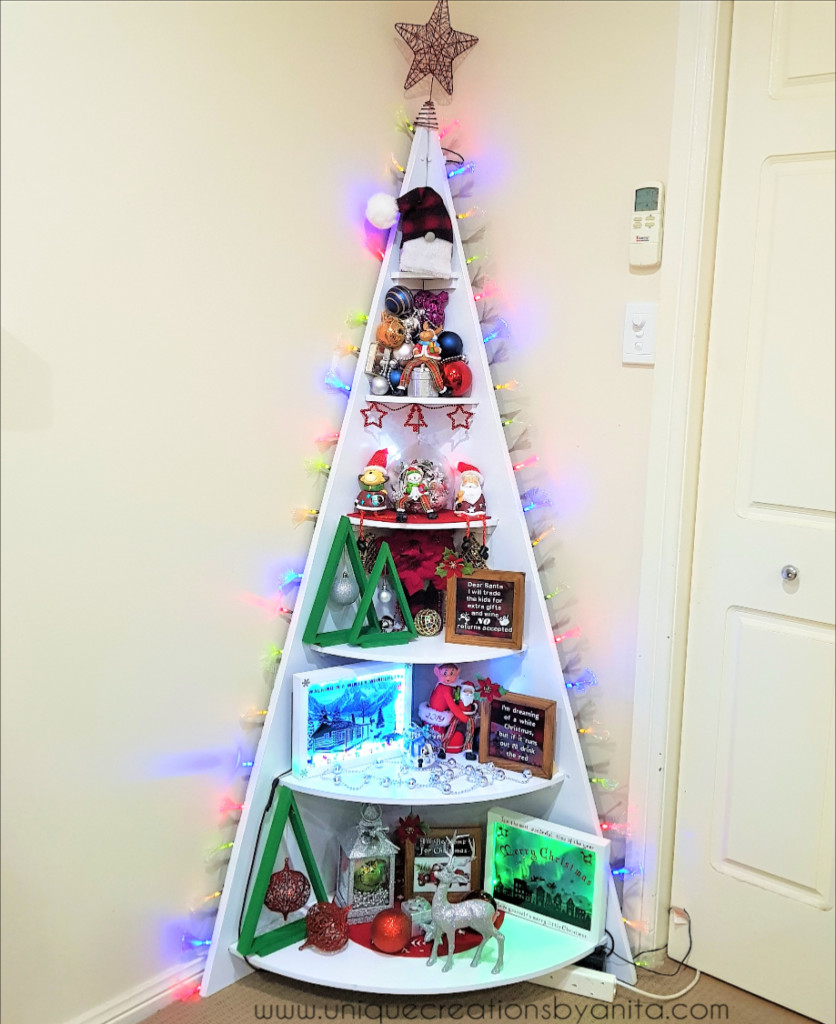
Looking for an alternative to the traditional Christmas Tree? Check out this Christmas Tree Shelf.
Unicorn Spit Christmas Baubles – Easy DIY for a Colourful Tree.


If you’d like to find any of the items used in this project, we’d greatly appreciate it if you used our affiliate links. These links provide us with a small commission at no extra cost to you, allowing us to continue creating and sharing more inspiring projects. We’d also love to hear your thoughts—feel free to leave a comment or share this post!


20 Comments
Michelle
November 27, 2019 at 12:29 amThis is beautiful!!!!
Anita Holland
November 27, 2019 at 3:29 amThank you so much Michelle
Michelle Leslie
November 27, 2019 at 5:34 amWow, those shadow boxes are so effective when the lights are on. I’ve been meaning to get myself a Cricut for the longest time, maybe I’ll spoil myself this Christmas 😉
Anita Holland
November 27, 2019 at 12:48 pmThank you so much, I can’t believe you don’t have one. It is one of the best machines that I own. 😁
Sarah-Marie
November 27, 2019 at 1:58 pmWhat a gorgeous Christmas decoration! They look amazing. #Alittlebitofeverything
Anita Holland
November 28, 2019 at 5:58 amThank you so much, very kind of you to say. 😁
Julie Briones
November 27, 2019 at 10:07 pmWhat a lovely idea, Anita! And the tutorial is great for the Christmas shadow box!
Anita Holland
November 28, 2019 at 5:53 amThank you so much Julie, so many projects you can make with a cricut.
Chas Greener
November 29, 2019 at 3:20 amThese shadow boxes are wonderful – Pinned Happy Thanksgiving
Anita Holland
November 29, 2019 at 11:06 amThank you Chas!
Jo - Cup of Toast
November 29, 2019 at 2:14 pmI love this! What a creative idea 🙂
Anita Holland
November 29, 2019 at 8:30 pmThank you so much for the lovely comment😁
Teresa
November 29, 2019 at 5:52 pmIt’s beautiful! My kids would love to have something like this at home!
Thank you for sharing at The Really Crafty Link Party. Pinned.
Anita Holland
November 29, 2019 at 8:29 pmThank you, the possibilities are eendless to what you can put in these boxes. So much fun to make.
Marilyn Lesniak
December 1, 2019 at 2:19 amThank you for sharing at #OverTheMoon. Pinned and shared. Have a lovely week. I hope to see you at next week’s party too! Happy Holiday!
Anita Holland
December 2, 2019 at 12:10 amThank you, I will be there with bells on.
Cecilia
December 2, 2019 at 4:09 pmWhat a fun tutorial! Thanks for sharing at Vintage Charm!
Anita Holland
December 4, 2019 at 3:03 amThank you so much, happy you liked it.
Katie Mansfield
December 3, 2019 at 11:24 pmThis is amazing. I love it.
Anita Holland
December 4, 2019 at 3:09 amThank you so much, glad you like it.