
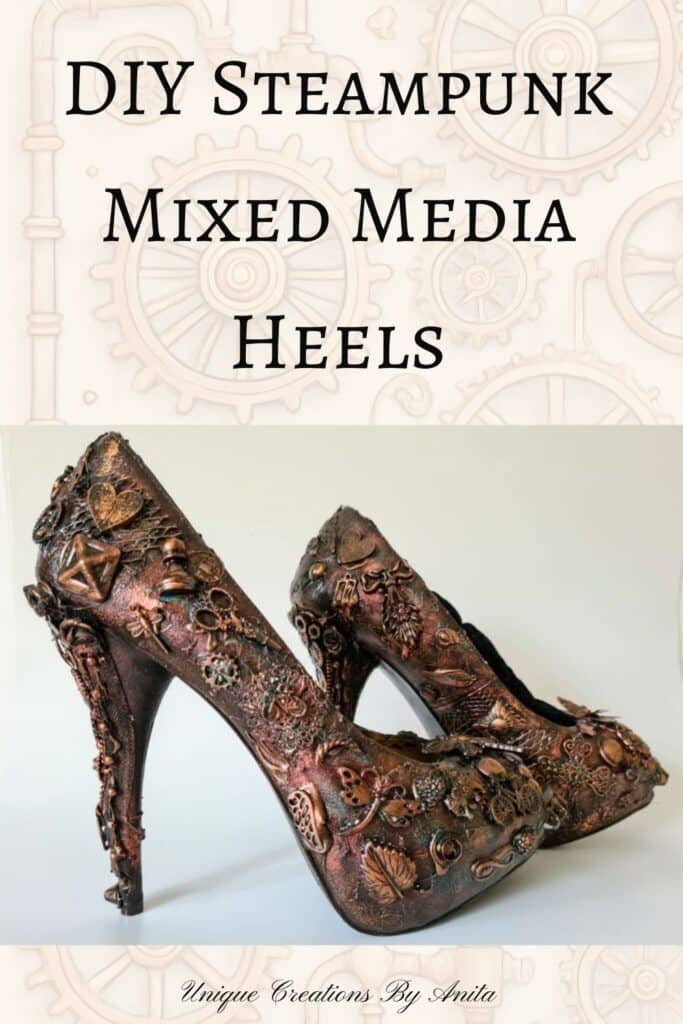
When I spotted a pair of stiletto heels for just $10, I had to have them, only to discover that standing still was the only thing I could do in them. That sparked my Steampunk Stiletto Ring Holder: Upcycled High Heel Jewellery Stand project, a tutorial that shows you how to transform uncomfortable heels into a show-stopping, mixed-media masterpiece. Whether you choose to display yours as a unique ring holder or—if you can walk in high heels—strut out in truly one‑of‑a‑kind footwear, this technique lets you personalise every detail to make your shoes as distinctive as you are.

Before we dive into this tutorial, be sure to subscribe to my bimonthly newsletter to be the first to see my latest projects. You can also follow me on Pinterest and Facebook, where I also include my unique mixed-media art projects.
Steampunk Stiletto Ring Holder: Upcycled High Heel Jewellery Stand
**This post may contain affiliate links. This means I earn a small commission on links used at no extra cost to you. Please see my disclosure policy for more information.**
Materials Needed
- One pair of high-heeled shoes (leather or faux leather works best)
- Black gesso or black acrylic paint
- Texture paste and a variety of stencils
- Red and white plastic netting (e.g. produce bags)
- Offcut non‑slip mat
- Assorted embellishments: zippers, nuts, studs, gear charms, decorative buttons, thumbtacks, shells, charms.
- Hot glue gun with black glue sticks
- Turbo tacky glue for small pieces
- Coloured wax paste (store‑bought or DIY)
- Mica powders (burnt copper, purple)
- Mod Podge or clear spray sealer
- Foam offcut for ring insert
- Black velvet or velour fabric
- Craft knife and scissors
- Small paintbrush for blending wax and mica
Step 1: Prepare the Heels
Clean the shoes thoroughly with a damp cloth to remove dust and grease. Remove any loose decorations or straps. Let them dry completely before painting. To make this stiletto ring holder, you’ll need a pair of high‑heeled shoes. I opted for a mixed‑media makeover because I already had plenty of bits and bobs on hand—most of the embellishments came from around my house and workshop.

Step 2: Apply Base Coat
Use black gesso or acrylic paint to coat the entire shoe, inside and out. Give it two thin coats, allowing each to dry. This creates a uniform base and helps subsequent layers adhere. Although the glitter finish was beautiful, I wanted these heels to echo the steampunk aesthetic of my spare room. Assemblage mixed media art is about arranging found items to create a 3D texture. You can find the basic techniques for assemblage here.

Step 3: Build Texture
Place your chosen stencil against the shoe and spread texture paste over it.

Lift the stencil immediately, then wash it to prevent paste hardening.

Push any sharp peaks flat with your finger if desired.

Repeat with different stencils, and incorporate items like netting or non‑slip mat offcuts for unique patterns. You can use just about anything that has an interesting texture.

Step 4: Embellish with Mixed Media
Arrange your embellishments across the shoe surface. I used:
- Zipper teeth from old garments
- Metal nuts from my workshop
- Studs salvaged from a dog collar
- Steampunk gear charms and decorative buttons
- Thumbtacks and tiny shells
- Wooden embellishments

Glue heavier pieces with black hot glue sticks and lighter bits with turbo tacky glue. Don’t worry if it looks chaotic—coverage will even out later.

close-up view of items used on the shoes.

It may look like a chaotic jumble right now, but stay with it.

Step 5: Re‑Paint and Highlight
Once all embellishments are set, paint the entire shoe black again.

This hides shadows under pieces and unifies the look.

Next, use your fingertip to rub coloured wax paste over raised surfaces—avoid filling every nook so black shows through. If you don’t have wax paste at home, check out this post to learn how to make your own.

Layer four wax colours, blending each edge gently with a small brush.

Once you’ve applied all the wax colours, use a small paintbrush to gently swirl them together until the hues merge seamlessly.

Then, for extra sparkle, lightly dust the raised areas with burnt copper and purple mica powder and softly blend once more with your brush for a subtle metallic sheen.

In the sunshine, they’ll catch the light and shimmer beautifully.

Step 6: Seal (Optional for Wearable Shoes)
If you plan to wear these heels, seal them with Mod Podge or a clear spray to protect the finish. Paint the soles black if desired.


Step 7: Create the Ring Insert

Cut the foam to fit inside the shoe’s footbed.

Cover it with black velvet, cutting a slot with a craft knife to hold rings upright.

Secure the fabric in the groove with hot glue, then glue the completed insert into the shoe.

Step 8: Assemble and Display
Slide your rings into the foam slots and arrange your new jewellery stand on a dresser or in a display cabinet.

If you can still walk in these heels, why not wear them on a special night?
")
")
More mixed media project ideas
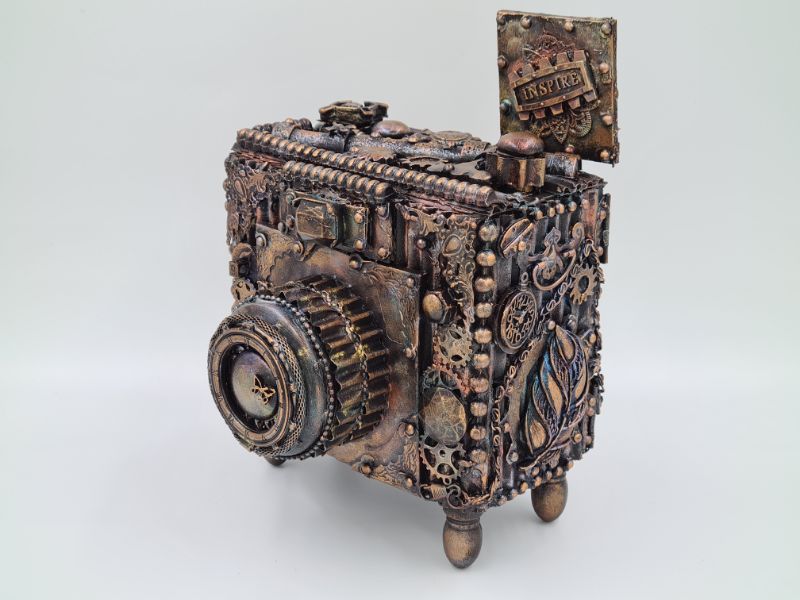
I needed a prop camera for my steampunk project photos, so I crafted one from cardboard and other recycled materials.
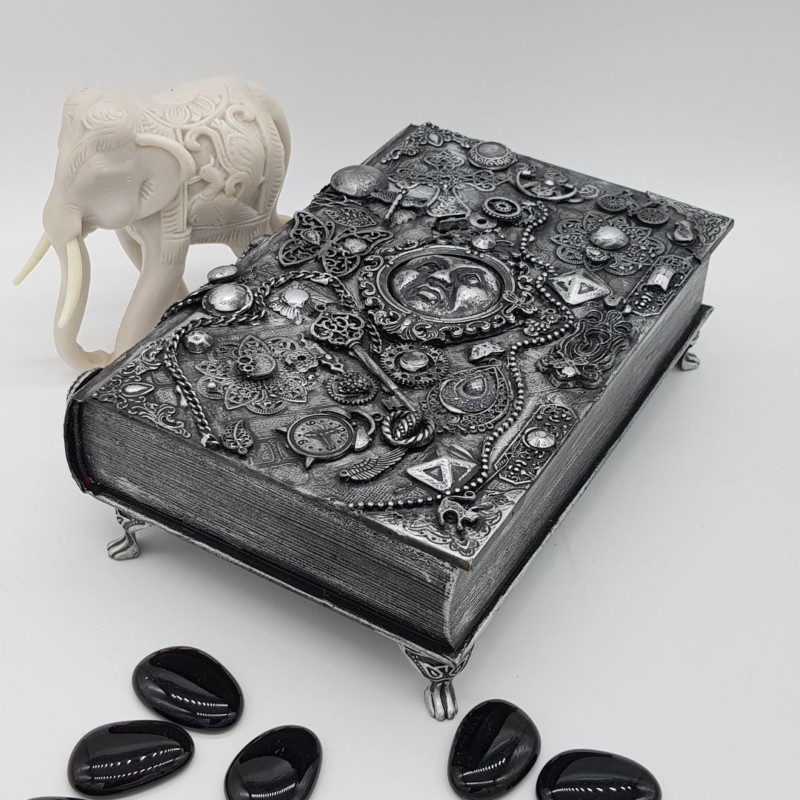
I applied the same mixed‑media technique to transform an old book into a jewellery box. You can find all my mixed media art projects HERE.

If you’d like to find any of the items used in this project, we’d greatly appreciate it if you used our affiliate links. These links provide us with a small commission at no extra cost to you, allowing us to continue creating and sharing more inspiring projects. We’d also love to hear your thoughts—feel free to leave a comment or share this post!


48 Comments
Michelle Leslie
April 27, 2020 at 4:09 pmOMW!!!! Stunning Anita. I love Steampunk-themed stuff and transforming shoes is one of the best ideas I’ve seen in a long time. I haven’t been able to walk in heels of any length for years so there’s a cupboard full of them can be made over. Love this idea.
Anita Holland
April 28, 2020 at 8:30 amThank you so much, Michelle, I have never really been able to walk in high heels. But we can dream, can’t we? I am a flip flop kind of girl.
Sara
April 27, 2020 at 9:12 pmWow, I love the bling in the shoes but love the bling ON the shoes even more! I’m going to raid my closet now, but not before I pin 🙂
Anita Holland
April 28, 2020 at 8:28 amThank you so much Sara, I have a very generous husband. lol
Christy @ Our Southern Home
April 27, 2020 at 9:41 pmWOW! This is awesome. It looks like something that you’d see in a high-end art gallery!!!
Anita Holland
April 28, 2020 at 8:27 amAww, thank you, your comment has made my day.
creativejewishmom/sara
April 27, 2020 at 11:56 pmWow, what an amazing idea for using old shoes, and these are beauties! Thanks for sharing on craft schooling Sunday!
Anita Holland
April 28, 2020 at 8:26 amThank you so much, it is very kind of you to say.
Deana Landers
April 28, 2020 at 4:11 amThis is such a great idea, Anita. The thrift store is full of these spiked heels. I may have to try this.
Anita Holland
April 28, 2020 at 8:26 amThank you Deana, I know our thrift store has loads and lots of junk jewellery for cheap.
Libbie
April 28, 2020 at 5:58 amWhat a great upcycle! Would make a great BFF gift!
Anita Holland
April 28, 2020 at 8:24 amThank you Libby, I already have people asking me to make them as gifts.
Lori Nell
April 28, 2020 at 7:07 amSuch attention to detail! Beautiful job, Anita.
Anita Holland
April 28, 2020 at 8:24 amThank you Lori for the lovely comment.
Pamela @ DIY Vibes
April 28, 2020 at 8:26 amThis is such a cool look, thanks for walking us through your process. You are so creative!!
Anita Holland
April 28, 2020 at 8:29 amThank you so much, Michelle, I am on a steampunk frenzy at the moment. I love the uniqueness of steampunk.
Anita Holland
April 28, 2020 at 8:31 amThank you so much, there is so much to see using mixed media. You can usually find something new each time you have a look.
Linda Primmer
April 28, 2020 at 9:43 amWow Anita, a great project. You are so artistic. Thanks for sharing at Love Your Creativity.
Anita Holland
April 29, 2020 at 8:22 amThank you so much, Linda.
Meegan
April 28, 2020 at 11:07 amI just love your creativity and all the ingenuity you put into this project! You have given me so many ideas. Thanks so much for sharing. Pinned, for sure.
Anita Holland
April 29, 2020 at 8:22 amThank you so much Meegan, I am really happy that you like them.
Alexandra
April 29, 2020 at 12:54 amWOW! What an amazing transformation!!
Anita Holland
April 29, 2020 at 8:20 amThank you so much, they turned out better than I had hoped.
Karen, the next best thing to mummy
April 29, 2020 at 9:59 pmThis is such a great idea #alittlebitofeverything@_karendennis
Anita Holland
May 1, 2020 at 10:50 amThank you so much Karen
Jeanne
April 30, 2020 at 5:14 amNice project and great photos! Great Repurposing. Useful as well! 🙂
Anita Holland
May 1, 2020 at 10:50 amThank you so much, I had to take loads before I got some good ones. lol
Kathy A
April 30, 2020 at 9:54 amAwesome project and great tutorial. At 5’7″ with weak ankles and a 5’4″ SO, stilettos have never entered my house–but I do love them! When GW opens again, I am going to have to keep my eyes open!
Anita Holland
May 1, 2020 at 10:51 amThank you so much. From the comments on these shoes, I don’t think many women wear them.lol
ROBIN LAMONTE
May 1, 2020 at 4:10 amWhat a clever way of repurposing high heel shoes Anita!
Robin
Anita Holland
May 1, 2020 at 10:52 amThank you so much Robin, They were no use to me as shoes.
Create With Joy
May 3, 2020 at 10:53 amAnita, these shoes are the absolute bomb – or, at least what you envisioned and transformed them into is!
Thank you for sharing this amazing project at Inspire Me Monday at Create With Joy and CONGRATS on your well-deserved spot as one of our Featured Guests this week! 🙂
Anita Holland
May 3, 2020 at 12:50 pmThank you so much for the awesome comment, you made my day. And a big thank you for featuring my project on your website.
Anita Holland
May 7, 2020 at 11:20 amThank you so much for the really nice comment, you made my day. And a bigger thank you for the feature.
Michele Michael
May 3, 2020 at 7:10 pmCrazy idea that I am so loving. Your mixed media work is always a treat. Thanks for sharing at Funtastic Friday
Anita Holland
May 7, 2020 at 11:19 amThank you so much, I love doing the mixed media because you can add just about anything and it will still look good in the end.
Cecilia
May 4, 2020 at 7:50 amHow fun, Anita! Thanks for sharing your creative projects at Vintage Charm!
Anita Holland
May 7, 2020 at 11:18 amThank you so much, and I will be back next week.
Antionette Blake
May 5, 2020 at 9:48 amWow. I could see creating and then selling these as it is auite unique. Thanks for sharing at #trafficjamweekend
Anita Holland
May 7, 2020 at 11:12 amThank you so much, I have had a few people ask me to make them. But I just do this for fun and share the tutorials.
Linky Party: Wonderful Wednesday 5/5-5/10 - Visit, Share & Be Inspired!
May 5, 2020 at 10:07 pm[…] Naturale // Staying Productive While Social Distancing Feature Chosen by Kasey // My Crafty Zoo Unique Creations by Anita // Stiletto-Ring-Holder Feature Chosen by Indah // My Purple World Fresh Vintage By Lisa // Using […]
Anita Holland
May 7, 2020 at 11:10 amThank you so much for the feature on my Stiletto ring holders.
Anita Holland
May 7, 2020 at 11:06 amThank you so much for the feature on my stiletto ring holder.
Anita Holland
May 12, 2020 at 4:45 pmThank you so much for the feature.
Maria
June 21, 2021 at 10:12 pmI love these stilettos and what you did with them, super creative. You are so talented, I think I have told you that many times. Have a great day.
Anita Holland
June 24, 2021 at 4:49 pmThank Maria, you always have the kindest comments. I really do appreciate them.
25+ diy shoe refashion tutorials - Swoodson Says
June 20, 2023 at 9:53 am[…] an upcycle, not a refashion, but what a clever way to recycle heels into jewelry holders from Unique Creations by […]
Anita Holland
June 20, 2023 at 9:59 amThank you