
Halloween is the perfect time to get creative with spooky DIY decorations, and this cement grim reaper Halloween decoration is a showstopper. Made from cement, chicken wire, and an old towel, this eerie figure looks like it stepped straight out of a haunted graveyard. I chose to make a Grim Reaper because Halloween is just around the corner, and people are always looking for unique DIY Halloween décor ideas. This project uses the cement-and-towel method, which is not only great for making a creepy Grim Reaper but can also be adapted to create cement planters and other fun projects.
This tutorial is also part of this month’s International Bloggers Club (IBC) challenge, where the theme was “Spin Me a Spindle”. For my project, I used a spindle as the main support for the Grim Reaper’s cloak. At the bottom of this post, you’ll find links to see how my fellow bloggers from around the world used spindles in their own creations.

Cement Grim Reaper Halloween Decoration – Made with an Old Towel
**This post may contain affiliate links. This means I earn a small commission on links used at no extra cost to you. Please see my disclosure policy for more information.**
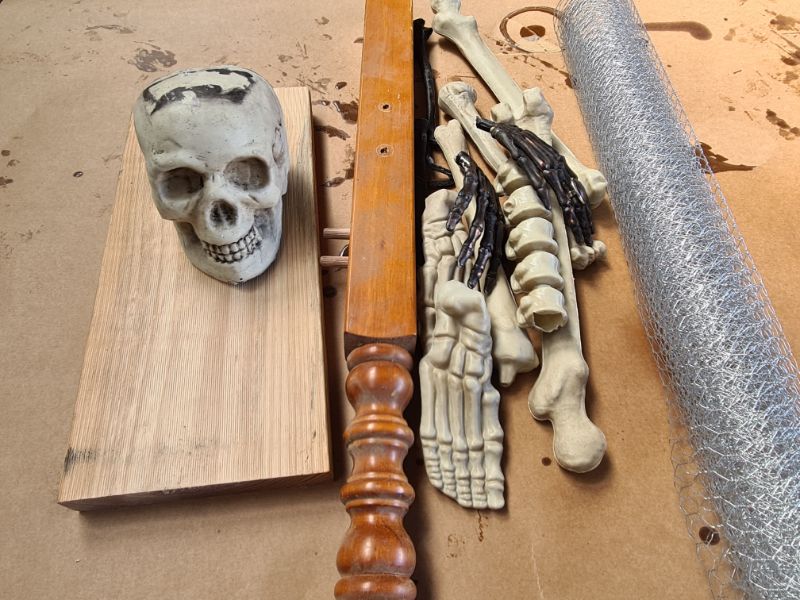
Materials Needed
- Wooden spindle (or a 2 x 4 piece of timber)
- Wooden base block (heavy enough to support the weight)
- Chicken wire
- Screws and drill
- Scrap wood for arms
- Old towel
- Bag of plastic skeleton bones (skull, hands, feet)
- Hot glue gun and glue sticks
- Plastic wrap (to protect skull)
- Cement and water
- Paintbrush (optional for touch-ups)
- Black spray paint
- Scrap fabric or plastic sheet (to protect surfaces)
- Optional Halloween accessories (pumpkin, trick-or-treat sign)
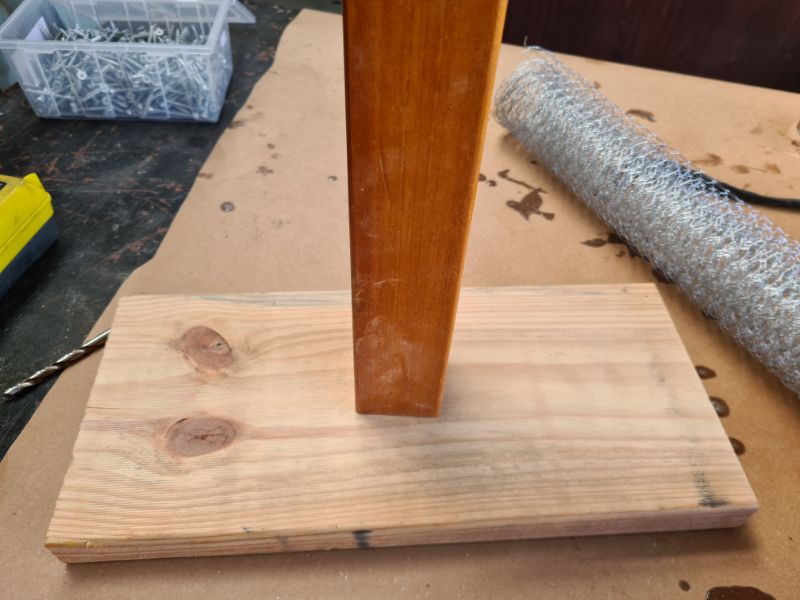
Building the Grim Reaper Stand
Start by preparing the base. Drill a hole into the wooden block and slightly countersink it so the screw will sit flush. Predrill a hole into the spindle, then screw it securely to the base from underneath. For extra strength, you can add wood glue before tightening. You’ll need a sturdy, well-balanced stand to support the weight of the cement.
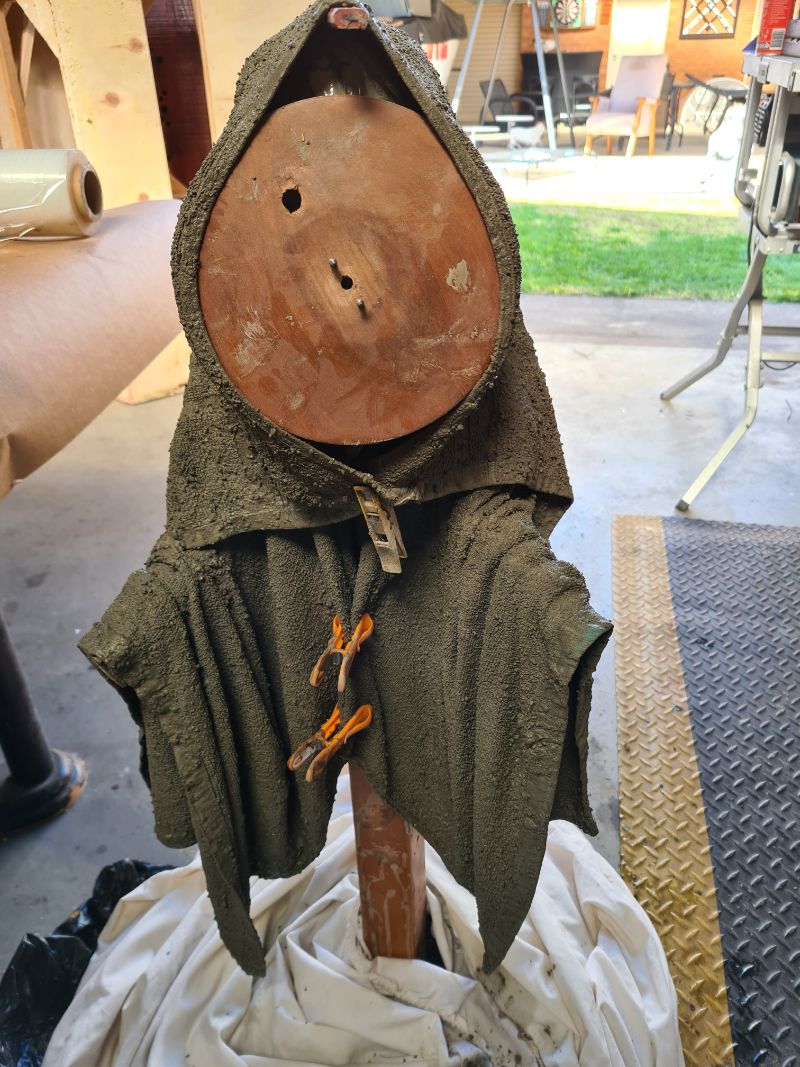
Next, prepare the skull by cutting a small X into its base and pressing it firmly onto the top of the spindle. Leave the excess plastic in place, as it will help secure the skull and keep it steady. This step forms the Grim Reaper’s head.
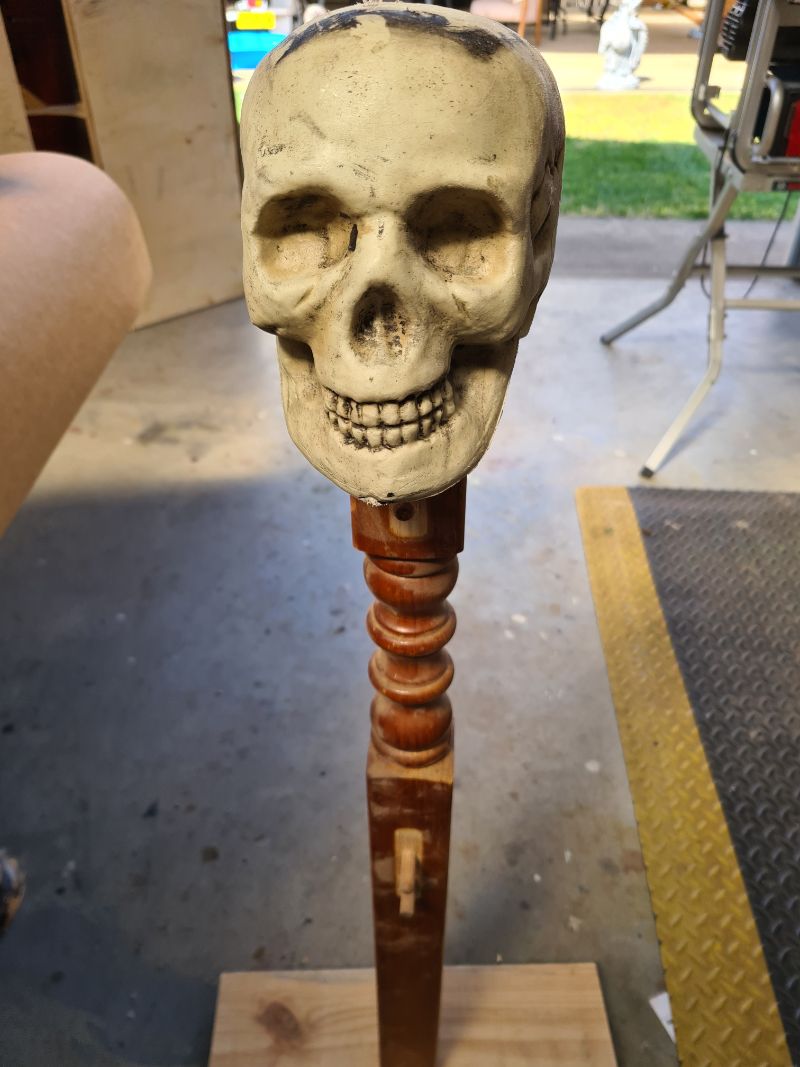
Creating the Grim Reaper Shape
To form the shoulders, cut a piece of chicken wire and shape it around the spindle. For arms, screw pieces of scrap wood into either side of the spindle. These will help support the towel cloak once cemented.

Making the Cement Cloak
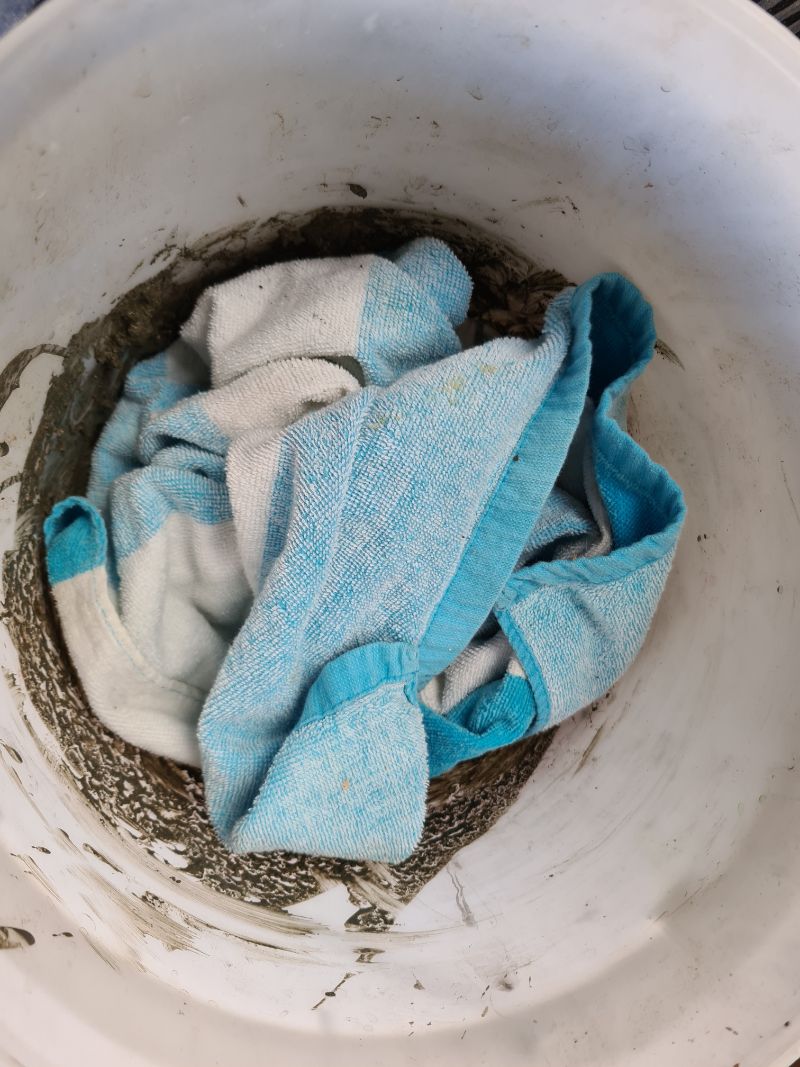
Mix the cement with water until it has a smooth, pourable consistency. Wrap the skull in plastic wrap to protect it from cement.

Before dipping the towel, dampen it with water. This step is important, as a dry towel will instantly absorb the moisture and prevent the cement from sticking properly. Once wet, dip the towel into the cement mixture until it is fully saturated.
Cover your work surface with plastic or scrap fabric, then drape the towel over the wire and arms to form the reaper’s cloak. Shape the folds to give the appearance of flowing fabric. I didn’t mix the cement thoroughly, so a few lumps are visible, but by then it was too late to start over.
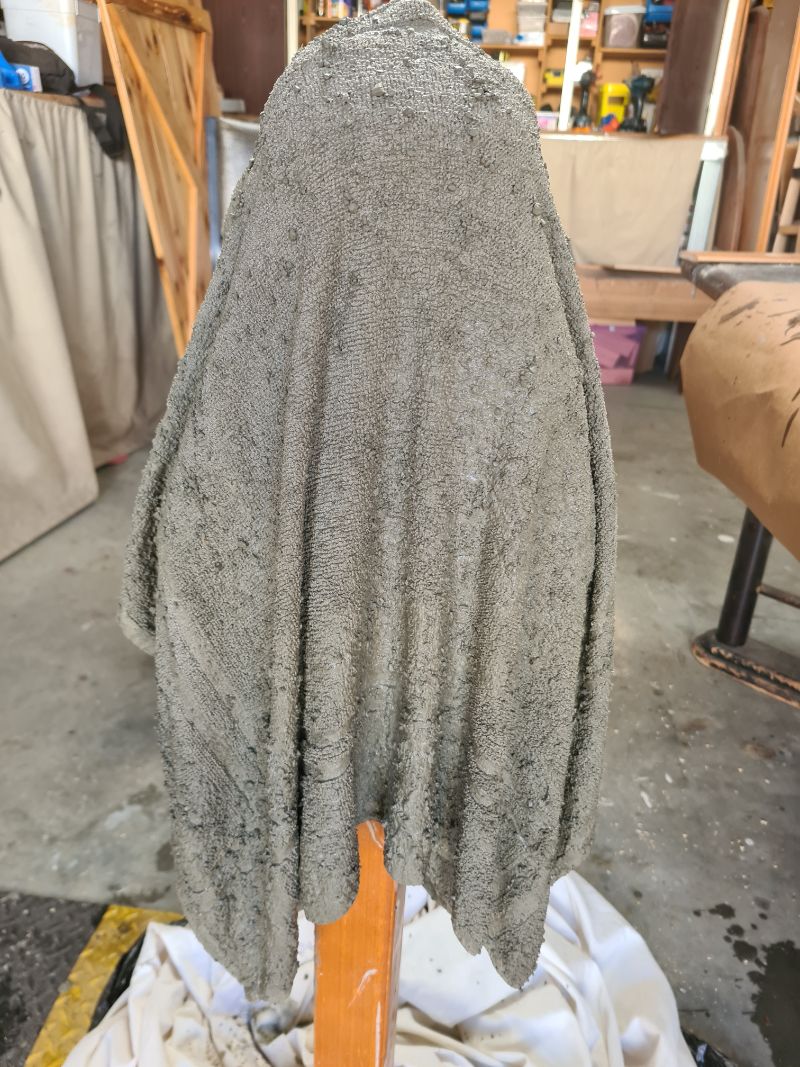
To keep the cloak away from the face while drying, wedge scrap items underneath. Remove them before the cement fully sets.
Leave the cement to cure overnight. If it still feels weak the next day, mix a smaller batch of cement and paint it over the surface with a brush for reinforcement.
Painting the Grim Reaper
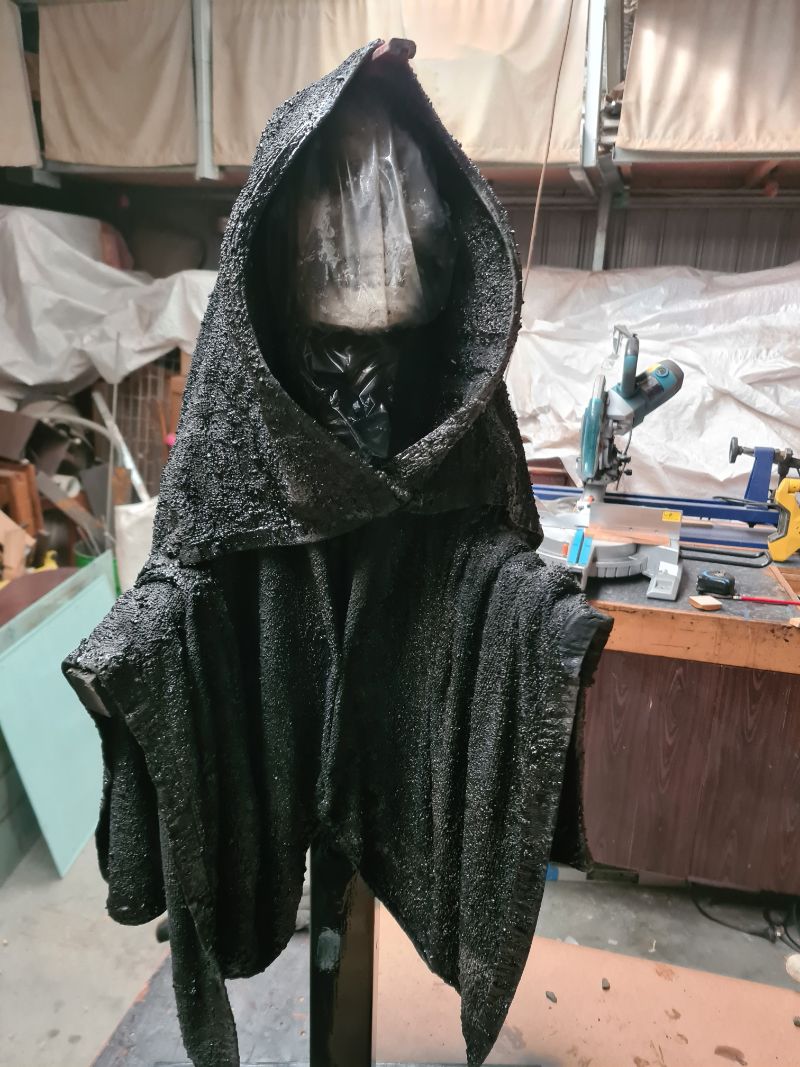
Once dry, spray paint the entire cloak black. Cement tends to absorb paint, so expect to apply at least four coats before achieving a deep black finish. Spray the base black as well, blending it with the reaper’s body. Once dry, peel the plastic wrap away from the skull.
Adding Bones and Details
Attach the hands and feet with hot glue. To give them an aged, weathered effect, dry-brush black paint into the grooves and wipe away the excess. The paint settles into cracks and crevices, making the bones appear old and dirty. Finish by adding small Halloween props, such as a pumpkin or a trick-or-treat sign, to complete the scene.


More Halloween projects for you.
These skull figures were created using liquor glasses as the base and then decorated to bring them to life.

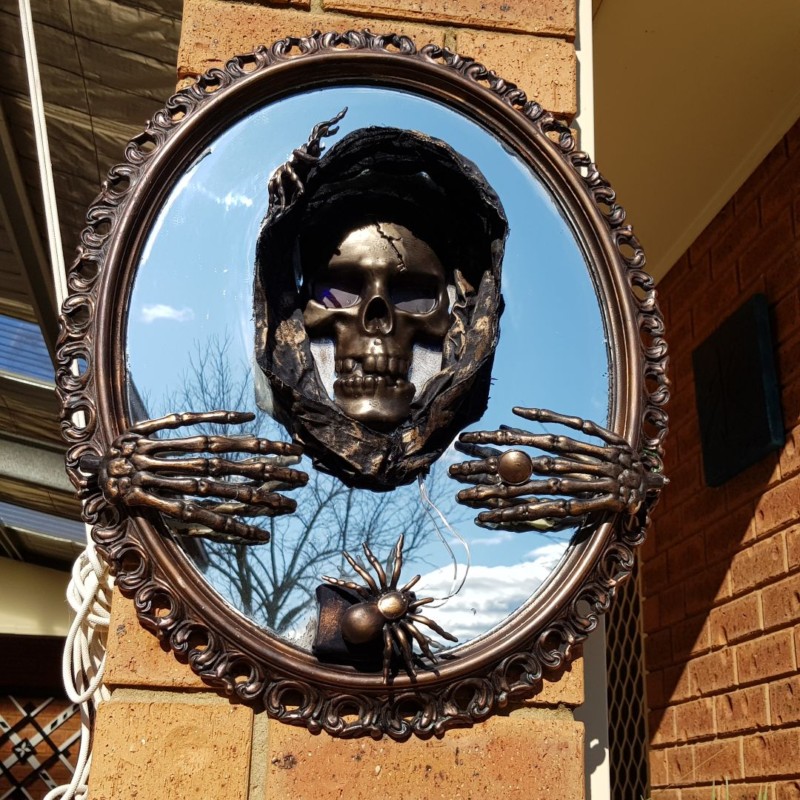
This 3D Halloween mirror creates a chilling illusion, making it appear as though the Grim Reaper is stepping out of the glass and into the room. You can see more great Halloween projects here.
More about IBC
If you follow my blog, you will know I am part of the IBC (International Bloggers Club), which is a group of talented bloggers from around the world. We have members from Spain, South Africa, Australia, the United States, and Canada. Each month we come together and create a project with a common theme.
If you missed last month’s “Wall and all ” theme, here is the link to my Shou Sugi Ban barn quilt. The “Wall and all ” contributions from my fellow bloggers for this month’s challenge are listed below. Please feel free to jump over and give them some love.

- Meegan Makes|DIY Spindle outdoor bird perch
- Interior Frugalista|Antique chair spindle wind chimes
- Birdz of a feather |Coral reef pattern
- Me
- A Crafty Mix|DIY CD spindle water feature


If you’re interested in any of the items used in this project, we’d appreciate it if you used our affiliate links. Clicking these links earns us a small commission at no extra cost to you, helping us create more inspiring and exciting projects to share. We’d also love to hear your thoughts—feel free to leave a comment or share this post!


20 Comments
Sara
September 20, 2021 at 10:18 pmI am always in awe of your Halloween creations and this one is no exception; your reaper is fantastic Anita! I have so many towels starting to go threadbare and this is such a great idea for them!
Anita Holland
September 24, 2021 at 11:49 amThank you so much Sara, I was a bit stumped on this theme.
Michelle Leslie
September 20, 2021 at 11:54 pmWhen I first saw your amazing grim reaper I was scratching my head trying to figure out where the spindle went. So, so clever. Love everything about him.
Anita Holland
September 24, 2021 at 11:50 amThanks Michelle, After seeing all your projects I had so many ideas flying around. lol
Marie - Interior Frugalista
September 21, 2021 at 5:38 amWhat a spooktacular idea for Halloween! The Grim Reaper’s cloak is amazing and looks so much fun to make. Since becoming empty nesters we don’t decorate for Halloween but my daughter does and she would flip if I made one of these for her. I already have the perfect spindle and a laundry room shelf full of old towels. Very cool, Anita!
Anita Holland
September 24, 2021 at 11:50 amThanks Marie, it was a quick and easy project to do.
Meegan
September 21, 2021 at 1:14 pmOne of kids hosts a haunted house in their backyard for all of their friends and neighbors. THIS would be the perfect addition to the haunted decorating! I am excited to share it with them. You are so talented, Anita.
Anita Holland
September 24, 2021 at 11:51 amThank you so much Meegan I bet they would love making them too.
Sandi
September 28, 2021 at 12:51 amCan you repost your floral arrangement from last year? Thanks
Anita Holland
September 28, 2021 at 9:09 amThank you so much Sandi, That post is still on my website if you search for Halloween it will come up.
Sandy Hennen
September 30, 2021 at 1:56 pmI love your detailed how to and especially your added comments about the oopsies. The 4 layers of spray paint was a helpful one. Note to self: I’ll be sure to add black acrilic paint to the cement mixer.
Anita Holland
October 2, 2021 at 3:56 pmThanks sandy, I wish I had added the black first, would have been easier.
Lori Nell
October 25, 2021 at 10:50 pmWonderfully spooky creation for Halloween! Your tutorials are great!!👻
Anita Holland
November 1, 2021 at 4:08 pmThank you so much Libbie, Happy Halloween.
Libbie Burling
October 26, 2021 at 12:51 pmAnita,
Spooktacular! We don’t decorate for Halloween- empty nesters in a rural location but my girls would love this! Pinning for next year.
Anita Holland
November 1, 2021 at 4:09 pmThanks Libbie, We are the same, empty nesters. I make them for my niece, we are that old couple that sits in the dark so they think no one is home. LOL
Janet
October 26, 2021 at 10:59 pmSo creative and well done!
Anita Holland
November 1, 2021 at 4:09 pmThank you Janet.
A Crafty Mix | How to Make a CD Spindle Water Feature - A Crafty Mix
February 12, 2022 at 3:55 am[…] my humble opinion this scarily awesome Grim Reaper made by Anita is a must for […]
How to Make a CD Spindle Water Feature - A Crafty Mix
September 6, 2024 at 4:28 pm[…] my humble opinion this scarily awesome Grim Reaper made by Anita is a must for […]