
s month’s International Blogger Club Challenge (IBC). This month, the topic was Rock & Roll, and we had to create something incorporating the theme in our project. I chose Elvis Presley because he is still the King of Rock & Rock in my eyes, he was the first person that popped into my head.

An Elvis Presley tribute photo frame, but that would not be very Unique. So this Elvis Presley Tribute guitar was my next idea. More information about IBC is at the bottom of this post.
How to Make an Elvis Presley Tribute Guitar
**This post may contain affiliate links. Which means I earn a small commission on links used at no extra cost to you. Please see my disclosure policy for more information.**
Materials
- 12 mm plywood (size to suit guitar body)
- White acrylic paint
- Dark mahogany stain (optional, for testing finishes)
- Satin clear polyurethane (sealer)
- Black adhesive vinyl
- Transfer tape
- Record-label graphic print (for the “sound hole”)
- Photo paper (for Elvis photos)
- Craft glue
- Thrifted vinyl record
- Old belt (for the strap)
- Leather lace
- Small wood screws
- glue gun – Black hot-glue sticks
- Steampunk silicone mould
- Downloaded Elvis silhouette images converted to SVG (or your own artwork)
- Jigsaw
- Orbital sander with 120-grit discs
- Bench sander (to shape the record)
- Cricut or Silhouette cutting machine
- Scraper or brayer (for vinyl application)
- Drill with small bits
Draw the guitar
After many failed attempts to sketch the guitar—I can’t draw to save my life—I tried another approach. I asked a friend with a guitar if I could borrow it for a few minutes. I laid it on a sheet of craft paper and traced around the shape with a pencil. Then I cut out the paper shape and used it as a template to mark the outline onto the wood. The tuning pegs were on the back, which made tracing the headstock tricky, but I planned to sort that out later.

I chose to use 12 mm plywood for this project so it would be light enough to hang on a wall. You can now place the template on the wood and trace around with a Sharpie.

Cut out the guitar shape
Using a jigsaw, cut out the shape of the guitar. I cut the headstock square for now until I could work out how I wanted it.

Using an orbital sander and 120-grit sanding discs, I sanded the wood smooth.

Stain and varnish
Because I make my projects up as I go, they don’t always work the first time. So I’m sharing what doesn’t work as well as what does. I originally stained the guitar in dark mahogany and sealed it with two coats of satin polyurethane, but that finish didn’t work for this piece.

When I added the black vinyl decals, they disappeared into the mahogany—there wasn’t enough contrast. I switched to white vinyl, but a silhouette just doesn’t read the same in white as it does in black. Suddenly, Elvis didn’t look like Elvis anymore. I had to paint the guitar white and seal it again with two coats of clear polyurethane. If you’re using vinyl decals, it’s always a good idea to seal the wood first—the vinyl adheres better to a smooth, sealed surface.

Creating the vinyl Decals
To create the vinyl decals, you’ll need a Cricut or Silhouette Cameo. There are plenty of machines on the market, but these are the two I’ve used. The projects you can make with them are amazing—they really take your crafting to the next level. Here are a few I’ve made with mine.
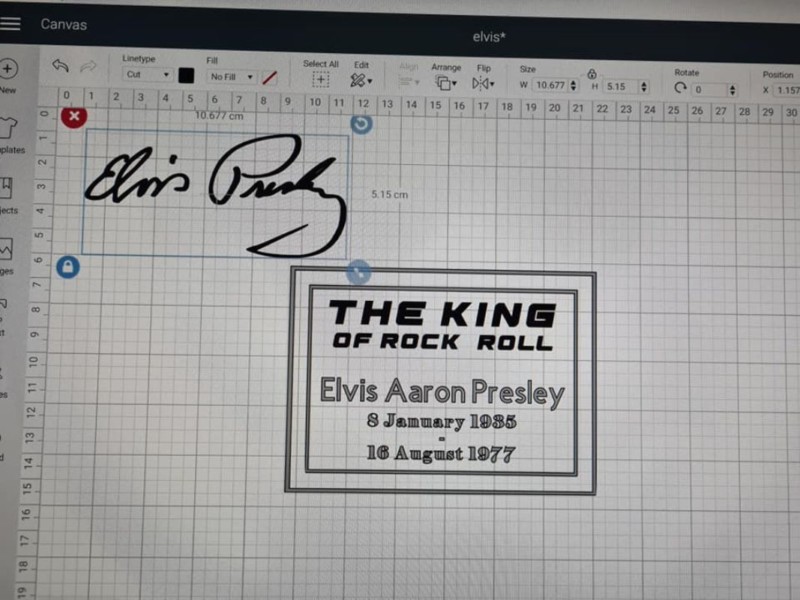
I found all my images free on the internet by searching for Elvis Presley silhouettes. Download the images to your computer and convert them to SVG files using Inkscape, which is free software. I’ve included a tutorial on creating SVG files with Inkscape.

Once you’ve resized your images to the exact size and shape you want, send them to your Cricut. Place the vinyl on the cutting mat, load the mat, and let the machine do the cutting. When it’s done, weed the design—peel away the excess vinyl so only the parts you want remain.

Place your transfer tape over the decal and rub it with a scraper to lift the design. Position it on the guitar and rub with the scraper again to transfer it to the wood. Finally, peel back the transfer tape slowly. Repeat for all your decals.

Any wording you want to add can be typed up in a text box and cut in the same way as above.
Adding the photos
I found the photos online and downloaded them. For better quality, print on photo paper. I planned to frame them at first, but changed my mind—the frames pulled attention away from the images.

Glue the images in place with craft glue. For the guitar’s “sound hole,” I printed a vinyl record label from the internet and used that as the insert.

Decorating the vinyl record
I picked up a vinyl record at a thrift store for $1 to add some interest to the fingerboard, which looked a bit plain. I tried cutting it down to size, but it kept snapping. In the end, the only thing that worked was sanding it to shape on a benchtop sander.

I created another design in Cricut Design Space to match the record’s size and saved it as a single cut file. I cut it from one large sheet of vinyl. For this one, you’ll do a reverse weed—remove the Elvis details and leave the surrounding vinyl in place.

The decal can now be transferred onto the record using the same method described above. The black from the vinyl record will create the silhouette. Again, I used a label from an Elvis record for the centre.

How to make tuning pegs
I was completely stumped about how to make the tuning pegs—until inspiration struck. While working on a steampunk mixed-media project, I noticed a steampunk tap had the exact shape I needed.
Use a steampunk silicone mould and black hot glue. Fill the mould with hot glue, then smooth it with a wet finger. Once it sets, trim any ragged edges.

Drill holes in the headstock and glue the tuning pegs in place. It still looked a bit plain for my liking, so I added one of Elvis Presley’s famous quotes.

To make the fingerboard look more like a guitar, cut a few extra decals with your vinyl cutting machine.

Making the strap
The strap for the guitar was one of my husband’s old belts; I just removed the buckle. One side was screwed into the wood, and the other was tied using some leather lace.

Completed project
And that is my Elvis Presley tribute guitar complete.


About IBC (International Bloggers Club)
If you follow my blog, you will know I am part of the IBC (International Bloggers Club), which is a group of talented bloggers from around the world. We have members from Spain, South Africa, Australia, the United States, and Canada. Each month, we come together and create a project on a common theme.
If you missed last month’s dreaded toilet paper challenge, here is the link to my oriental canvas decorated with toilet paper. The contributions from my fellow bloggers for this month’s challenge are listed below. Please feel free to jump over and share your thoughts.
A crafty Mix | Repurposed Packing tape storage

More great projects
How to make an LED headphone stand


If you’re interested in any of the items used in this project, we’d appreciate it if you used our affiliate links. Clicking these links earns us a small commission at no extra cost to you, helping us create more inspiring and exciting projects to share. We’d also love to hear your thoughts—feel free to leave a comment or share this post!


21 Comments
Michelle Leslie
July 20, 2020 at 10:15 pmYou always live up to your blog’s name Anita. So much detail and thoughts went into the making the Elvis inspired guitar. Now I need to find me some of those Steampunk silicone molds. What a neat idea to use a glue gun to make the guitar knobby things.
Anita Holland
July 22, 2020 at 6:48 pmThank you Michelle, The steampunk mould was a fluke, I saw the resemblance by accident. I used the glue because I was too lazy to go outside to my shed and use resin. The black hot glue dries a lot harder than the clear.
Marie-Interior Frugalista
July 23, 2020 at 1:24 amThis is AWESOME, Anita! Such a creative idea and who doesn’t love some Elvis. I’ve been wondering how to create SVG files so thanks a bunch for the link to the video tutorial! Of course I paid special attention to all the vinyl bits here being a Cricut newbie. You rocked this challenge! LOL
Anita Holland
July 24, 2020 at 3:16 pmThank you so much Marie. It is very useful to be able to create your own SVG files, then you are not limited to what other people have available.
Anita Holland
July 27, 2020 at 11:26 amThank you so much for the feature on my Elvis Guitar. I has actual gone to a local man who has an Elvis museum.
Anita Holland
July 31, 2020 at 11:13 amThank Michelle, It was a blogger challenge and who does not love Elvis. lol
Denise/My Home of All Seasons
August 2, 2020 at 6:10 amWhat an amazing project Anita! I am going to pin this for later. My daughter will absolutely love it! Thanks for sharing.
Anita Holland
August 3, 2020 at 10:21 amThank you so much Denise.
Lynn Spencer
August 3, 2020 at 8:42 pmFrom one Elvis fan to another, what a lovely tribute! In The Ghetto still brings tears to my eyes, along with Kentucky Rain!
Anita Holland
August 3, 2020 at 10:56 pmThan k you so much Lynn, he was a great artist. Imagine what he could have been.
Sara
August 3, 2020 at 10:34 pmI love Elvis; he’s the first thing that would’ve come to my mind too. I had no idea you could even get black hot glue! I always learn something new from you 🙂 You do the most interesting things for IBC; if you ever have an opening, I’d love to join along one day!
Anita Holland
August 3, 2020 at 11:04 pmThank you so much Sara. The black Hot glue is so much better than the clear, I use it for my mixed media projects because it blends in better. I will enquire about the IBC group and I will get back to you with some information.
Laurie @ Vinyet Etc
August 4, 2020 at 12:11 amElvis was my very first crush, I just adored him, his music and I was an obsessed fan for his movies. Thank you for sharing this wonderful tribute project!
Anita Holland
August 4, 2020 at 8:25 amThank you so much Laurie.
Deana Landers
August 4, 2020 at 12:12 amAnita, your details are amazing. My husband would love this Elvis guitar. His nephew is an Elvis impersonator. Thank you for demonstrating the hot black glue. I didn’t know about that.
Anita Holland
August 4, 2020 at 8:27 amThank you so much Deana, I am really surprised how many people don’t know about black hot glue. It is more forgiving when doing mixed media projects and I have found it does not “string” as much as the clear.
Rosemary Palmer
August 4, 2020 at 1:33 amhow fun – have you ever been to Graceland?
Anita Holland
August 4, 2020 at 8:29 amThank you! Unfortunately I have not, but I bet it is awesome.
Angie @ Postcards from the Ridge
August 4, 2020 at 2:07 amWhat a fun project! We love Elvis!
Anita Holland
August 4, 2020 at 8:30 amThank you Angie, we must all be around the same age lol
Repurpose a Packing Tape Roll into Boho Storage - A Crafty Mix
September 6, 2024 at 8:42 pm[…] forget to go have a look at what Anita from Unique Creations by Anita did with her Rock ‘n Roll […]