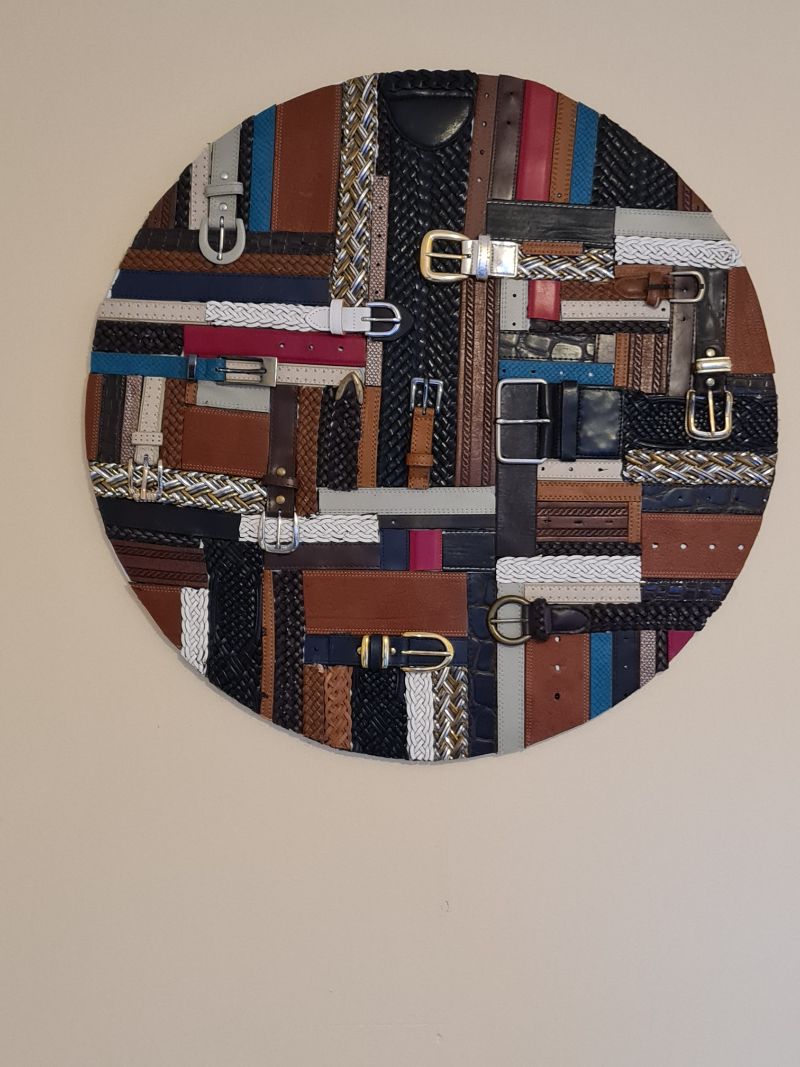
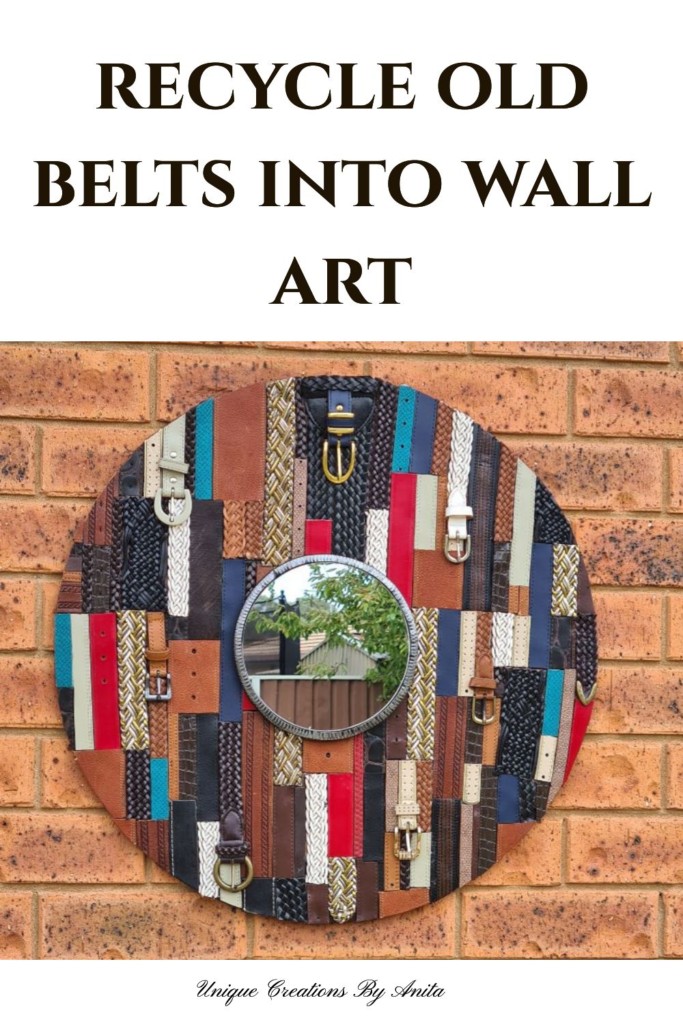
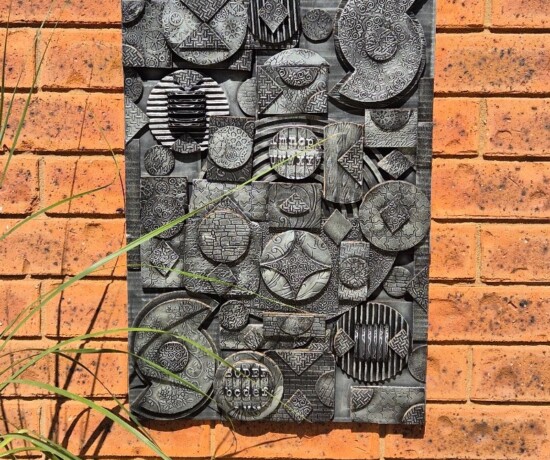
Meet the Leather Belt Wall Hanging—a bold, textured art piece made entirely from recycled belts and a round wooden base. A quick chat with my local charity shop produced a mountain of damaged belts headed for landfill, and that pile sparked the perfect upcycle.
Inspired by my earlier scrap-wood wall art and timed with our latest Do It Over Designers blog hop, this project blends sustainability, texture, and statement style into one striking decor idea you can make at home.
Before we dive into this tutorial, be sure to subscribe to my bimonthly newsletter to be the first to see my latest projects. You can also follow me on Pinterest and Facebook, where I also include my unique mixed-media art projects
Leather Belt Wall Hanging: Turn Thrifted Belts into Textured Wall Art
*This post may contain affiliate links. This means I earn a small commission on links used at no extra cost to you. Please see my disclosure policy for more information.**
Why this project works
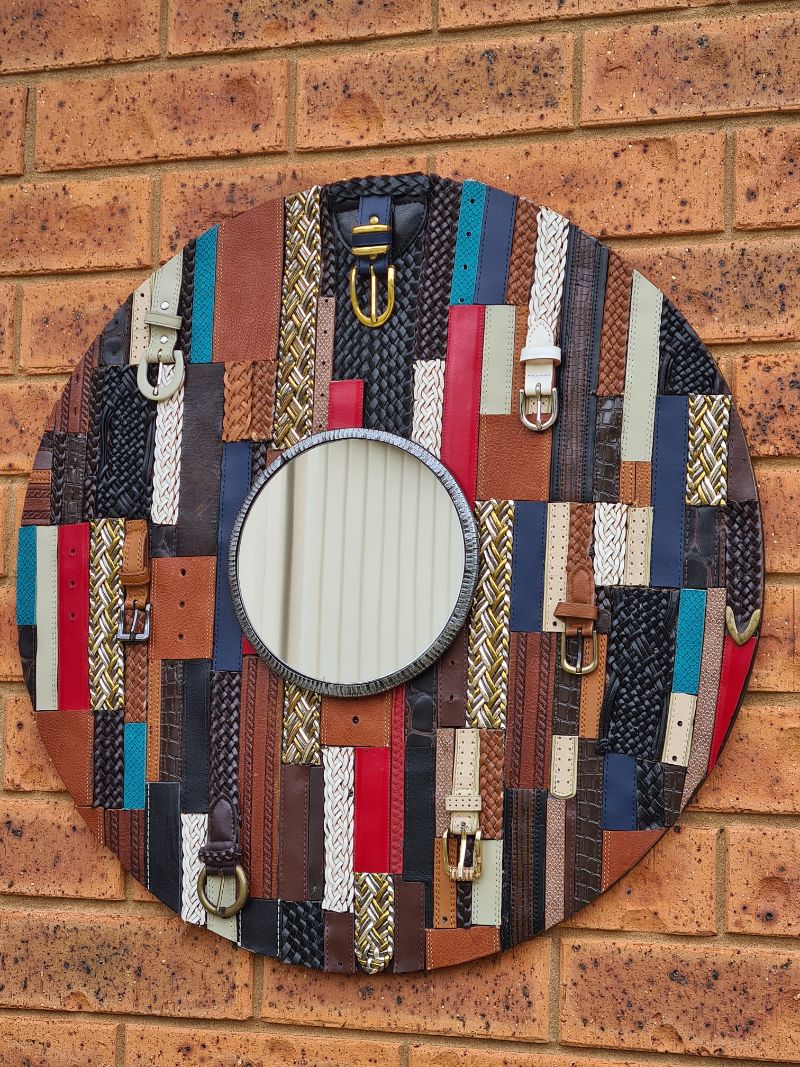
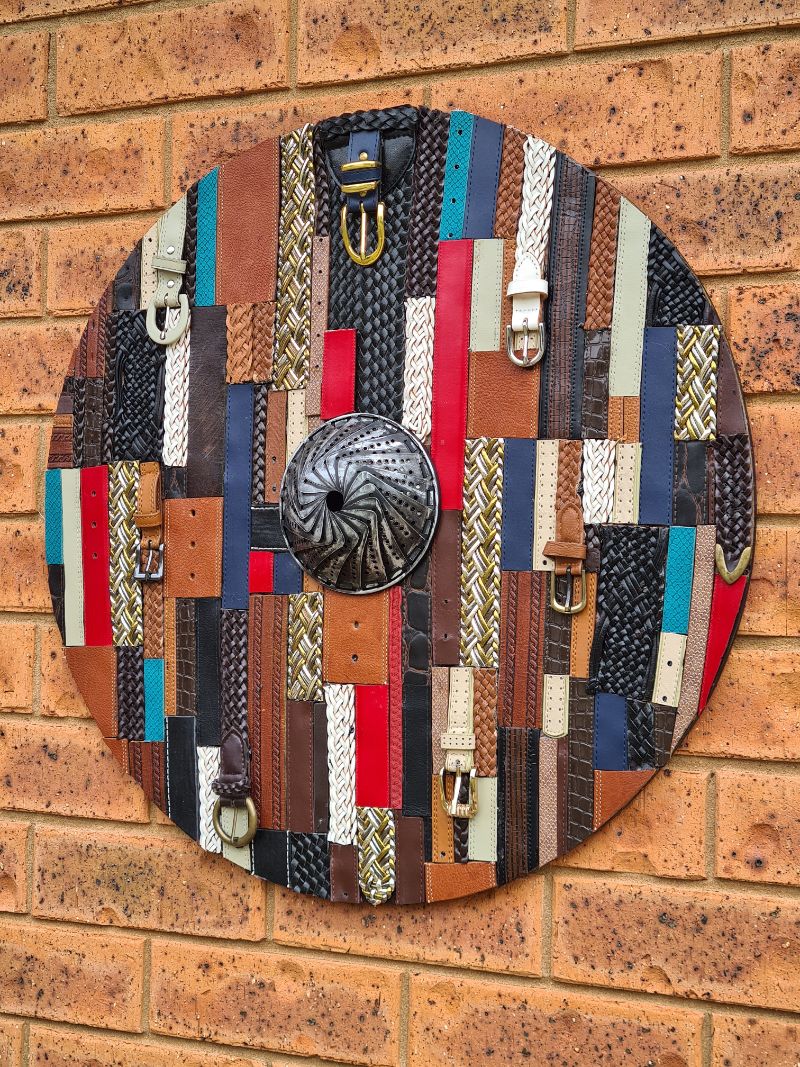
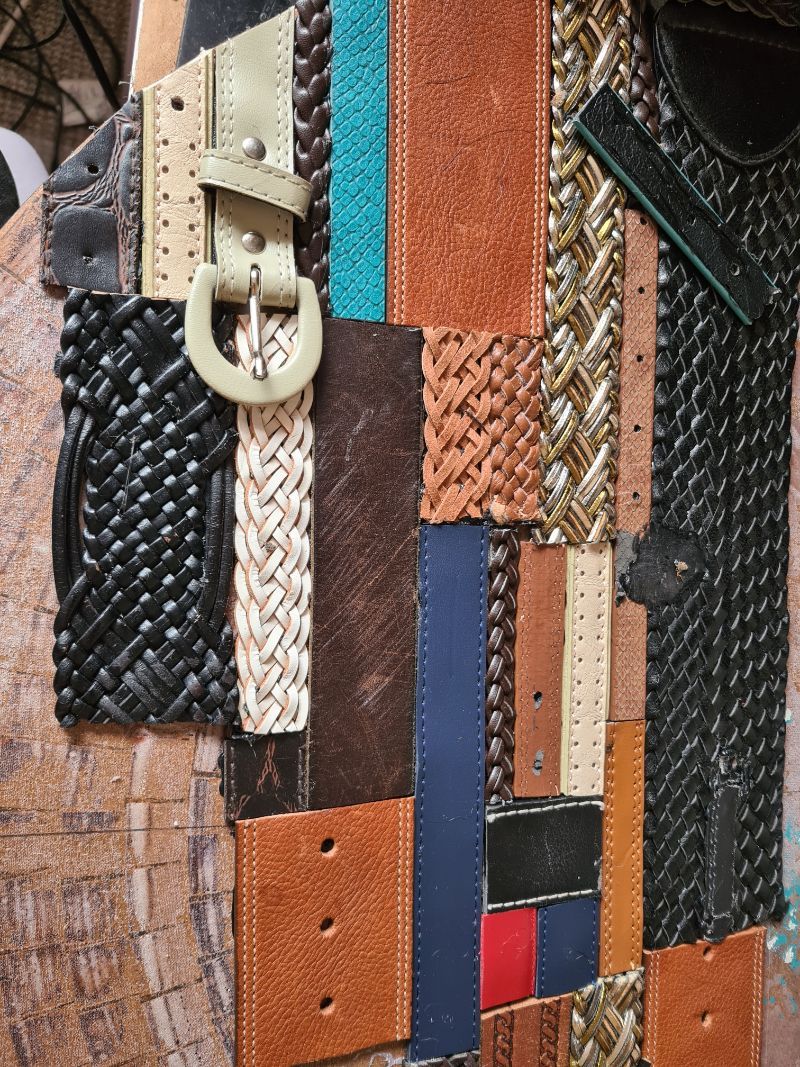
Belts deliver instant texture and variation—different grains, widths, colours, stitching, and buckles (if you keep them) create movement across the surface. Laying the belts in a single direction keeps the design clean and modern, while a small mirror or found object in the centre gives the piece a strong focal point.
Materials (and a few tools)
- Assorted recycled leather belts (mixed colours, widths, and textures)
- Round wooden base, approx. 600 mm diameter (mine came from a broken mosaic mirror)
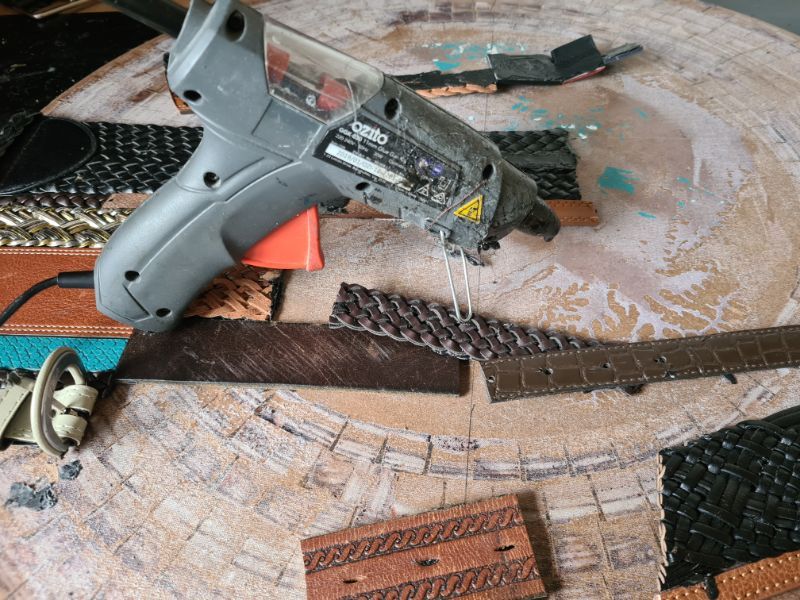
- Black hot glue sticks and a hot glue gun
- Heavy-duty scissors or rotary cutter and cutting mat
- Craft knife and metal ruler
- Fine-tip permanent marker
- Drill and small screws (for the focal piece and hanging hardware)
- Hanging hardware (D-rings and picture wire)
- Optional: small round mirror or found object (I tried a vintage steamer), spray paint (black), silver wax to highlight texture, clear sealer
Prepare the base (and what not to do)
This project took two tries. I’m sharing both versions so you can learn from my mistakes and compare layouts— including a mixed-direction belt design that might be your favourite. I reused the wooden circle from a fallen mosaic mirror. Remove any tiles and adhesive, sand lightly, and wipe clean.
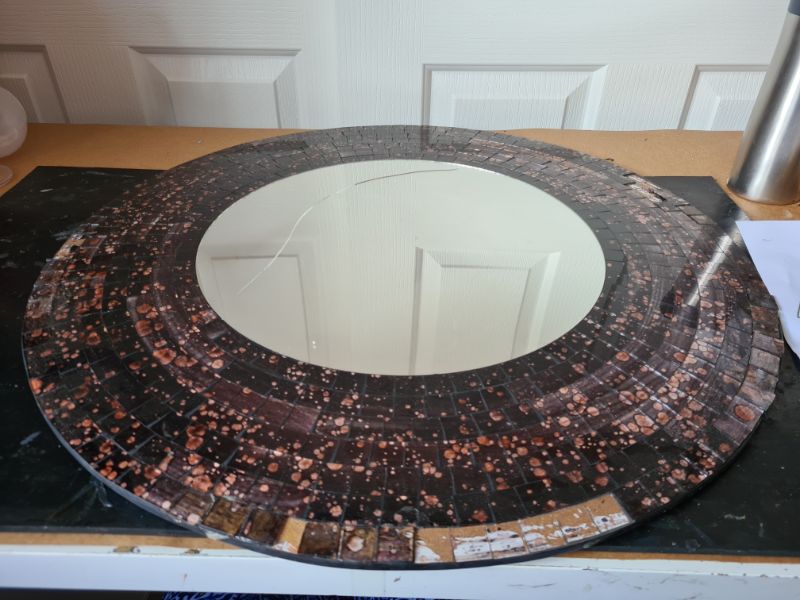
Skip covering the base in faux leather: hot glue won’t bond well to shiny leatherette, and the tiles can peel off once you hang them. Bare wood gives hot glue the grip it needs. You can guess how I know this
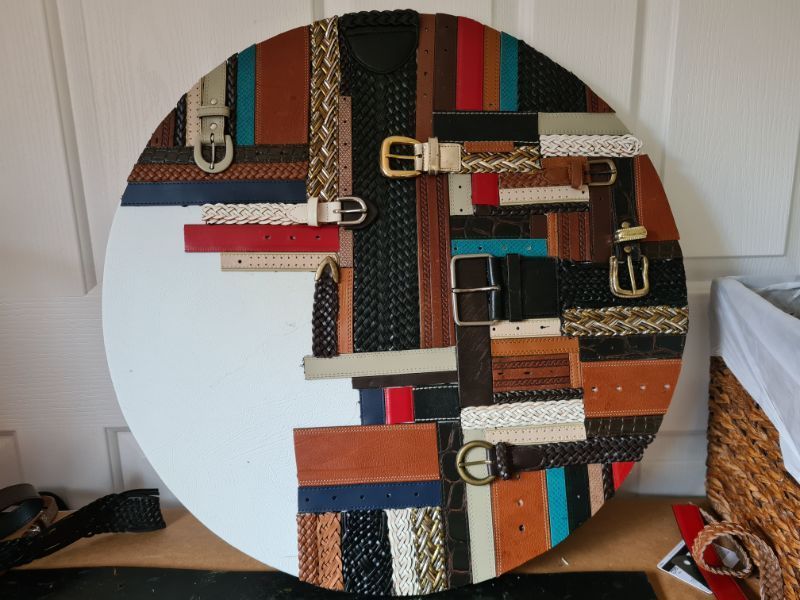
In my first attempt, I also glued the recycled belts in a random manner, which was not the look I was going for. It looked a bit too messy for my liking.
Cut and arrange the belts
Trim the belts into shorter lengths and lay them all in the same direction for a tidy, contemporary look.
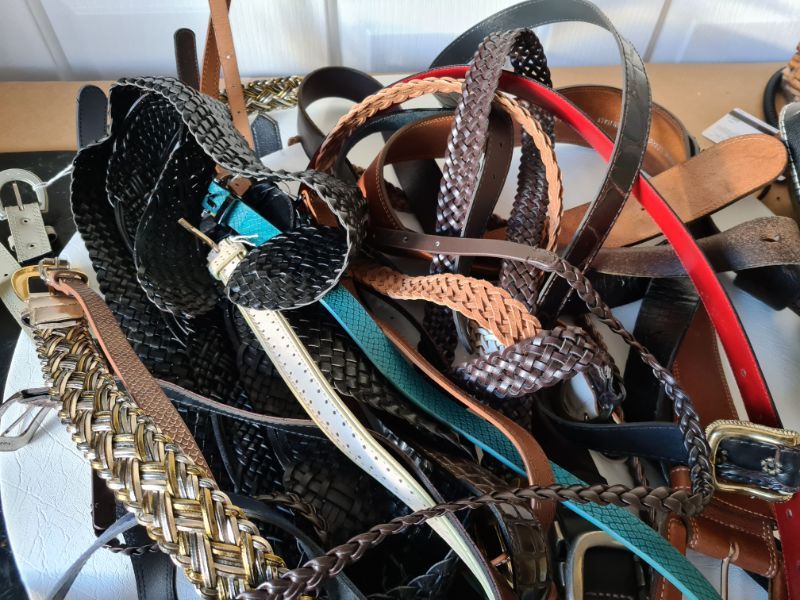
Mix colours and textures to build depth. Dry-fit a few rows to find a rhythm, then commit with black hot glue—it disappears between darker belts and looks neater at the joins.
You can mix all the different colours and textures.
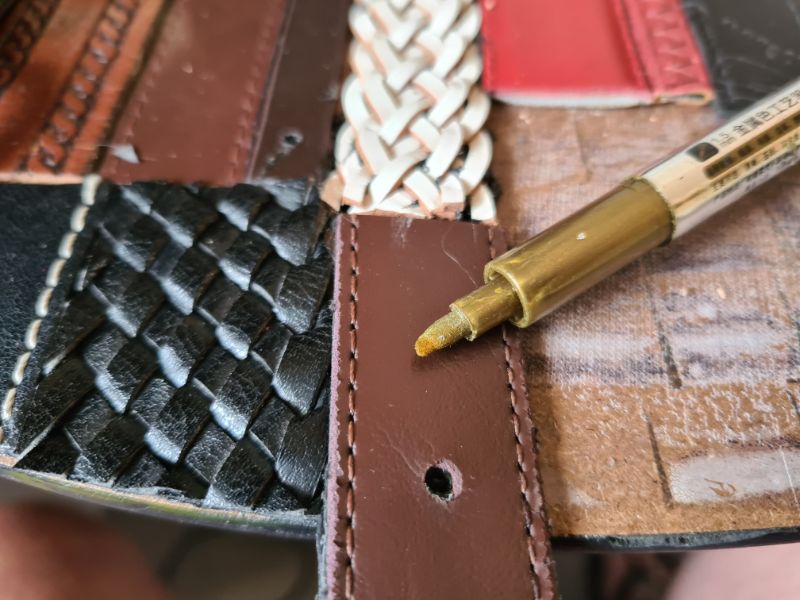
Clean edges on a circle
When you reach the edge, place a belt strip so it overhangs the circle. Trace the curve from below with a fine marker, then cut along that line. Refit and glue. Work around the circle, keeping gaps tight and edges crisp for a professional finish.
Add the focal point (steamer vs. mirror)
A focal point anchors the texture. I tried a vintage steamer from the op-shop—sprayed black, then brushed with silver wax to catch the raised details.
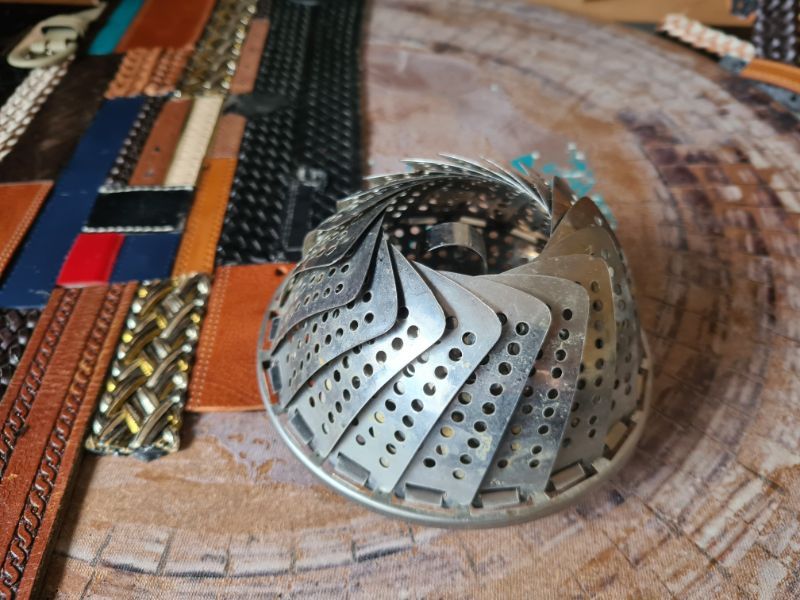
I drilled through the centre of the board and fixed it with a small screw. My husband said it looked like a Viking shield (he’s not wrong!).
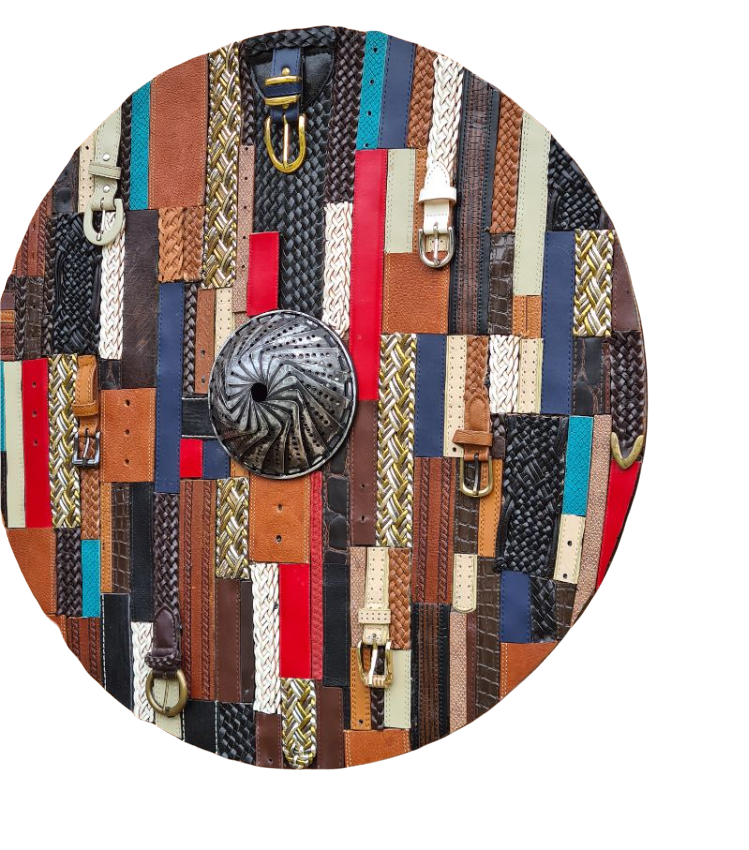
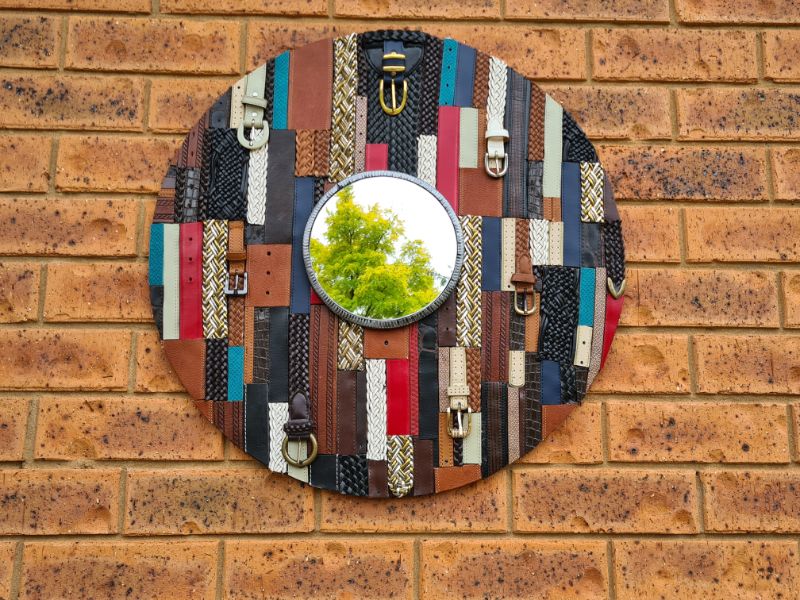
If that’s a bit edgy for your space, swap the steamer for a small round mirror for a clean, sculptural centre. I’d love to know which you prefer.
Hang it safely
Fit D-rings on the back and wire for hanging, making sure they’re level and screwed into solid timber. The belts add weight, so use appropriate wall anchors.
Troubleshooting and pro tips
- Glue bond: If your base isn’t raw wood, scuff-sand the surface. For glossy finishes, switch to contact adhesive or a thin epoxy.
- Gaps: If tiny gaps appear, fill with a slim offcut or warm a dab of black glue and press it flush.
- Colour balance: Alternate dark and light belts so the surface doesn’t feel heavy on one side.
- Finishing: If you like, mist a clear matte sealer to even sheen and protect the leather.
Variations you’ll love
- Horizontal stripes with one contrasting band through the centre.
- Chevron by meeting two directions at the middle line.
- Monochrome using belts in similar tones for a calm, minimal look.
- Hardware highlights by keeping a few buckles and studs in the mix.
More projects using recycled materials
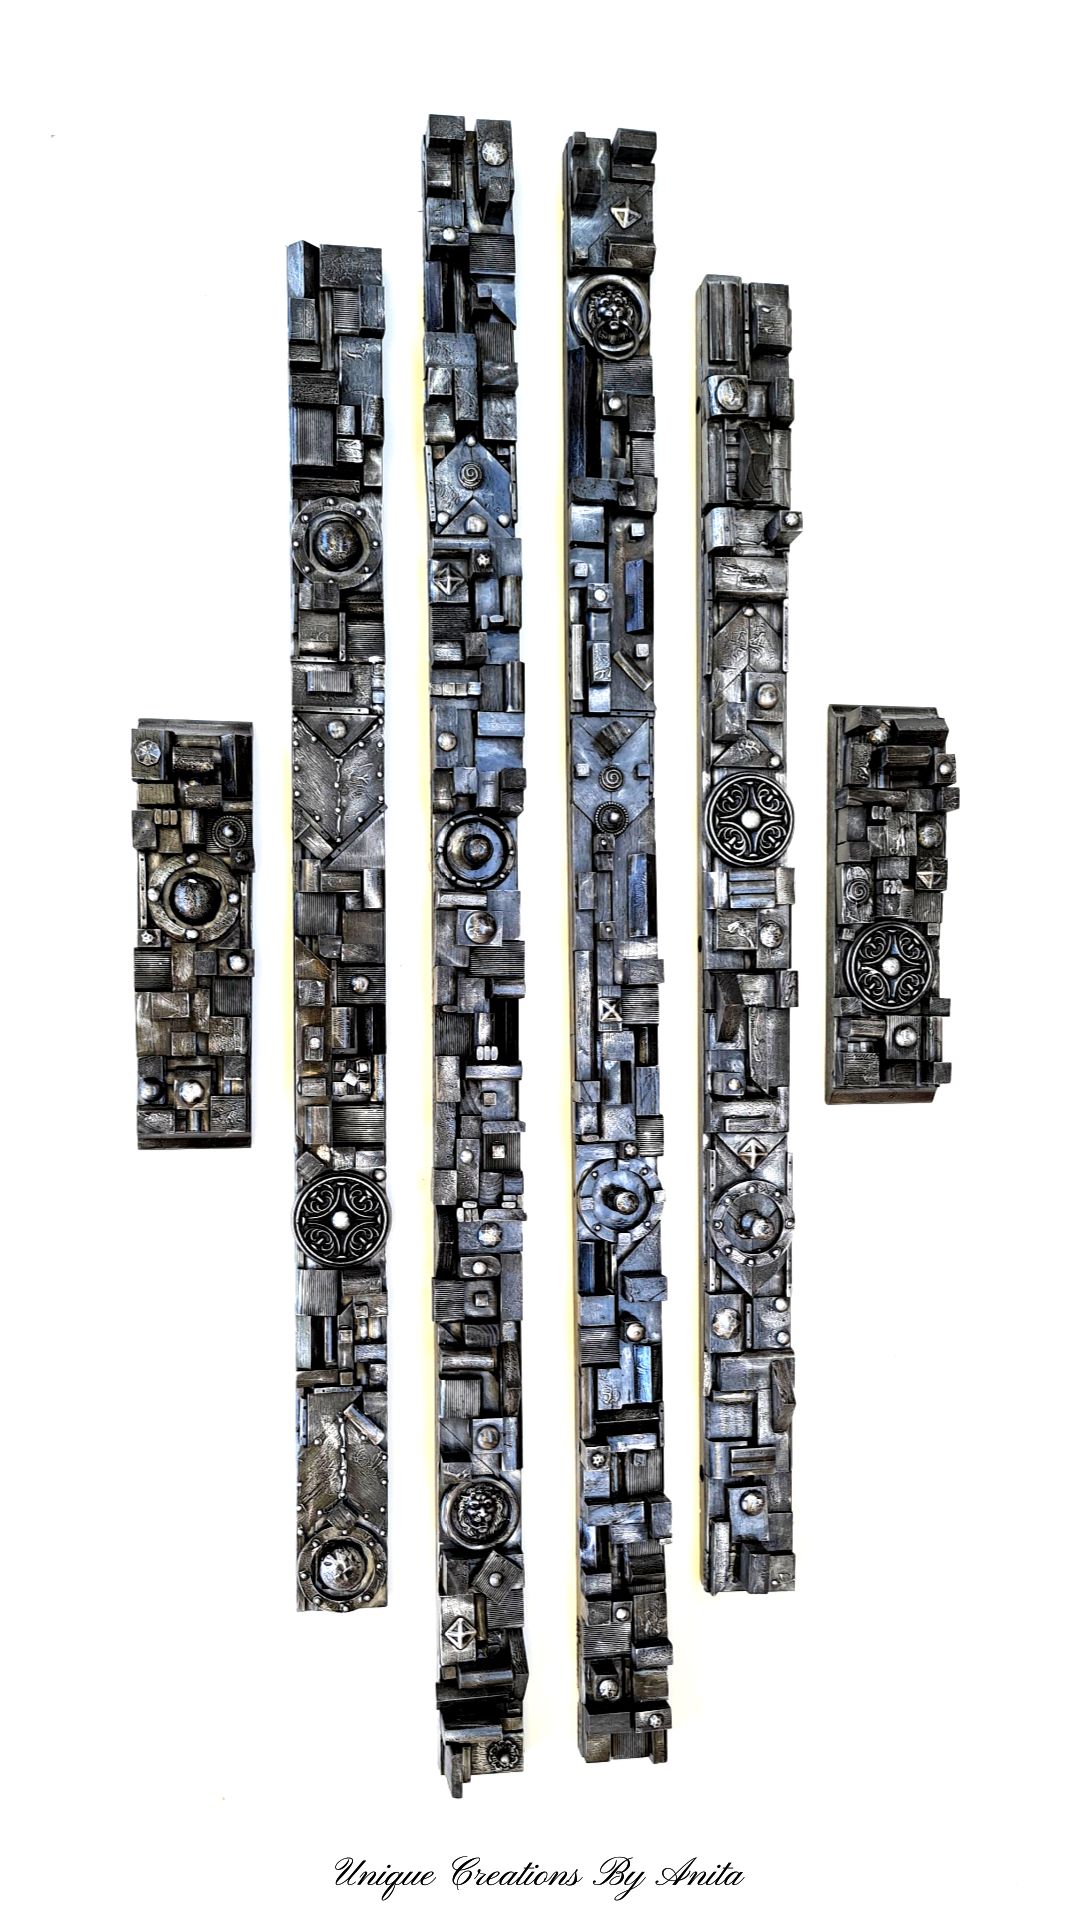
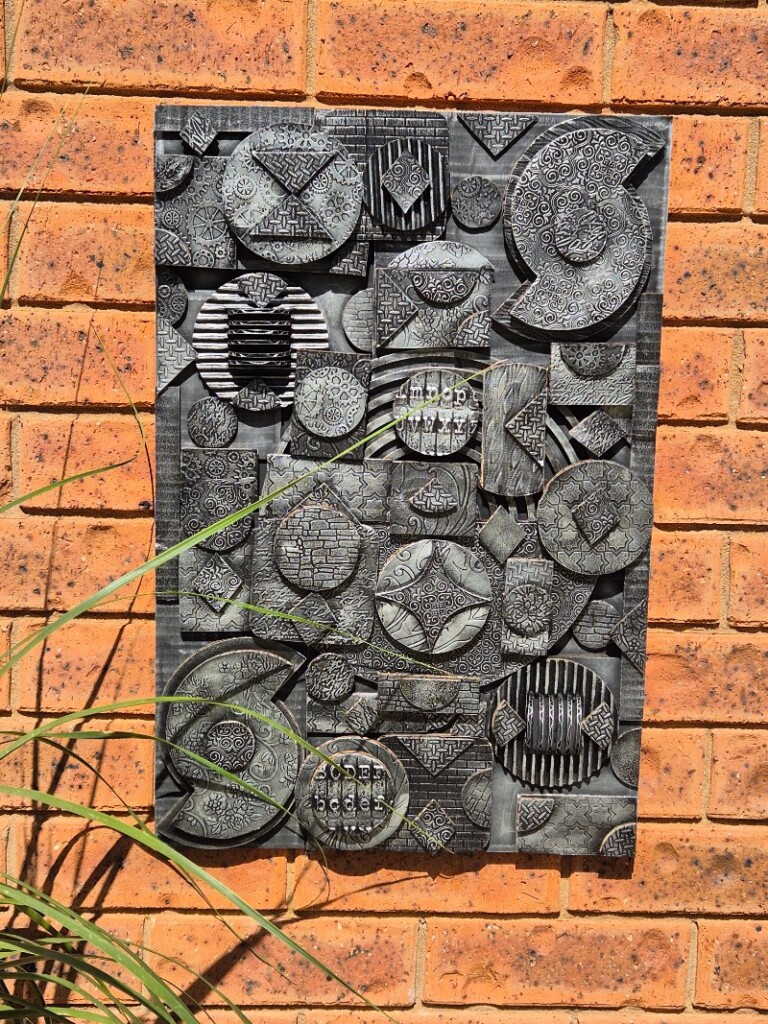
Crafted entirely from tiny offcuts gathered in my workshop and craft room, this wall art gives scraps new life.
Prefer paper crafts? Make a comparable textured wall piece from recycled cardboard.
Do It over Designer’s
It’s time for more ideas, and my friends have lots of them for you. Be sure to visit them and see what they’ve been upcycling/recycling/DIYing. Here are the links:
Interior Frugalista

If you’re interested in any of the items used in this project, we’d appreciate it if you used our affiliate links. Clicking these links earns us a small commission at no extra cost to you, helping us create more inspiring and exciting projects to share. We’d also love to hear your thoughts—feel free to leave a comment or share this post!
30 Comments
Remaking Our Modern House Number Sign - Modern on Monticello
March 26, 2022 at 10:02 pm[…] Unique Creations by Anita […]
Patti @ Pandoras Box
March 26, 2022 at 11:20 pmVery clever and unique! The assortment of belts you used made this piece so interesting – well done!
Anita Holland
March 30, 2022 at 3:19 pmThank you so much Patti, I had so much more than I need so this worked out perfectly.
Sara
March 26, 2022 at 11:30 pmAwesome project Anita! How great that your local thrift store sets aside damaged material for you! I do side with your husband; I prefer the mirror but I’m sure you’ll come up with something else for the steamer 🙂
Anita Holland
March 30, 2022 at 3:20 pmThanks Sara, they are very good locally benefits of a small town. I did go for the mirror in the end. lol
Sara
May 2, 2022 at 9:46 pmSmall towns are the best!
Anita Holland
May 5, 2022 at 11:53 amFor sure Sara, there are so many benefits to small towns.
Kim
March 26, 2022 at 11:31 pmAnita that is truly unique and a true work of art!
Anita Holland
March 30, 2022 at 3:20 pmThanks you so much Kim.
Ann
March 27, 2022 at 12:02 amI love your creative mind, Anita! I think both versions look amazing, but if I had to choose, I’d choose the one with the steamer. Great project!
Anita Holland
March 30, 2022 at 3:21 pmThanks Ann, My husband thinks my creative mind comes up with some strange ideas. lol
Marie B.
March 27, 2022 at 12:02 amThis is just the coolest and most unique wall mirror, Anita, and definitely a piece of art! I’m sure you’ll come up with the perfect steampunk piece for the strainer. I hope the staff at the charity shop see what you’ve done with the belts!
Anita Holland
March 30, 2022 at 3:22 pmThank so much Marie, my sister said if I did not mention it was a steamer she would not have noticed. But once I mentioned it see could not see past it.
Gail @Purple Hues and Me
March 27, 2022 at 12:14 amHow beautiful and clever using belts, Anita! And so creative and unique, too! You rock!
Anita Holland
March 30, 2022 at 3:23 pmThanks Gail, that is so kind of you to say.
Tania
March 27, 2022 at 2:38 amVery cool! I have been saving leather belts for an upcoming project too 🙂
Anita Holland
March 30, 2022 at 3:24 pmThanks Tania, maybe go try your local charity shop, ours was really cool about doing it.
Julie
March 27, 2022 at 3:47 amWow, wow, wow! This is very cool. (and I realise it’s not cool to say cool but I can’t change the habit’s of a lifetime!)
I love it with the mirror, the other one does have a bit of a Viking shield with a steamer vibe, now you’ve said it I can’t unsee it anyway!
Sometimes being forced to have a second attempt at the project makes it even better as the little niggles are ironed out.
You are just so endlessly creative 🙂
Anita Holland
March 30, 2022 at 3:25 pmThanks so much Julie, I am no stranger to doing some projects twice. I always seem to come up with different ideas the second time around.
Alexandra
March 29, 2022 at 1:18 amWOAH!! This is awesome!!
Anita Holland
March 30, 2022 at 3:25 pmThank you so much, that is very kind of you to say.
TD Creedy
April 4, 2022 at 6:04 amLove this project. I like all the different textures in your leather wall art but feel the mirror could appeal to some and the steamer to others where as if you had a small circle of wood with L shaped hooks in it, the kind you put net curtain rods onto, it could become a buckle or belt hanger. Bikers and recycling young people who like up cycled items in their homes could love this accessory hanger too. Rock chicks would hang their necklaces from the hooks and earrings could hang in the plaited leather sections. This project you’ve made could have anything in the middle and it would be a winner.
Anita Holland
April 4, 2022 at 6:19 pmThanks so much, I like the idea of the belt hangers, I wish I had thought of that. lol
Grant
April 23, 2022 at 12:38 amI love how the mirror turned out! I make a lot of mirrors out of reclaimed and recycled items, so this is right in my wheelhouse.
How did you attach the mirror?
Anita Holland
April 26, 2022 at 5:29 pmThank you so much. Sorry for the delay in getting back to you, I attached the mirror using a hot glue gun.
Michelle Leslie
May 2, 2022 at 9:11 pmYou did it again, Anita. You always surprise me with your creations. I love the wall hanging with the steamer. It looks like one of those shields the Vikings carried into battle and it’s not weird at all.
Anita Holland
May 5, 2022 at 11:52 amThanks so much Michelle, I stayed with the steamer in the end. I like the viking look. lol
maria
May 2, 2022 at 9:47 pmThis reminds me of a southwest art piece. I remember my mom did a collage with all ties, wish I had it.
Anita Holland
May 5, 2022 at 11:53 amThanks Maria, I have seen some projects using ties. One of our old lady at work also made a bed quilt from some.
Rosemary Palmer
May 7, 2022 at 9:30 pmI love this idea. And I could see it done in all shades of brown for a MSM look.