
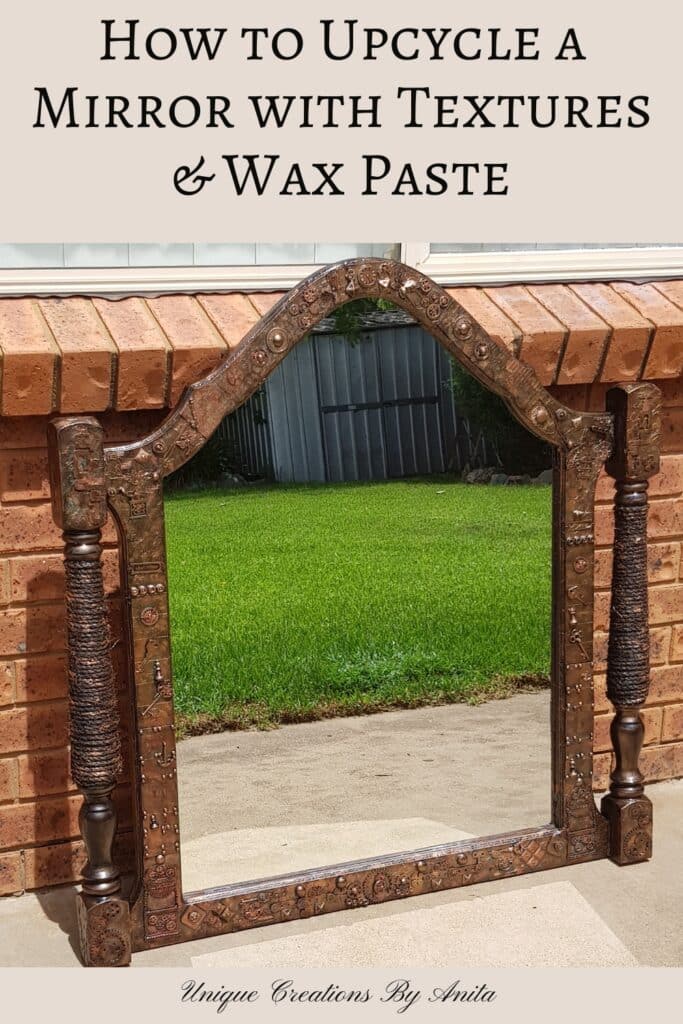
Steampunk Mixed Media Mirror Makeover brings new life to an old dresser mirror with layers of texture, metallic highlights and found objects. In this DIY tutorial, you’ll learn how to prep the frame, add textures with napkins and rope, layer charms and clock parts, craft a burlap hot-air-balloon ornament, then finish with black gesso and metallic wax paste for an industrial-chic look.
The International Bloggers Club (IBC) is a global network of DIY and craft bloggers who join monthly themed challenges—like this month’s Mixed Media theme—to share ideas, provide feedback and showcase their creations to an enthusiastic international audience. More about IBC at the end of this post.

Before we dive into this tutorial, be sure to subscribe to my bimonthly newsletter to be the first to see my latest projects. You can also follow me on Pinterest and Facebook, where I also include my unique mixed-media art projects.
Steampunk Mixed Media Mirror Makeover
**This post may contain affiliate links. This means I earn a small commission on links used at no extra cost to you. Please see my disclosure policy for more information.**
Materials Needed
- Old mirror (with frame)
- Kraft paper (to protect glass)
- Sanding block
- Mod Podge (or PVA glue)
- Paper napkins or thin toilet-paper layers
- Black gesso
- Foam paint roller
- Sisal rope
- Hot glue gun and sticks
- Multi-purpose glue
- Wooden steampunk cutouts (plumbing shapes, brackets)
- Metal charms, keys, clock hands, studs, shells, split peas
- Thick cardstock strips
- Cricut vinyl decals (butterfly, clock, hinges)
- Burlap and leather off-cuts
- Onion-bag netting
- Broken necklace chains (for balloon ropes)
- Nuts, brackets, glass stones (for balloon base)
- Metallic wax paste (four colours)
- Satin spray polyurethane
1. Prepare the Frame
Mixed media art simply means using a mix of materials—paper, fabric, metal, found objects—in one piece so you get more texture, depth and visual interest than you would with paint alone. It is so simple to do, I will show you my process. Cover the mirror glass with kraft paper to catch paint and glue. Scuff the frame’s surface with a sanding block. This helps Mod Podge stick.
")
Apply a layer of Mod Podge to the frame. Gently press paper napkins into the wet Mod Podge, creating wrinkles. Let dry, then add a second coat of Mod Podge over the napkins.
")
Roll on black gesso with a foam roller. Coat thoroughly, including recessed creases.
")
Wrap sisal rope around side spindles. Secure with hot glue and paint rope with black gesso.
")
Lightly mist with water to help the gesso penetrate all the layers.
")
2. Add Textures & Embellishments
")
Top Section
Glue wooden plumbing cutouts to the frame with multi-purpose glue. Layer on metal charms, studs, keys and old clock hands. There is no real method to this; it is more about covering the frame with different layers and textures. For more tips and tricks on items you can use to add texture to your assemblage projects, this post has it all.
")
Side Sections
Attach thick cardstock strips along the sides for added height. Press split peas onto corners for extra texture. Imperfections add character!
")
Vinyl Elements
Using my Cricut, I cut custom vinyl decals in a steampunk style.
")
Along the top edge, I layered metal charms, studs, keys, clock hands and metal fears for a rich steampunk finish. Zoom in to catch every little detail.
")
3. Craft the Hot-Air-Balloon Accent
No steampunk setup is complete without a hot-air balloon, so I crafted one myself using recycled materials.
")
I crafted a miniature hot-air balloon with a burlap basket trimmed in leather offcuts, an onion-bag net covering the balloon, and broken necklace chains for the ropes.
")
The bottom of the mirror was decorated using wooden cutouts, nuts, brackets, studs and glass stones.
")
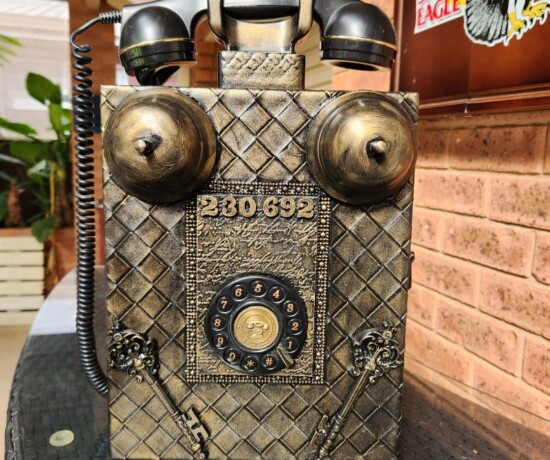
This is the assembled mirror before painting—and yes, it looks like a hot mess! The secret in mixed media art is to picture the finished piece once it’s painted and highlighted with wax pastes. Stick to your theme—mine’s steampunk, so I loaded on industrial-style embellishments—and the end result will come together beautifully.
")
4. Paint & Seal All Elements
Brush black gesso over every glued element. Ensure full coverage for a cohesive base.
")
Once dry, apply metallic wax paste highlights. If you’re a seasoned crafter, you probably already have the ingredients to whip up your own wax pastes—this tutorial will guide you through the process.
")
To apply the wax, dip your fingertip into the paste and gently buff it over the raised details. Blend gently with a fine brush, leaving some black exposed for depth.
")
I worked in three colours, blending them until I was happy with the look. If you’re ever unhappy with the result—as I have been—let the wax dry, cover it with black gesso, then start over with fresh wax. Finish with three coats of satin spray polyurethane for durability.
")
Before & After Close-Ups
Capturing the metallic shimmer of the wax pastes was tricky in my dimly lit home, but these close-up before-and-after shots highlight the true effect.


More mixed media art projects
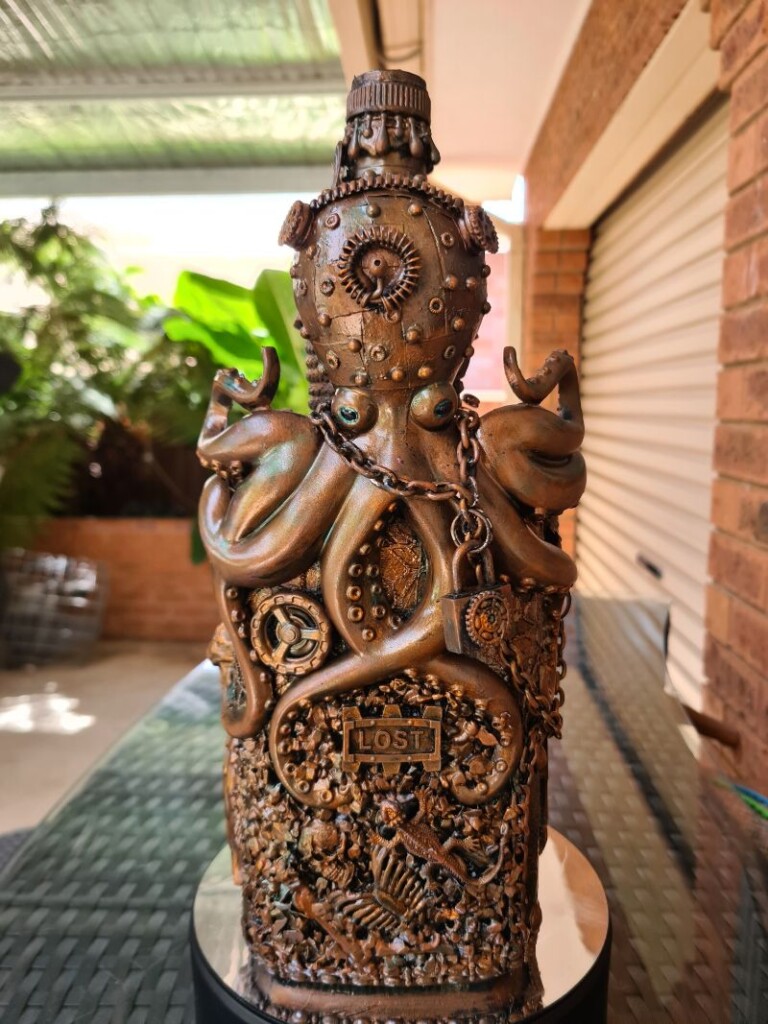
Learn how to add texture to your mixed-media art bottle using these techniques.
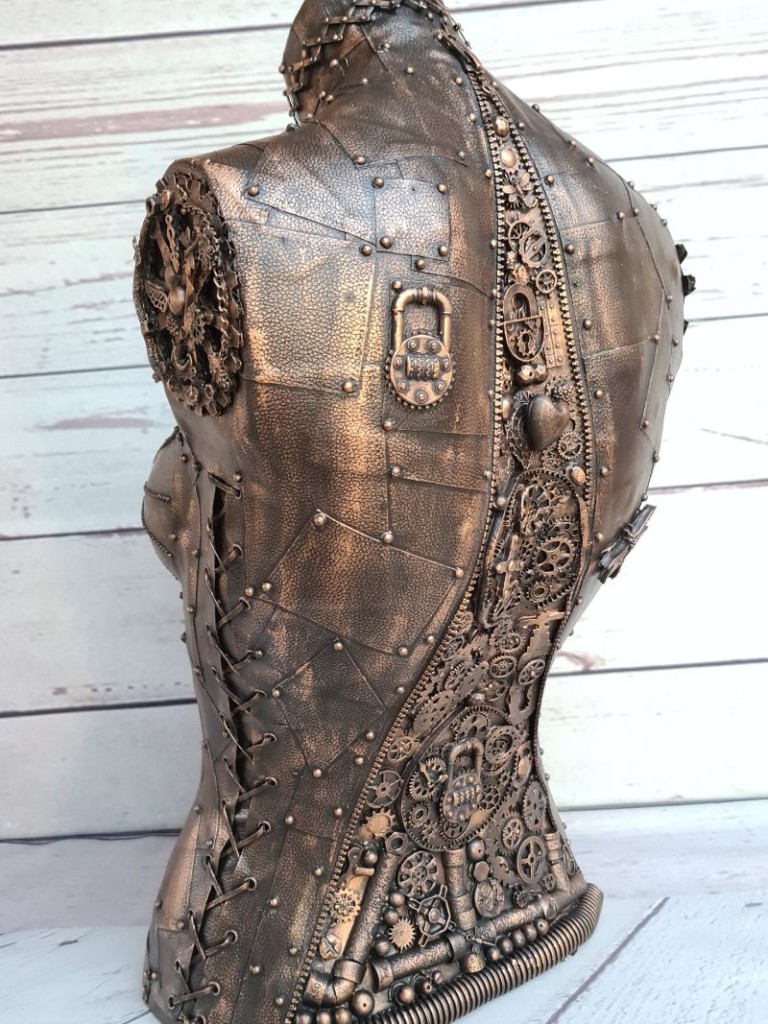
I adorned this steampunk mannequin with leather scraps and a mix of found and handcrafted elements from my craft room and workshop. If you are looking for more inspiration, you can find all my mixed media art projects HERE.
About IBC (International Bloggers Club)
If you follow my blog, you will know I am part of the IBC (International Bloggers Club), which is a group of talented bloggers from around the world. We have members from Spain, South Africa, Australia, the United States, and Canada. Each month, we come together and create a project on a common theme.
If you missed last month’s Vintage Valentine theme, here is the link to my Vintage Valentine wall hanging, which can be used throughout the year. The mixed-media contributions from my fellow bloggers are below. Please feel free to jump over and share your thoughts.
A Crafty Mix|Mixed Media Night Light

Northern feeling|Diy mixed media art


If you’d like to find any of the items used in this project, we’d greatly appreciate it if you used our affiliate links. These links provide us with a small commission at no extra cost to you, allowing us to continue creating and sharing more inspiring projects. We’d also love to hear your thoughts—feel free to leave a comment or share this post!

50 Comments
Michelle Leslie
February 18, 2020 at 11:20 pmWow, Anita, your mirror would fit right into a scene from Mortal Engines. I can actually picture this in Hester’s bedroom. Stunning. So happy find a fellow Steampunker in the big blogging cosmos.
Anita Holland
February 20, 2020 at 11:14 amThank you so much, Michelle. If I had a chance to redo my house I think I would go steampunk, I find it so interesting
Michelle
February 19, 2020 at 2:29 amLove your projects! Can something else be used in place of the black gesso?
Anita Holland
February 20, 2020 at 11:17 amThank you, Michelle, you can use any acrylic paint to do this. I only used gesso because I had lots of it at home.
Marie
February 19, 2020 at 5:02 amAnita, in all honesty, when I started reading this post I thought, what the hell is she doing to that mirror? By the end, I had to pick my chin off the floor. This is AMAZING! I can’t stop looking at the close-up shots of every single element you used on this steampunk mirror. Your blending of the different waxes to highlight these elements is impeccable! Wow Wow and Wow
Anita Holland
February 20, 2020 at 11:25 amThank you so much for the lovely comment, Marie. To be honest I did not have a clue where I was going either. I just kept adding things and was not happy with the look, so I kept adding more. But once painted and highlighted I loved it. I will be keeping this for myself which is rare for me. It is just such a shame that the photos do not do the mirror justice but the close-ups will give you a good idea.
Kim
February 22, 2020 at 3:44 amWow, Anita!! That’s truly amazing. I love all the details.
Anita Holland
February 23, 2020 at 1:08 pmThank you Kim, each time you look you seem to find something new to look at.
Anita Holland
February 23, 2020 at 1:08 pmThank you so much, glad that you liked it.
Susan
February 23, 2020 at 12:37 pmWow! The finish on this project is amazing!! I have my doubts that I could pull it off, but I might have to try it. It’s insanely cool! Ever since I saw this I have been looking around my house and seeing so many things I’d like to try this on. Thanks for sharing such a great technique!
Katrin
February 24, 2020 at 1:47 amAnita, wow this mirror turned into such a unique piece of art! Very creative!
Anita Holland
February 25, 2020 at 2:37 pmThank you so much Katrin, I did love the results.
alice
February 24, 2020 at 2:16 pmthe mirror came out really nice and I am surprised at the final results.
Anita Holland
February 25, 2020 at 2:39 pmThank you so much Alice, I was as surprised as you were.lol
Lydia C. Lee
February 24, 2020 at 2:27 pmThat looks fantastic! How clever! #AnythingGoes
Anita Holland
February 25, 2020 at 2:40 pmThank you, Lydia!
Michele Michael
February 25, 2020 at 12:23 amLove this piece sharing and pinning.
Anita Holland
February 25, 2020 at 2:40 pmThank you so much for sharing my project.
Jeanna
February 25, 2020 at 2:57 amThat is incredible, you must be teeming with creativity and energy. I thought it was a beautiful mirror to start but you turned it into a true work of art.
Anita Holland
February 25, 2020 at 2:42 pmThank you so Much Jeanna, I do seem to have some strange ideas in my head and sometimes they pay off.
Carol
February 25, 2020 at 4:11 amFascinating process and so many layers to your final beauty
Anita Holland
February 25, 2020 at 2:43 pmThank you, Carol. The more layers you add the better the project will look in the end.
creativejewishmom/sara
February 25, 2020 at 9:17 amGorgeous! great to meet you on Craft Schooling Sunday!
Anita Holland
February 25, 2020 at 2:43 pmThank you so much, I will be stopping by again.
Jeanne
February 27, 2020 at 12:47 amWhat fun! love the gears and the hot air balloon! I do mixed media on paper, but this is entirely another level.
Anita Holland
February 27, 2020 at 11:53 amThank you so much, I have only recently started doing mixed media and really love it. It can make the most boring item look something special.
Maria
February 27, 2020 at 9:55 amWhat a beautiful art work on that mirror
Anita Holland
February 27, 2020 at 11:52 amThank you so much Maria, soi nice of you to say.
Allyson
February 27, 2020 at 4:04 pmWow, amazing mirror and so unique! I love everything about it! Visiting from Wonderful Wednesday.
Anita Holland
March 3, 2020 at 11:14 amThank you so much Allyson, it is very different.
Grandma's House DIY
February 29, 2020 at 5:47 amI love it! Thanks for sharing with us at the To Grandma’s house we go link party – I’ll be featuring you next week on my blog, Facebook and Instagram!
Anita Holland
March 3, 2020 at 11:19 amThank you so much for the feature it is greatly appreciated.
Joy
February 29, 2020 at 3:42 pmAmazing transformation to a steam punk framed mirror Anita. Very clear ‘how to’. Thank you for sharing with How Sweet the Sound.
Joy
Anita Holland
March 3, 2020 at 11:20 amThank you so much Joy, I had so much fun doing it and the results were so great.
Linda at Mixed Kreations
March 2, 2020 at 1:20 amWow! That mirror came out really nice! Love it!
Anita Holland
March 3, 2020 at 11:22 amThank you, I honestly loved the outcome so much I surprised myself.
Anita Holland
March 3, 2020 at 11:19 amThank you Michelle, Steampunk has always fascinated me because it has so many interesting elements to it.
Anita Holland
March 3, 2020 at 11:25 amThank you Shelbee, I have never been a crafty person, I have always done woodwork and furniture. I only started this last year and just jumped in and had a go after watching some videos on youtube and saw how simple it was. It looks like you need to be very artistic but you really don’t need to be.
Kathleen Lanfried
March 8, 2020 at 1:45 amLove it! I’m planning steampunk design on my closet doors and built in wardrobe. Thanks for sharing your creative mind.
Anita Holland
March 9, 2020 at 11:22 amYou are very welcome, I would love to see it when you are done.
Sam - Raggedy Bits
March 4, 2020 at 8:31 amWow, Anita, this mirror transformation is amazing!!! Love how you have used mixed media to give a plain old mirror a fresh new look!!
Thank you so much for sharing your awesome project with us over at Waste Not Wednesday!
Leanna
March 4, 2020 at 4:31 pmThis is really beautiful and unique. Such a stylish makeover, I love this concept and have never seen anything like it before. I am very much inspired. Thank you.
Anita Holland
March 5, 2020 at 4:25 pmThanks, Leanna it is out there even for me, but I get these strange ideas in my heart that don’t go away until I try them. This was one that worked out well.
Anita Holland
March 5, 2020 at 4:21 pmThank you so much for the feature on my mirror, it really does mean a lot to know others like my projects.
Anita Holland
March 5, 2020 at 4:23 pmThank you so much for the feature.
Anita Holland
March 5, 2020 at 4:24 pmThank you so much I love to be PINKED. LOL
Anita Holland
March 24, 2020 at 1:42 pmThank you so much for the feature on my mixed media mirror. It is greatly appreciated.
Brenda Miller
May 9, 2020 at 3:57 amWow is all I can say, it turned out beautiful. I amy going to try my hand at it. Any last minute suggestions on things that you “should have done” It is so gorgeous, I am refering to techniques. You can tell by all the comments that it was definately a hit in the craft world. Thanks for showing us how each step was done.
A Crafty Mix | For the Love of Africa –Mixed Media Night Light - A Crafty Mix
November 27, 2021 at 8:36 pm[…] Unique Creations by Anita | Northern Feeling | A Crafty Mix […]
For the Love of Africa –Mixed Media Night Light - A Crafty Mix
September 6, 2024 at 3:54 pm[…] Unique Creations by Anita | Northern Feeling | A Crafty Mix […]