This week’s project is for the International Bloggers Club (IBC) challenge. Our theme is “All Bottled Up”—make something using a bottle. If you follow my Facebook page, you’ll know mixed media bottle assemblage is my thing. I’ll admit, it felt a bit like cheating because this theme plays to my strengths. Mixed media bottle assemblage turns a plain glass bottle into rich, touchable art. In this post, I’ll walk you through the basic techniques for making a mixed media bottle assemblage, step by step. In this post, I’ll share 15 techniques I use to build bold, 3D texture on mixed-media bottle assemblage projects. More about IBC at the end of the post.

What is mixed media art assemblage?
Mixed media art assemblage is a 3D artwork built by combining different materials and found objects into one piece. Think bottles, wood blocks or canvas layered with fabric, paper, metal bits, beads, zips, toys and jewellery, then unified with paint, wax or patina. The goal is to create depth, texture and a clear focal point so the eye moves smoothly across the work.
Artists often use recycled items for character and sustainability, arranging parts by contrast in size, shape and colour, then tying everything together with a base coat—usually black gesso—and light highlights to bring out raised details. It sits between collage and sculpture: part wall art, part object, always tactile and full of story.
Before we dive into this tutorial, be sure to subscribe to my bimonthly newsletter to be the first to see my latest projects. You can also follow me on Pinterest and Facebook, where I also include my unique mixed-media art projects
Mixed Media Bottle Assemblage 101: Easy Texture Techniques for Dramatic Results
**This post may contain affiliate links. This means I earn a small commission on links used at no extra cost to you. Please see my disclosure policy for more information.**
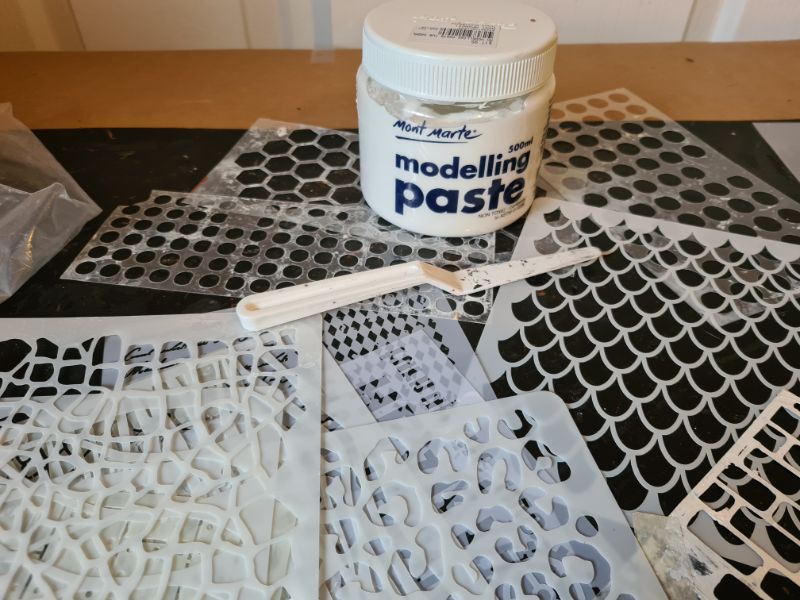
Materials needed
- Clean glass bottle (washed and de-labelled)
- Black gesso or black acrylic paint
- Epoxy resin (for casting)
- Silicone moulds (assorted)
- Hot glue sticks (black) and a glue gun
- Strong craft glue (e.g. Ultimate Glue)
- Texture/modelling paste
- Background stencils (store-bought or DIY)
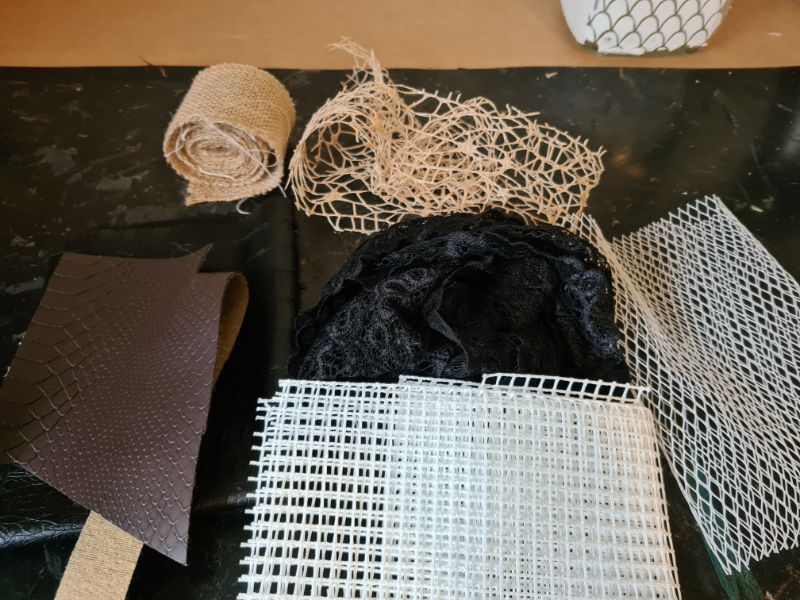
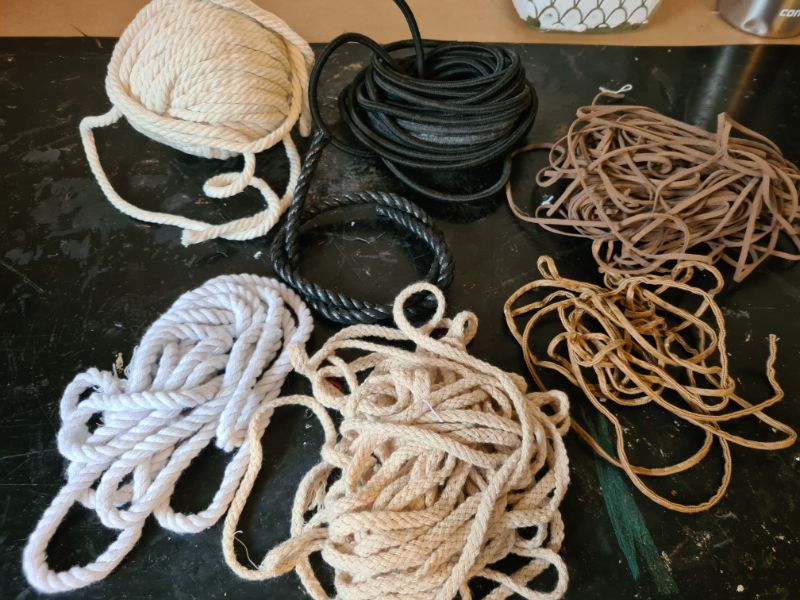
- Fabrics for texture: burlap/hessian, lace, tapestry mesh, leather, zippers, onion bags
- Ropes and cords (including shoelaces)
- Chains and braided trims
- Old belts and handbag straps (buckles, keepers, clips)
- Glitter gravel
- Clean sand
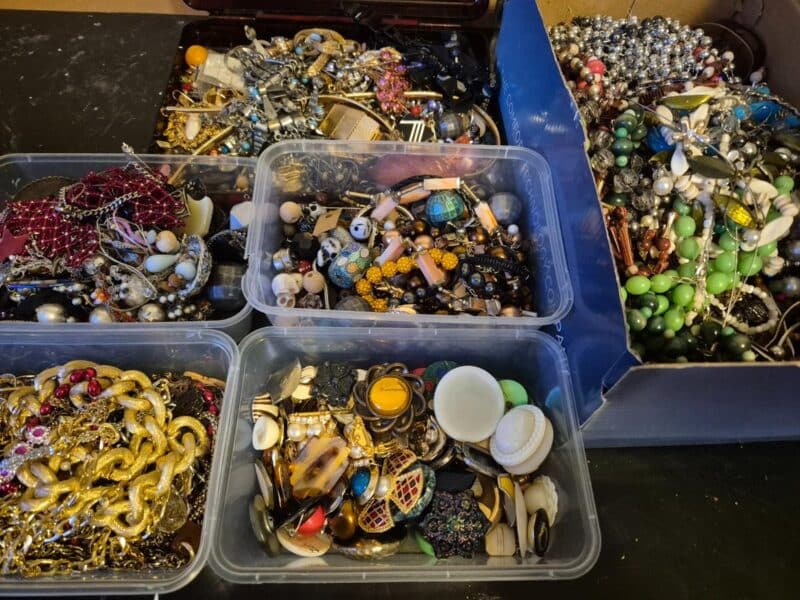
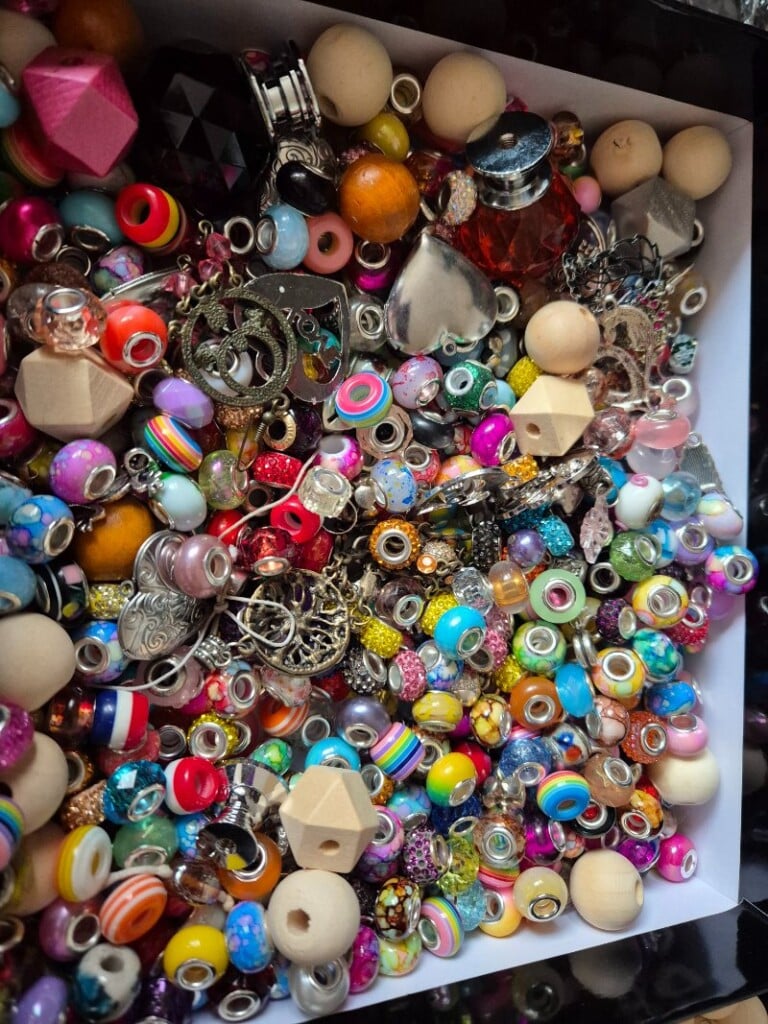
- Assorted charms (bulk packs work well)
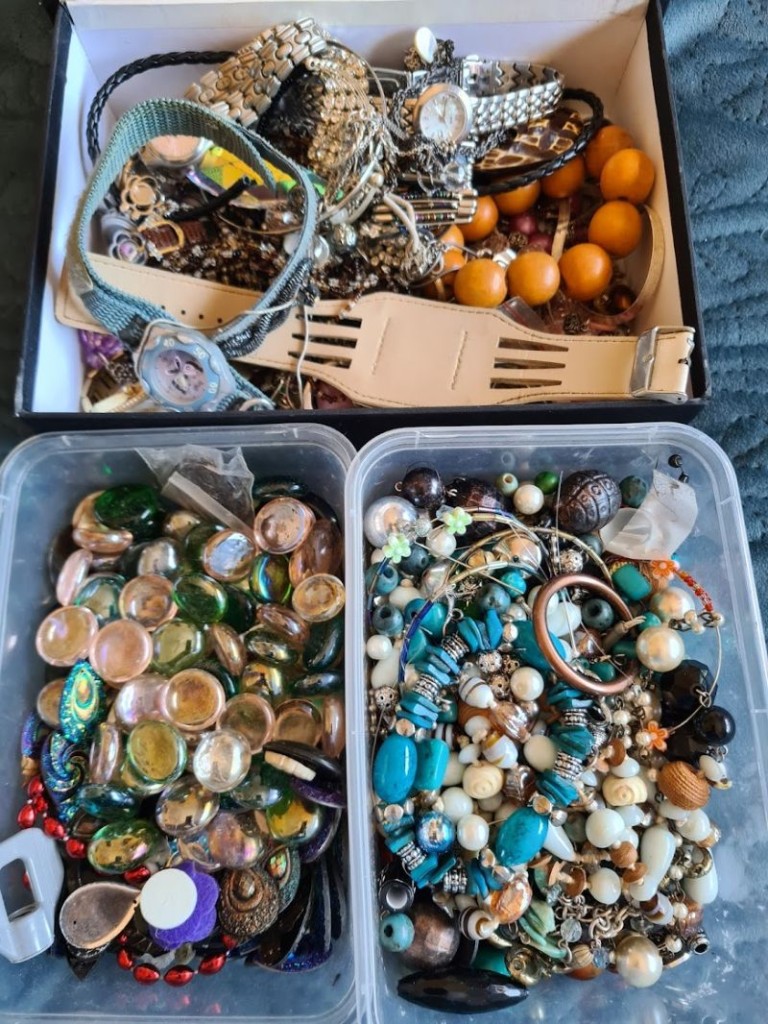
- Broken jewellery and loose beads (watches, bracelets, chains)
- Small plastic toys (cars, LEGO pieces, insects)
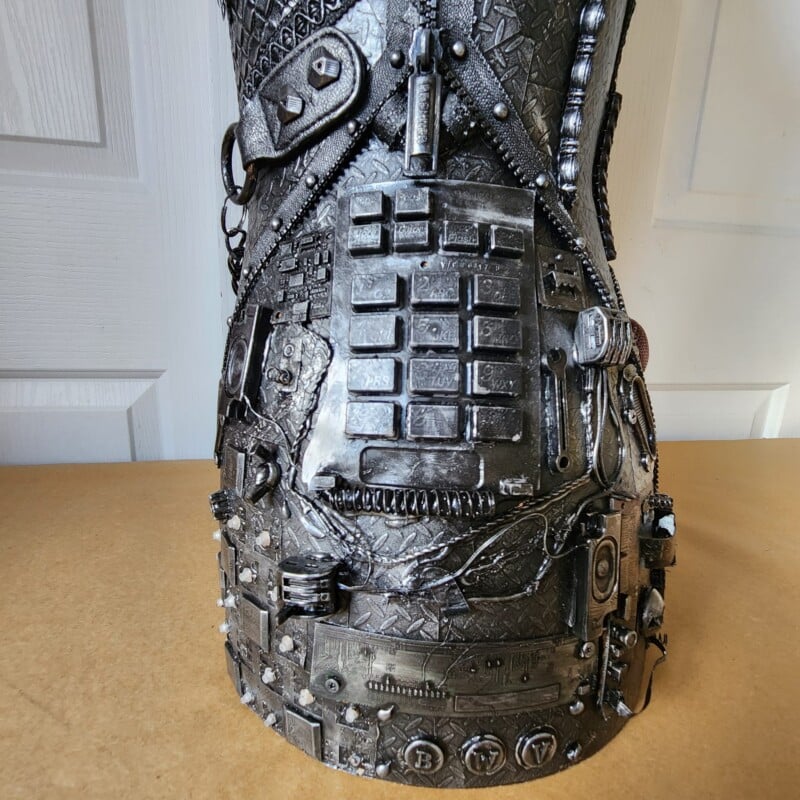
- Workshop bits: nuts, bolts, screws, thumbtacks, circuit boards
- Embossing press and folders
- (Optional) Cricut and mylar sheets for custom stencils
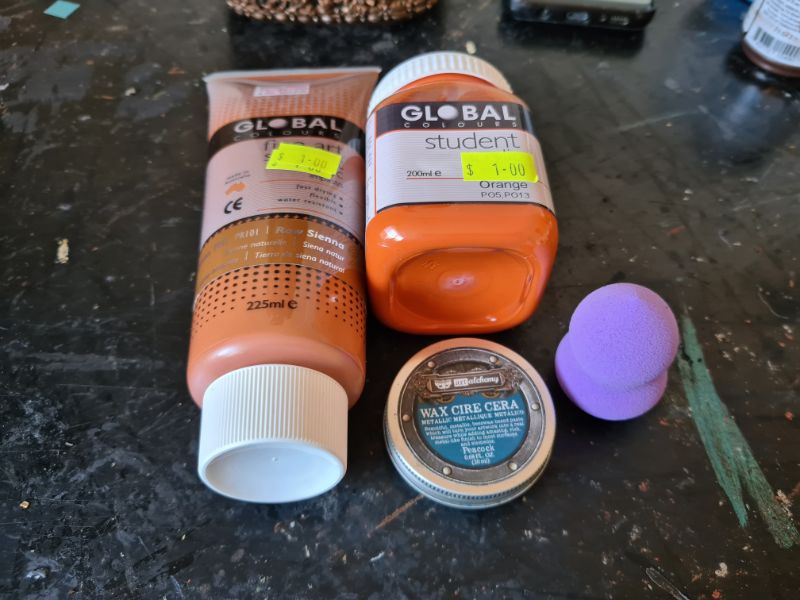
- Metallic “rust” craft paint
- Acrylic highlight colours: orange, raw sienna, peacock blue
- Soft brushes and a sponge
- Scissors/craft knife and snips/cutters
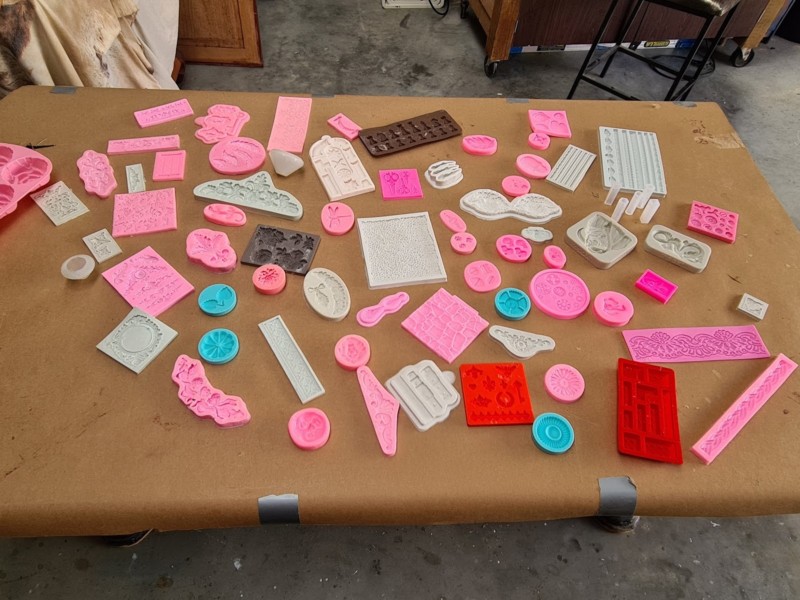
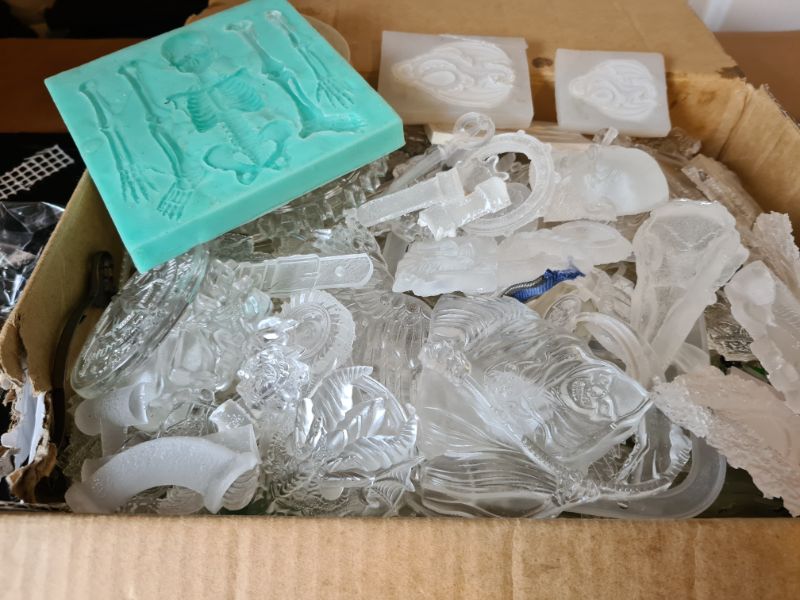
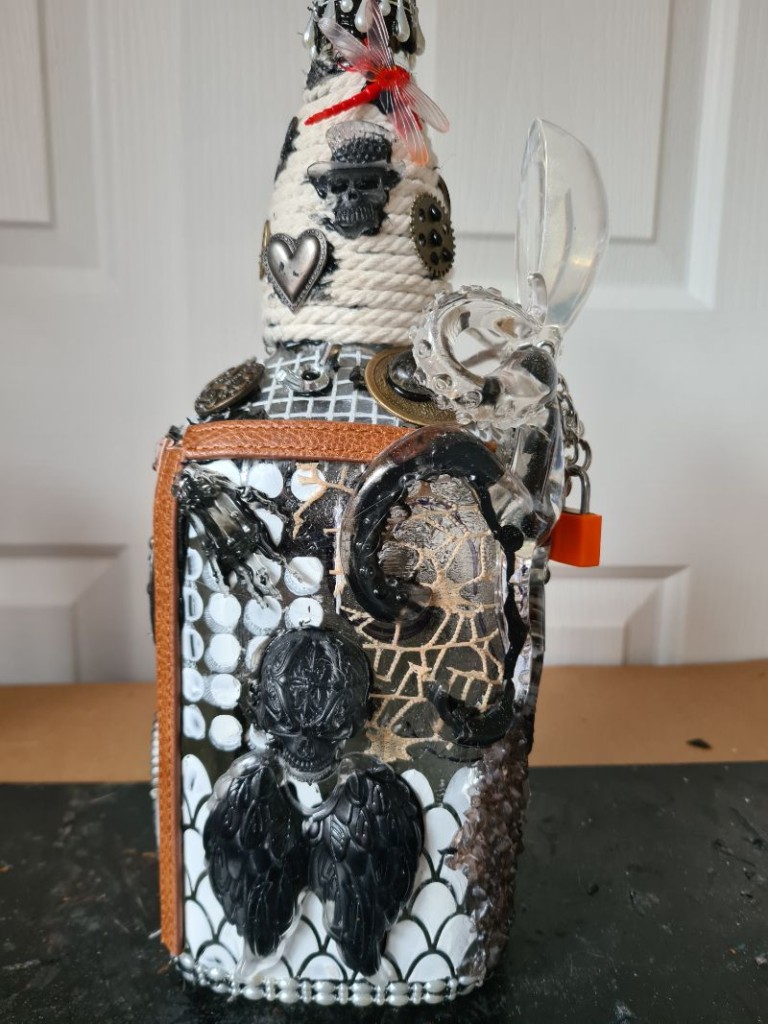
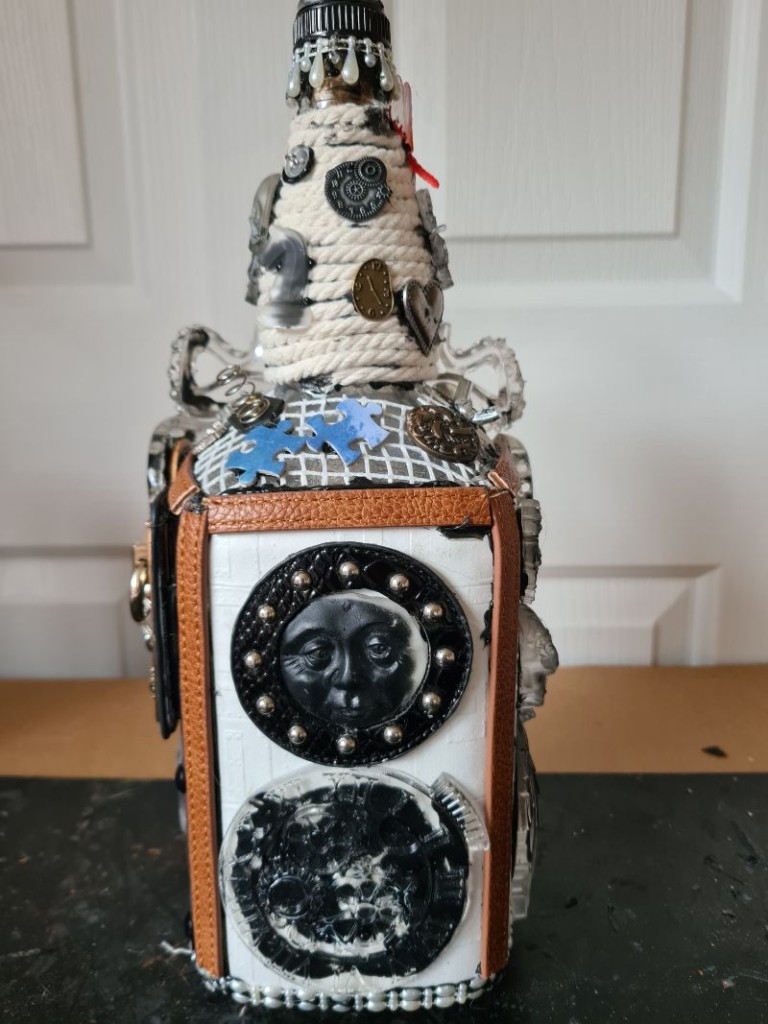
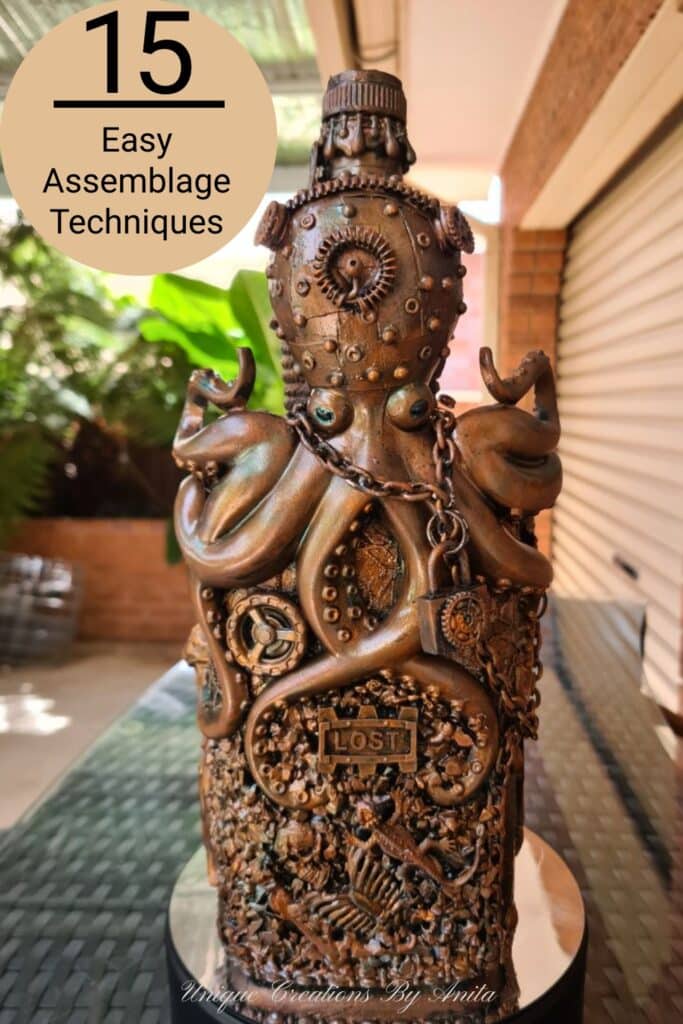
1. Resin Embellishments
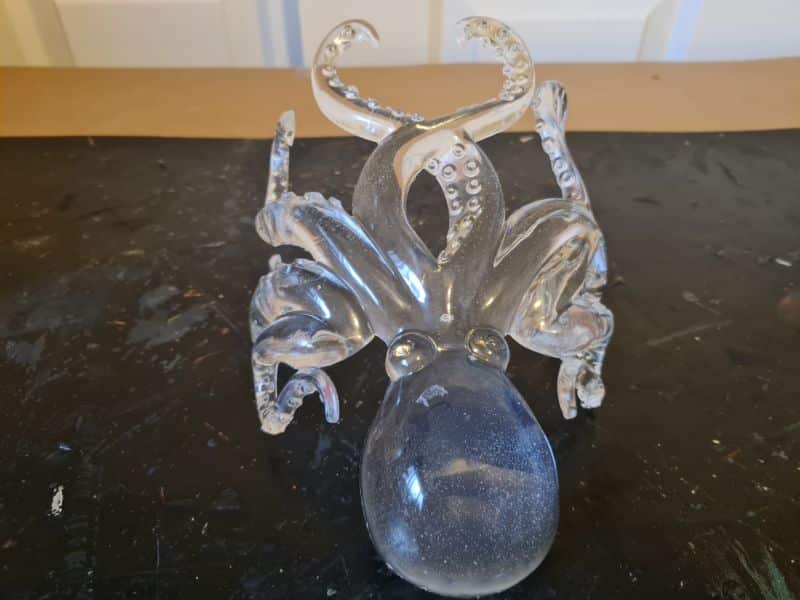
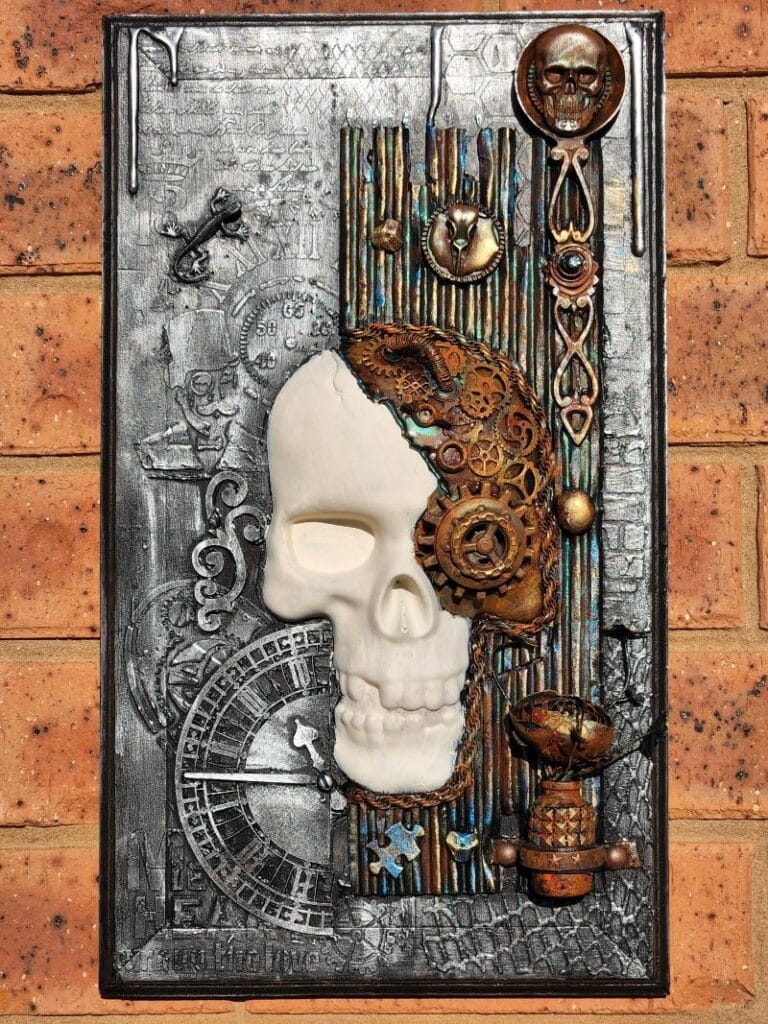
I’ve built a large collection of silicone moulds over the years. They’re great for casting crisp 3D embellishments. The photo shows only a small sample, but it gives you the idea of what they look like. I find epoxy resin works best in these moulds. It picks up every tiny detail, and once cured, it’s tough and long-wearing—much more durable than clay or other materials.
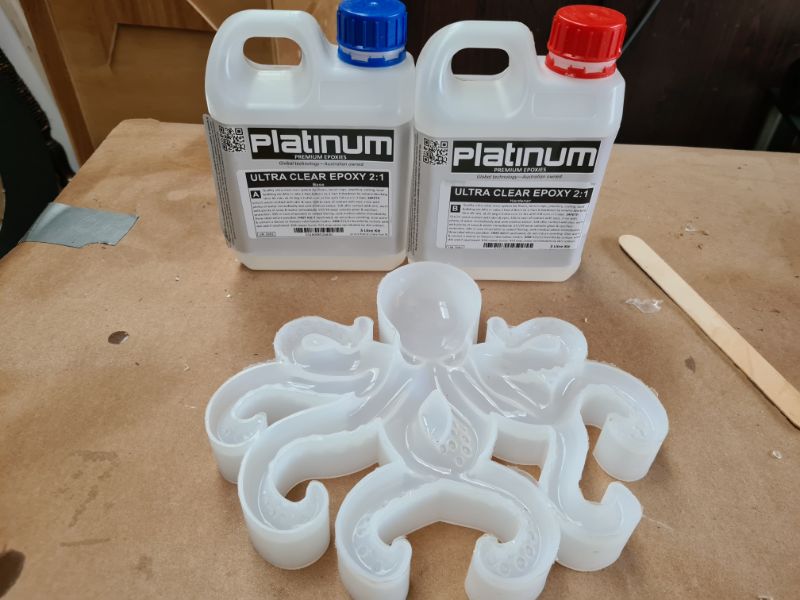
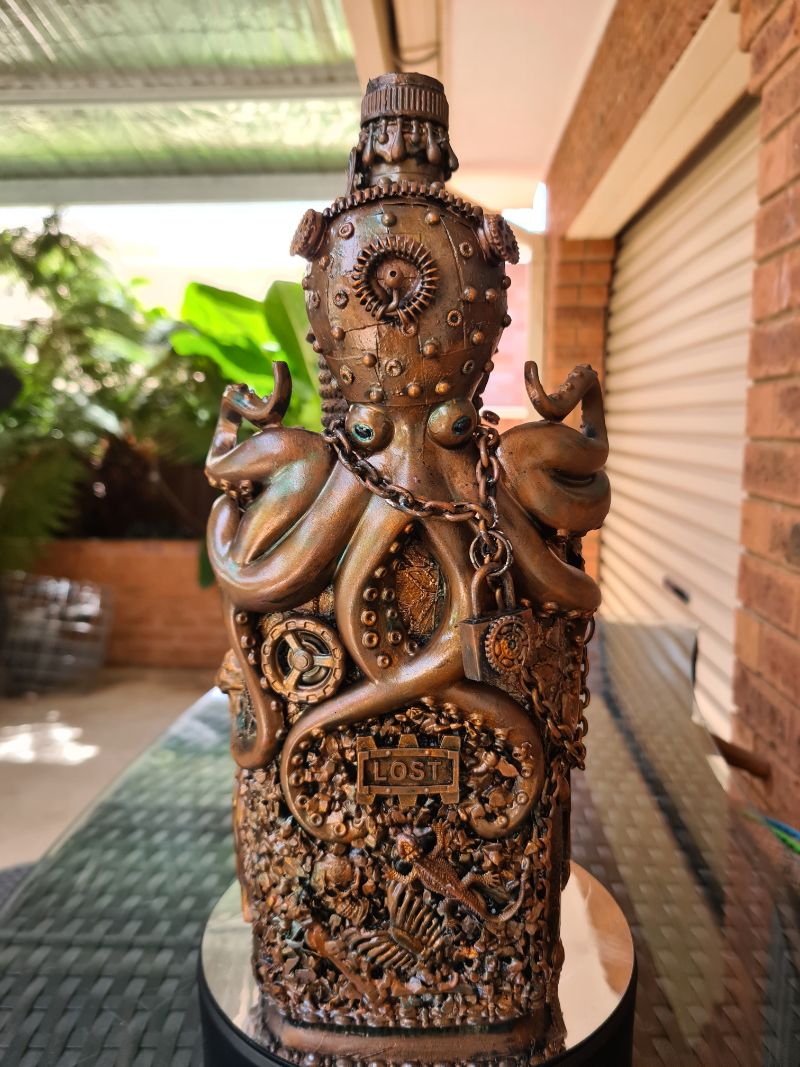
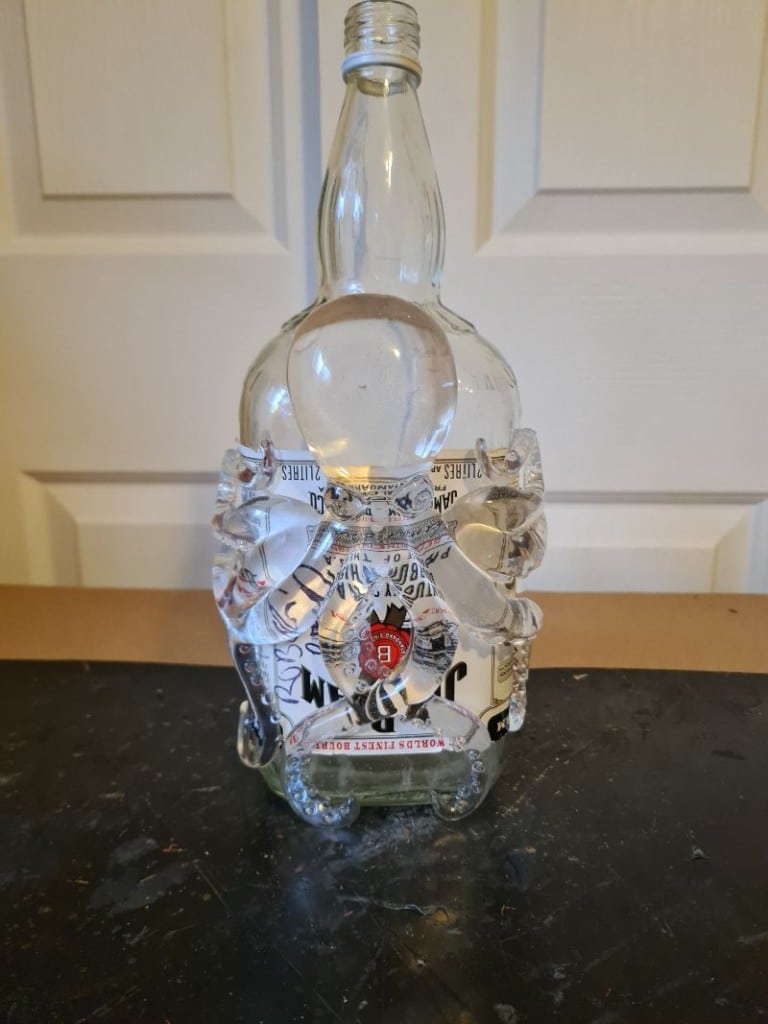
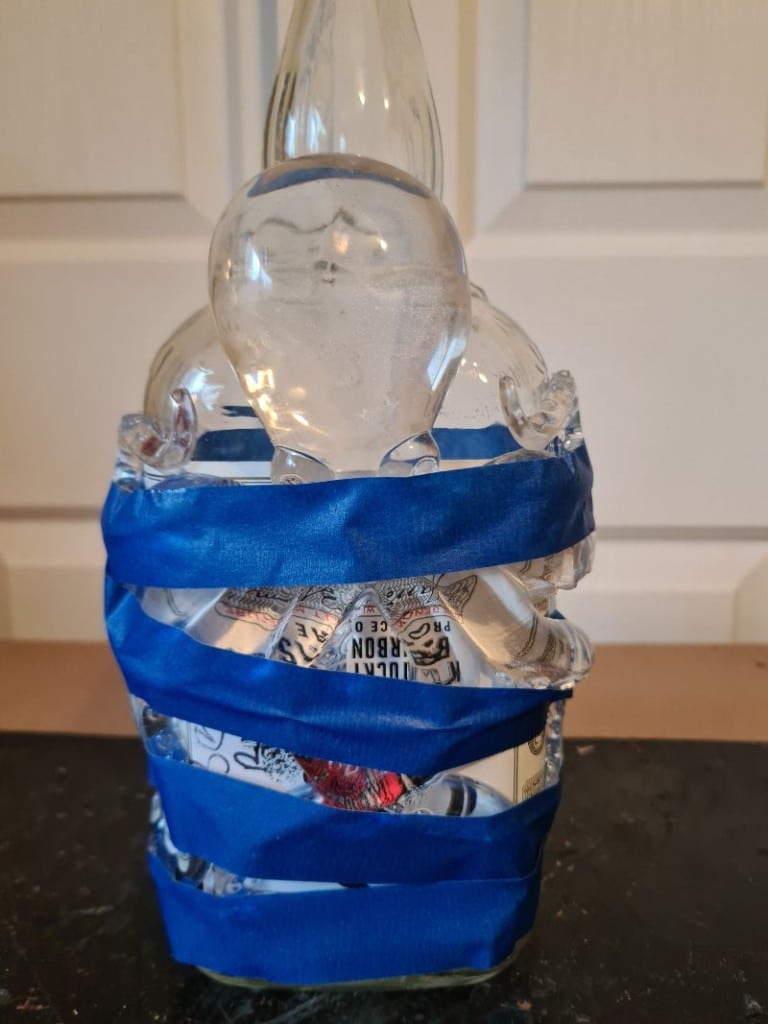
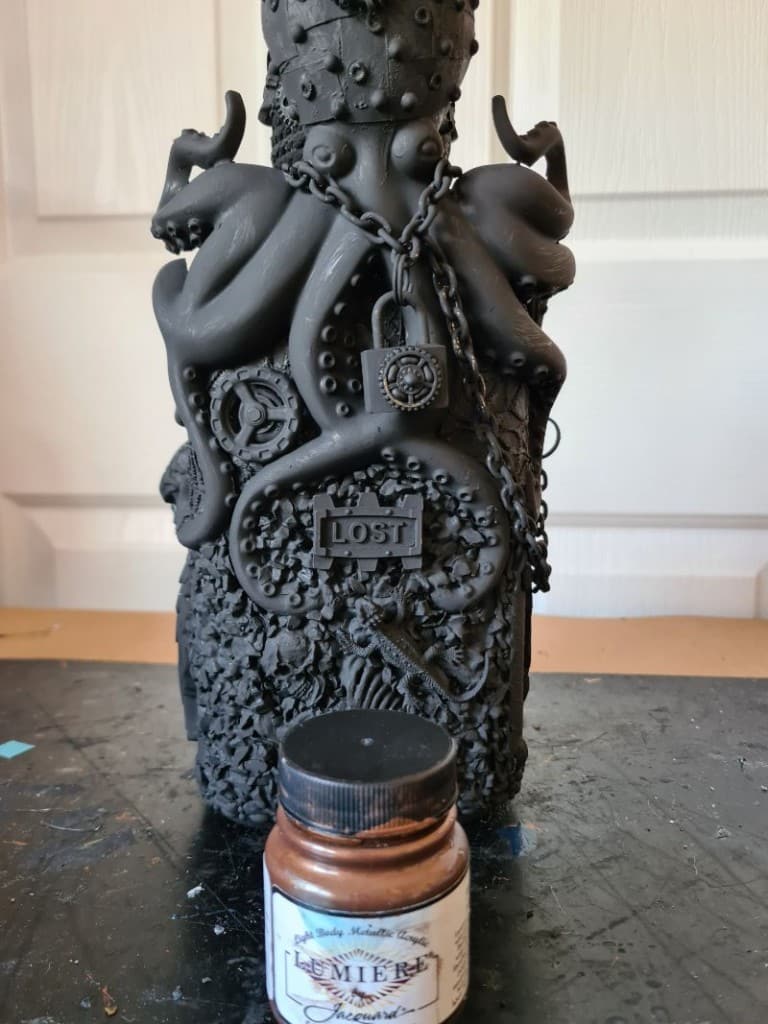
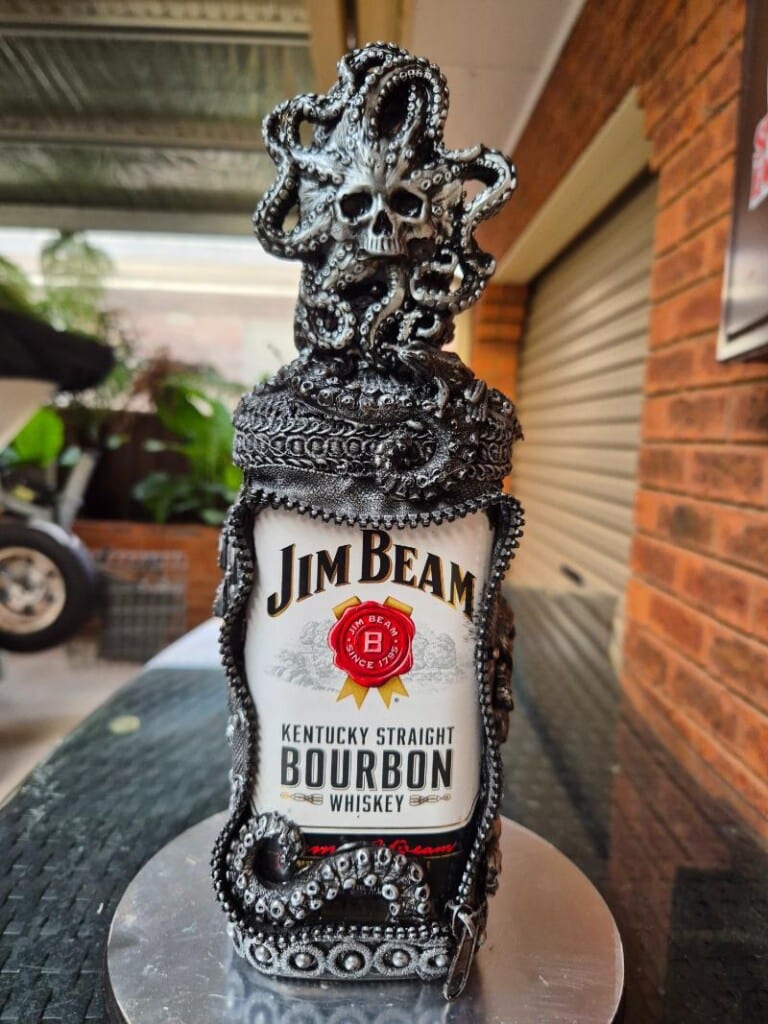
This octopus mould is the most expensive one I’ve bought, and when it arrived, it was huge. I thought I’d checked the size, but I was wrong. If your mould is too large, you can still make it work by shaping the casting around the bottle. I pour epoxy resin and leave it for about eight hours—firm enough to hold detail, but still flexible so it can bend to fit. I used the same trick when I made my planter/bowl. For large castings like this, tape the octopus to the bottle while it hardens—it holds the shape in place and works great.
2. Fabrics
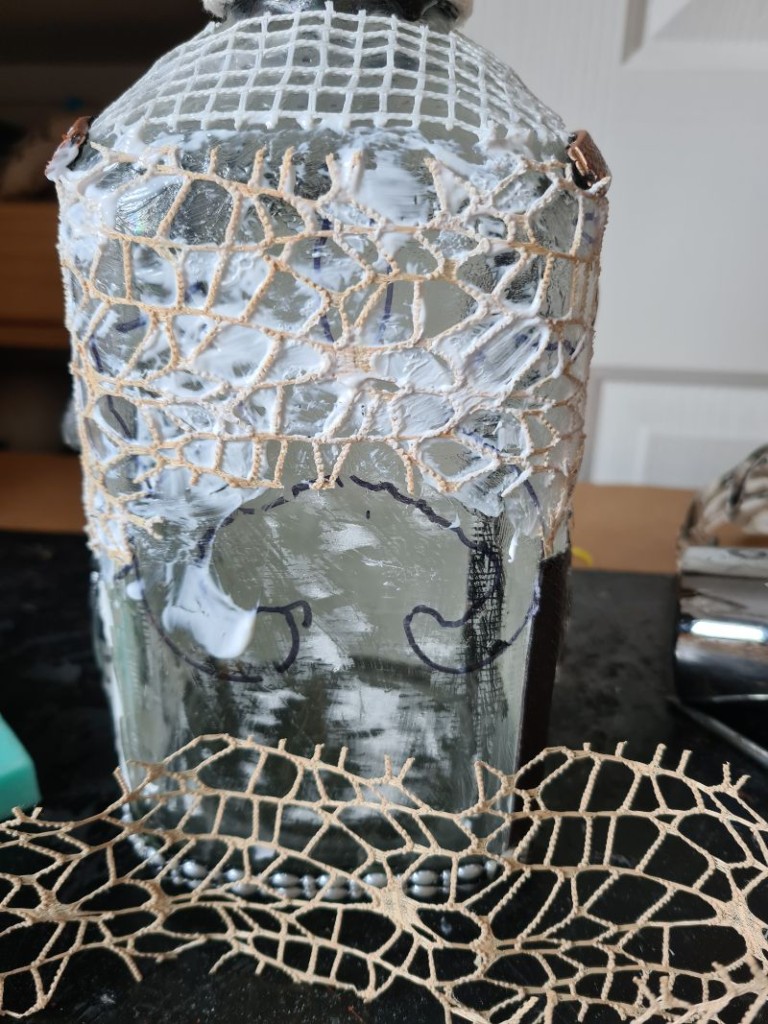
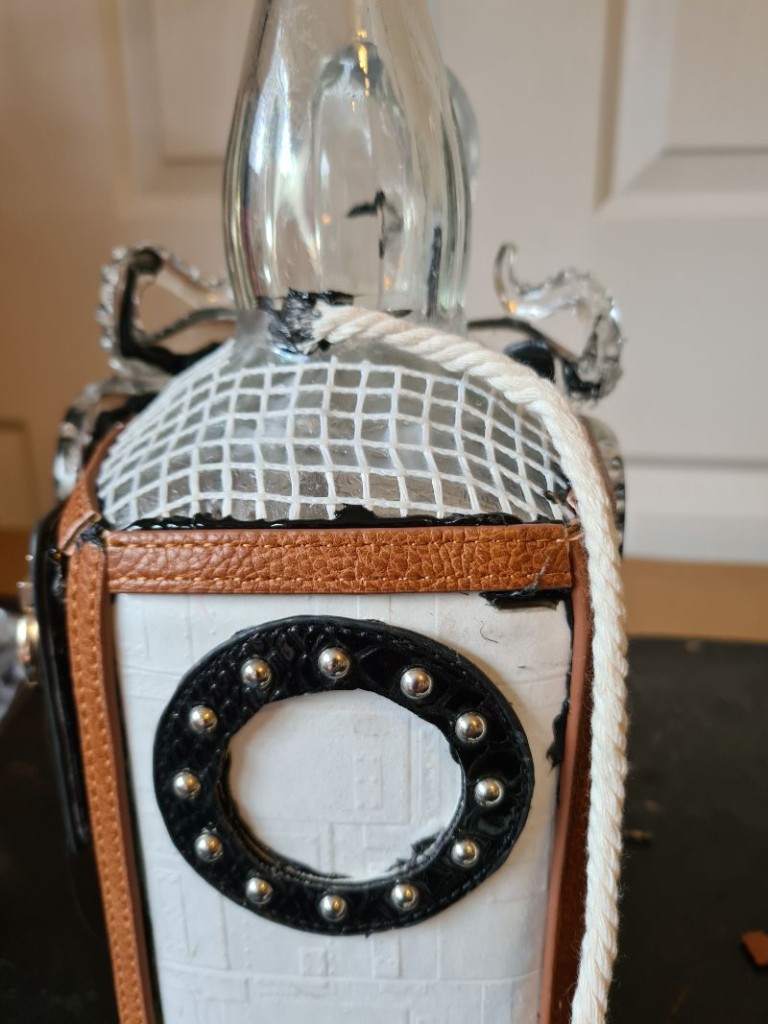
Fabrics offer loads of texture, and each one gives a different look. I like to recycle leather, straps, clips, zippers and other fittings from old handbags. You can also use tapestry mesh, onion bags, burlap (hessian) and lace—once painted, they all look amazing. I traced the shape of the octopus on the bottle, then added texture inside that outline so the casting has something to grip and hold onto.
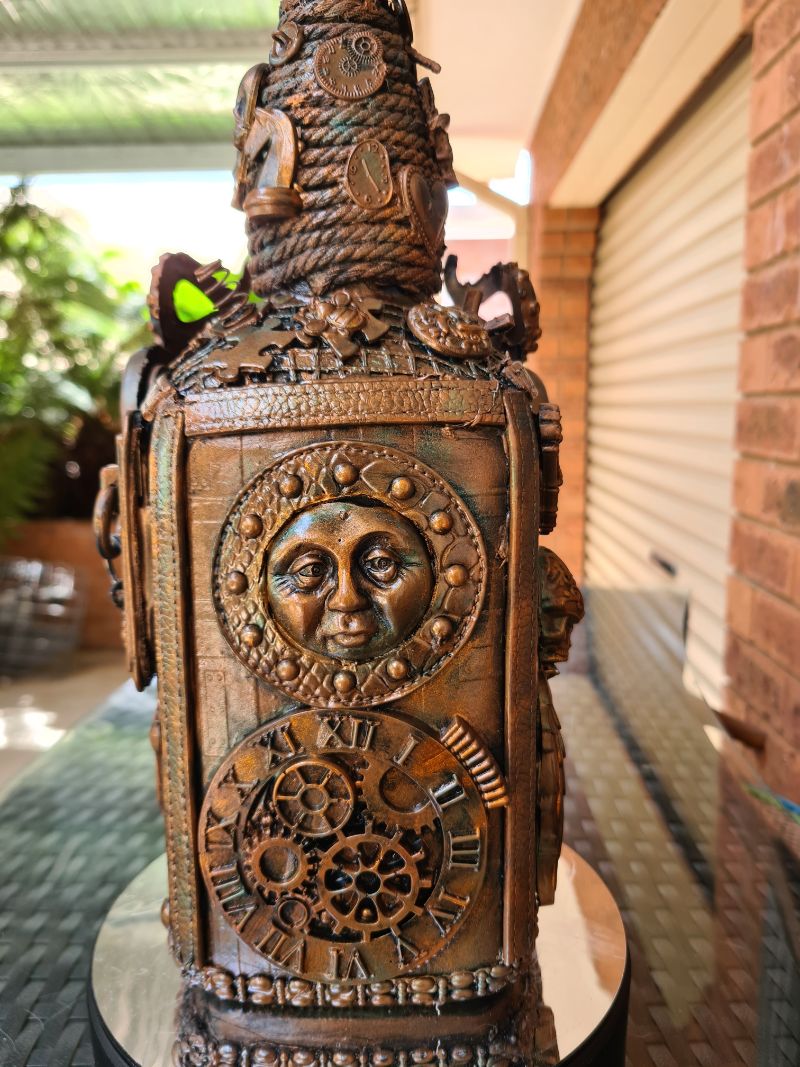
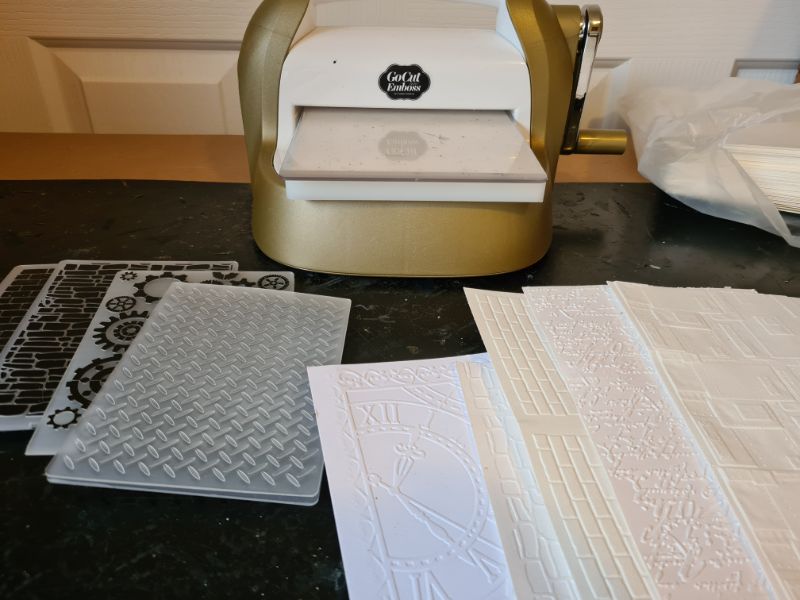
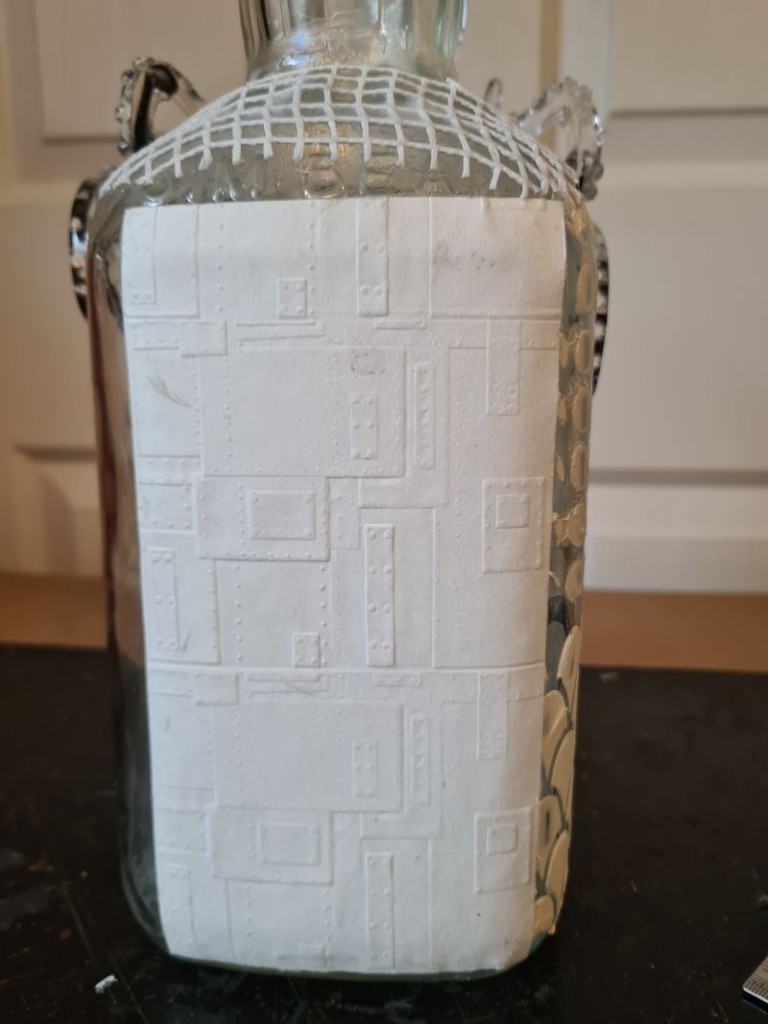
3. Embossed paper
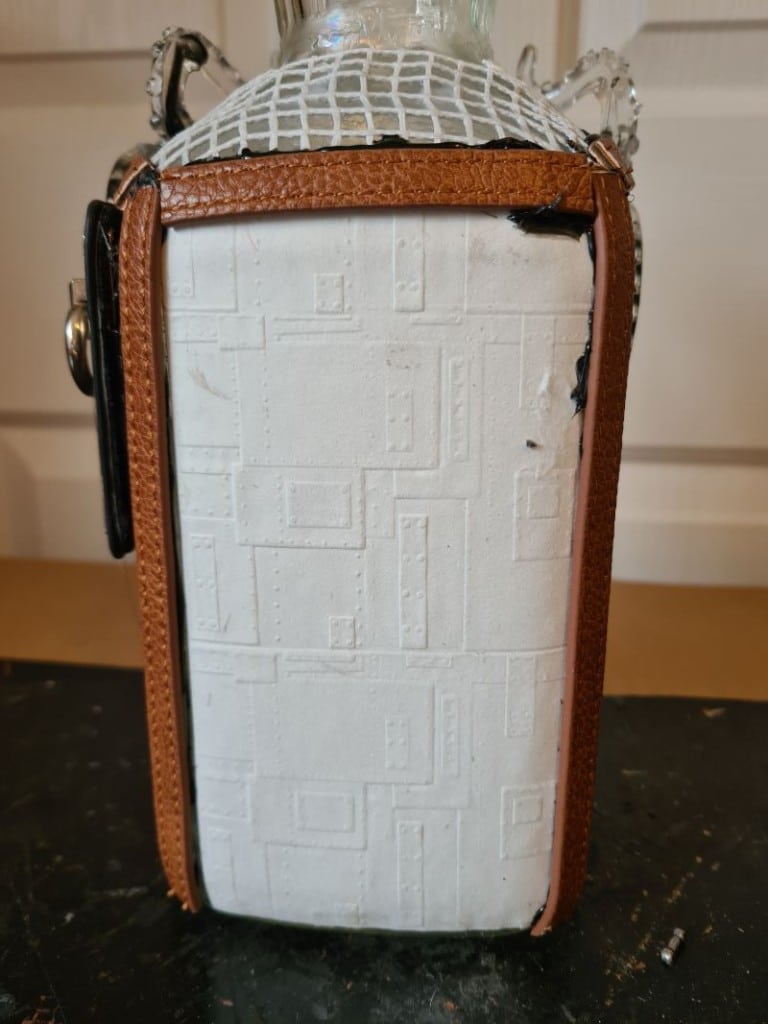
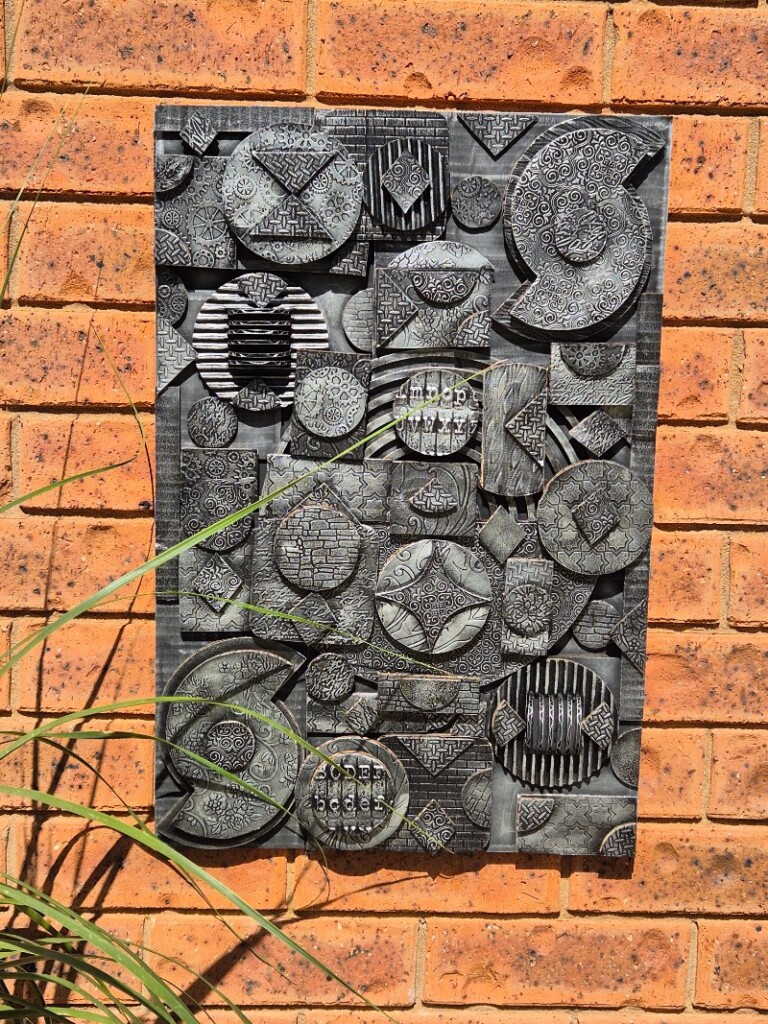
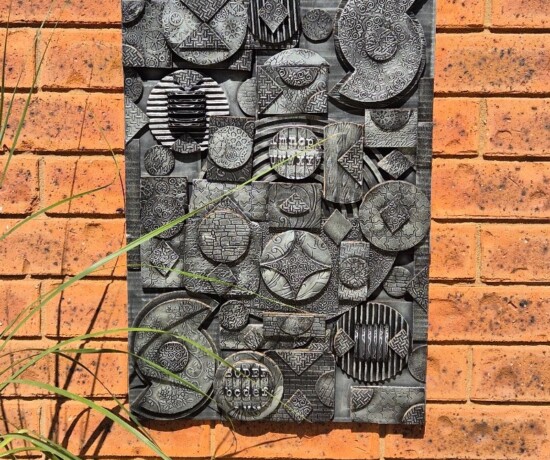
Embossed paper is another great way to add texture, and there are loads of folder designs to choose from. I bought my embossing press second-hand, but even new they’re about $100. It’s simple to use: place card stock in the embossing folder, sandwich it between the plates, and run it through the press. You’re not limited to paper, either—I flatten recycled aluminium cans and emboss those too. I used that method to make the textured wall hanging shown here.
I glued the embossed cardboard and tapestry mesh to the bottle with Ultimate Crafter’s Glue (or any good tacky glue). It looks messy now, but once you paint it, the textures pop and it looks great.
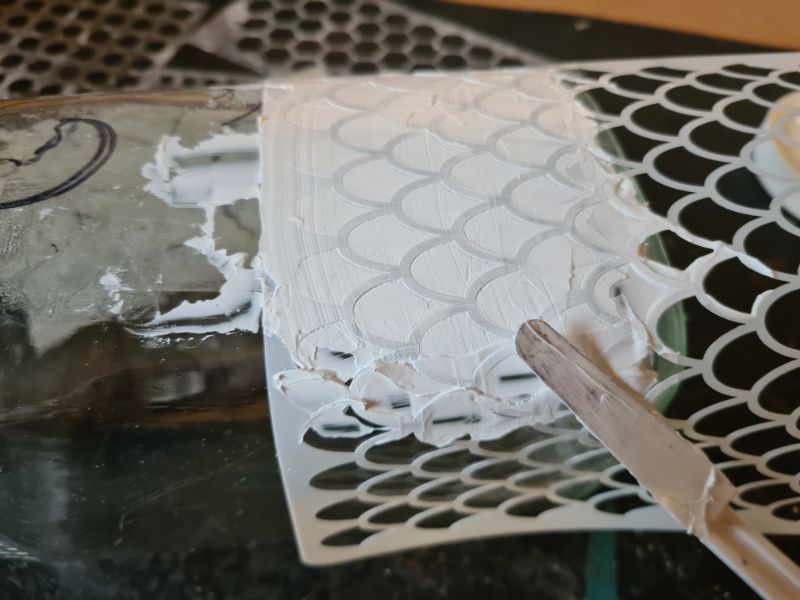
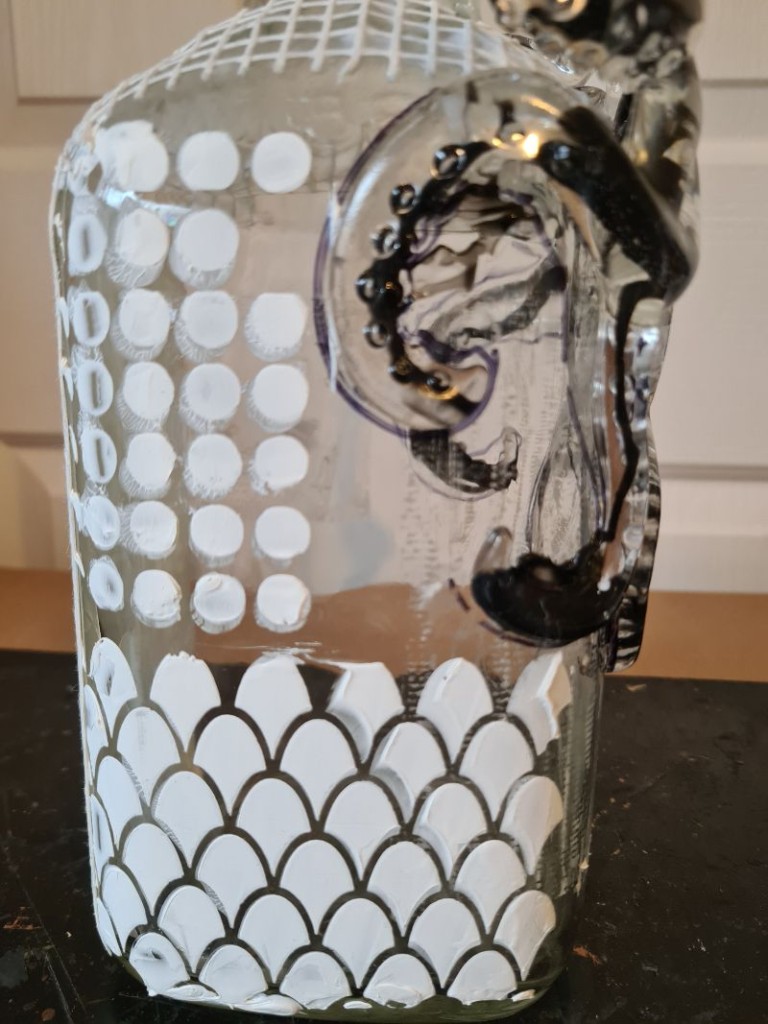
4. Modelling /Texture paste
Texture paste and stencils are an easy way to add slightly raised detail to mixed-media bottles. You can buy assorted packs of background stencils or make your own with a Cricut and mylar film. To use them, place the stencil on the bottle and spread a thin, even layer of texture paste over the openings. Lift the stencil off and let it dry. This step doesn’t need to be applied perfectly—the detail will still look great once it’s finished.
5. Ropes and cords
You can use all sorts of ropes and cords. I recycle strands from old necklaces, use shoelaces, and any cheap cord works. I wrap rope around the neck of most bottles because I like to add large resin embellishments there. The rope gives the hot glue something to grip, so the pieces stay put. I use hot glue to attach the rope around the bottle neck. From experience, black blends in better than clear with the black paint.
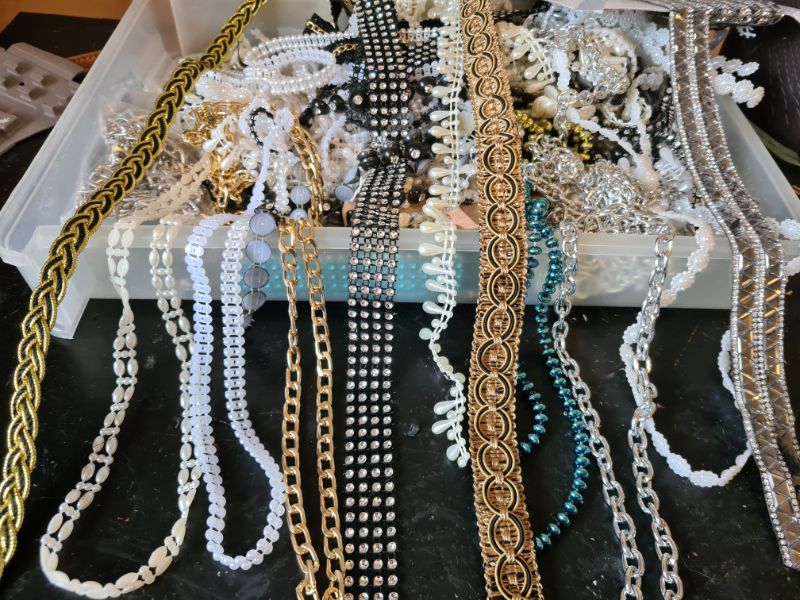
6. Chains and braids
I’ve been making mixed media art for a few years, so I’ve built up a big selection of trims. I use plastic beaded chains, braided fabric trims and metal chains, which I buy by the metre on AliExpress and Temu. They have a huge range at very reasonable prices.
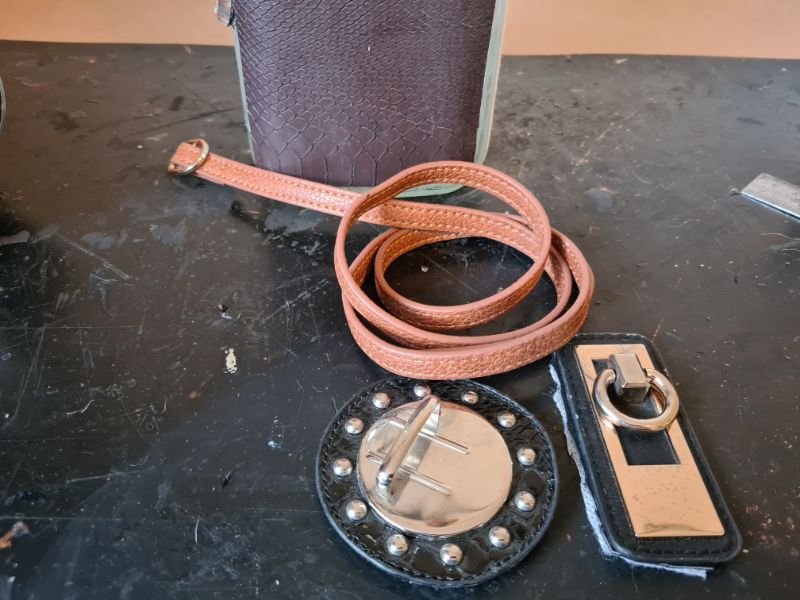
7. Belts and handbag straps
Belts and handbag straps add great texture and detail to bottles. I asked my local op shop to save old belts and bags that aren’t good enough to sell. They let me buy them for next to nothing since they’d be thrown out anyway.
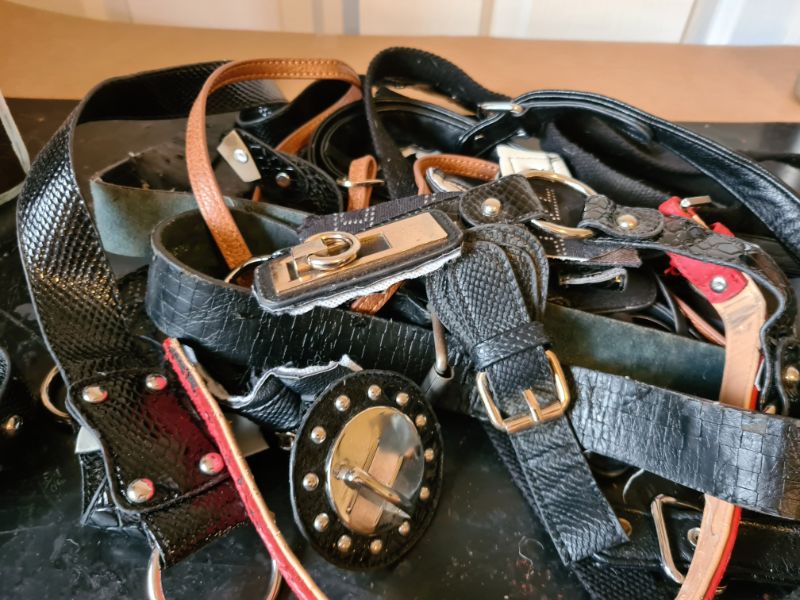
Here are the parts I salvaged from old handbags that I used in this project.
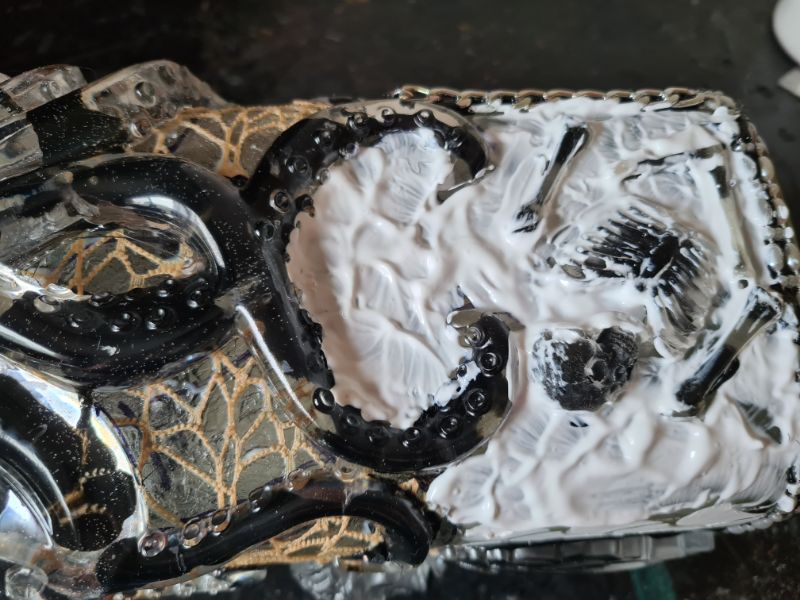
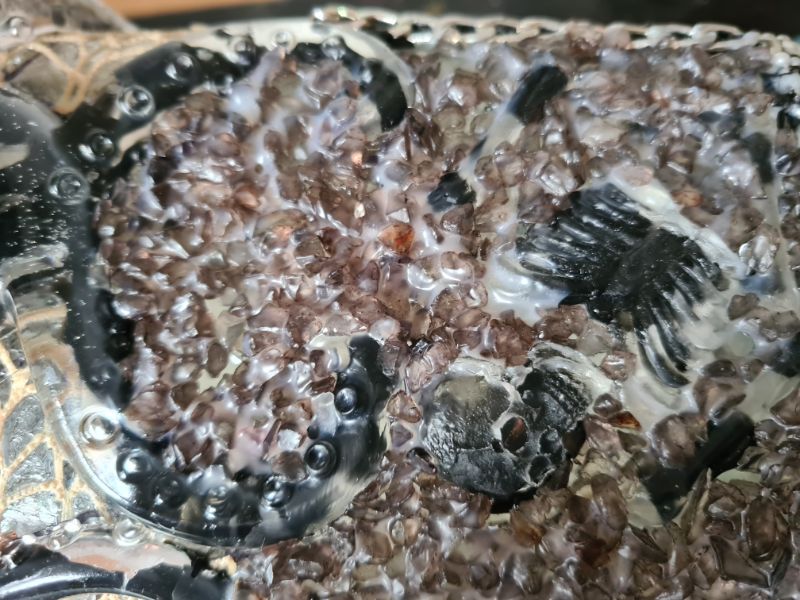
8. Glitter, gravel and sand
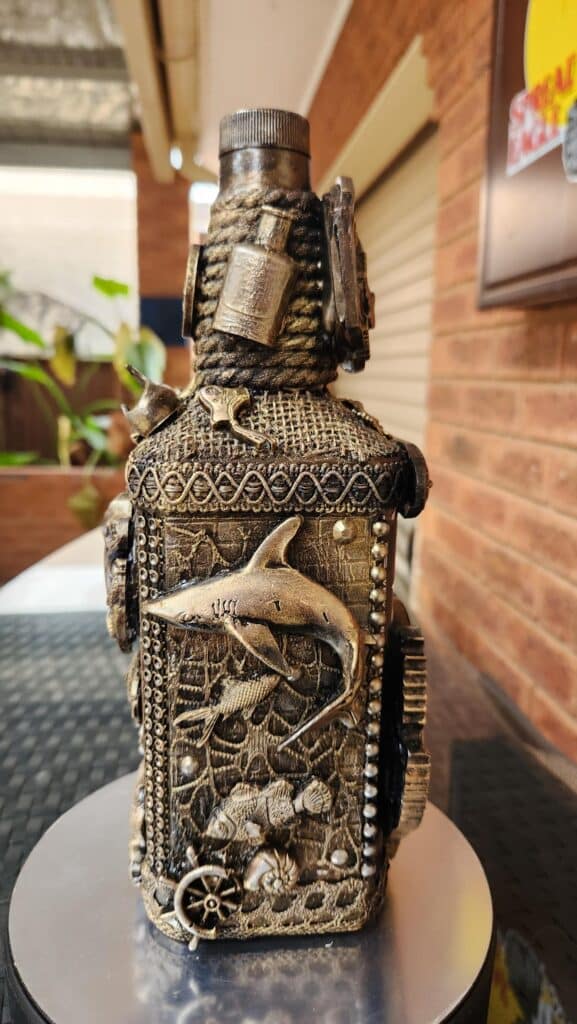
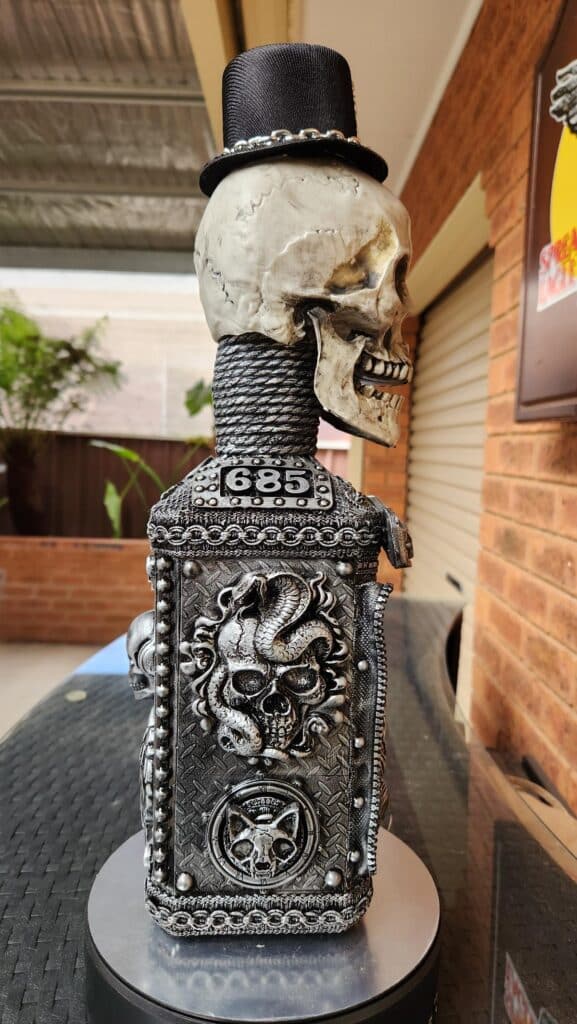
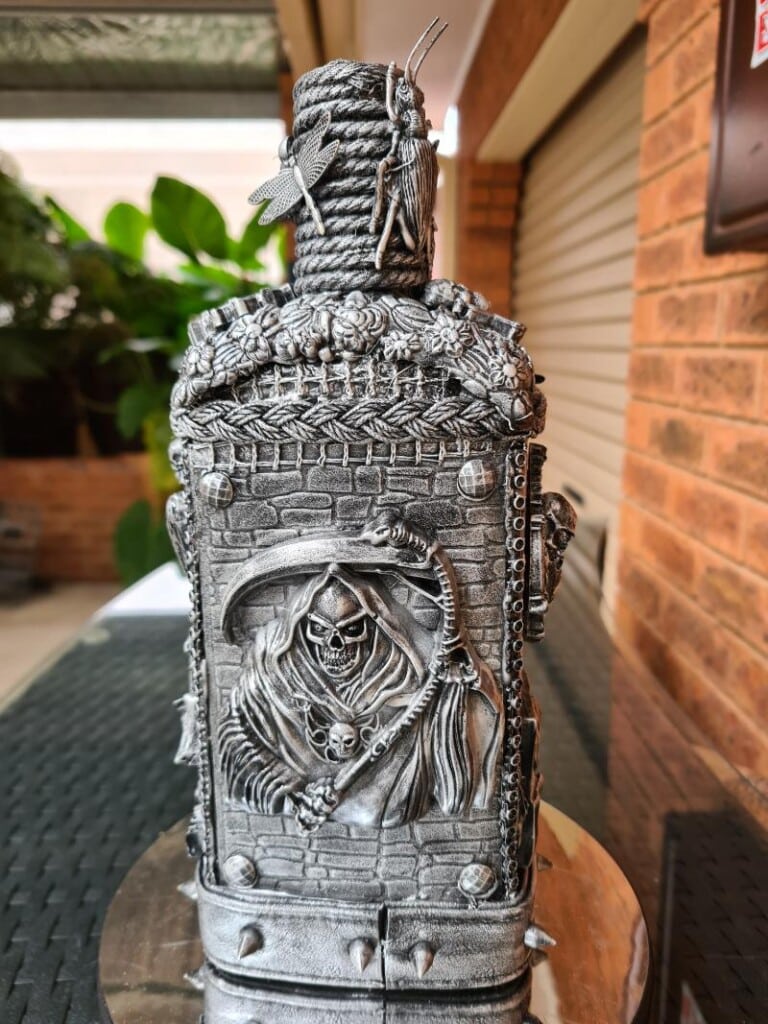
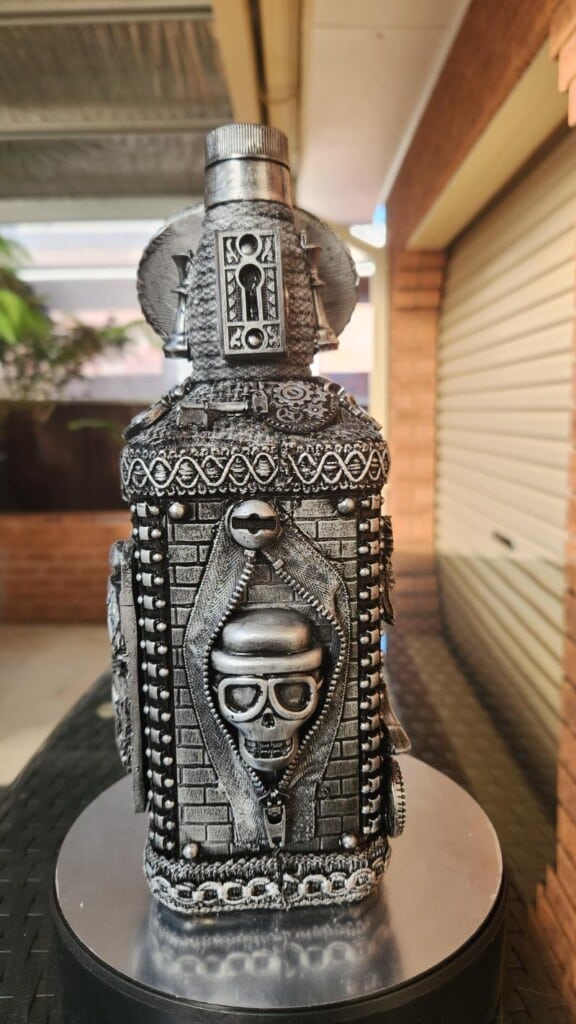
The theme for this bottle is a monster kraken, chained up after it ate a human and left the remains—creepy, I know! I’m not sure where these ideas come from. I glued parts of a small skeleton onto the bottle and set the scene so it looks partly buried in sand. I spread a generous layer of Ultimate Crafter’s Glue, pressed the glitter gravel into it, and left it to set.
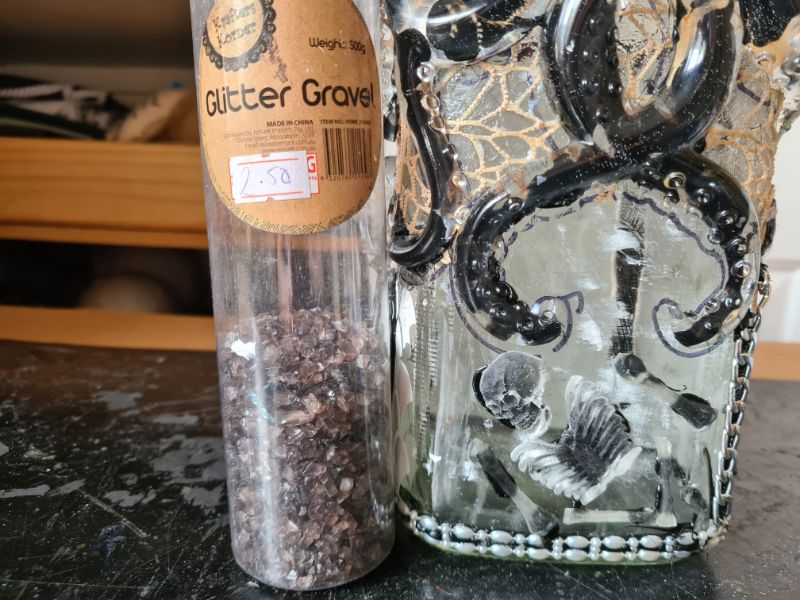
Sand is perfect for giving pieces an old, rusty look. I used this trick on a steampunk Christmas tree two years ago. I borrowed sand from my niece’s sandpit, pressed it into wet glue, and got that gritty, pitted texture you see here.
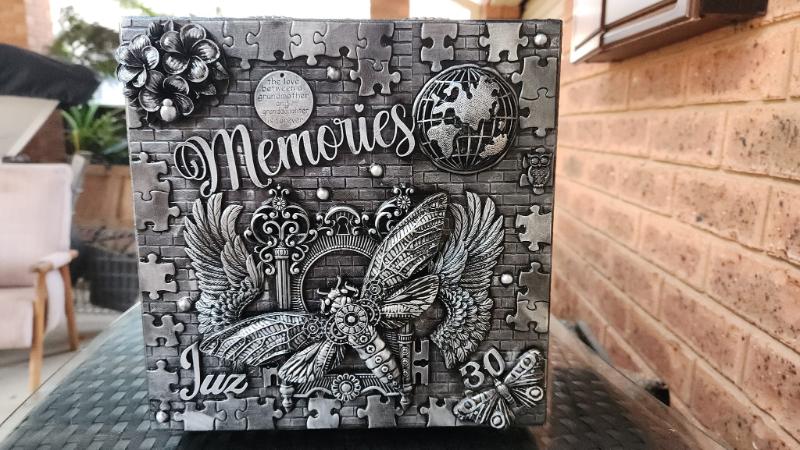
9. Charms
In most projects, I add small charms for extra detail and to fill bare spots. You can buy bulk packs on Amazon or AliExpress. Jigsaw puzzle pieces, buttons, and any small item with an interesting shape work well, too.
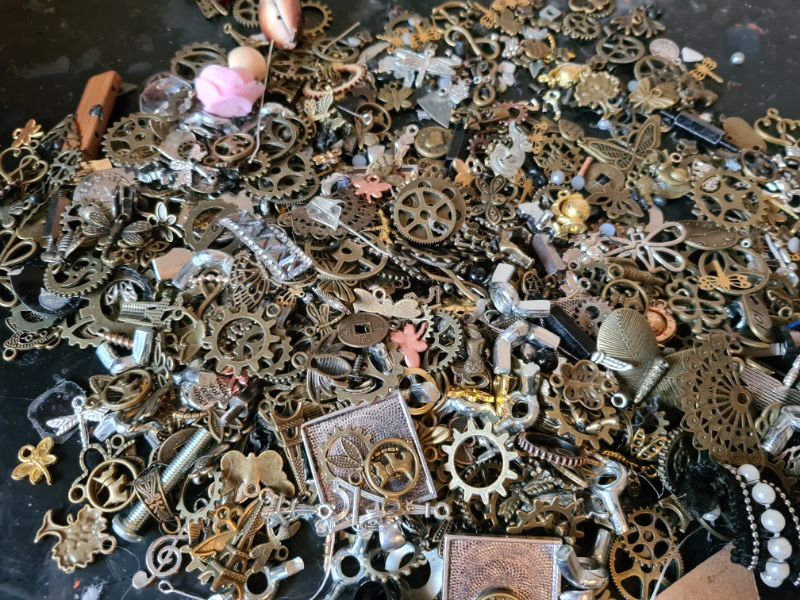
10. Broken jewellery and beads
Broken jewellery is another thing I pick up from my local charity (op) shop. They’re happy to set aside watches, bracelets and broken pieces for me, and they sell them at a very low price. Brooches add amazing texture and sparkle. I used a collection of them to make this wooden Christmas tree.
The best advice I can give is to look past the mess. The more bottles you make, the more you’ll learn which textures work best together. Before painting, my bottle looked rough; I added small squares of paper and a few half-pearls to the head because it felt too plain.
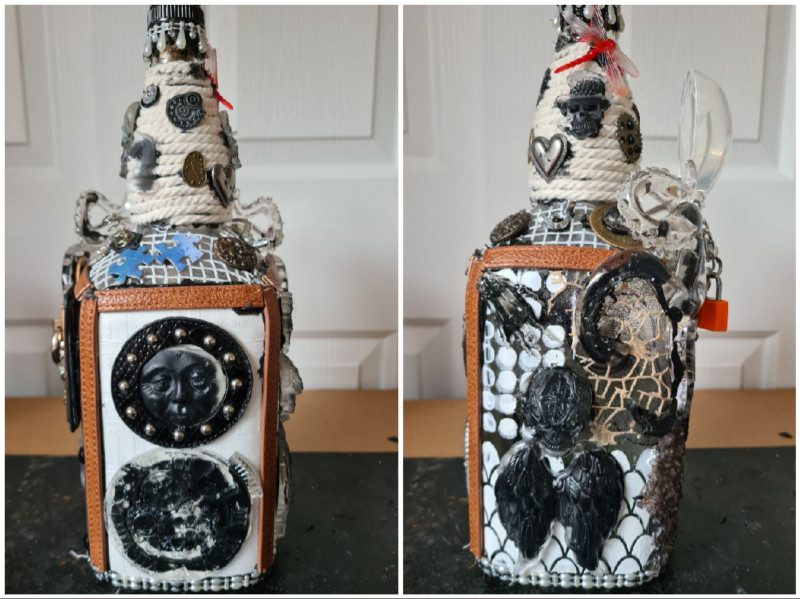
At this stage, it can look like something the cat threw up—but trust the process, the paint brings it together.
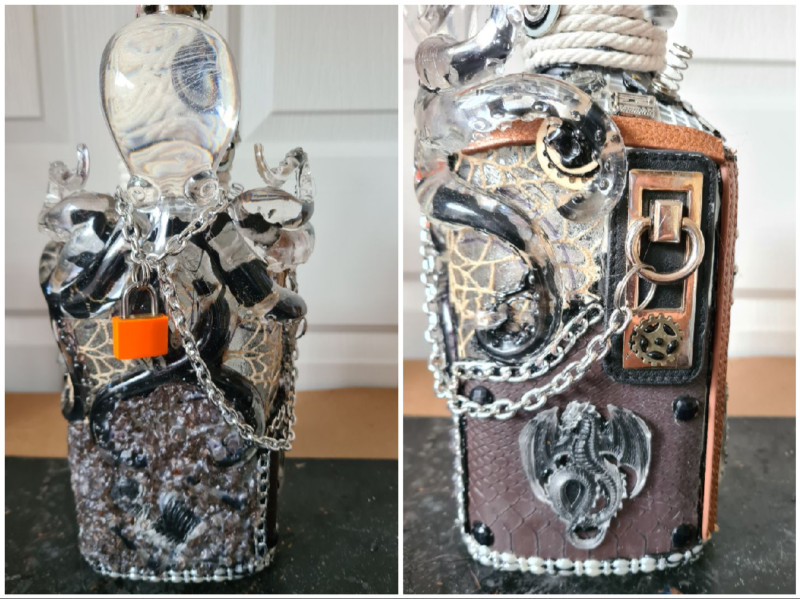
Painting the bottle
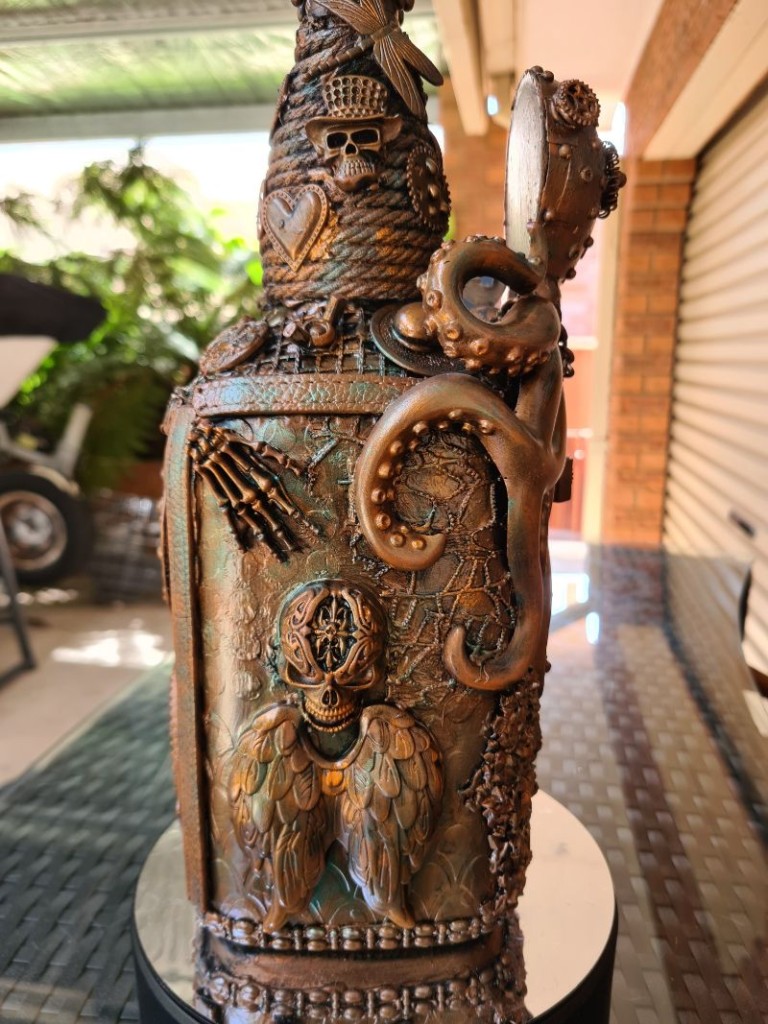
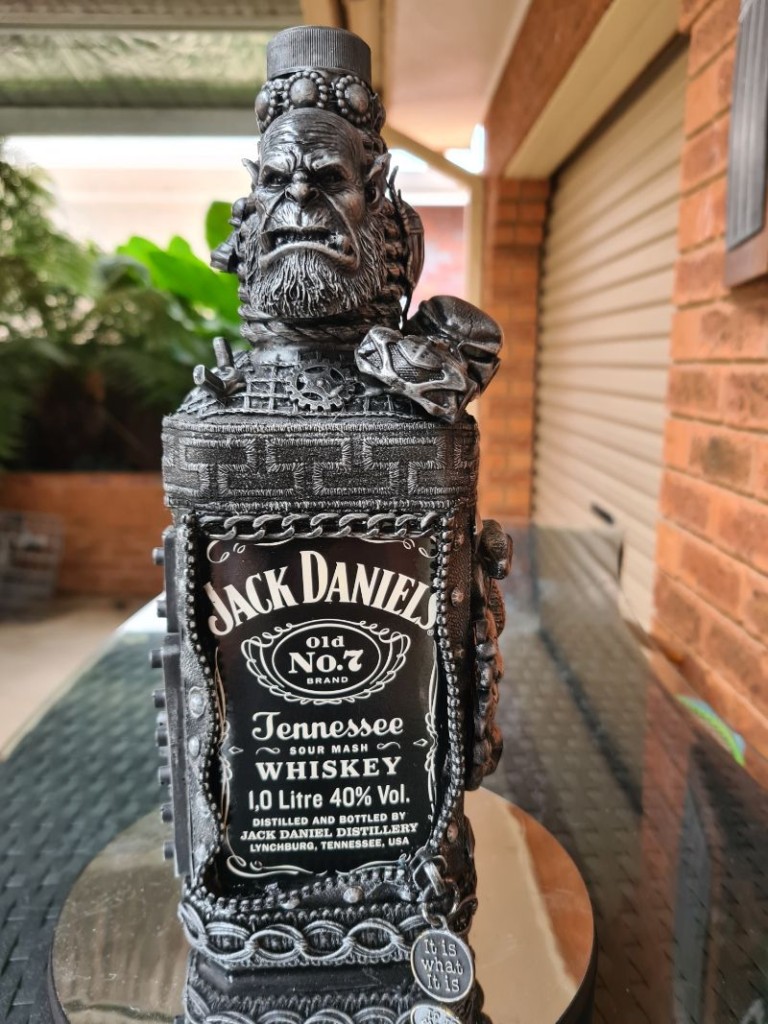
Paint everything black with gesso or acrylic. Then dab metallic rust paint over the surface with a sponge to pick up the raised textures. Finally, I brushed on highlights in orange, raw sienna and peacock blue around selected embellishments to make them pop. I seal all the bottles with a coat of clear acrylic spray.
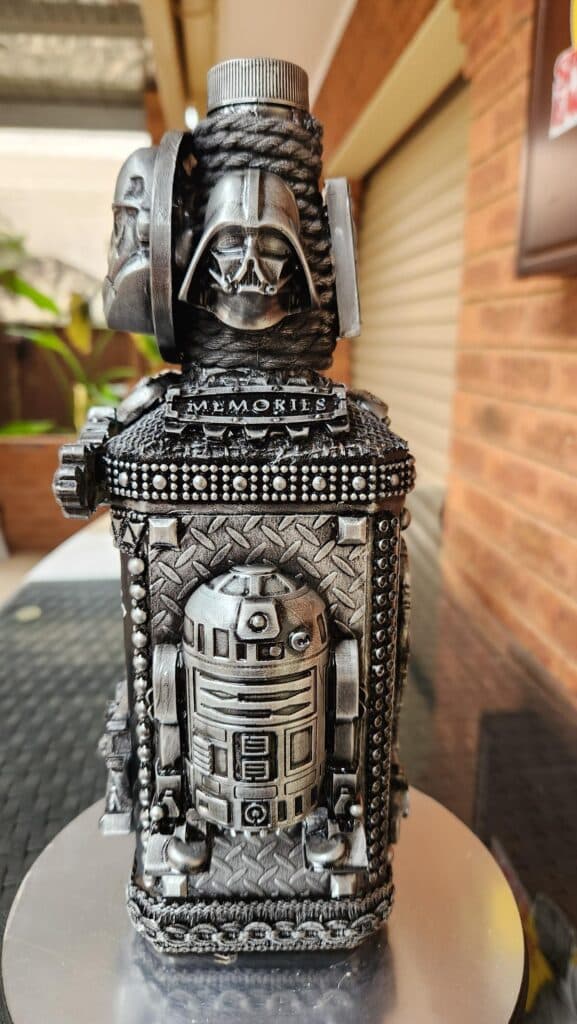
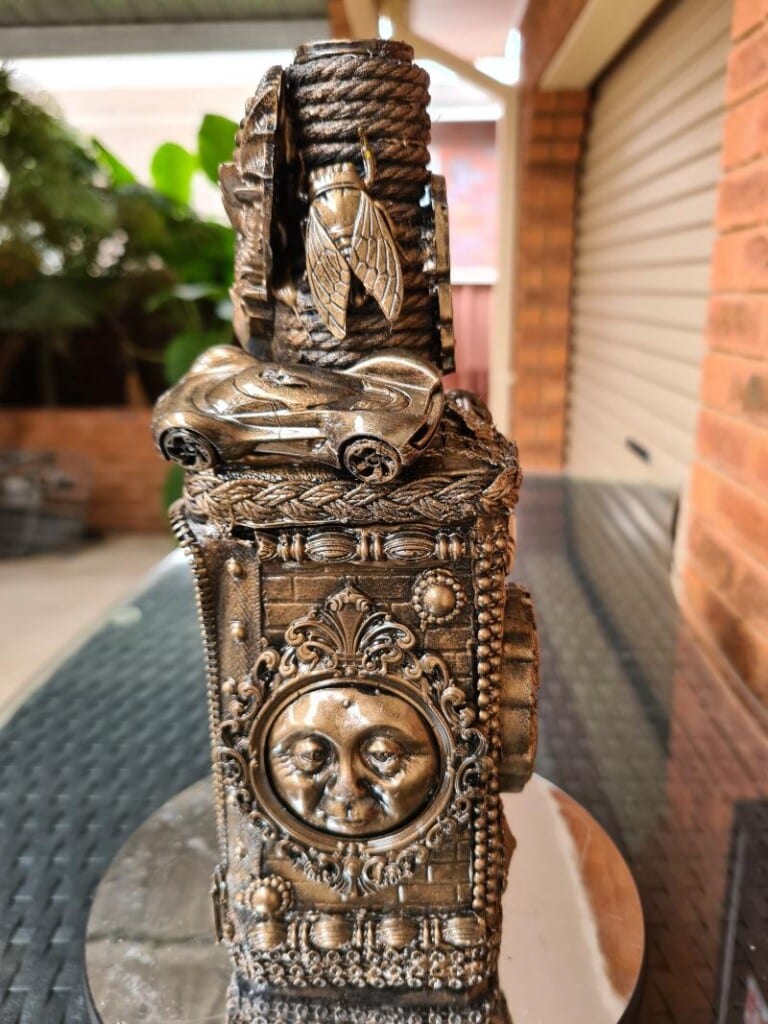
11. Kids’ small toys
Small toys are my favourite add-ons for decorated bottles. I especially love little cars, LEGO pieces and plastic insects—they instantly make each bottle look more interesting and unique. I grab multi-packs at Kmart for a few dollars per pack, which is a real bargain.
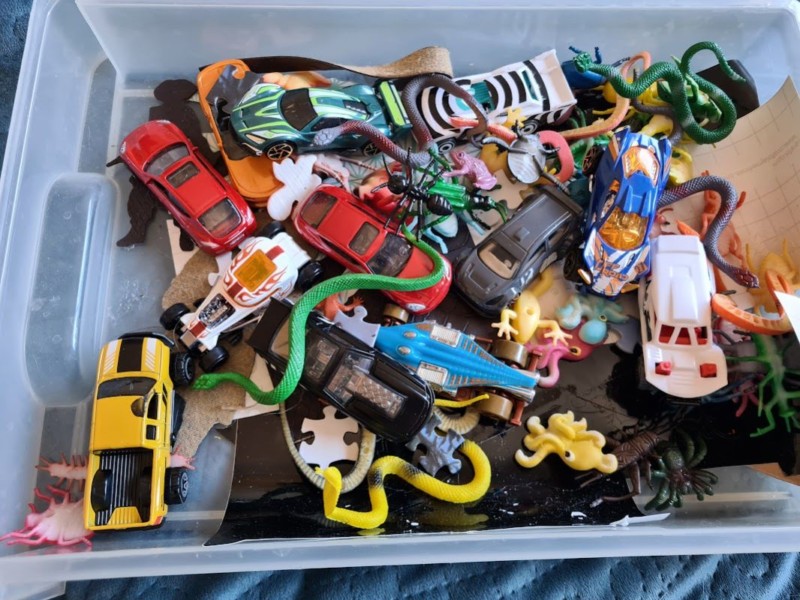
Here is an example to give you an idea of how cool they look.
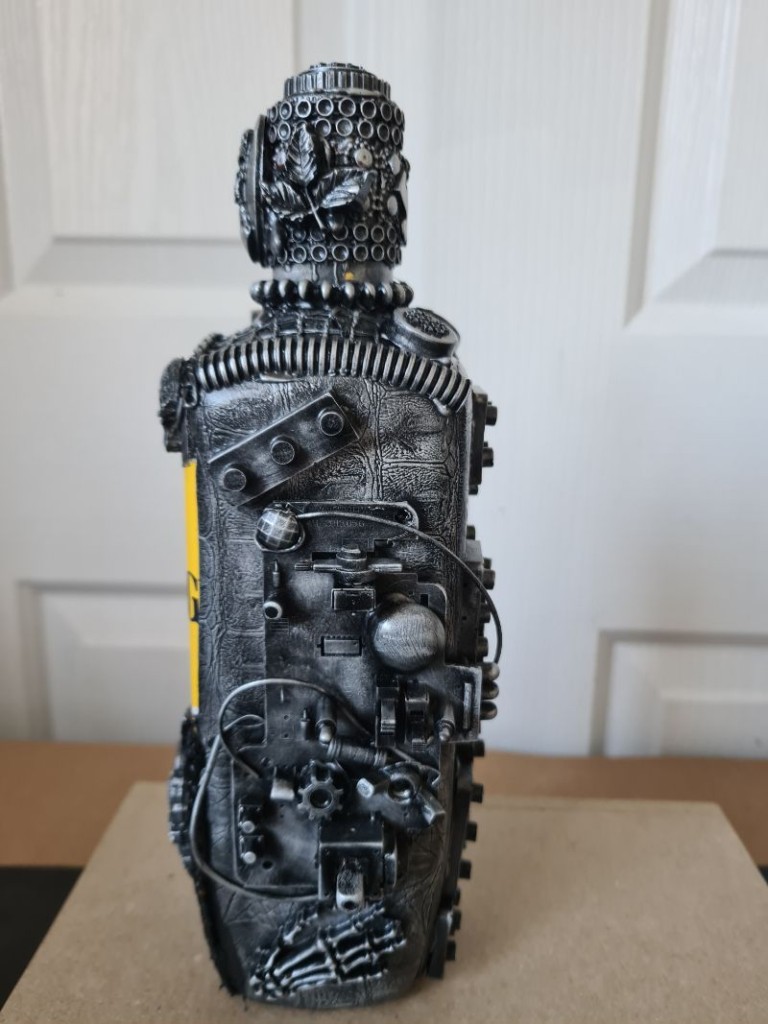
12. Electronic components
I do a lot of DIY, so I raid my workshop for bits like nuts, bolts, screws and thumbtacks. When a phone or appliance breaks, I pull it apart and save the interesting parts—circuit boards, gears and buttons. These scraps are perfect for steampunk art.
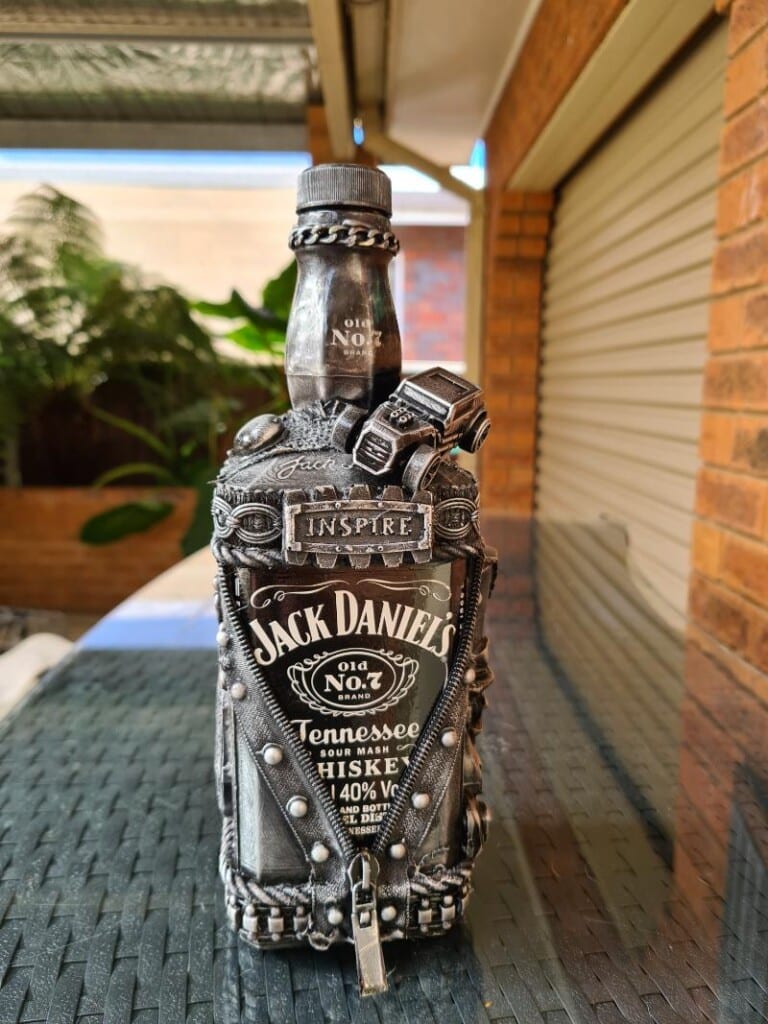
13. Add Zippers
Zippers are another of my favourites. Salvage them from old clothes, sleeping bags, handbags and jackets. They add lots of character to a bottle, and you can place them in different ways to get a whole new look each time.
14. Cardboard
Corrugated cardboard is the cheapest, easiest way to add texture. Peel off the top layer to reveal the ridged “flutes” that look fantastic on a mixed media bottle assemblage. It’s light, free from packaging, and once sealed, it’s surprisingly tough.
15. Recycled finds
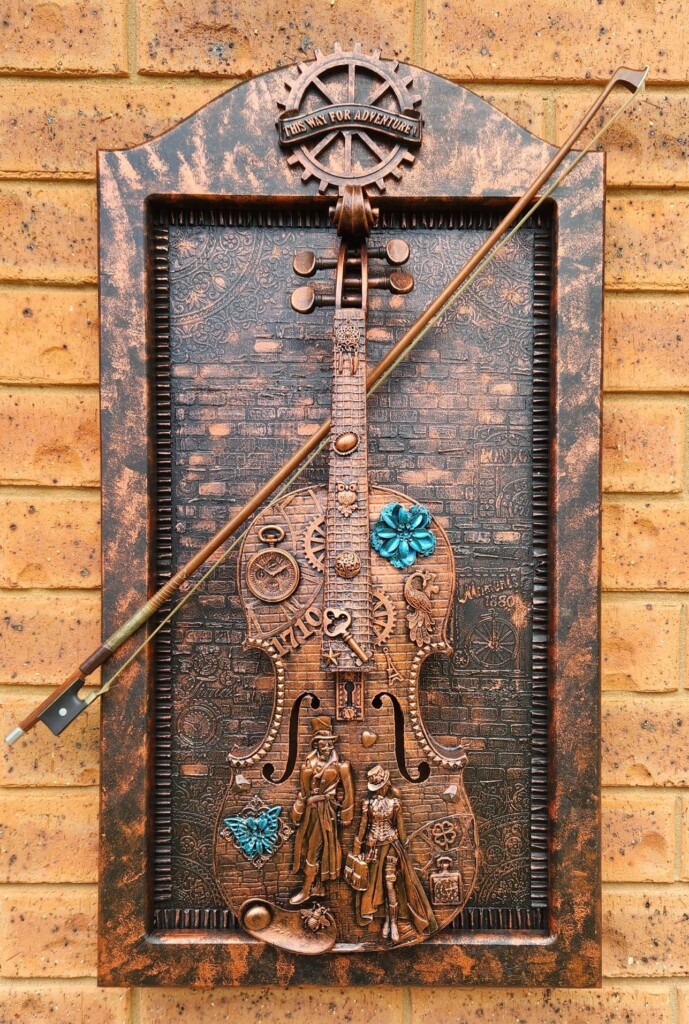
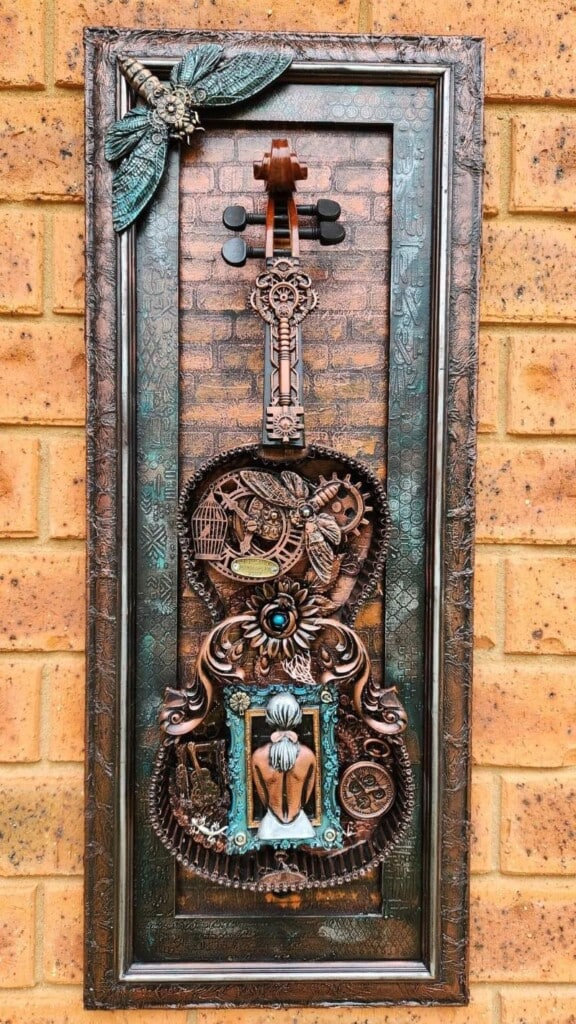
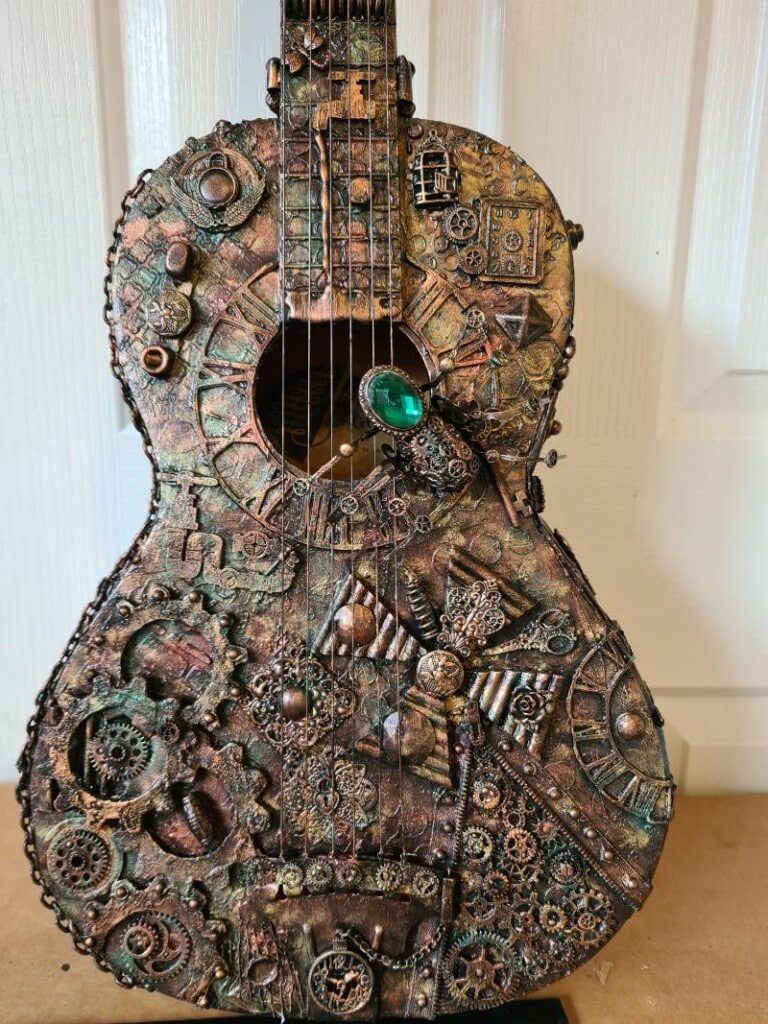
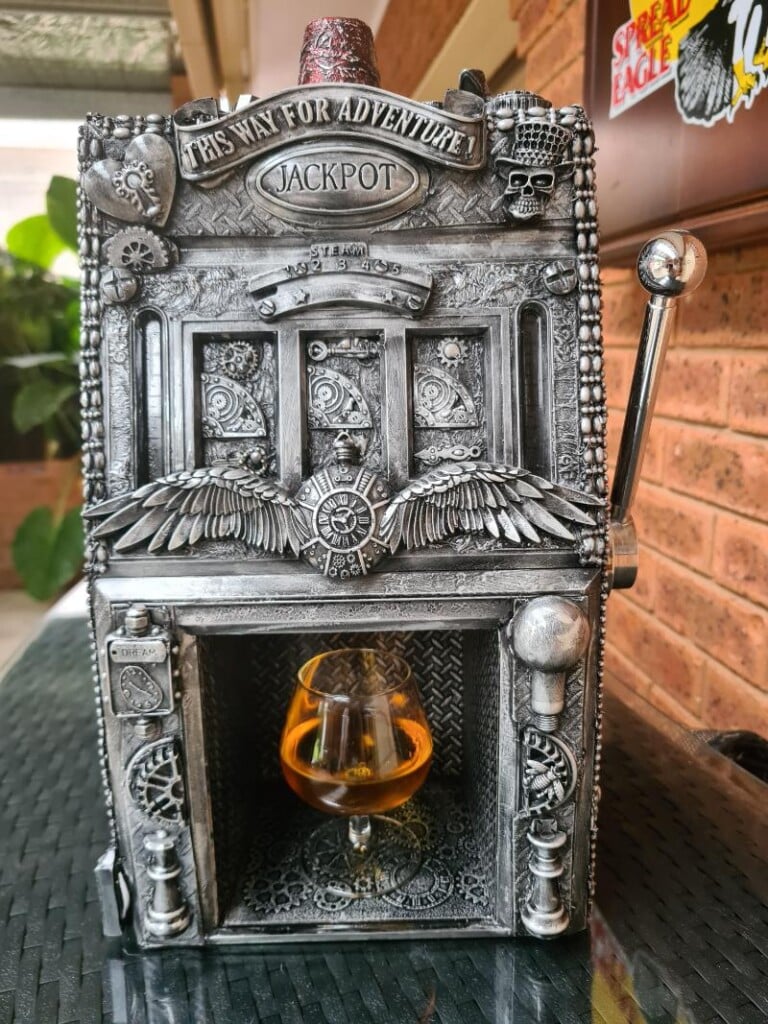
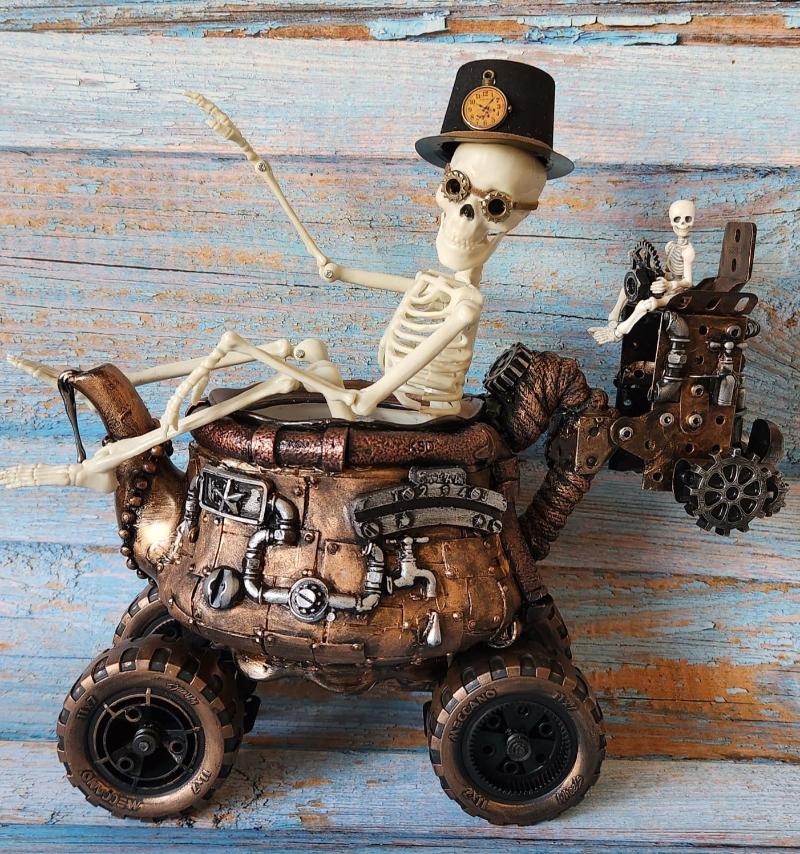
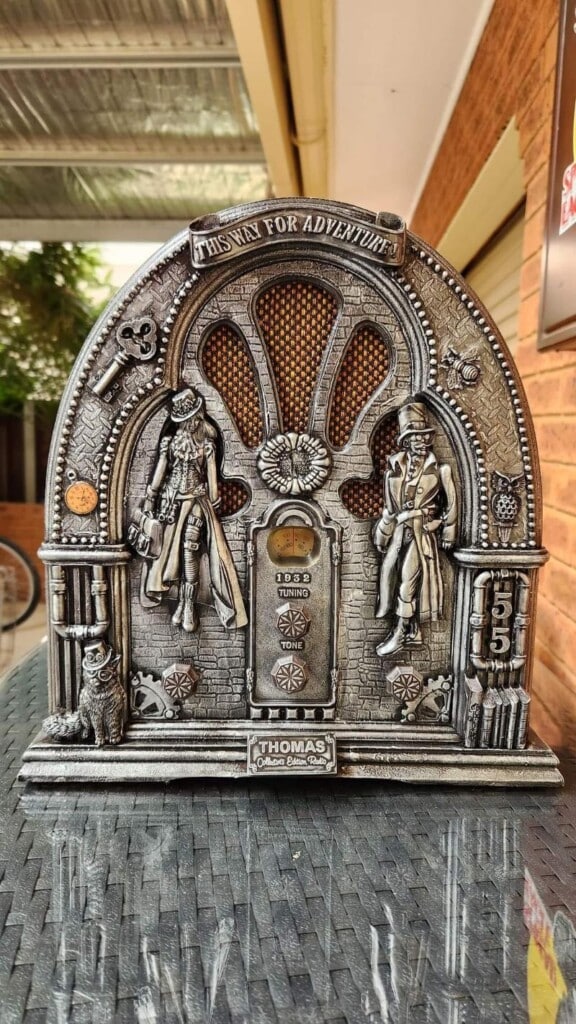
I love turning redundant finds from around my home into mixed-media assemblage art. I’ve repurposed teapots, spoons, a vintage radio, drinks machines, guitars and violins—proof you can transform almost any everyday object into an eye-catching assemblage.
1. Musical instruments
I post ads on Facebook Marketplace asking for broken musical instruments—violins, guitars, banjos—and most of the time people give them to me for free.
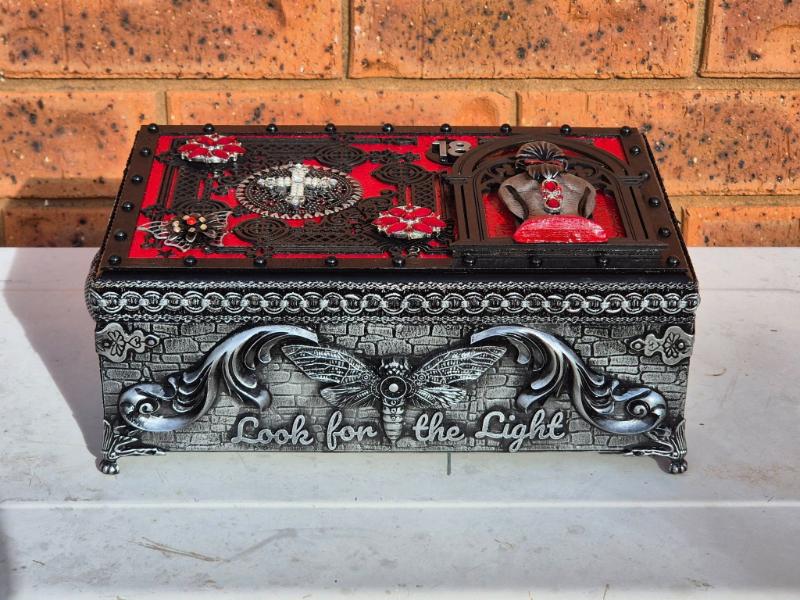
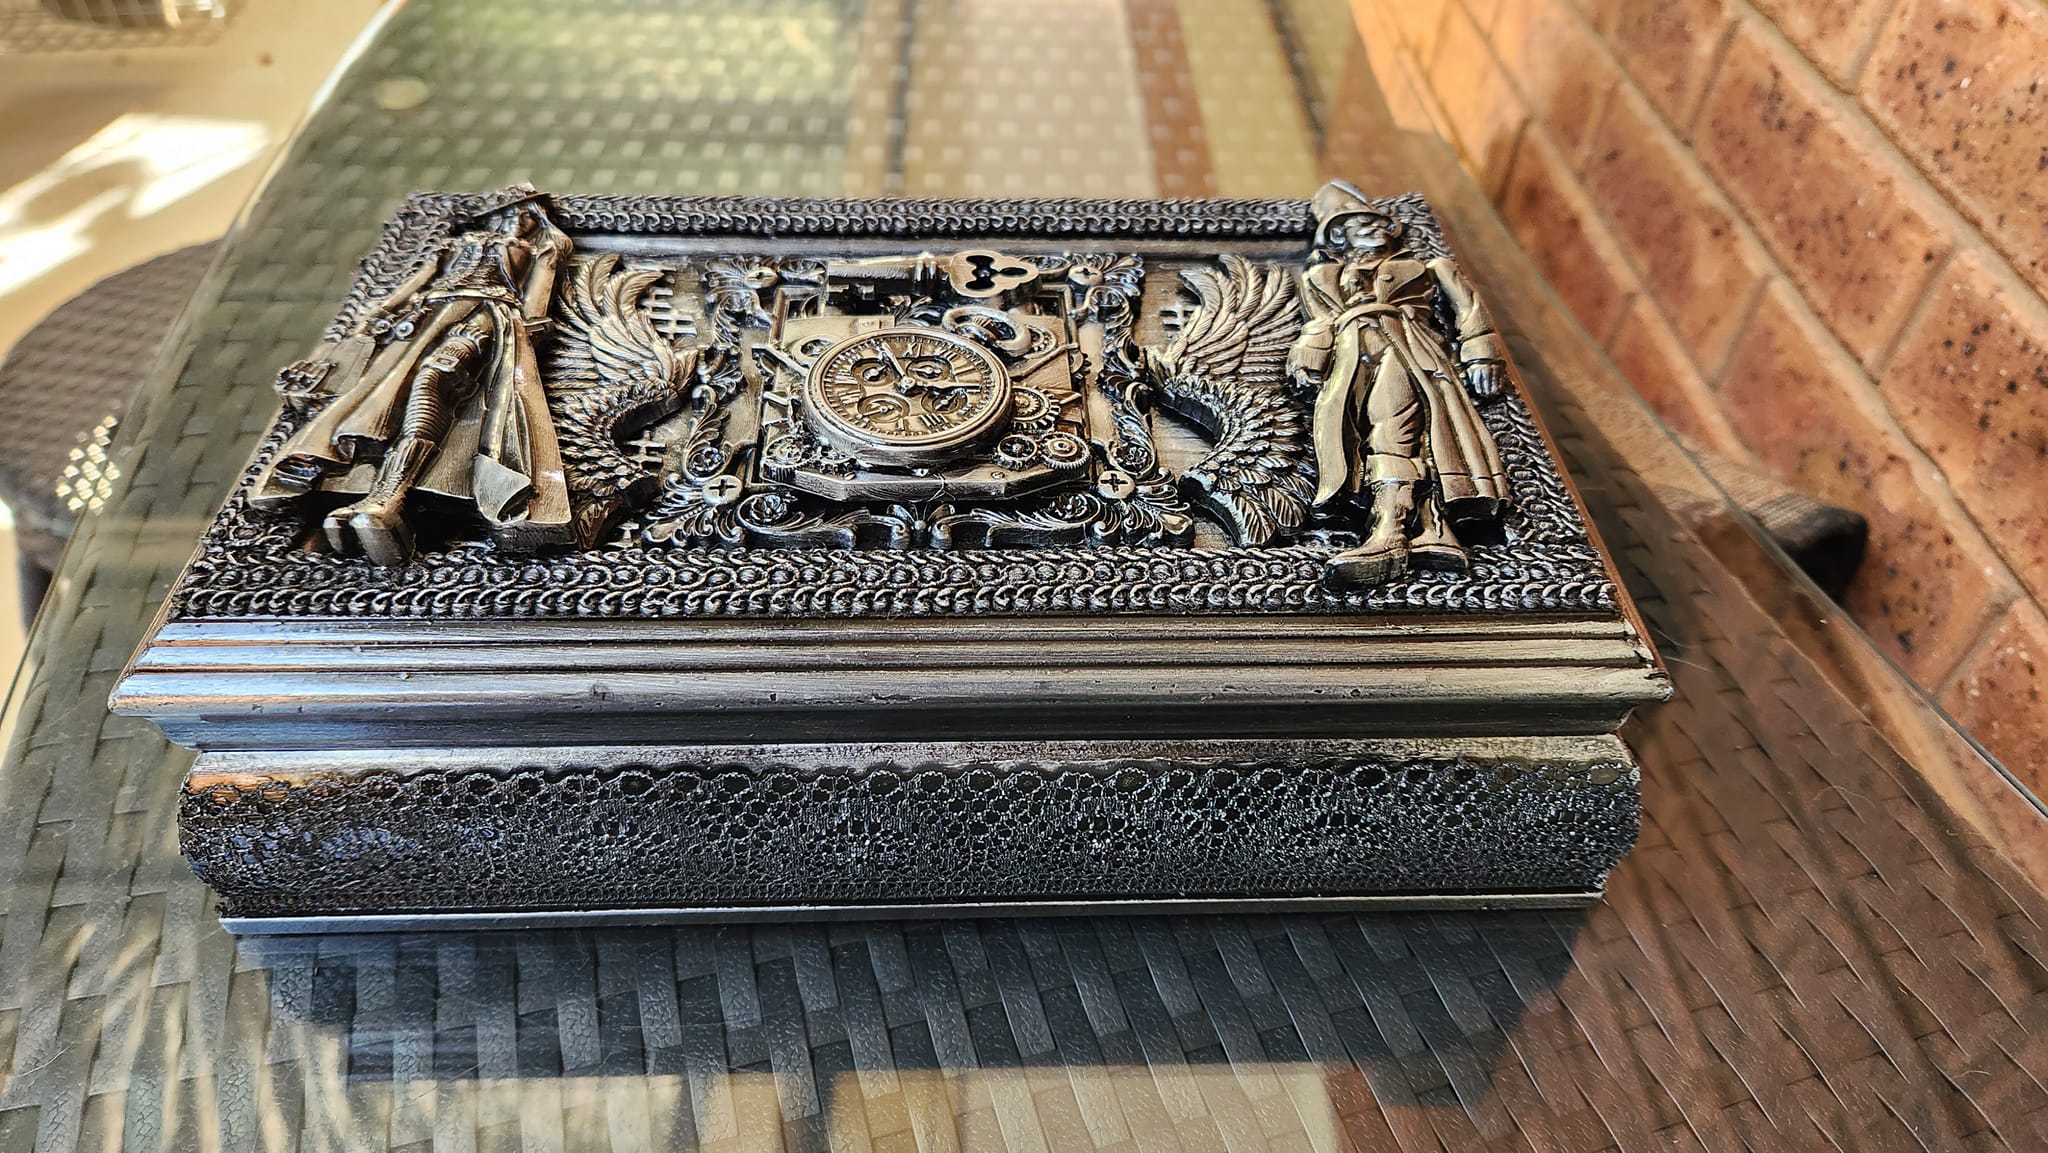
2. Recycled boxes and jewellery boxes
Facebook Marketplace and op shops are goldmines for cheap boxes to upcycle into assemblage art. Because you’ll cover the surface, scuffs and dents don’t matter. Old photo-album boxes are especially affordable now that most photos are stored digitally. To tidy the inside, either give it a fresh coat of paint or reline it with self-adhesive velvet.
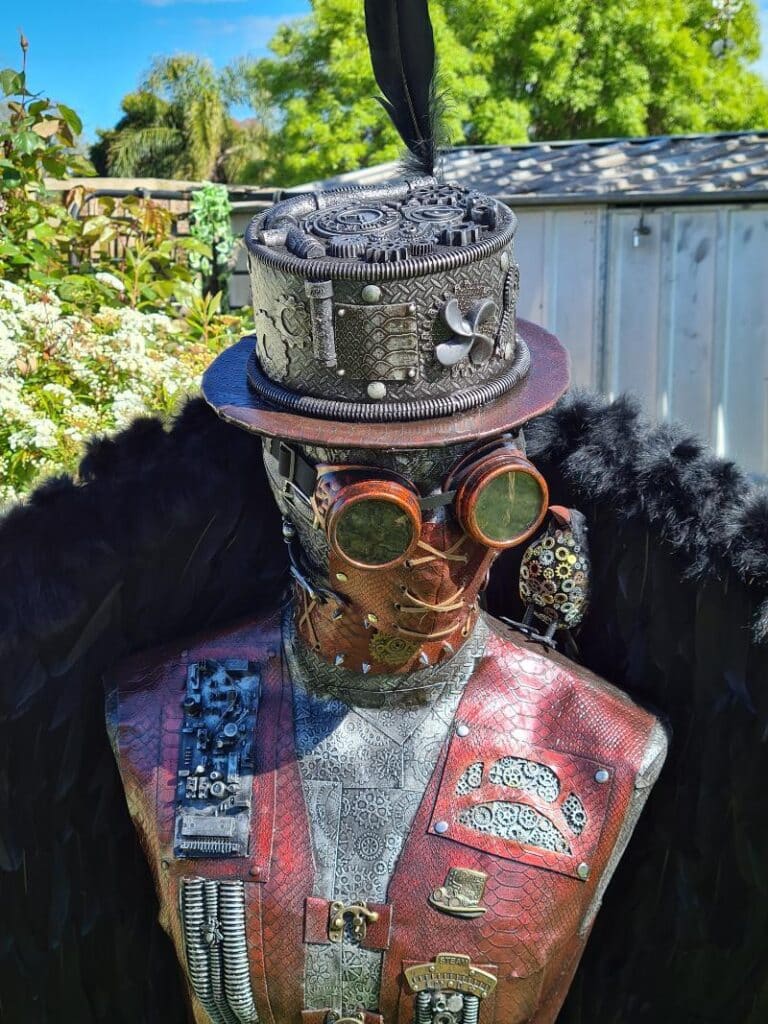
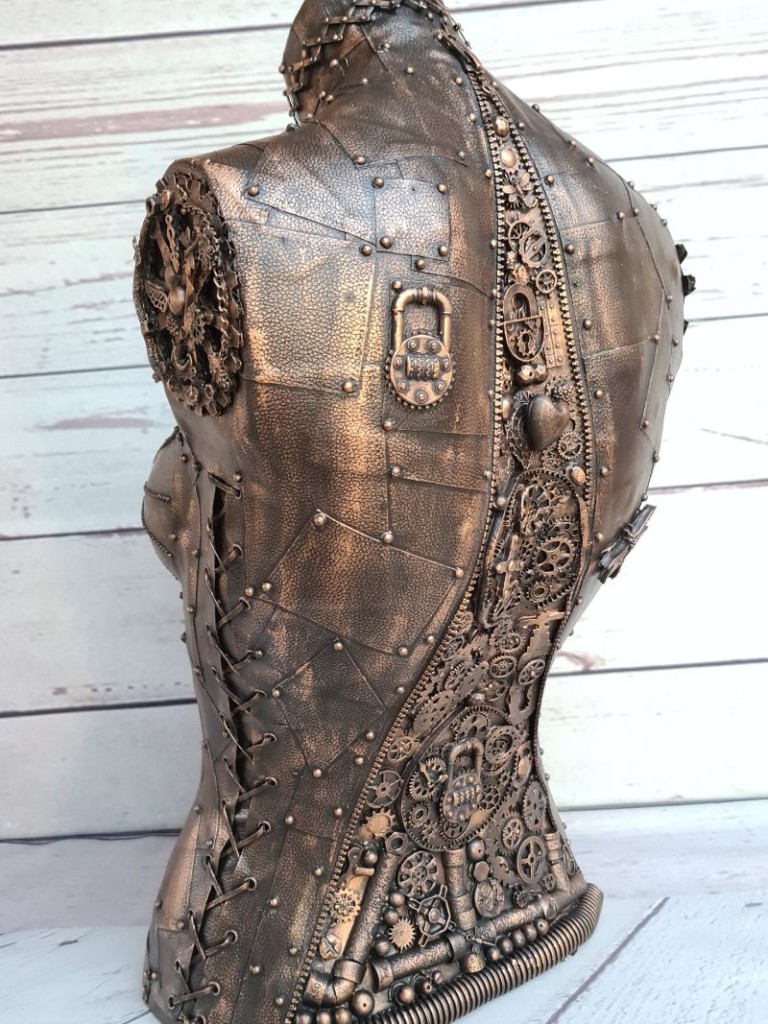
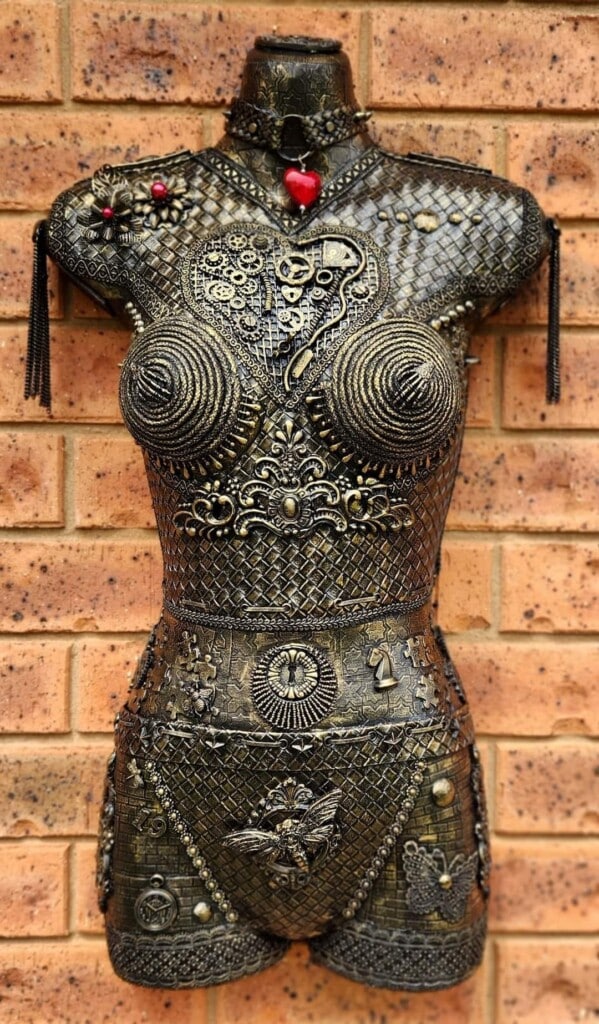
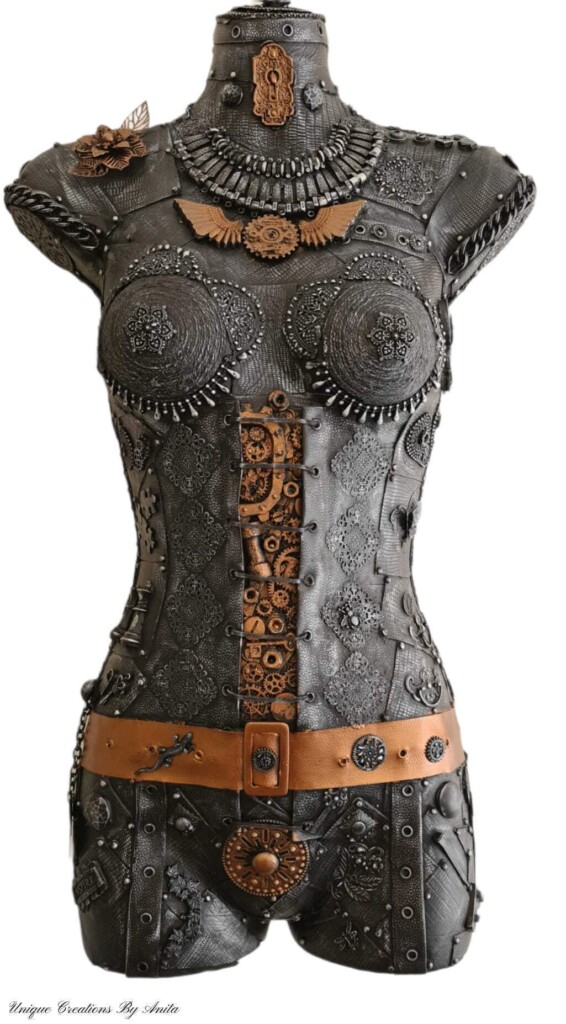
3. Shop Mannequins
Mannequin assemblage is one of my favourite projects. The large surface gives me a big canvas to let my creativity run wild.
4. Everyday items around your home
Final thoughts
Mixed media bottle assemblage rewards patience and play. Build layers, trust the mess, then let the paint reveal the magic. Start small if you’re new—cardboard, fabric and rope give instant texture for next to nothing.
Raid the recycling, rescue a few op-shop treasures and try one new technique each time. You’ll soon find your style and favourite textures.
More about IBC
If you follow my blog, you will know I am part of the IBC (International Bloggers Club), which is a group of talented bloggers from around the world. We have members from Spain, South Africa, Australia, the United States, and Canada. Each month, we come together and create a project with a common theme.
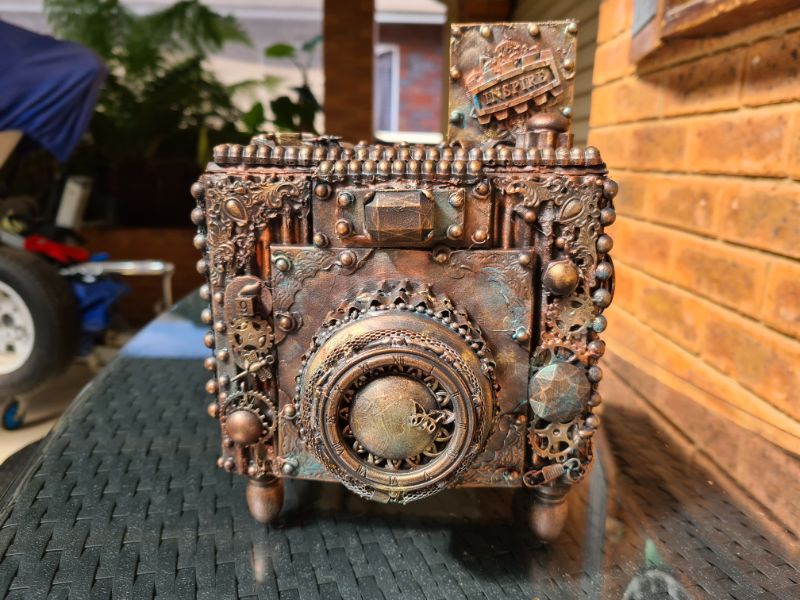
If you missed last month’s “Bodacious books ” theme, here is the link to my Steampunk book Lamp. The “All bottled up ” contributions from my fellow bloggers for this month’s challenge are listed below. Please feel free to jump over and give them some love.
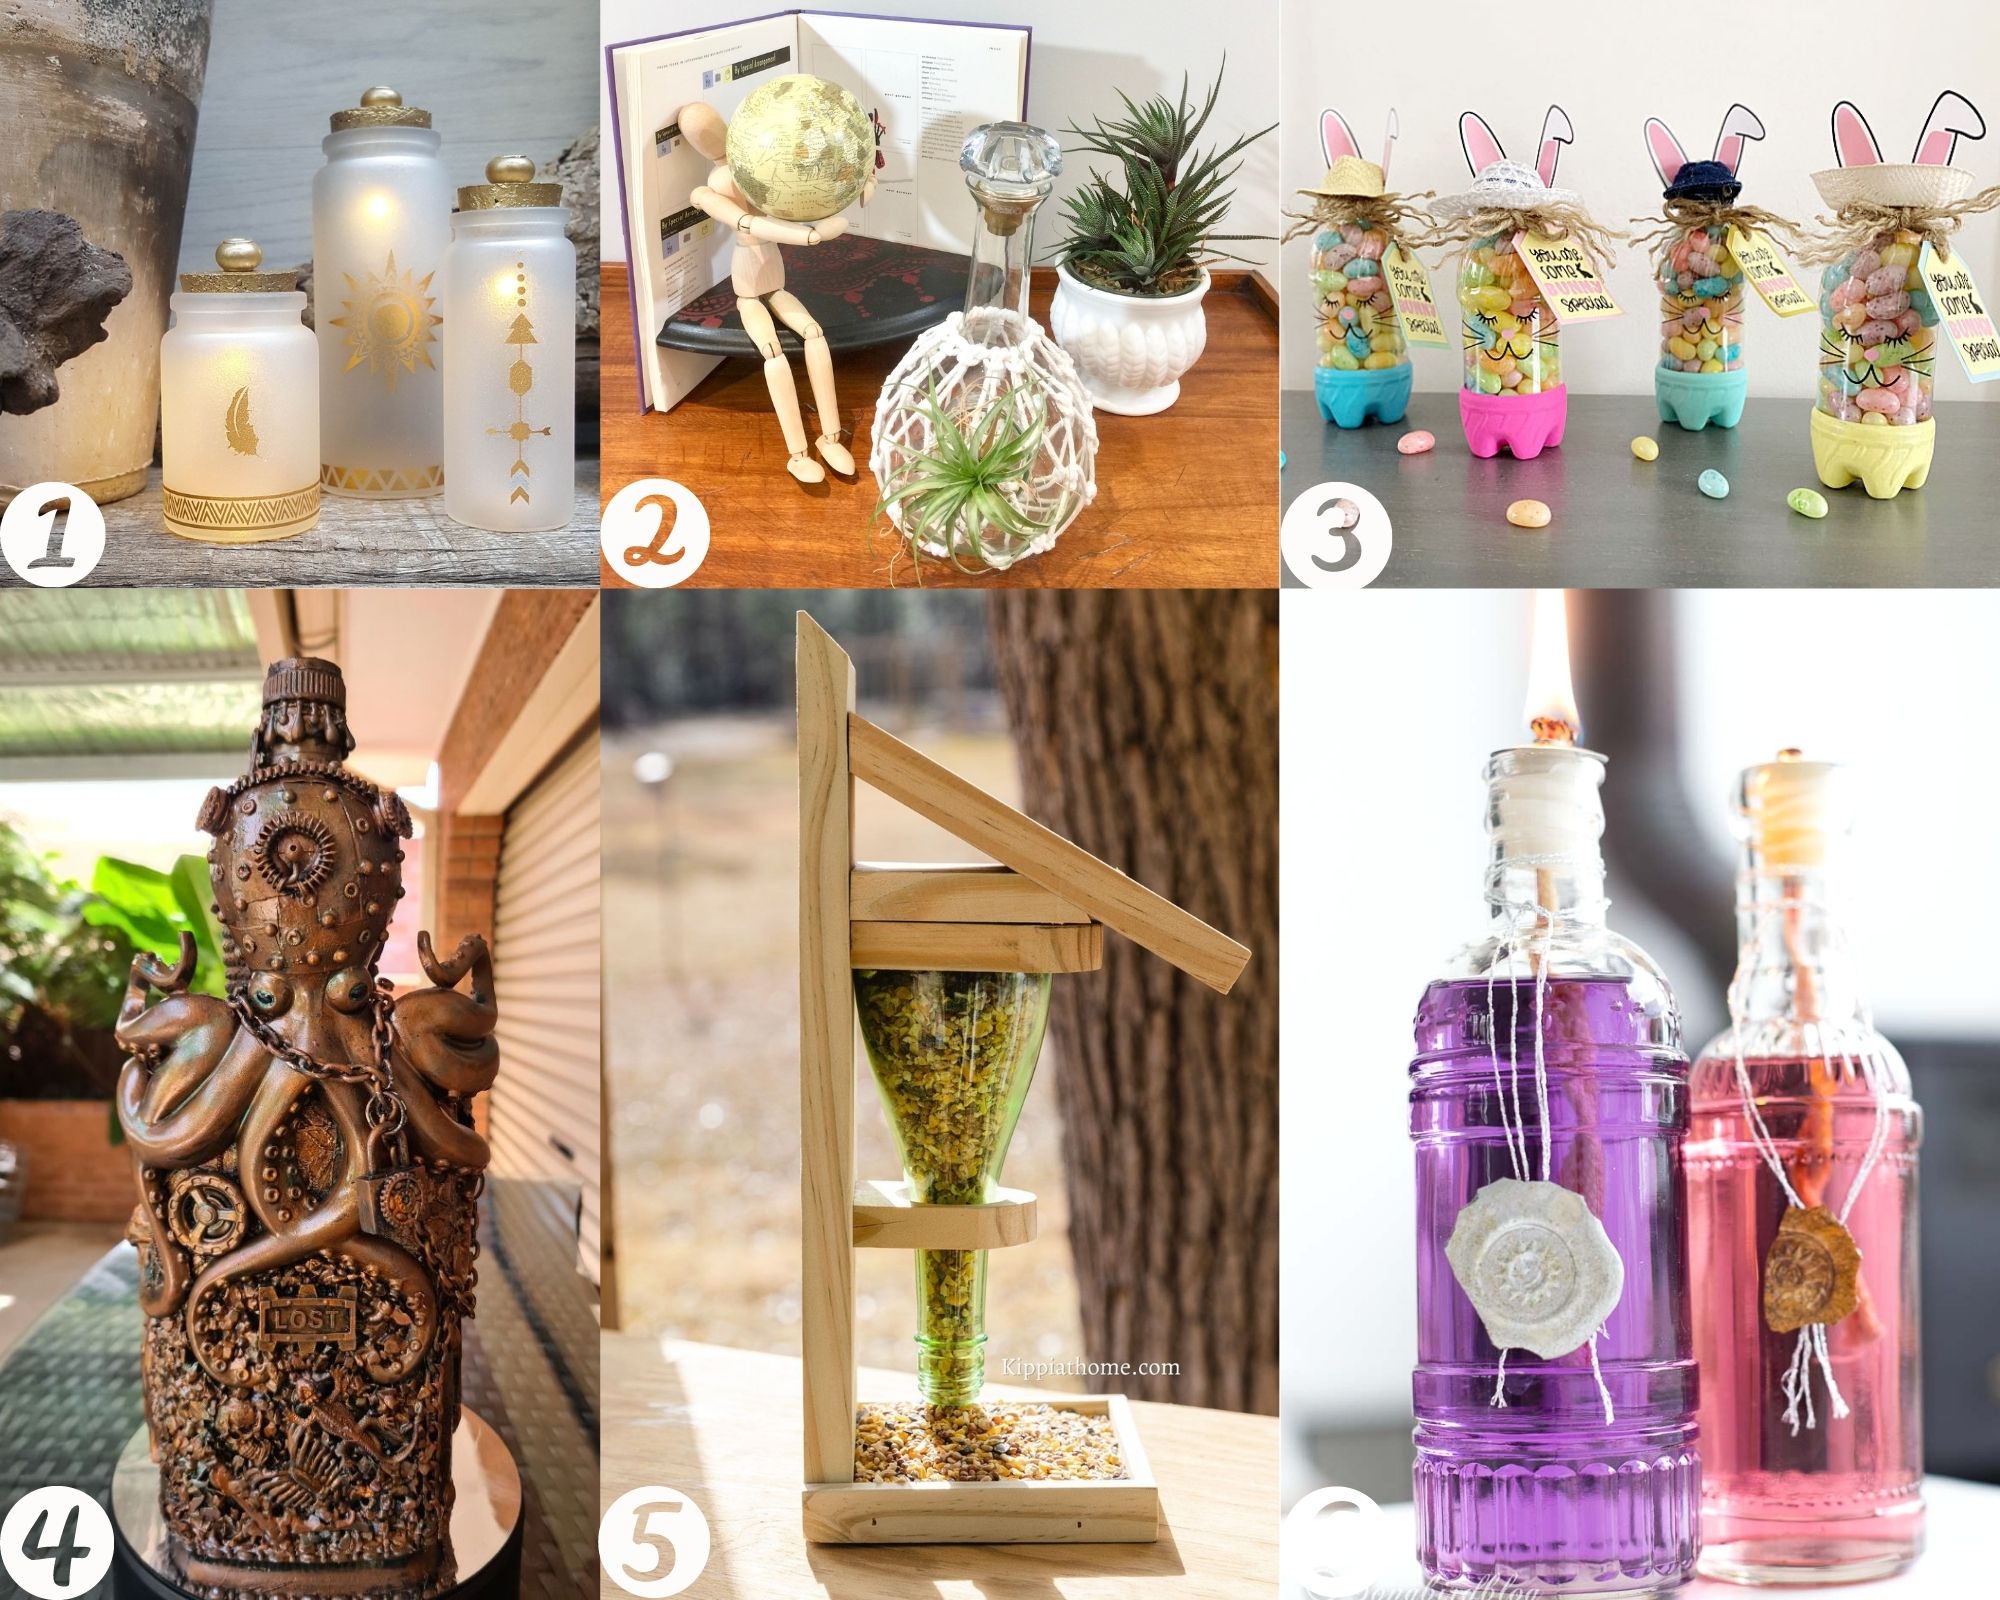
- A Crafty Mix|Glass bottle lights gold accents
- Birdz of a feather |Diy Air Plant holder
- Interior Frugalista|Recycled soda bottle Easter bunnies
- Me
- Kippi At Home| Wine bottle bird feeder
- Song Bird Blog|Diy tiki torch

If you’re interested in any of the items used in this project, we’d appreciate it if you used our affiliate links. Clicking these links earns us a small commission at no extra cost to you, helping us create more inspiring and exciting projects to share. We’d also love to hear your thoughts—feel free to leave a comment or share this post!
18 Comments
A Crafty Mix | 20-Minute Glass Bottle Lights With Gold Accents - A Crafty Mix
February 21, 2022 at 11:56 pm[…] altered mixed media bottle that looks like it came straight out of the Pirates of the Carribean made by […]
Sara
February 22, 2022 at 12:47 amAbsolutely amazing Anita; thank you for sharing your process! Brilliant idea to work with your local thrift store to buy up things that would be thrown away! The octopus is incredible on the bottle – not too big at all! You mentioned that you haven’t found a glue that will stick embellishments securely onto the glass so I’m wondering how did you glue the octopus onto the glass? Is that why you left the label on?
Anita Holland
February 22, 2022 at 12:02 pmThanks so much Sara. I pulled the label off after I had moulded the octopus to the bottle. If you zoom in and look closely you will see I added a mesh under the octopus. The octopus was then glued on top of the mesh which holds it in place. Some items will stick but with handling they do eventually fall off.
Michelle Leslie
February 22, 2022 at 1:06 amYou’re definitely not cheating by sharing another mixed media project, Anita. I’ve tried to do it but it never looks quite right, so for you to share your tips and tricks is the best. I feel far more confident now. Love how this one turned out. That octopus is AhMazing!!!!!!
Anita Holland
February 22, 2022 at 12:03 pmThanks so much Michelle, I was so excited to find the octopus and it turned out great in the end. Now I have finished painting my house hopefully I can get back outside in my shed for different projects.
Kippi
February 22, 2022 at 1:42 amYour designs for upcycling bottles are so unique. Your eye for combining elements, textures, and finishes is genius!
Happy Spring,
Kippi
Anita Holland
February 22, 2022 at 12:04 pmThanks Kippi, I seem to get more creative the more I do.
Marie B.
February 22, 2022 at 2:20 amIt was great fun learning your process for your amazing steampunk creations. Love that your local charity shop collects things for you that they can’t sell. You’ve amassed quite a collection of bits and bobs but truthfully, it is your impeccable eye and natural talent that brings these amazing creations to life. Love the octopus taking center stage!
Anita Holland
February 22, 2022 at 12:05 pmThanks Marie, It does help that the manager of my local shop is a friend. But they would just throw them out anyway, why not make some money. Thanks for the awesome compliment.
Maria
February 22, 2022 at 11:41 amyour talents are always amazing. Such a fun piece
Anita Holland
February 22, 2022 at 12:06 pmThanks Marie, this one was lots of fun to make.
Sherrye Grotte
February 22, 2022 at 3:35 pmThanks for a peak into the process of the making of! Very fascinating and interesting. What a talent you have!
Anita Holland
February 23, 2022 at 8:45 amThank you so much Sherrye and you are very welcome.
Rosemary Palmer
February 25, 2022 at 1:39 amAgain, amazed at the creativity you come up with. I love using liquor bottles for things.
Felicia
June 30, 2023 at 5:34 amThank you so much for sharing your brilliant ideas in making stunningly beautiful steampunk art. Your work is amazing and inspiring.
Anita Holland
July 1, 2023 at 10:15 amThank you so much Felicia, happy to help.
magda
April 5, 2024 at 12:07 amciao i tuoi lavori sono molto belli complimenti
Anita Holland
April 5, 2024 at 1:32 amThank you.