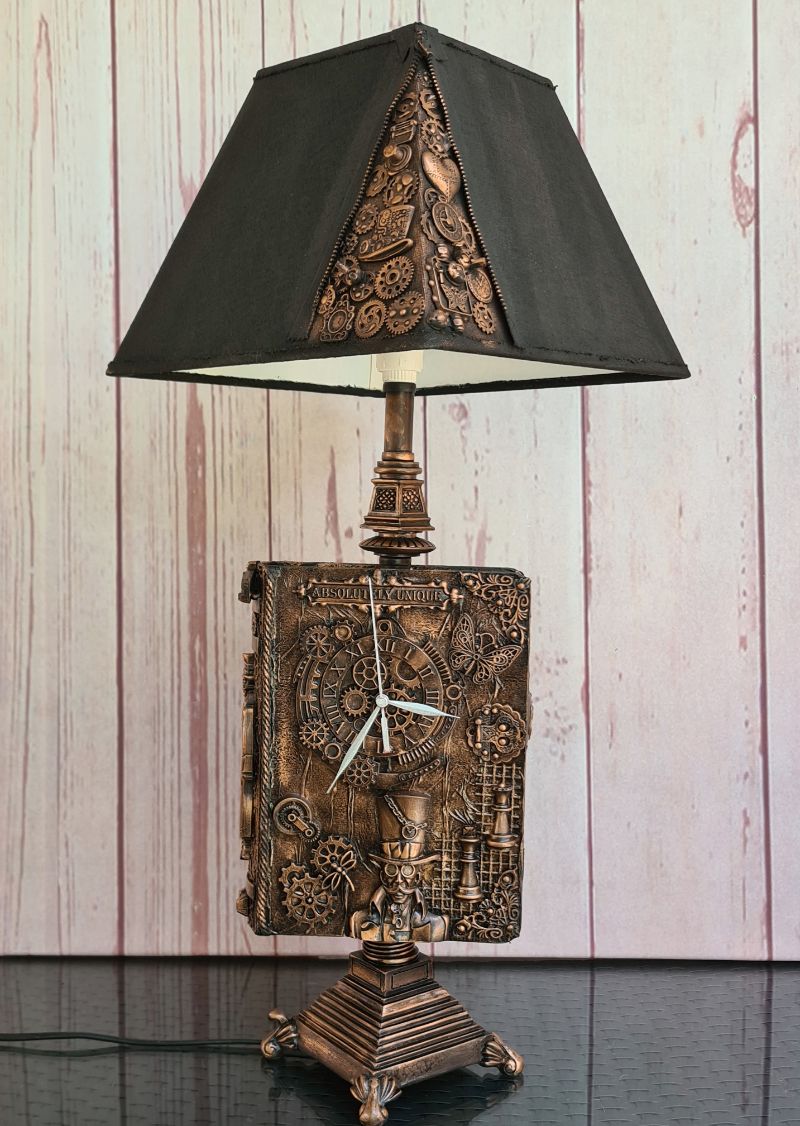
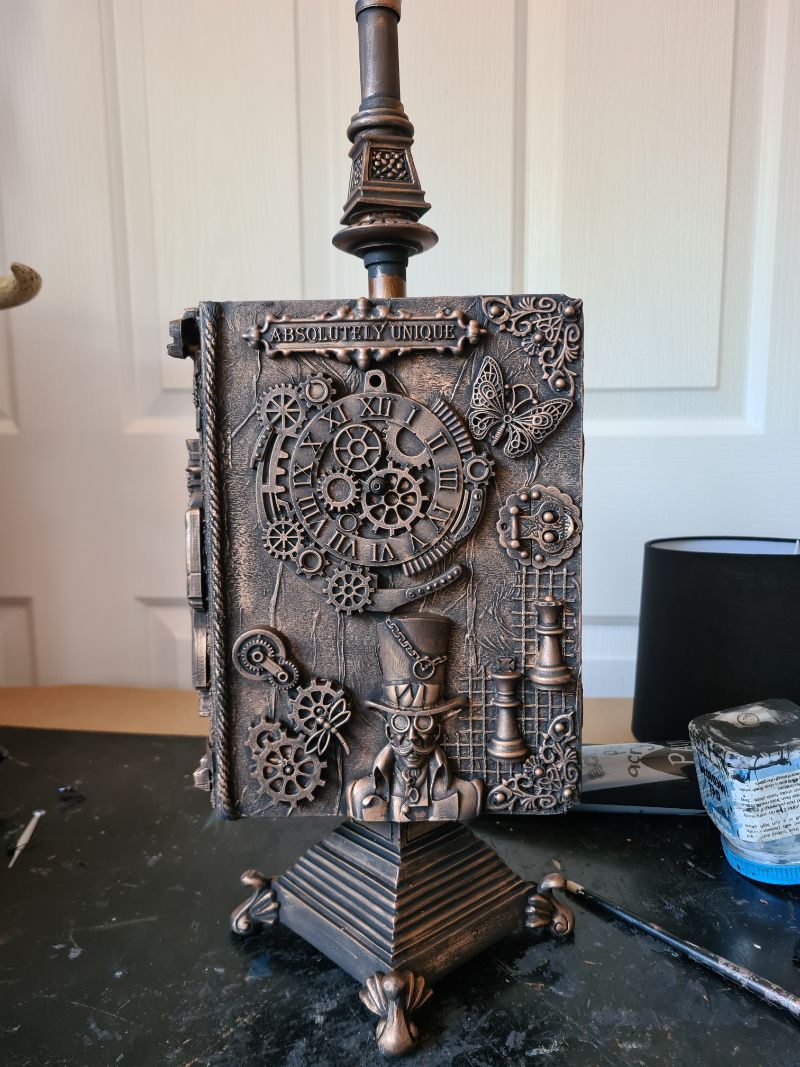
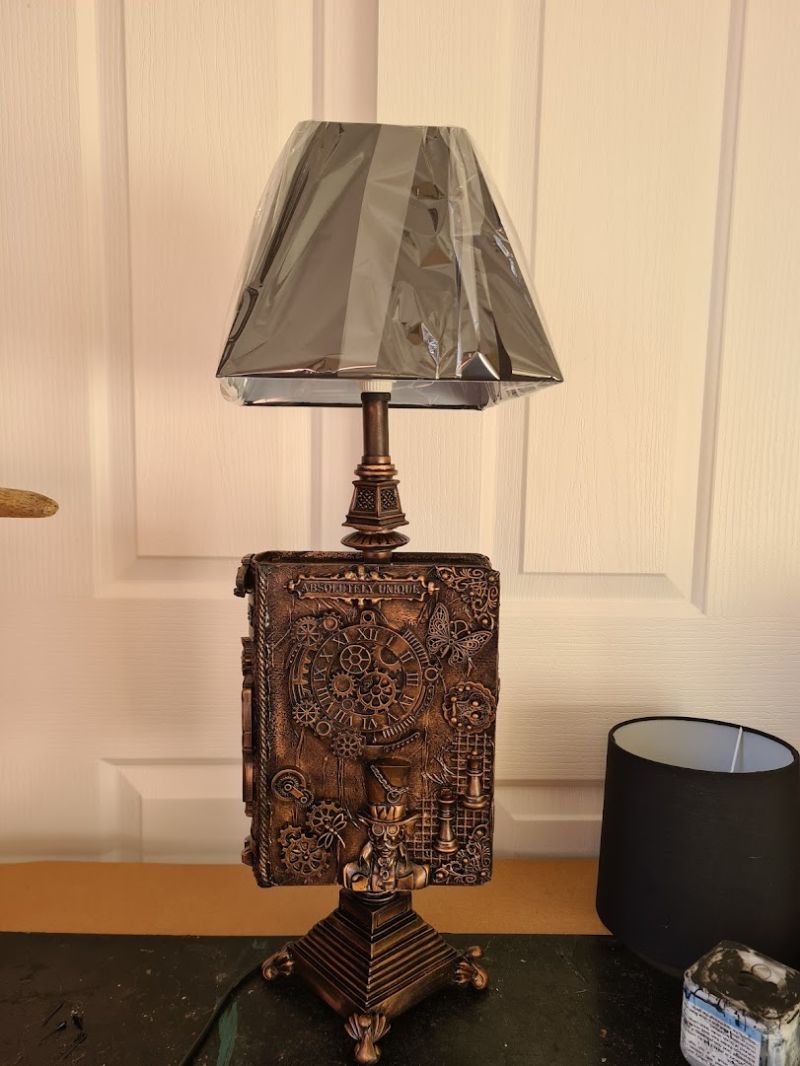
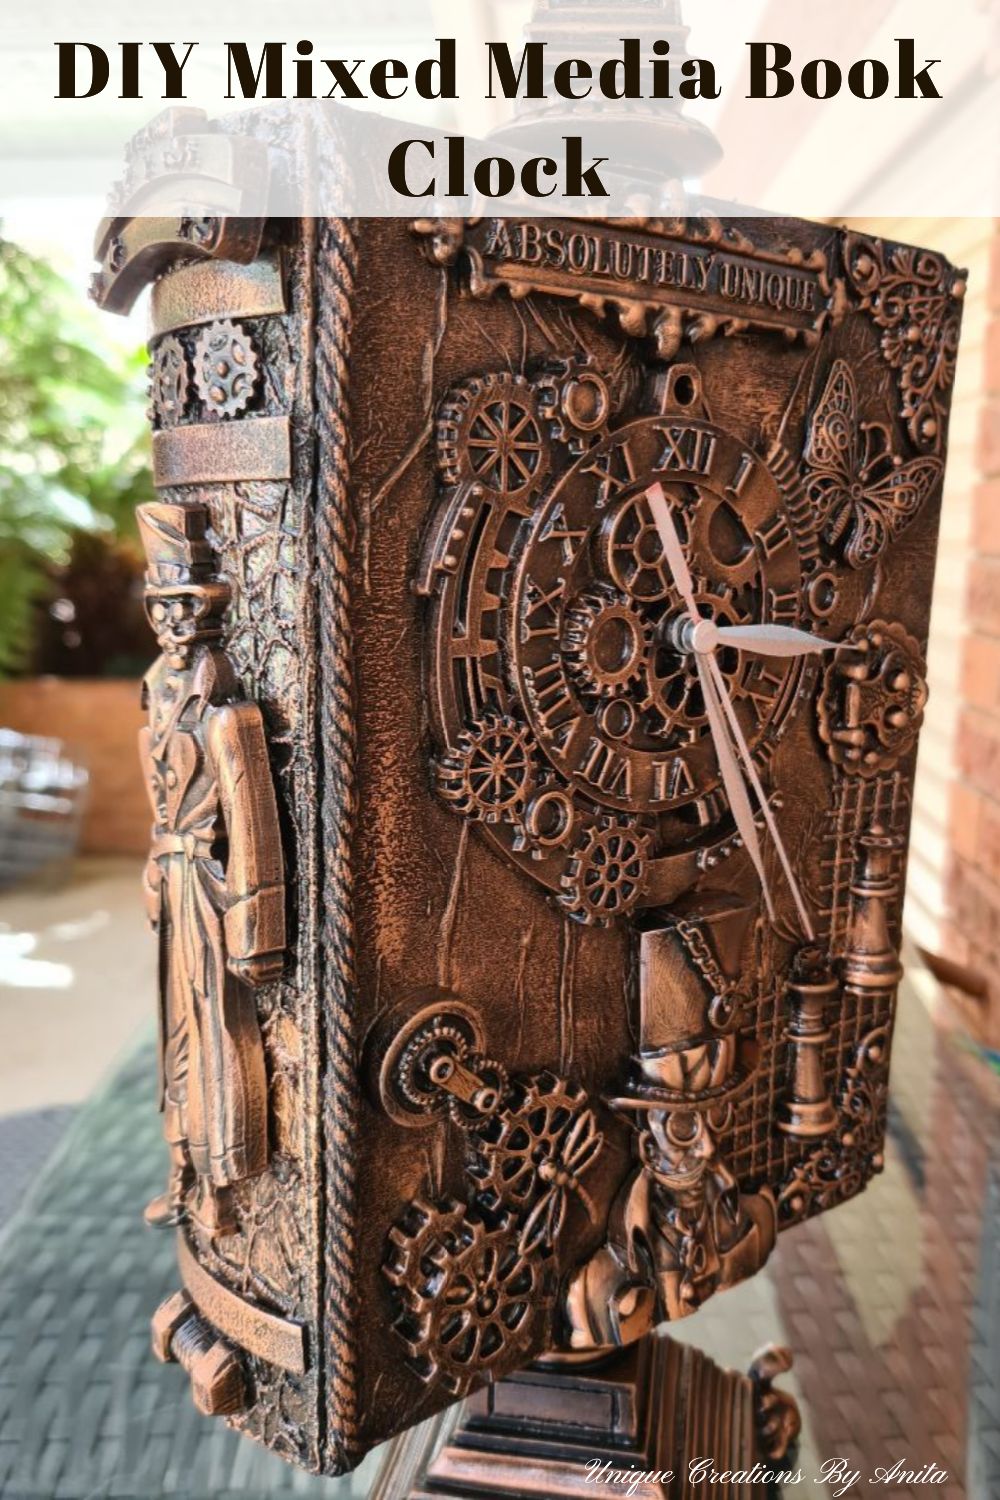
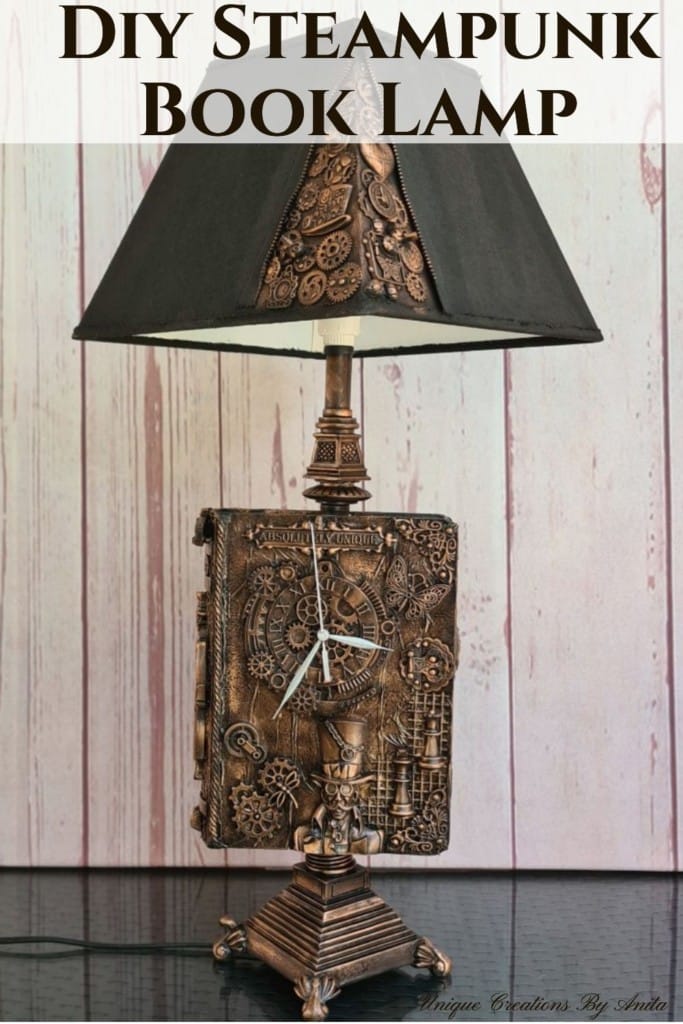
This DIY steampunk book lamp with a hidden clock began as my “Bodacious Books” project for the first IBC (International Bloggers Club) challenge of 2022. I turned a plain lamp and a papier mâché book box into a mixed-media statement piece that doubles as secret storage. If you love steampunk, texture, and upcycling, this easy tutorial shows every step, from cutting clean holes to adding bronze highlights and a working clock.
This project is quick to make and easy to customise to your home’s style. It began as a steampunk book lamp and, by the time I finished, it featured a built-in clock as well. More about the IBC at the end of this post.
Before we dive into this tutorial, be sure to subscribe to my bimonthly newsletter to be the first to see my latest projects. You can also follow me on Pinterest and Facebook, where I also include my unique mixed-media art projects
DIY Steampunk Book Lamp with Hidden Clock
**This post may contain affiliate links. This means I earn a small commission on links used at no extra cost to you. Please see my disclosure policy for more information.**
Materials and tools
- Materials and tools
- Paper mâché book-shaped box (craft store size to suit your lamp)
- Table lamp with a straight centre pole
- Clock mechanism with hands (kit or salvaged)
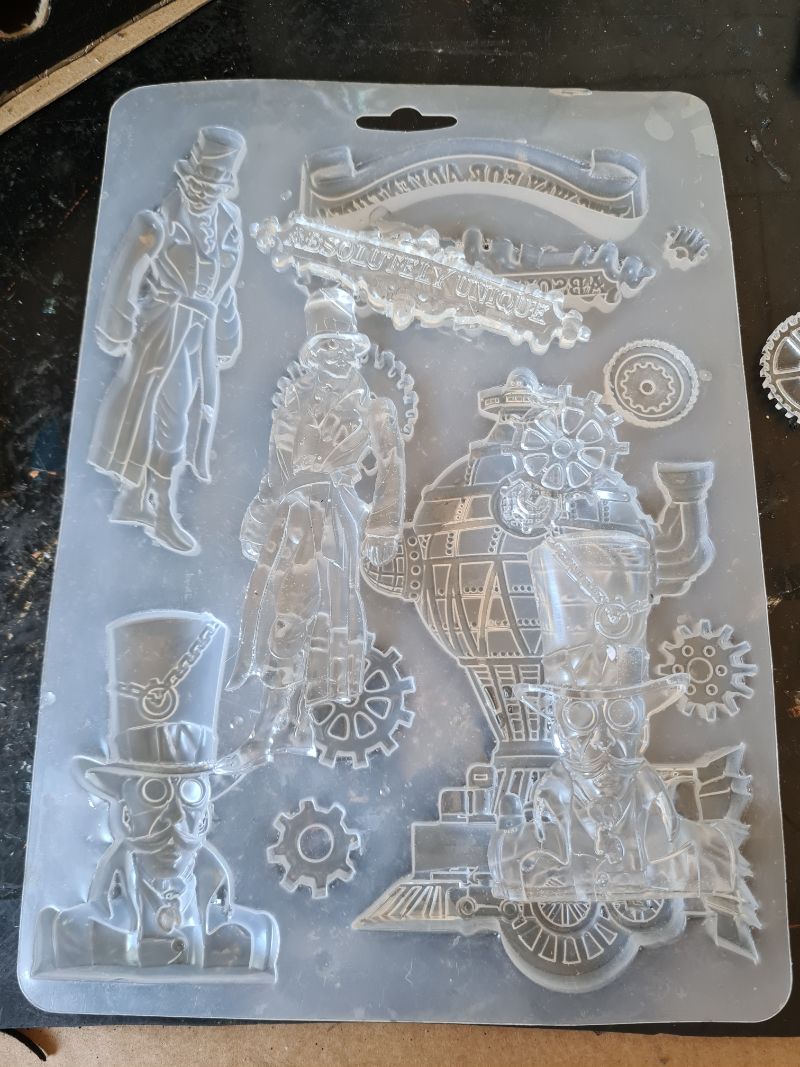
- Silicone moulds (Stamperia vagabond range)
- Epoxy resin (for casting embellishments)
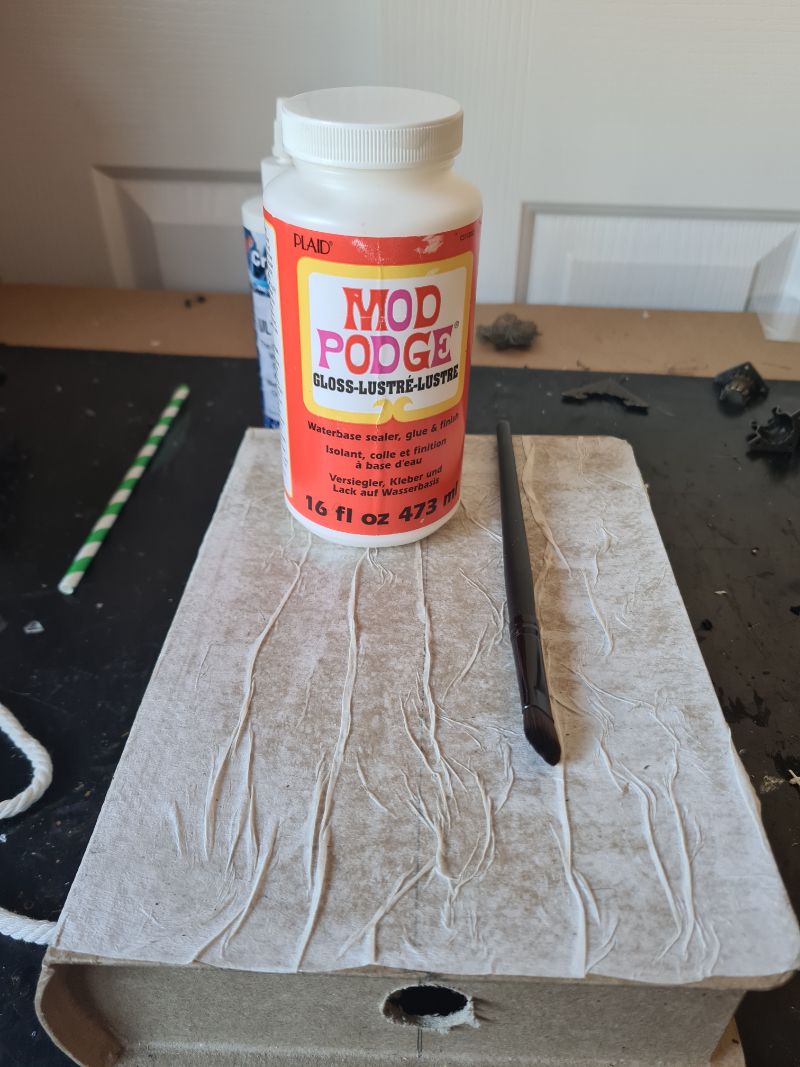
- Craft glue or PVA/Mod Podge
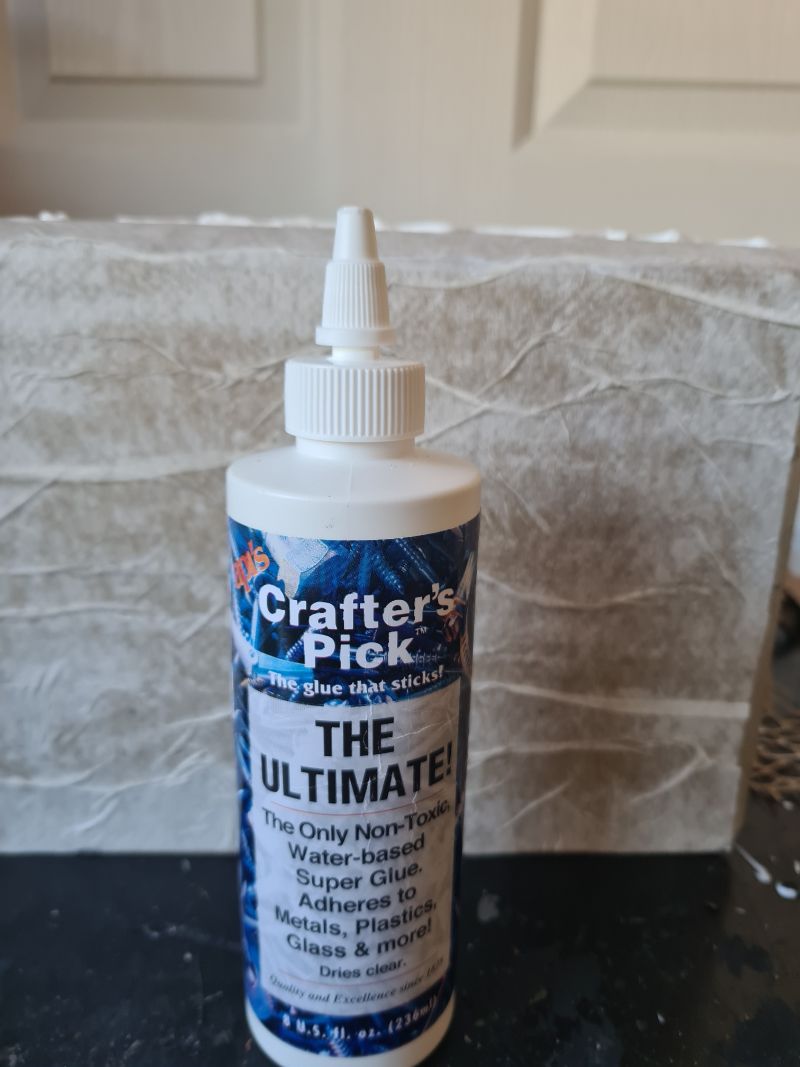
- Crafters Pick “The Ultimate” (or strong tacky glue)
- Hot glue gun and glue sticks
- Paper towel, burlap/mesh/rope/leather scraps, thin cardboard
- Black acrylic paint
- Metallic bronze wax paste (any brand)
- Old makeup brushes for soft dry-brushing
- Spray gloss polyurethane (clear sealer)
- Small magnet (for a hidden latch, optional)
- Zipper and small gears (for lampshade detail, optional)
- Craft knife and cutting mat
- Drill with hole saw or spade bit (size to match lamp pole)
Find a suitable lamp
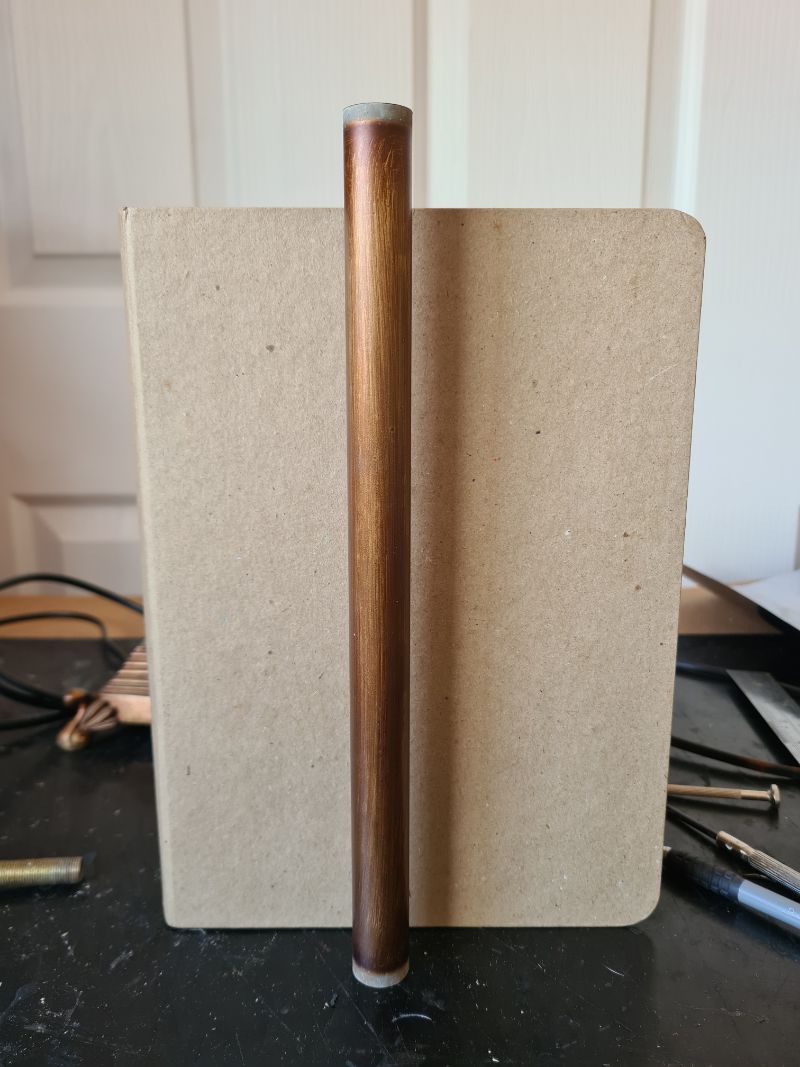
To make this project, you’ll need a lamp with a pole long enough for the height of the book. I had an old lamp that was so boring it ended up in the cupboard waiting for inspiration. It turned out to be perfect for this project—being a hoarder does pay off sometimes.
My first thought was to use a real book and hollow out the middle to fit over the lamp pole. While that’s fairly easy to do, it can affect the balance of the lamp. The spine side is heavier than the other side, and the only way to counteract that is to drill the hole off-centre, which wouldn’t look very good.
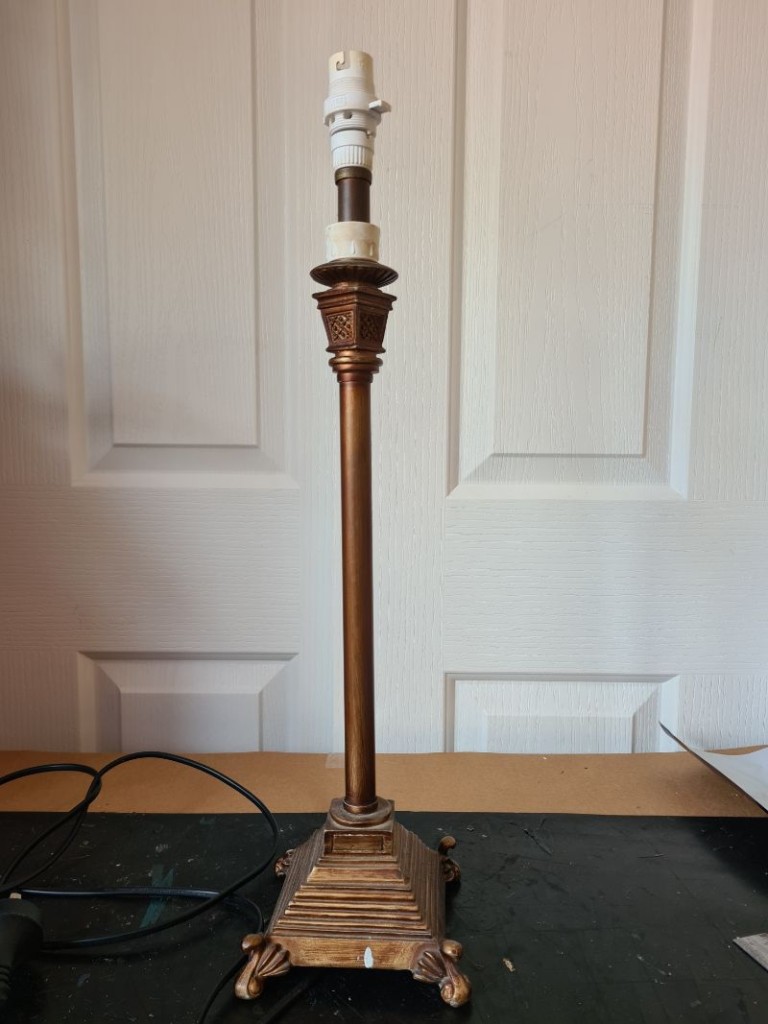
Prepare the book
In the end, I used a paper-mâché book-shaped box from a craft store for $6. Before decorating, I made sure it would fit onto the lamp. I also took photos of the lamp and its wiring so I could put it back together correctly later.
Mark the centre on the top and bottom. Drill neat holes to suit the pole.
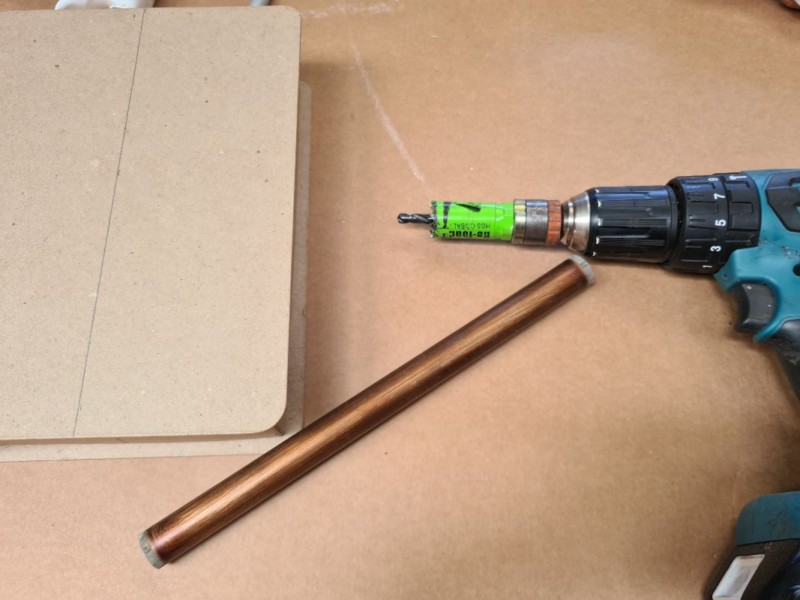
Dry-fit the book on the pole to confirm clearance for the wiring and the switch.
Decorate the book
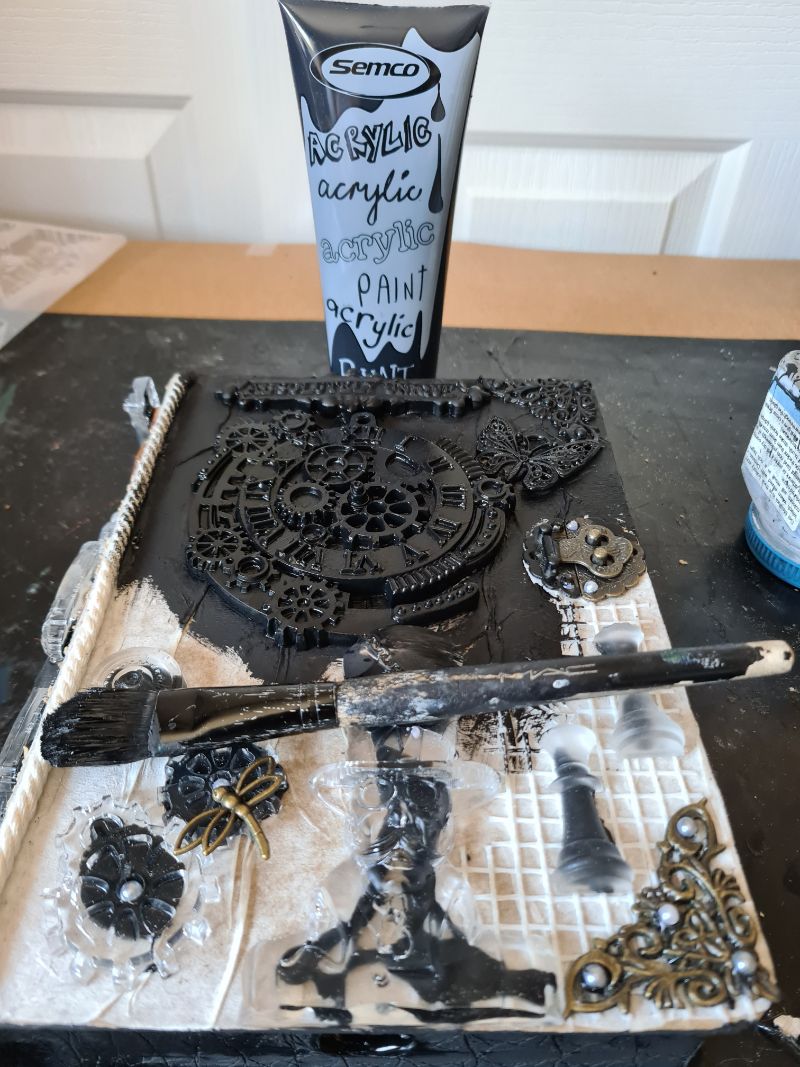
To decorate the book, I used a mixed-media technique, and you don’t need to be arty to do it. I’ll walk you through it step by step. Start by adding texture to the surface: brush on a layer of craft glue, then lay a sheet of paper towel over the top and gently press it into soft creases.
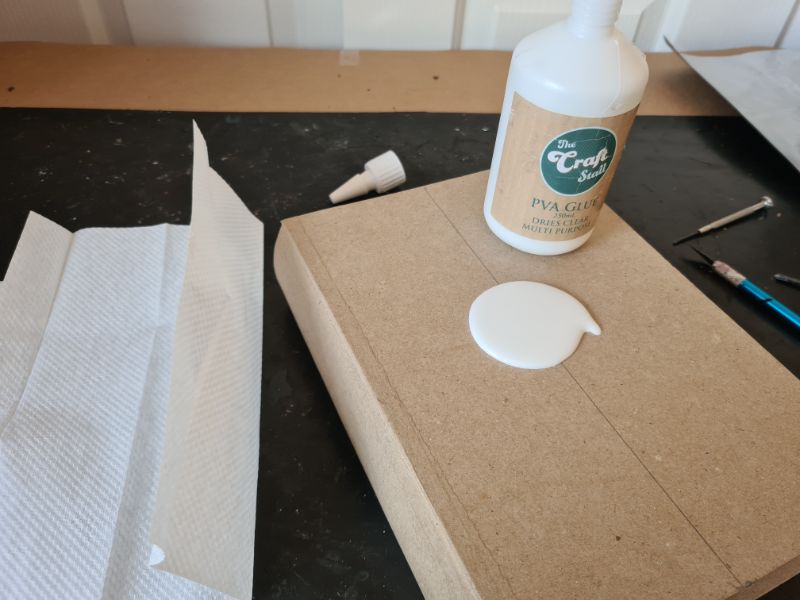
Next, use your fingers to gently shift the paper towel and form soft creases across the surface.
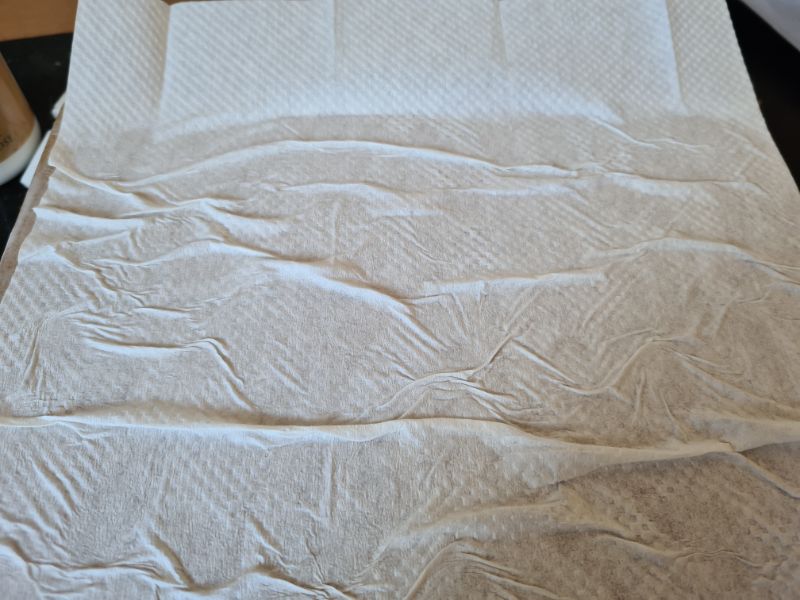
Once the glue dries, brush on another coat of glue or Mod Podge. This seals the texture and gives later embellishments a better surface to adhere to. This is the easiest way to add texture. For more tips and tricks on items you can use to add texture to your assemblage projects, this post has it all.
You can use burlap, mesh, rope, leather, and even cardboard—just as I did on this replica camera.
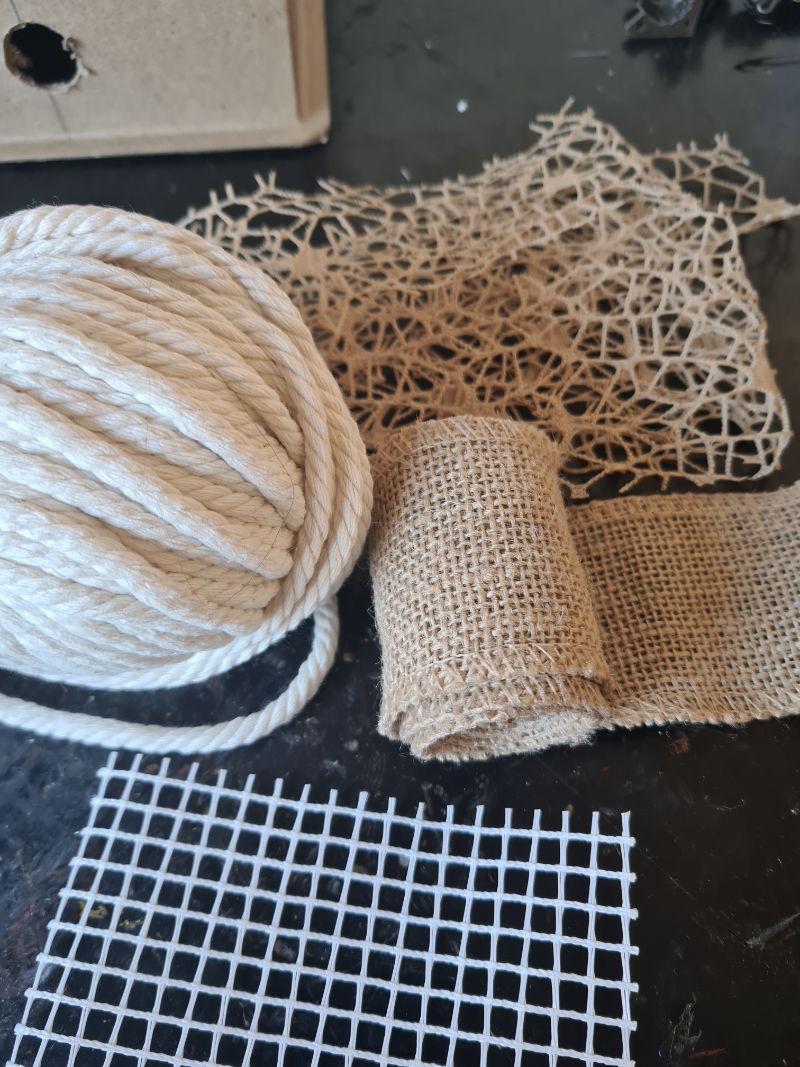
The glue that works best for me is Crafters’ Pick “The Ultimate,” or tacky glue. Brush a thin layer over the surface and lay the mesh on top. Then use a small brush to dab more glue over the mesh so it grips and stays in place.
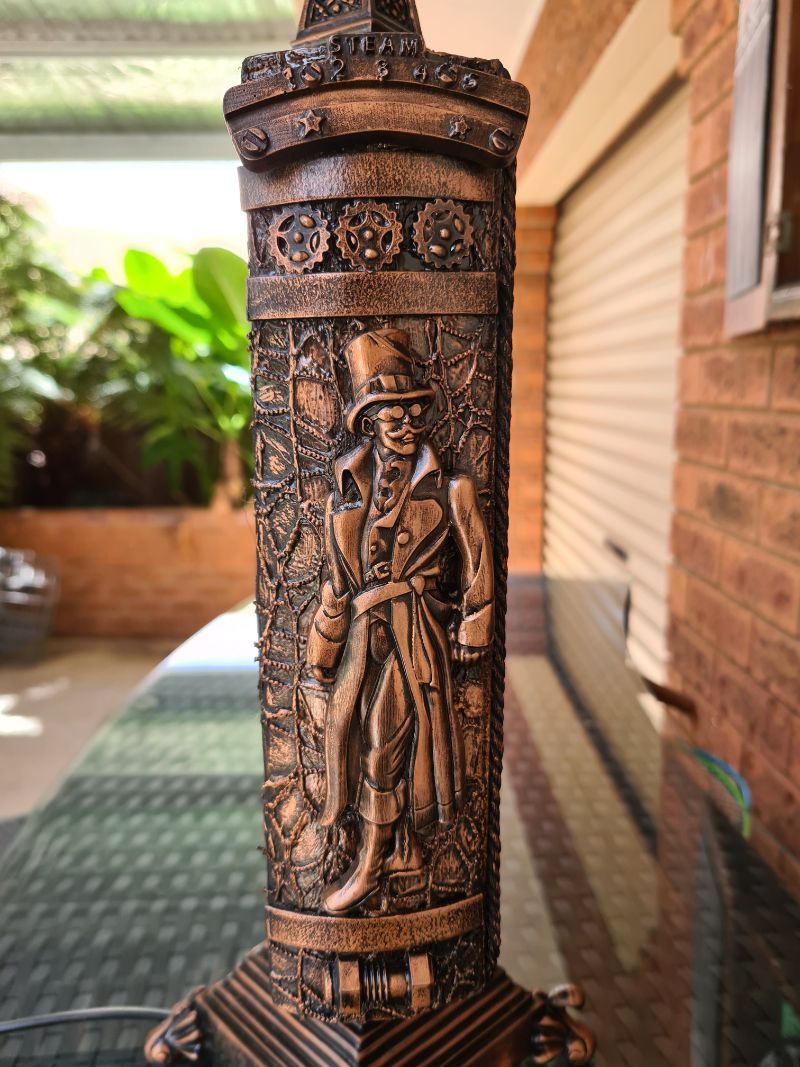
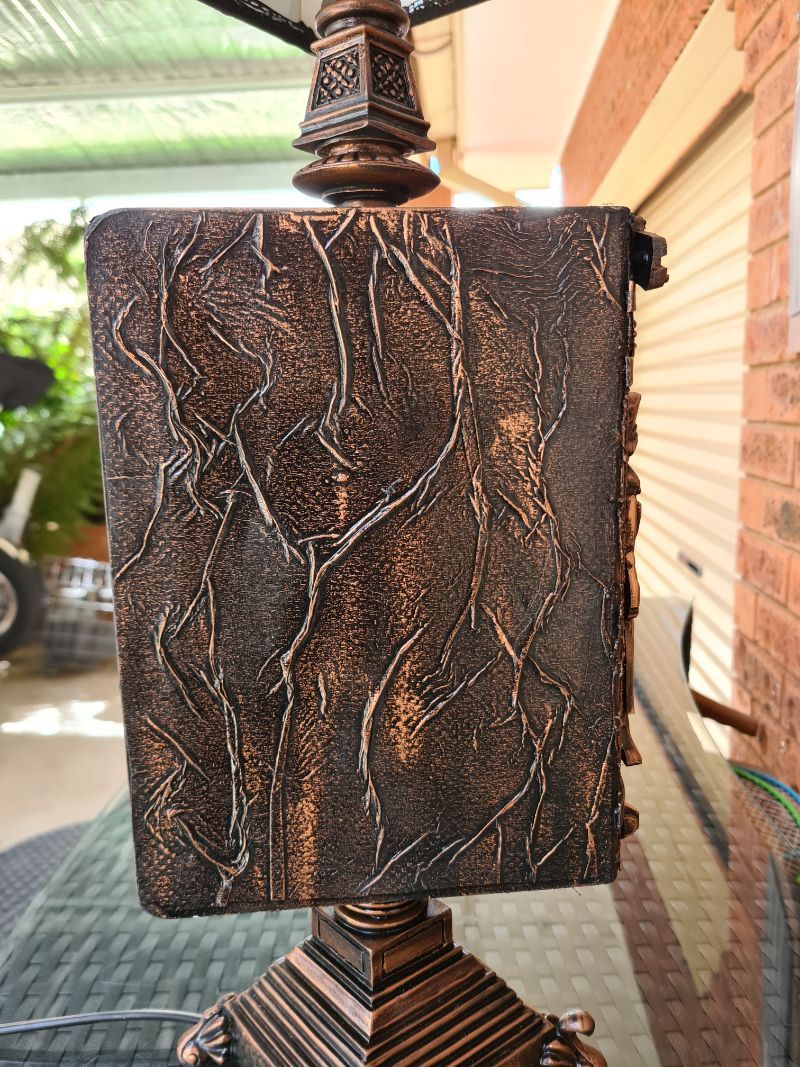
Making the steampunk embellishments
Over the years, I’ve collected a stack of silicone moulds and use them to cast my embellishments. I pour epoxy resin into the moulds rather than clay or other mediums because it cures stronger and holds detail better. The piece shown below was made with a Stamperia mould—they offer a great range if you want styles beyond steampunk.
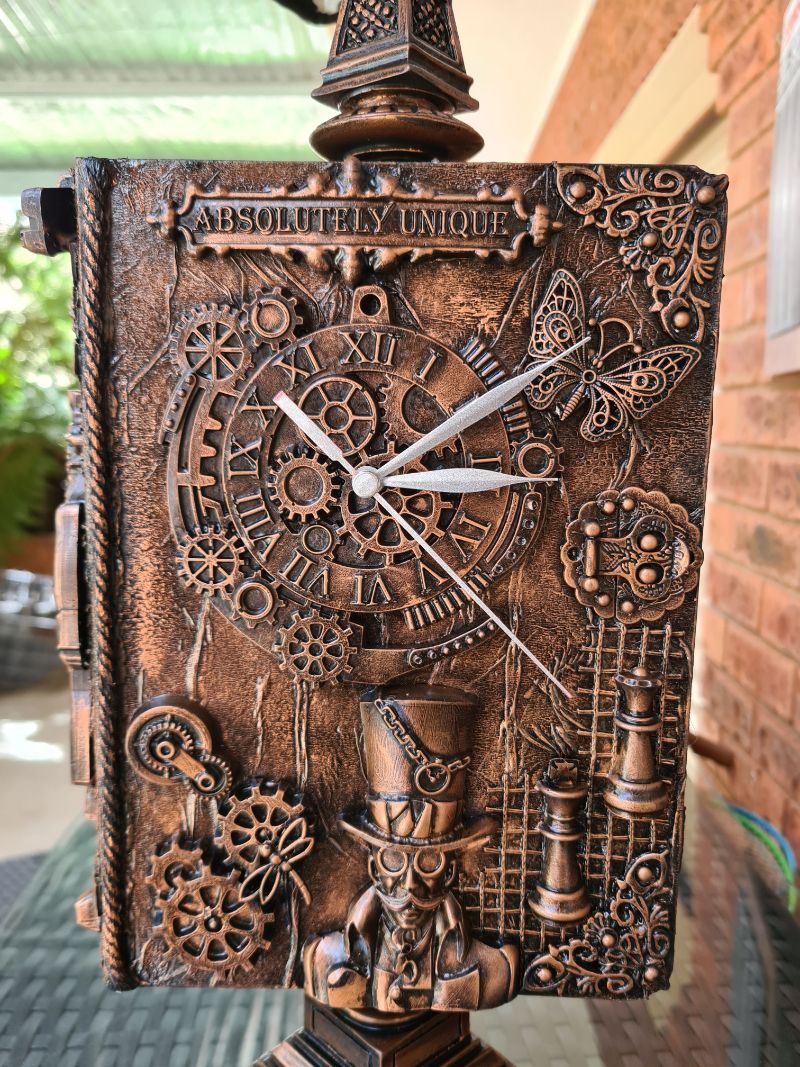
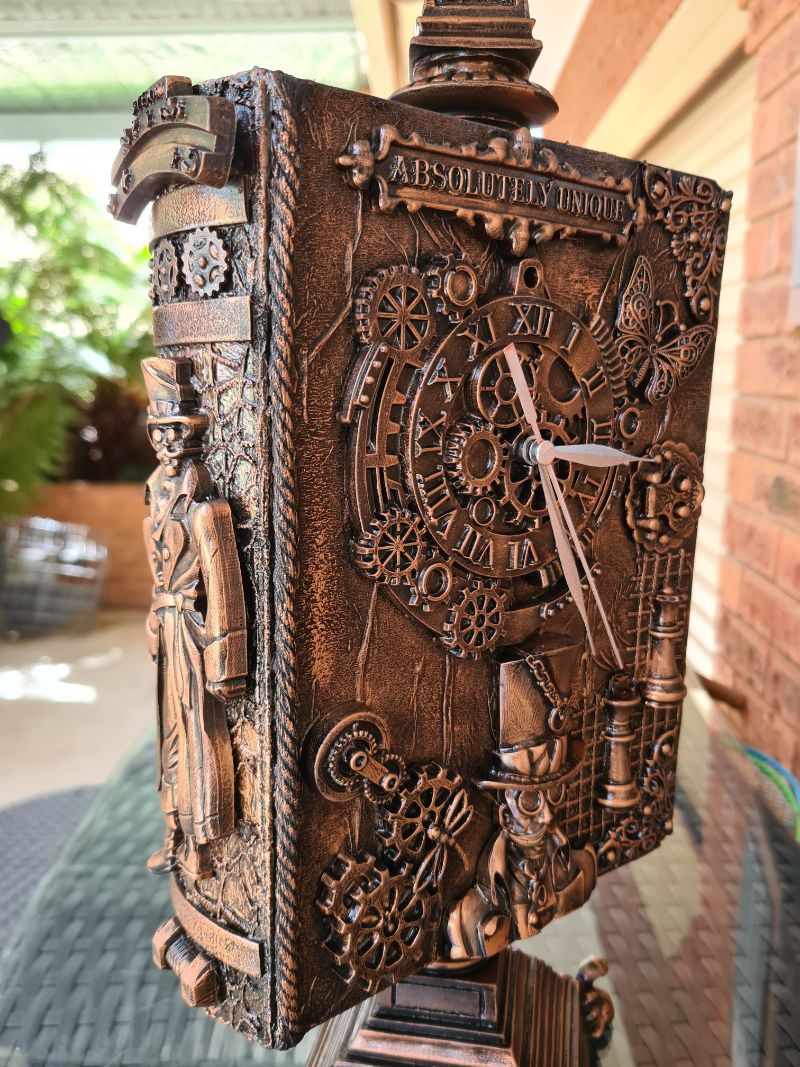
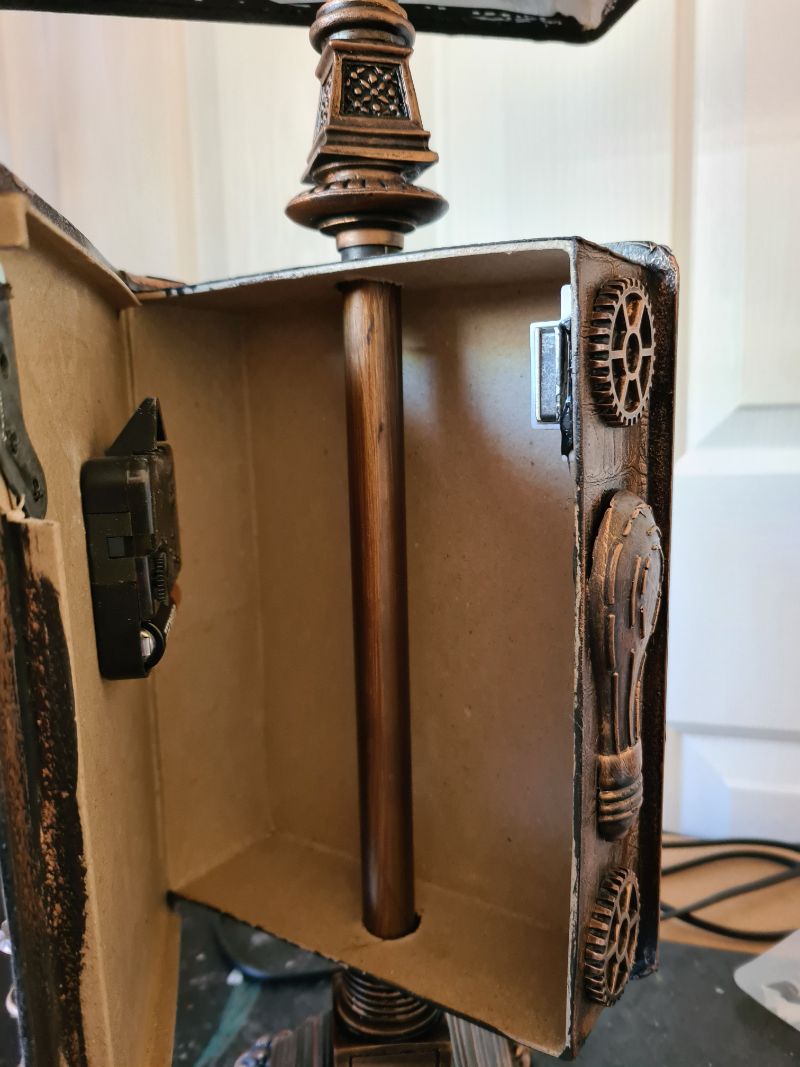
Adding the clock to the book
For the clock, you’ll need a clock mechanism. Over the years, I’ve made a few using clock-making kits bought online. Another budget-friendly option is to pop into an op shop and salvage the mechanism from a cheap second-hand clock.
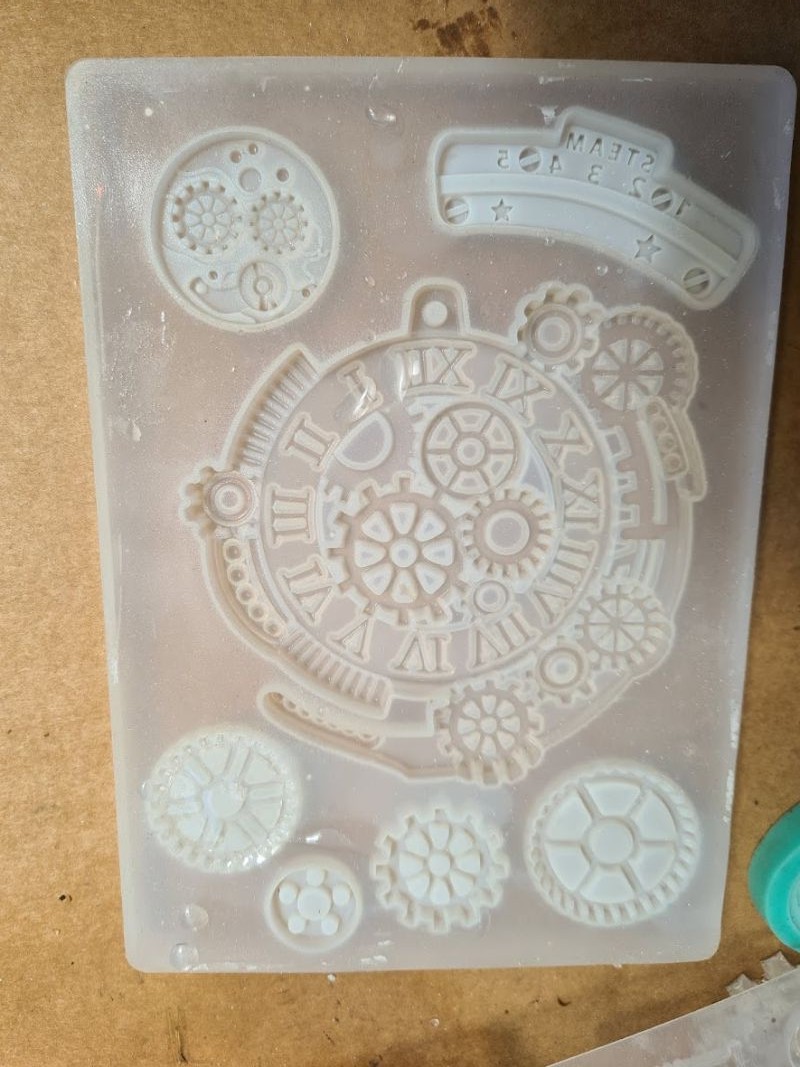
For the face of my clock, I used another steampunk silicone mould. This was not designed as a clock face, but it was easily adapted by adding a hole in the centre for the mechanism.
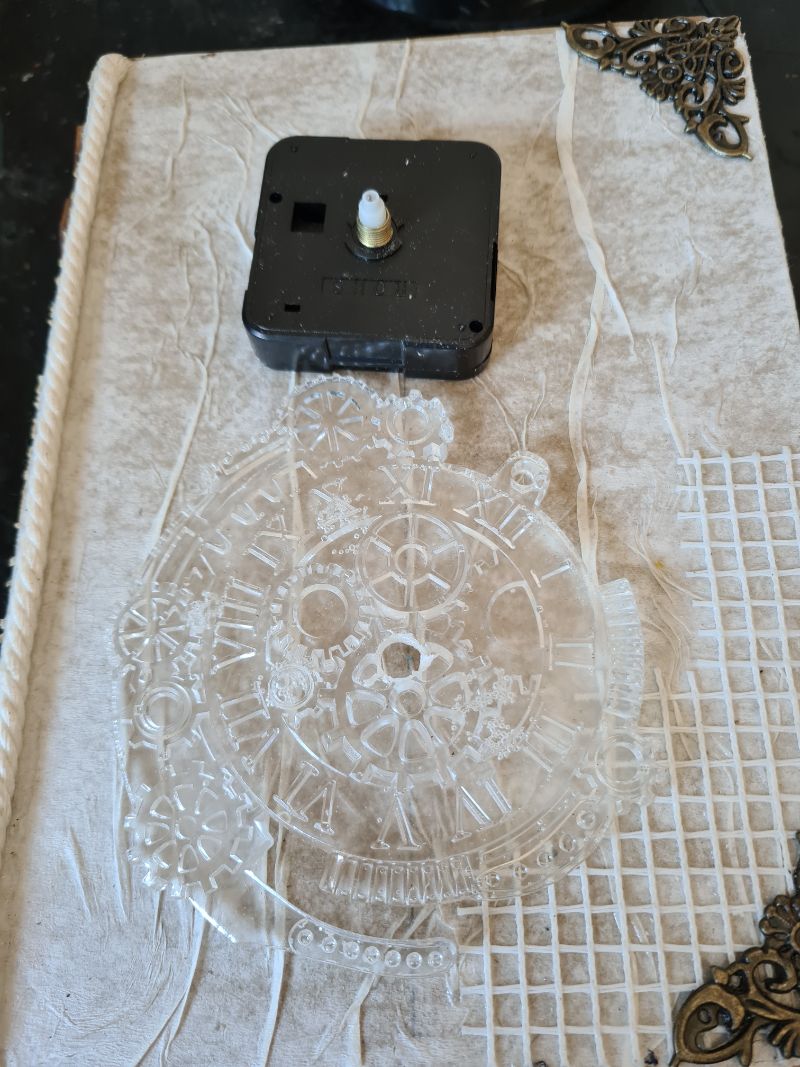
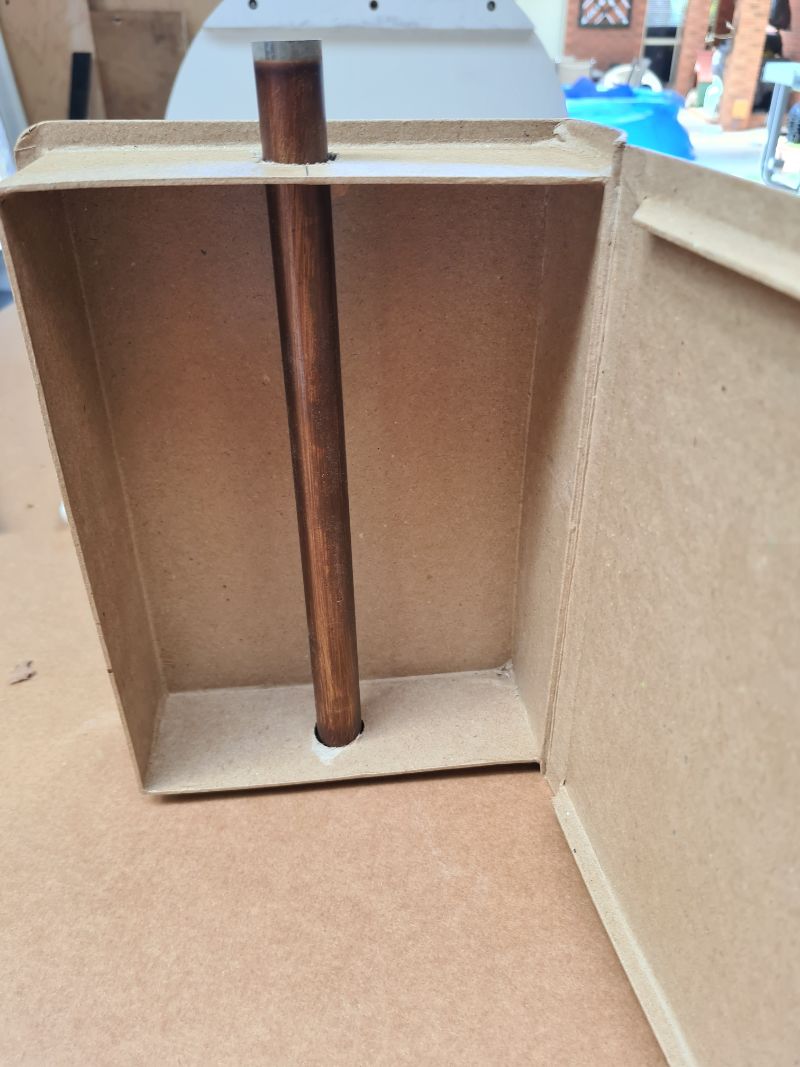
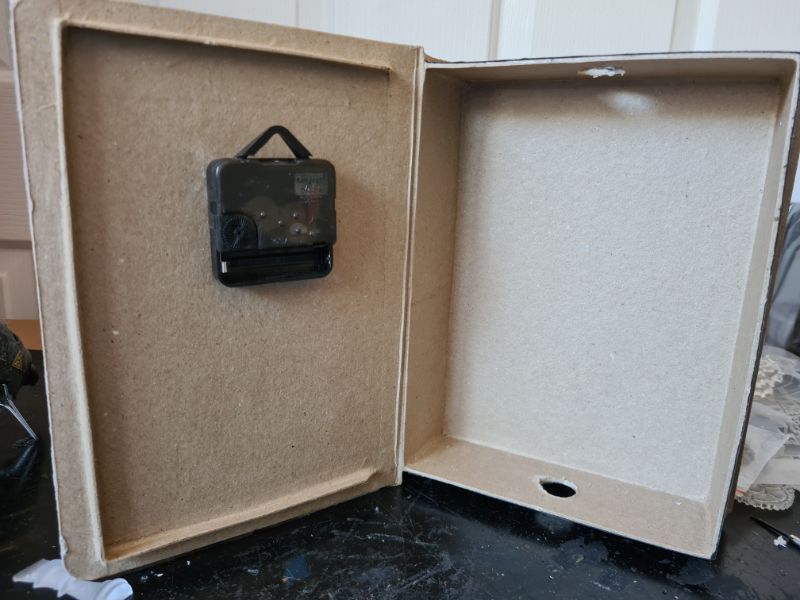
Next, I dry-fitted all the embellishments to decide their final positions. Once happy with the layout, I fixed them in place with hot glue. For the clock opening in the book, I drilled a hole the same size as the one in the clock face. Then I hot-glued the clock mechanism inside the book lamp, centred behind the hole.
Painting the book lamp
I also added a few extra embellishments from my craft stock—the lock and metal corners—for more texture. Next, paint the entire surface with black acrylic paint or gesso.
For the bronze highlights, I used a metallic bronze wax paste. You can use a store-bought wax paste or make your own if you have the ingredients.
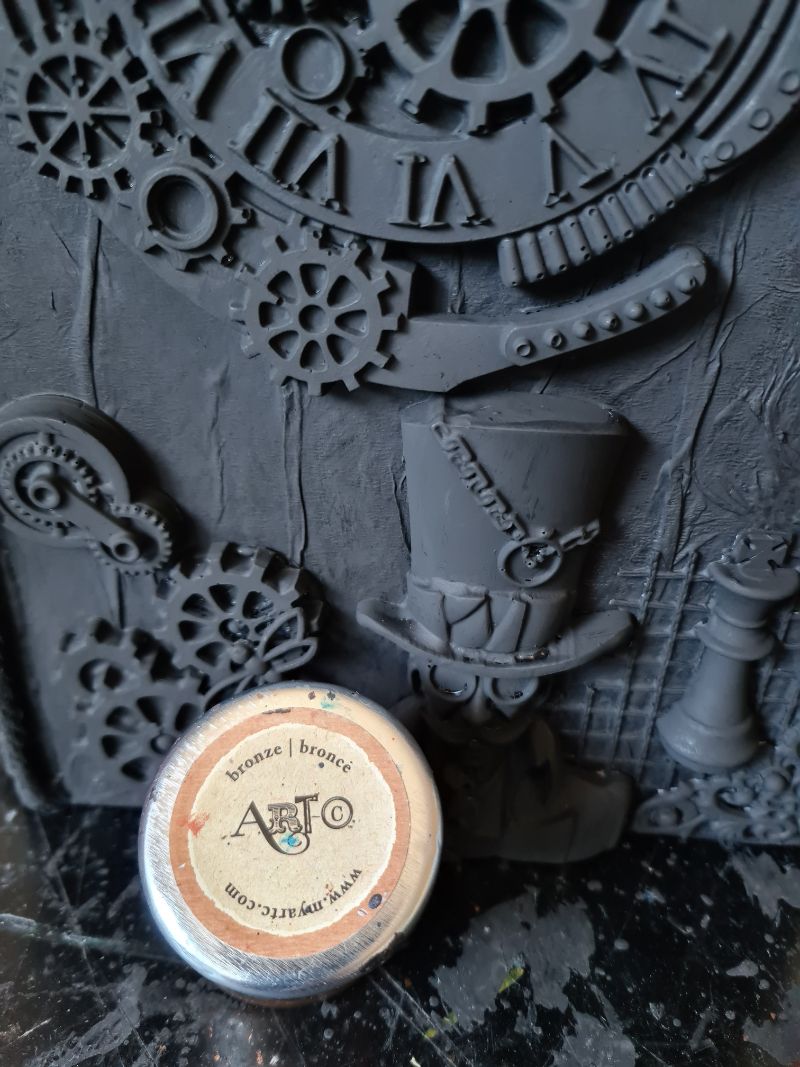
This is applied by adding the wax using your finger to all the raised surfaces first.
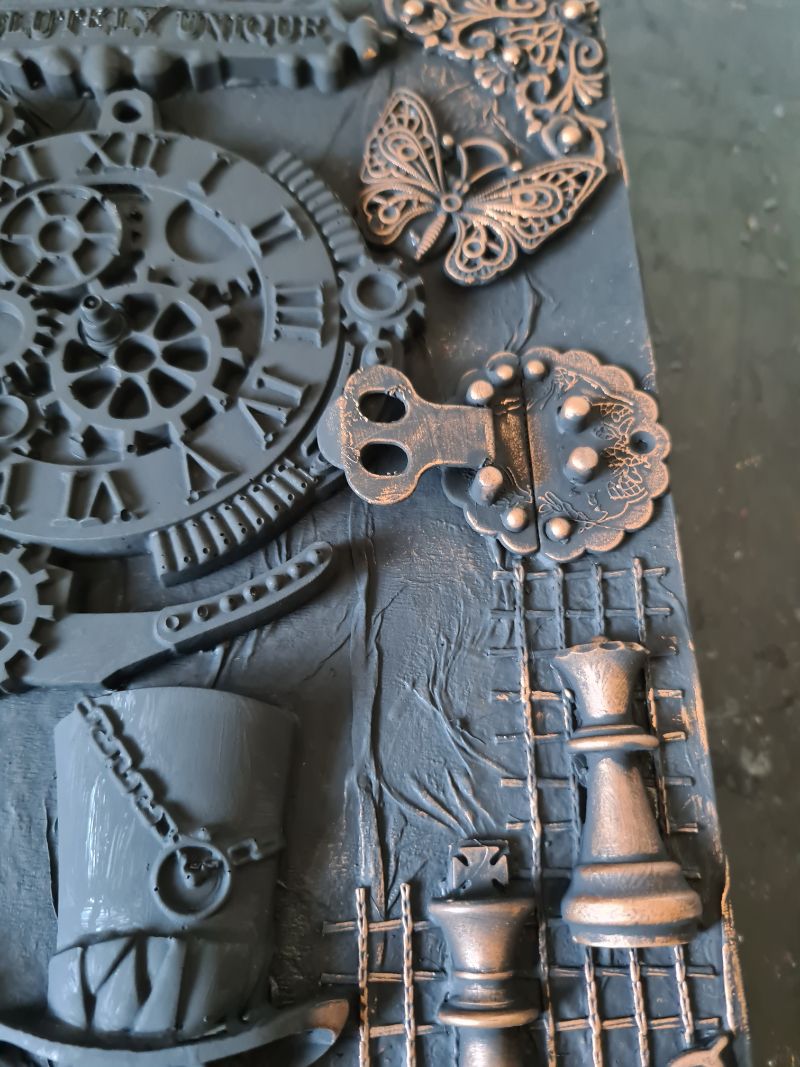
After you’ve highlighted the raised areas with bronze, softly blend a very light colour over the black in the recesses between the embellishments. I use old makeup brushes for this—the worn bristles give a gentle, diffused finish and, truth be told, this technique does ruin them over time.

I’ve found this is the best way to lay down a light layer without “painting” the colour on. Load the brush with the tiniest amount of colour and gently swirl it into the gaps. This is how it looks once that soft colour settles between the details.
Seal the book surface
Let the wax cure for about eight hours before sealing. Spray on two light coats of gloss polyurethane. To finish, paint the clock hands silver so they pop against the bronze. Reassemble the lamp and fit the shade.
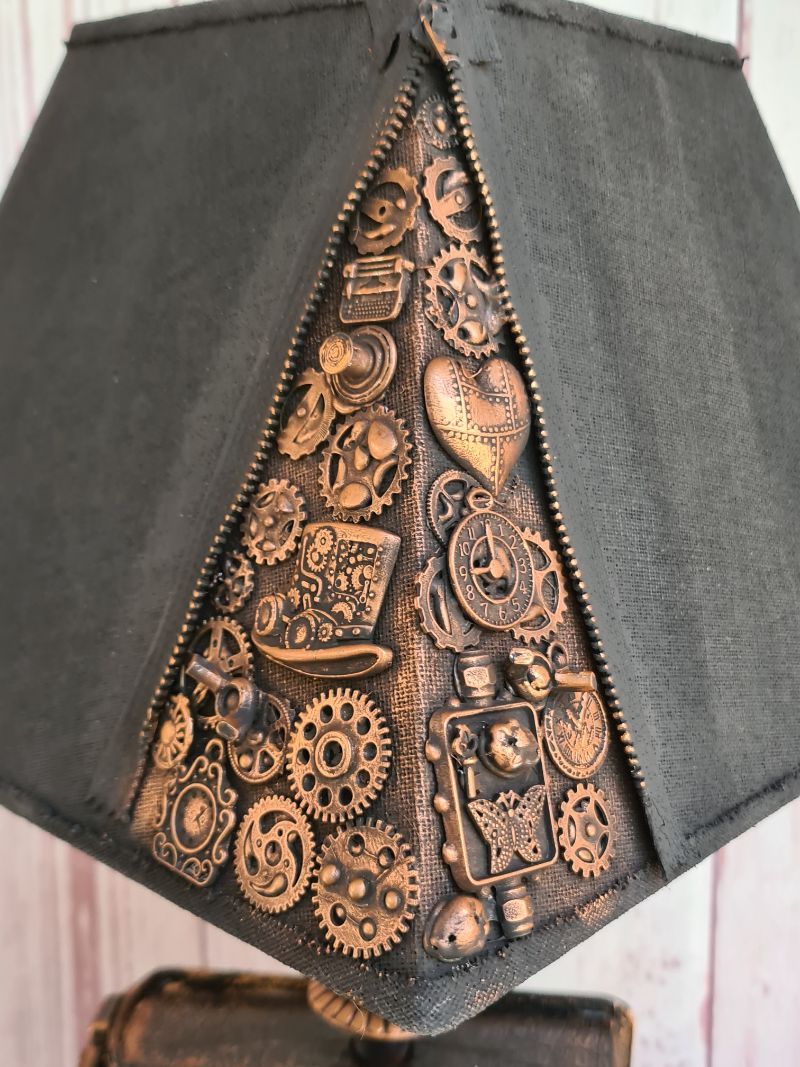
Lampshade makeover (optional)
The small lampshade looked a bit lost on the lamp. I had a larger one, but it was beige fabric, so I painted it black with acrylic. Thin the paint with a little water for a smoother finish. Then I added a zipper up one corner with a few gears peeking out—and that’s when things started to go downhill.
Adding the zipper to the lampshade
When I glued the zipper to the lampshade, I used a little too much adhesive. As I smoothed the zipper down, excess glue squeezed out onto the fabric. I thought a quick wipe would fix it, but it left a shiny patch beside the zipper. I tried repainting, yet faint streaks still showed. Learn from my mistake—go light on the glue to avoid this happening to you.
This side-view photo shows how it looks when you add leather to the surface.
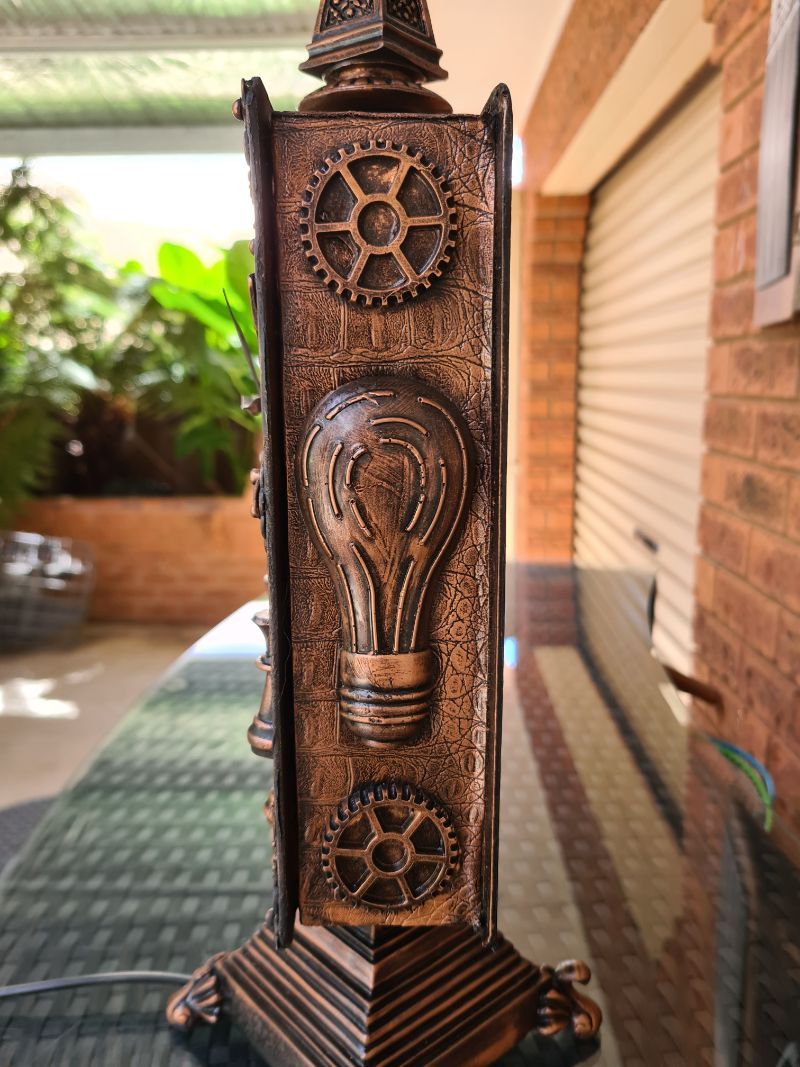
For the back, I did not add any embellishment but I did add the tissue and paint and highlight the surface with bronze wax.
While photographing the project, I noticed the book kept opening slightly. As an afterthought, I glued a small magnet—saved from a repurposed jewellery box—inside to hold it closed.

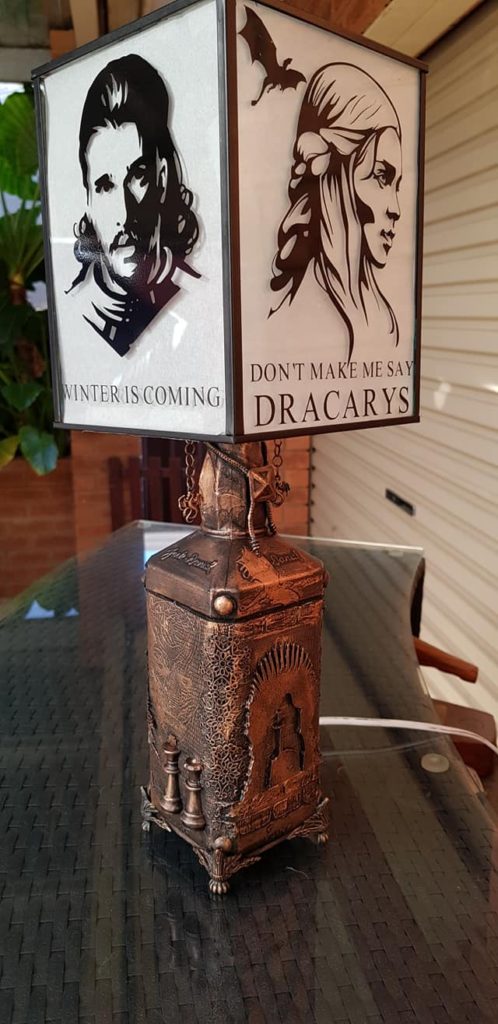
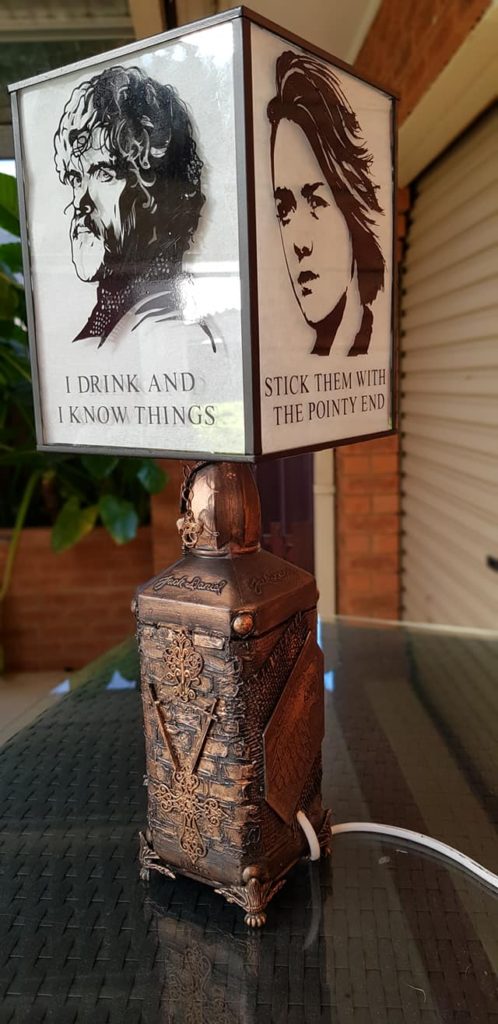
Here’s another mixed-media lamp I made, inspired by Game of Thrones.
More Project ideas using books
This spellbook is a great idea for Harry Potter fans and great for Halloween.
Another option is to turn an old book into a jewellery box.
More about IBC
If you follow my blog, you will know I am part of the IBC (International Bloggers Club), which is a group of talented bloggers from around the world. We have members from Spain, South Africa, Australia, the United States, and Canada. Each month, we come together and create a project with a common theme.
If you missed last month’s “Felted fixation ” theme, here is the link to my Steampunk Nutcracker. The “Bodacious Books ” contributions from my fellow bloggers for this month’s challenge are listed below. Please feel free to jump over and give them some love.
- Birdz of a feather |Upcycled book
- Interior Frugalista|Vintage Style Decoupage Wooden Book Box
- Me
- A Crafty Mix|Linen Book Covers

If you’re interested in any of the items used in this project, we’d appreciate it if you used our affiliate links. Clicking these links earns us a small commission at no extra cost to you, helping us create more inspiring and exciting projects to share. We’d also love to hear your thoughts—feel free to leave a comment or share this post!

21 Comments
Marie B.
January 25, 2022 at 12:25 amAnita, your steampunk lamp is absolutely amazing but then you took it up several more notches by turning it into a clock. Girl, your talent never ceases to amaze me! Great tutorial too BTW
Anita Holland
January 25, 2022 at 1:05 pmThanks Marie, I added the clock as the last moment because it seemed like a waste of space.
Sara
January 25, 2022 at 12:52 amWow Anita! I’m always amazed at what you come up with. This is absolutely stunning. You are a true artist.
Anita Holland
January 25, 2022 at 1:06 pmAWW thank you so much Sara, I have started making my projects so I can sell them after. My poor house is bursting at the seams with all my projects.
Adriana Laura
May 20, 2022 at 10:30 amWhere do you plan on selling your stuff?
Michelle Leslie
January 25, 2022 at 2:55 amOh my soul, Anita. You did it again!!! Your steampunk stuff is mind-blowing and I honestly can’t see any mess up with the lampshade. It looks perfect. You are so talented.
Anita Holland
January 25, 2022 at 1:08 pmThank you so much Michelle, I feel like a cheat when I do steampunk because I find it so easy. I think we are our own worst critics when it comes to our projects.
A Crafty Mix | DIY Stylish Linen Book Covers With Metal Tags - A Crafty Mix
January 25, 2022 at 3:16 am[…] Unique Creations By Anita made a Steampunk book lamp that doubles up as a clock. […]
Denise Reeser
January 25, 2022 at 11:48 pmEvery time I see your projects, I’m in awe! They are so unique and absolutely beautiful. Love the clock addition to the lamp.
Anita Holland
January 28, 2022 at 11:21 amThank you so much Denise!
Ann
January 26, 2022 at 12:39 amYou’ve done it again, Anita. Your lamp is gorgeous and I love the clock feature!
Anita Holland
January 28, 2022 at 11:22 amThank you ann, the clock was an afterthought, because an empty box seemed like a waste.
maria
January 26, 2022 at 1:43 amThis is beautiful. Do you have your own gallery, seriously you should. The workmanship is just amazing.
Anita Holland
January 28, 2022 at 11:23 amThank you Maria, that is an awesome compliment. I have started selling my creations because my house is full. I have sold some of my mannequins to art collectors, getting a spot in a gallery is still a dream.
Rosemary Palmer
January 29, 2022 at 3:26 amLove – love it. The copper color is great.
Anita Holland
January 29, 2022 at 11:27 amThank you so much Rosemary!
Kippi Ohern
January 29, 2022 at 5:07 amYour book lamp is amazing! Your combination of elements is genius.
Happy Valentine’s Day,
Kippi
Anita Holland
January 29, 2022 at 11:28 amThank you Kippi. x
Brooke Fedigan
February 1, 2022 at 11:49 pmSuch a wonderful Lamp!!!! Your talents are not wasted on this amazing DIY project. I love all the details in the lamp as well, especially the bulb. Great Job!
TD Creedy
April 4, 2022 at 6:30 amI love this steampunk book lamp and shade. It’s a shame about the shine you mentioned made by the glue. I could see some kind of different shade beside the zip but it didn’t defect from the lovely steampunk design one but. If it really bugs you, how about a row of bronze or black eyelets with same coloured brads fed inside them or ball bearings glued into the eyelets to look like rivets? Or for a different lighting effect leave the eyelets as they are and let the light play in the room. But again I thought it lovely as it was.
Anita Holland
April 4, 2022 at 6:21 pmThank you so much, I have it in the corner of my lounge. So I don’t notice the shiny bits anymore.