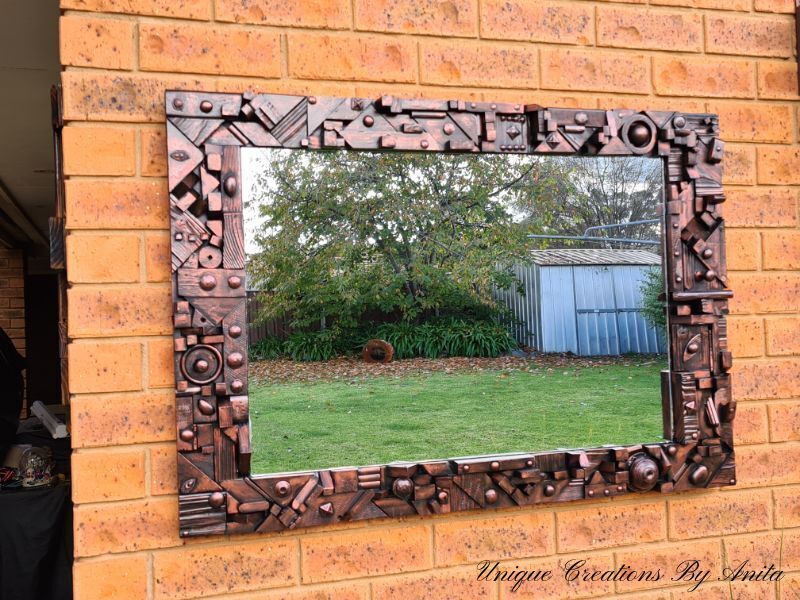
Scrap Wood Mirror Frame with Copper Highlights is a quick upcycle that transforms a plain mirror into striking wall art using only offcuts and found materials. I’ve been tackling my scrap pile lately, and this project uses the smallest pieces to decorate a simple mirror frame. Imperfections are welcome. Rough edges, dents, and random textures build character. I’ll show the full process, the fixes for a couple of hiccups, and simple ways to seal and hang your finished mirror.
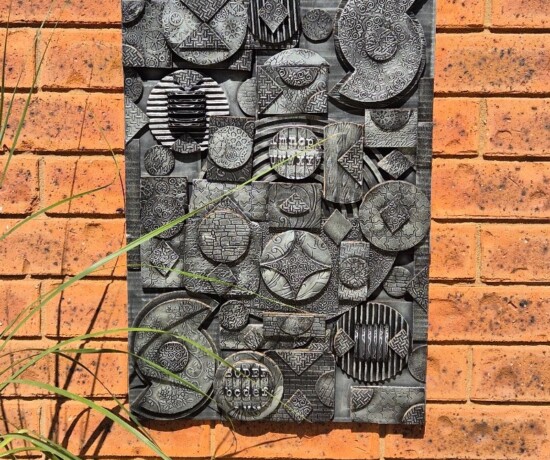
This assemblage technique turns everyday décor into art by layering scrap wood and found objects for rich texture. A black base with metallic highlights adds depth, unifies mismatched pieces, and creates a bold, custom finish.

It is also time for our next blog hop for ‘Do It Over’ Designers. We are a group of bloggers who come together to share our latest recycling, upcycling, and DIY projects. Be sure to visit the other talented bloggers who are participating this month in the links at the end of this post.
Before we dive into this tutorial, be sure to subscribe to my bimonthly newsletter to be the first to see my latest projects. You can also follow me on Pinterest and Facebook, where I also include my unique mixed-media art projects
*This post may contain affiliate links. This means I earn a small commission on links used at no extra cost to you. Please see my disclosure policy for more information.**
Materials and tools
- Old mirror (any size)
- Plywood backing (cut larger than the mirror opening)
- Assorted scrap wood offcuts (mixed thicknesses add great texture)
- Found objects: wood stubs, beads, pebbles, buttons, thumbtacks, upholstery studs, curtain rings, wood biscuits, broken drawer pull, plastic beads, glass pebbles, Christmas bauble halves, ping-pong ball halves, resin embellishments
- Large hot glue gun and glue sticks
- Wood glue
- “No More Nails” or similar construction adhesive
- Black quick-dry spray paint (matte) or black gesso
- Copper metallic wax paste (or DIY: clear wax + copper mica powder)
- Clear spray polyurethane (2–3 coats)
- 2 cm × 2 cm timber battens for bracing the back (length to suit)
- Screws, drill, driver bit, countersink bit
- MDF and thick cardboard offcuts, kraft paper for neat backing
- Hanging hardware: D-rings, picture wire, bumpers
- Pencil, ruler/square, clamps
- Router with straight bit and fence, jigsaw (optional if recessing the mirror)
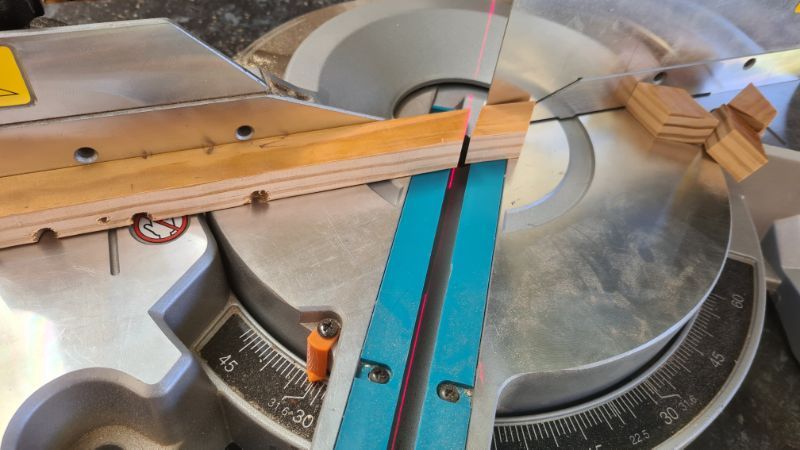
- Saw for trimming scraps (mitre saw, hand saw, or multi-tool)
- Safety gear: mask, eye protection, gloves
Prepare the base frame
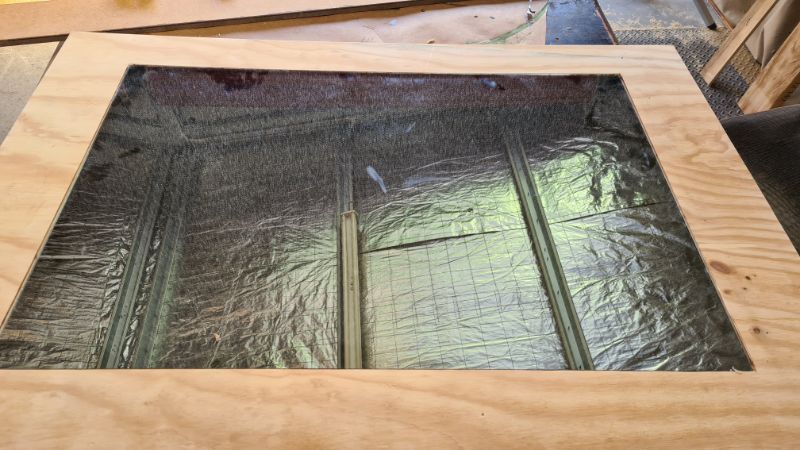
I repurposed a gifted mirror and built a plywood surround sized with 8 cm rails top and bottom, and 12 cm on the sides. The mirror had glued-on hanging hinges that protruded, so I routed a shallow recess (a lip about 15 mm wide and as deep as the mirror) and jigsawed out the centre.

If your mirror sits flat, skip the routing and glue it on later.

Cut and sort your scraps
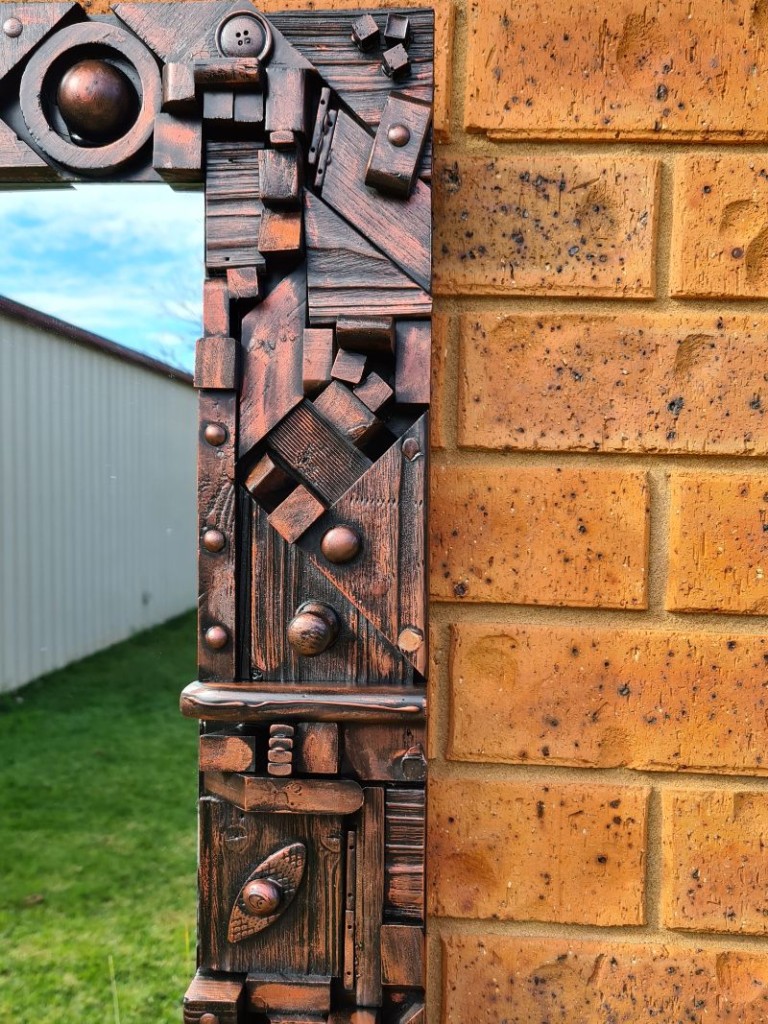
Trim longer offcuts into smaller blocks. Leave saw marks, dents, and char from previous projects; texture reads beautifully once painted and waxed.

I include odd pieces from Shou Sugi Ban tests or damaged timber. Variety in grain, height, and shape gives the best result.

Dry layout and design tips
Arrange pieces around the opening first to keep the inner edge neat. Do the outer edge next. Fill the field in a loose mosaic. Mix in found objects for interest. Balance chunky parts with flatter pieces so the surface steps up and down.

Glue the mosaic to the frame
Use a large hot glue gun for speed. The glue strands and blobs add hidden texture once painted.
")
Work in small sections so the glue stays hot. Keep inner and outer borders straight, tucking small pieces into gaps. Tiny voids are fine; they catch wax later.

Add found treasures
Press in wood stubs, beads, pebbles, curtain rings, wood biscuits, thumbtacks, bauble halves, ping-pong halves, buttons, drawer pull parts, and resin bits. Nothing needs to be precious; random junk gives the frame a story. Add items at varied heights.

Close-up images to see the items used
I’ve included close-up photos below—zoom in to see the small details and item ideas. For more tips and tricks on items you can use to add texture to your assemblage projects, this post has it all.


Paint it black
Spray two light coats of black paint to reach every crevice. Spraying is far faster than brushing gesso on a build like this. Let it dry fully between coats. If you like moody, gothic décor, you can stop here.

Copper wax highlights
Now the magic. Rub a fingertip lightly in copper wax and skim only the raised areas.

Don’t cover the black completely; contrast sells the texture. Build the shine slowly. If you don’t have copper wax paste at home, you might already have the ingredients to make your own, and this post will show you how.

Seal for durability
Lock in the finish with two to three coats of clear spray polyurethane. Allow short drying gaps and check from the sides for any dull spots you missed.

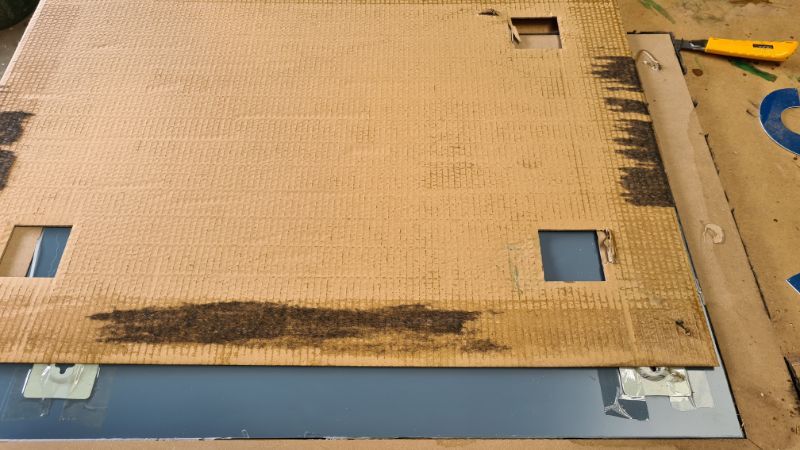
Fix a warped backing (easy brace)
If your plywood bows, glue and screw two timber battens across the back. Aim screws through solid areas, not voids. Add the mirror with construction adhesive in the recess or directly onto flat plywood. Close the back with cardboard and an MDF panel, then cover with kraft paper for a clean look.

Finish and hang
Fit D-rings and wire or keyhole brackets. Add rubber bumpers so the frame sits stably and protects the wall. Good light shows off the copper glow.

Colours can shift in bright sun or low indoor light, so place the mirror where the highlights catch.


More scrap wood project ideas
Shou Sugi Ban elevates pallet wood, adding rich colour and striking texture for standout wall art.

This scrap wood wall art was my first project using this technique.

I found this slice of scrap wood, which I cleaned up and turned into a wooden suncatcher.
")

It’s time for more ideas, and my friends have lots of them for you. Be sure to visit them and see what they’ve been upcycling/recycling/DIYing. Here are the links:
Southern Sunflowers
My Hubbard Home


If you’re interested in any of the items used in this project, we’d appreciate it if you used our affiliate links. Clicking these links earns us a small commission at no extra cost to you, helping us create more inspiring and exciting projects to share. We’d also love to hear your thoughts—feel free to leave a comment or share this post!


35 Comments
Sara
July 24, 2021 at 10:11 pmWowsers Anita! This is absolutely incredible. Who knew you could make something so striking with bits and pieces. Makes me want to do woodwork just so I can get scraps to do this :). Do you have any advice for fixing a warp in a china hutch door? It’s essentially a frame with glass in it.
Anita Holland
July 26, 2021 at 4:07 pmThank you so much Sara, you are missing out on not doing woodwork it is so much fun. Without seeing the whole hutch I could not say, it sounds like it needs some extra support after having heavy items inside.
Kim
July 24, 2021 at 10:19 pmAnita, I’m always completely blown away by your creativity, your upcycling vision and your mad skills. This is absolutely beautiful!! Off to pin the pretty!! Happy Hopping!!
Anita Holland
July 26, 2021 at 4:10 pmThank you so much Kim, your comments are always so great. Most of the time I have no idea if they are going to work when I start.
Ann
July 24, 2021 at 10:38 pmThis mirror frame is absolutely gorgeous, Anita. You’ve created a beautiful piece of artwork with scraps. Well done!
Anita Holland
July 26, 2021 at 4:10 pmThank you so much Ann.
Gail @Purple Hues and Me
July 24, 2021 at 10:48 pmOMG, Anita! Your creativity and talent is amazing! Your mirror frame looks like something found in an upscale store! It’s just fabulous! And I love all of your other wood scrap creations, too!
Anita Holland
July 26, 2021 at 4:11 pmThank you Gail, I am on a mission at the moment to try and use some of them up. I am just too mean to throw them away. lol
Sage
August 1, 2021 at 1:35 pmThat is sooo COOL looking!! I have two old mirrors, both were from relatives so I’ve had them in my closet. No place to hang them in the home. But both need to be framed, and you gave me the perfect way to do it! Need to wait but I’ll be building my wood stash for the projects…have to keep things like this hidden away or Felix Unger will throw them out. You might be too young to remember ‘The Odd Couple’ tv show. But I’m the slob, Oscar Madison, my guy is the obsessed clean freak Felix. I know TMI, but I love this mirror creation 🙂
Anita Holland
August 1, 2021 at 3:16 pmThank you Sage. I do remember the odd couple and I can imagine how it must be. My husband is the same, but luckily he hates coming into the shed because it is so dirty. So I don’t have to worry about that. lol
Tania
July 25, 2021 at 12:34 amYour steampunk projects are so cool!!
Anita Holland
July 26, 2021 at 4:11 pmThank you Tania.
Marie - Interior Frugalista
July 26, 2021 at 12:14 amYou know how much I LOVE your steampunk creations. Your scrap wood mirror is FABULOUS!!!
Anita Holland
July 26, 2021 at 4:14 pmThank you so much Marie, the pictures really do not do it justice.
Susan Stevenson
July 26, 2021 at 8:49 pmThe mirror is beautiful Anita. I bet you have so much fun creating these, it looks like something I’d like to do 🙂
Anita Holland
July 28, 2021 at 8:22 amThank you so much Susan, it was lots of fun to make.
Stacey
July 26, 2021 at 11:18 pmThis is like the coolest thing ever. It makes me want to go out, buy a mirror and make it. Of course, my honey will have to work with the power tools because I’m very fond of my fingers.
Anita Holland
July 28, 2021 at 8:23 amThank you, it is so easy to do. I love using power tools it allows you to create so many different projects.
Laura L WALKER
July 27, 2021 at 12:38 amThis is so clever. I love it. Laura
Anita Holland
July 28, 2021 at 8:24 amThank you Laura.
Meegan
July 27, 2021 at 10:00 pmI have a mirror that REALLY needs a refresh. THIS is just the answer I need. Anita, I am always amazed at your creative ideas. Especially using scrap wood and then the colors. Definitely looks professionally made. You are incredible.
Anita Holland
July 28, 2021 at 8:25 amThank you Meegan your comment is so kind and I really do appreciate it.
Allyson
July 28, 2021 at 10:39 amYour mirror frame is absolutely amazing!! Adding all your “random junk” lol was beyond creative.
Carolina Gonzalez
July 28, 2021 at 2:06 pmSpectacular as usual like everything you do. Love it.
Rosemary Palmer
July 28, 2021 at 11:19 pmLove this – what a great way of using what you have. Maybe I could use up all those buttons I have.
Linda Johnston
July 29, 2021 at 6:22 amAmazing use of scrap of wood pieces wiith copper rub into a stylish edgy frame! Beautiful
Michelle Leslie
August 9, 2021 at 10:27 pmYou just have a knack for using odd bits and pieces together. I tried the other day and that stupid little perfectionist voice inside my head kept on saying “But the colors don’t match….” Ugh, I hate that voice but love your work.
Anita Holland
August 13, 2021 at 3:53 pmYou have to ignore that voice until the project is complete. LOL
Leonette (Lyn) Hirst
September 9, 2021 at 1:15 pmLove your creativity Anita.
Your inspiration is amazing, I feel like getting off the couch and making something. Before COVID I was always busy making, maybe it’s time to start again. Thank you Anita. 🤗
Anita Holland
September 13, 2021 at 7:38 pmThank you so much, I always have ideas in my head. I just need more time to do them.
Southern Crush Collective - Southern Crush at Home
January 9, 2022 at 5:32 am[…] Make your own beautiful Scrap Wood Mirror. […]
Deb Wagner
April 18, 2022 at 1:42 amI adore your wooden mirror frame! It’s just gorgeous, keep at it, girl, you are going places with all of your diy creations…
Anita Holland
April 18, 2022 at 1:32 pmThank you so much Deb, I really appreciate the awesome compliment.
Mel
November 17, 2025 at 9:48 pmYou’ve inspired me to try this at home! It may be too late to ask questions but I’ll give it a go. What thickness of plywood did you use? And, second question – what I’ve read to date is that polyurethane over wax will not stick. So, any of the waxed bits will not get the polyurethane coat. Does this matter? What about polyurethaning first and then wax? Maybe the wax won’t stick? Thank you,
Anita Holland
November 28, 2025 at 9:57 pmI thought the same thing when I first tried it, but these types of waxes don’t stay greasy. I have been doing this for year and have never had an issue. Maybe do a test first to be sure. But I can assure you if you use the same waxes it works perfectly.