
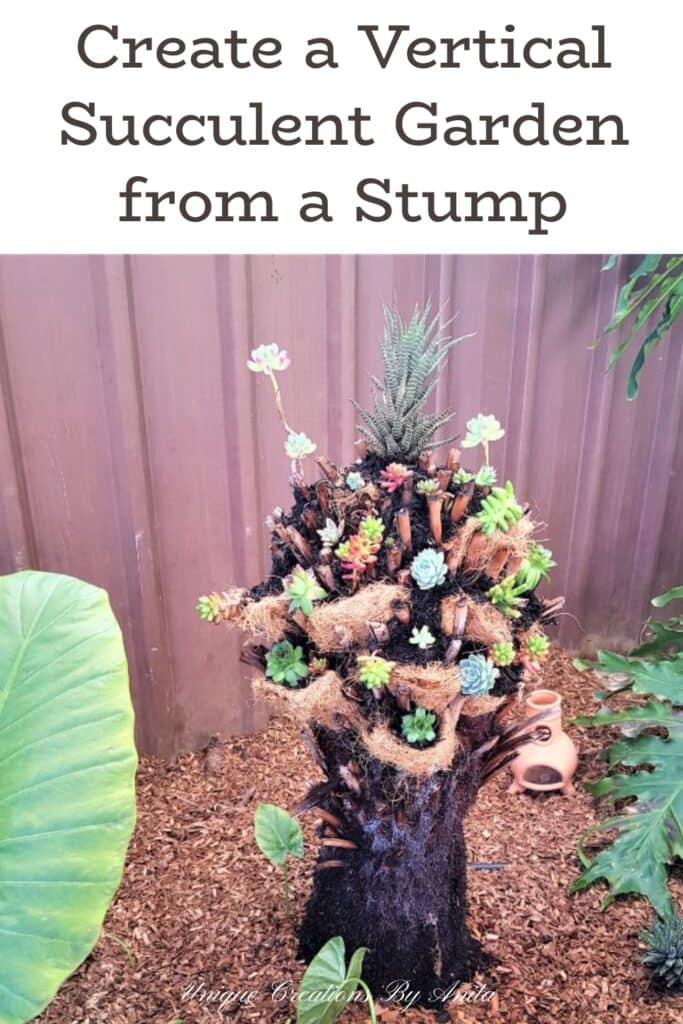
Last summer in Australia, when temperatures soared between 40 °C and 48 °C most days, my beloved fern tree couldn’t survive the relentless heat. Rather than digging out the dead stump, I transformed it into a stunning DIY succulent tree—an eye‑catching, drought‑tolerant feature that thrives with minimal care in our hot climate. In this tutorial, I’ll show you how to upcycle a deceased fern stump into a living, vertical succulent planter perfect for Aussie gardens.

Before we dive into this tutorial, be sure to subscribe to my bimonthly newsletter to be the first to see my latest projects. You can also follow me on Pinterest and Facebook, where I also include my unique mixed-media art projects.
Turn a Dead Fern into a Living Succulent Tree
**This post may contain affiliate links. This means I earn a small commission on links used at no extra cost to you. Please see my disclosure policy for more information.**
Materials Needed
- Dead fern stump or tree stump (with dead branches removed)
- Succulent potting mix or well‑draining cactus soil
- Coconut fibre hanging basket liner
- Assorted small succulents (e.g., Echeveria, Sedum, Haworthia)
- Garden shears or pruning secateurs
- Sharp knife for trimming liner
- Spray bottle or watering can with fine rose
- Gardening gloves
Prepare the Stump
Trim away all dried or dead branches with your garden shears to create planting pockets.

Leave shorter branch ends—about 2 cm long—to support soil and plants. Wear gloves to avoid splinters.

Add Coconut Fibre Liner
Cut the coconut fibre liner into triangles sized to fit each cavity.

Press the liner pieces into gaps, folding the points under to form a snug pocket. The fibrous material holds soil and moisture, preventing washout during rain.

Fill with Soil and Plant Succulents
Use succulent potting mix for excellent drainage. Starting at the top, fill each lined pocket with soil, then gently insert a small succulent. Work your way down the stump, trimming excess liner and ensuring each plant sits securely.

Avoid packing soil too tightly; succulents prefer aerated roots.

Incorporate a few taller succulents—like Crassula tetragona or Senecio vitalis—amongst the rosettes to introduce height variation and create a more dynamic, eye‑catching display.

Finishing Touches
Scatter decorative bark mulch around the base to improve aesthetics, suppress weeds and conserve moisture. Lightly mist each plant with a spray bottle—succulents dislike overwatering. Position your new succulent tree in a spot with partial to full sun, depending on succulent types.

Enhance the display by placing a decorative pottery vase—or a similar ceramic accent—beside your succulent tree to complete the look.

More unique succulent planter ideas
Another unique succulent planter idea is to use PVC pipe photo planters—simply insert your child’s photo to personalise each pot and inspire them to care for their very own little garden.

Give your glass planter a one‑of‑a‑kind finish with this simple technique using Unicorn SPiT and a coat of gold spray paint.


If you’d like to find any of the items used in this project, we’d greatly appreciate it if you used our affiliate links. These links provide us with a small commission at no extra cost to you, allowing us to continue creating and sharing more inspiring projects. We’d also love to hear your thoughts—feel free to leave a comment or share this post!

26 Comments
Carol
September 24, 2019 at 11:58 pmAnita that is one gorgeous little tree! Love the idea and it’s so attractive.
Anita Holland
September 26, 2019 at 1:03 pmThank you so much, the thought of digging it out seemed like hard work. This was much easier and cute too. lol
Dee | Grammy's Grid
October 2, 2019 at 3:48 amWhat a great idea!! Thanks so much for linking up at the #UnlimitedMonthlyLinkParty 5. Shared.
Anita Holland
October 4, 2019 at 5:21 amThanks, I was happy with the results.
Cecilia
October 3, 2019 at 6:30 pmThis is so creative! Thanks for sharing at Vintage Charm!
Ruby Manchanda
October 9, 2019 at 12:23 pmOh i heart your succulent tree
Anita Holland
October 9, 2019 at 4:33 pmThank you so much, It does look cute if I say so myself lol
Autumn is here! WW
October 9, 2019 at 11:48 pmThat is just too cute! I love what you’ve done for sure. I wish I could do something like that where I live, but winter is coming rapidly. It’s really cold tonight speaking of which time to close the windows and me get my butt in the kitchen and cook supper. Thanks for sharing! Have a great day! hugs Thanks for sharing!
Anita Holland
October 10, 2019 at 8:18 amOh my goodness, My Husband would love to hear the words “get my butt in the kitchen and cook” I am always “off to the shed order take away” lol
Lauren Renee Sparks
October 11, 2019 at 1:59 pmHow cute! Visiting you from the traffic jam linky. laurensparks.net
Anita Holland
October 14, 2019 at 10:37 pmThank you, Lauren!
Cherryl Ehlenburg
October 11, 2019 at 2:14 pmI love this idea! I live in Montana, with cold winters, so I’m sure nothing like that would survive, but it would be awesome in my rock garden!
Anita Holland
October 14, 2019 at 10:36 pmThank you.
Idona
April 18, 2020 at 2:09 amI was just thinking the same thing. I live in North Idaho, and it probably wouldn’t survive spring here this year however, it’s a great idea and it’s very cute.
Anita Holland
April 19, 2020 at 12:01 pmThank you so much.
Julie
October 16, 2019 at 9:42 amThis is a clever way to give a new life to your old fern. I’ll be interested to see how it goes along and how the succulents spread out, I have a feeling it’s going to look amazing!
Anita Holland
October 16, 2019 at 11:56 pmThank you so much, I am having a problem with it at the moment. The nesting birds keep stealing the coconut lining and pulling out my plants at the same time. lol
Clearissa Coward
October 19, 2019 at 10:47 pmOh that is the absolute cutest! It is so creative and just plain precious. Will it survive the Australian winter? Just curious because I would hate to see this go away. Thanks for sharing at #omhgww. Socialized. 🙂
Anita Holland
October 20, 2019 at 8:06 amThank you so much. It will survive because it is undercover. That is an enclosed border with shade cloth over the top. It is the nesting birds that are a problem, they keep stealing my lining for their nests pulling out my plants at the same time.
Maria
April 2, 2020 at 6:08 amSuper creative
Anita Holland
April 2, 2020 at 3:51 pmThank you so much.
Sara
April 4, 2020 at 3:41 amSo beautiful! Did you ever add to the lower part? I love how it looks! Succulents don’t stay small for long; have you had to trim back or transplant?
Anita Holland
April 5, 2020 at 5:04 pmNo, I did not go all the way down because there was not enough space to add soil. I have split it up a fair bit over the past year. But this year the birds nested under my pergola and kept pulling out the fibre for there nests pulling out my plants at the same time. Took me a while to figure out what was going on. lol
Marilyn J Gravelle
April 18, 2020 at 1:19 amBrilliant! What great use for something otherwise unattractive! I can imagine those succulents getting even bigger, filling this out beautifully! Very clever! Thanks for sharing!
Anita Holland
April 19, 2020 at 12:01 pmThank you so much for visiting my blog and leaving a lovely comment.
Jeanne
December 31, 2020 at 3:55 amWow, your ferns grow big! Nice project, I like succulent gardens. I’m worried about climate change and the environment, Wisconsin USA (and the midwest) has had a huge tree die-off due to an “Emerald Ash borer” insect – So many huge Ash trees have just died, including 20+ in my yard.