In today’s post, I’ll show you how to recycle cardboard boxes into a textured cardboard wall hanging that adds style and character to your home decor. Using simple techniques and supplies you likely already have in your craft stash, you can create a stunning, modern piece of art with minimal effort. This method is not only easy but also a budget-friendly way to transform everyday materials into a unique, eye-catching design.
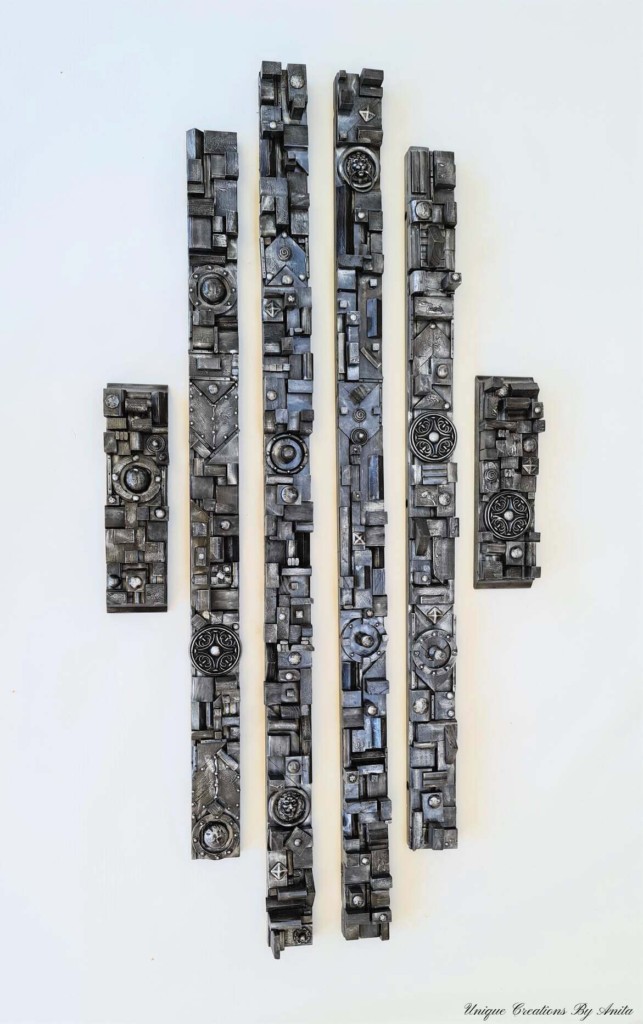
My inspiration for this project was this scrap wood wall art I had made years ago—an abstract collage of wood offcuts randomly glued together to create a striking, textured wall hanging.
That’s when the idea hit me: why not try a similar approach using cardboard? I could cut pieces into different shapes and layer them to form a textured cardboard wall hanging. However, I quickly realised that while varying the thickness of the cardboard would add depth, it wouldn’t create the textured effect I was looking for. That’s when I decided to incorporate embossed cardstock. By layering different embossed patterns onto the cardboard, I could achieve a rich, dimensional look similar to my original wood art.

Before we dive into this tutorial, be sure to subscribe to my bimonthly newsletter to be the first to see my latest projects. You can also follow me on Pinterest and Facebook, where I also include my unique mixed-media art projects.
We’re also creating alongside the Do It Over Designers Blog Hop, hosted by Ann from The Apple Street Cottage. Each month, we rescue and reimagine unloved items—in this round, the theme is paper. Don’t miss the fantastic ideas from the other makers linked at the end of this tutorial.
How to make a Textured Cardboard Wall Hanging
**This post may contain affiliate links. This means I earn a small commission on links used at no extra cost to you. Please see my disclosure policy for more information.**
Materials Needed
- Recycled cardboard box of assorted thickness
- Cutting mat
- Craft glue
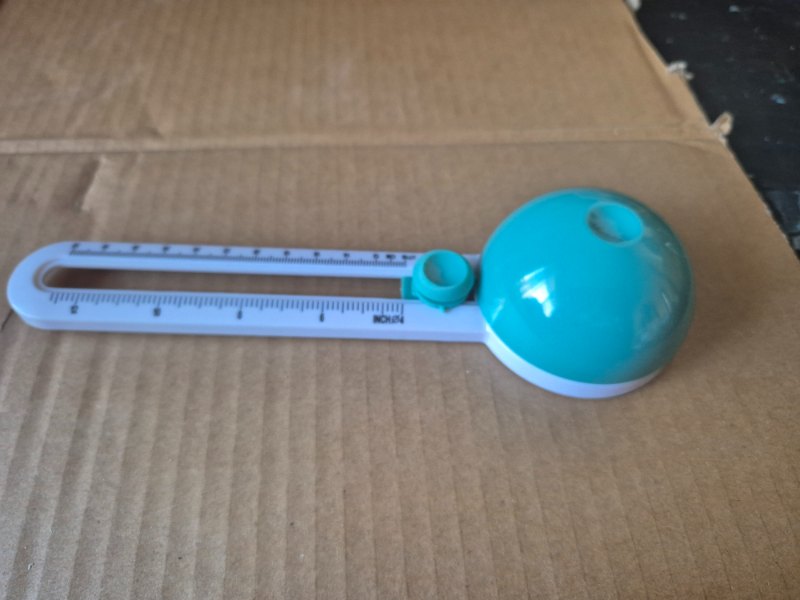
- Circle cutter
- Ruler
- Scissors
- Embossing press
- Embossing folders
- Silver wax paste
- Black paint
- Hot glue gun and glue sticks
- xTool P2 laser
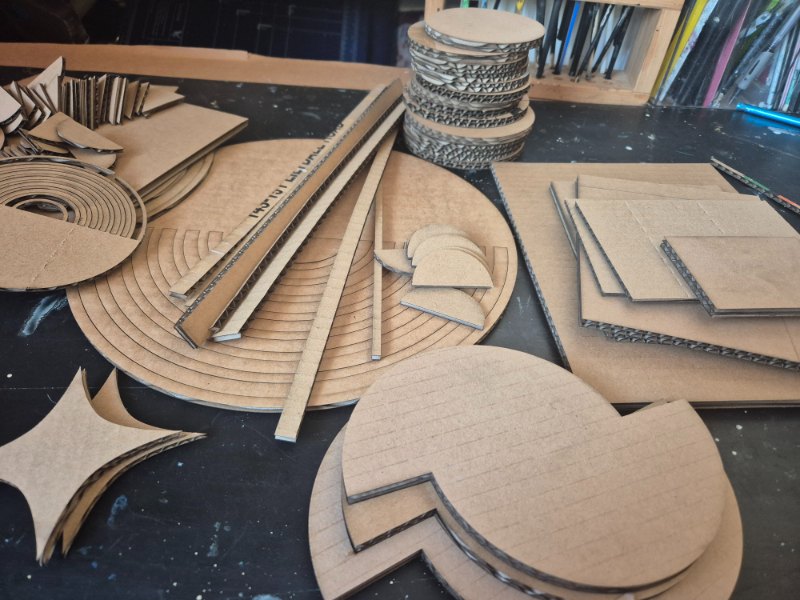
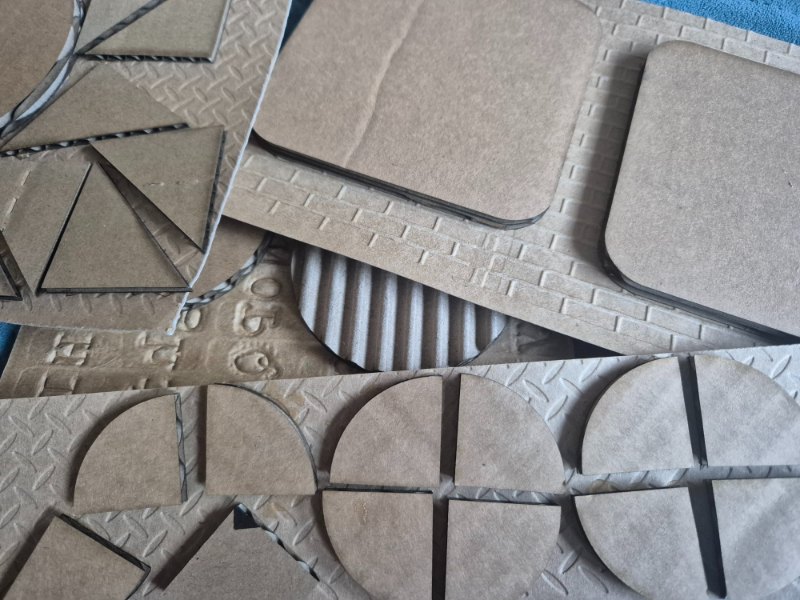
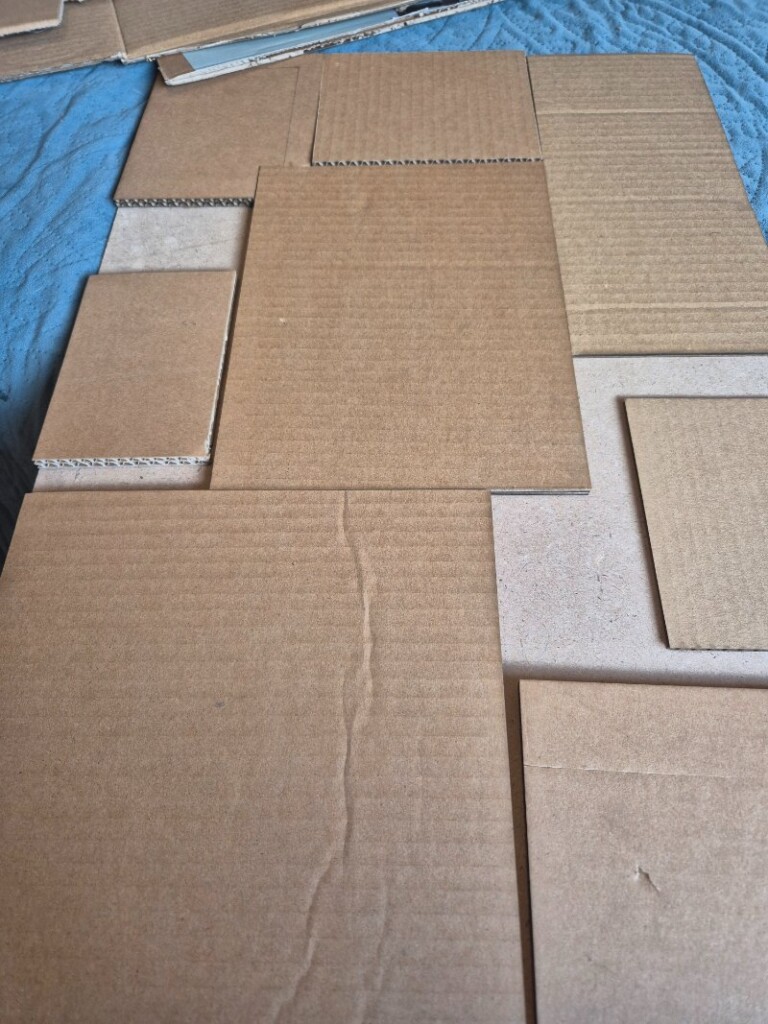
Cutting the cardboard pieces
I began by cutting basic geometric shapes from the flat sections of a cardboard box. Using a circle cutter made it quick and easy to achieve perfectly round shapes, while a ruler and craft knife helped me cut precise squares, triangles, and rectangles. My cutting mat, with its built-in measurements, made sizing effortless.
To get clean edges, it’s important to use a very sharp craft knife. Be mindful not to press down too hard on the ruler while cutting—doing so can crush the edges of the cardboard. After cutting out my circles, I used a ruler and craft knife to slice them in half, creating even more shape variations.
For unique designs, find a shape on Google, print it on thick paper, and use it as a stencil. Simply trace it onto the cardboard and cut it out with a craft knife for a professional-looking finish.
Laser cutting the cardboard pieces
In hindsight, I wish I had thought of using my laser-cutting machine sooner! While assembling my cardboard wall hanging, I ran out of shapes and was short on time due to other commitments. I was starting to think I might have to pull out of the challenge when my sister reminded me that I could use my Xtool P2 laser cutter. I couldn’t believe I hadn’t thought of it earlier—it would have made the process so much easier!
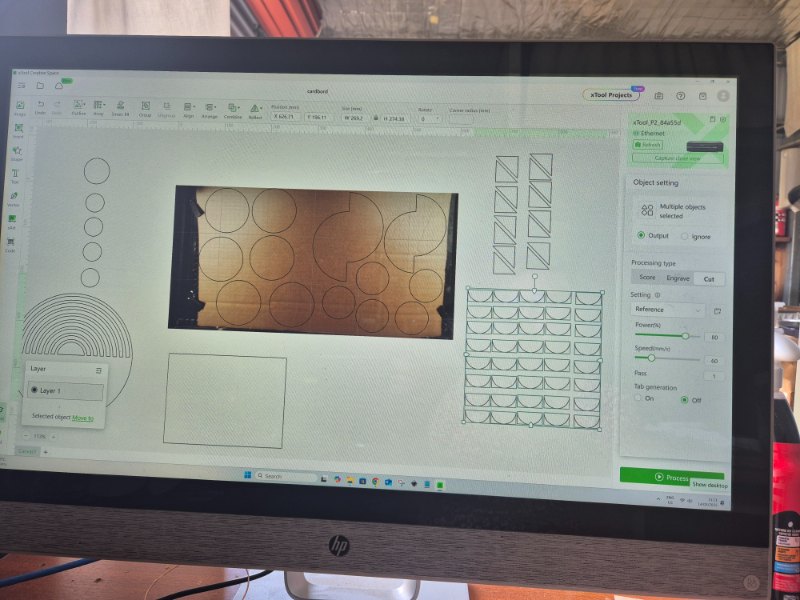
If I had planned ahead, I could have applied the embossed paper to the cardboard first and then cut the shapes all in one go. Figuring out the settings took trial and error, including small fires! Once right, the laser cut intricate designs perfectly.
Using the laser made it effortless to cut through 6mm cardboard, which was a real challenge with a craft knife. I’ve included my settings to give anyone with a laser a helpful starting point for their own projects.
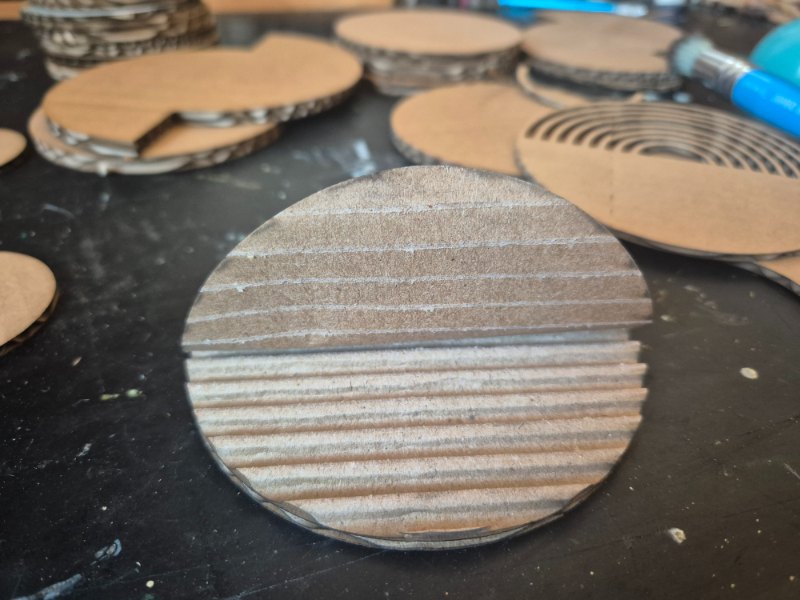
Adding Texture to the Cardboard
With my experience in mixed media art, I know that incorporating different textures enhances the final result. One simple way to add texture to thicker cardboard is by peeling away the top layer to reveal the ribbed corrugation underneath. To make this process easier, lightly mist the surface with water and let it sit for a few minutes. This loosens the glue, making it easier to peel away the lining paper. I’ve found that the inner lining of the box typically comes off the easiest.
Another effective method is applying a thick layer of acrylic paint and tapping the surface with a paintbrush to create an uneven texture. Once dry, adding wax paste will highlight the raised areas, giving the piece even more depth and character.
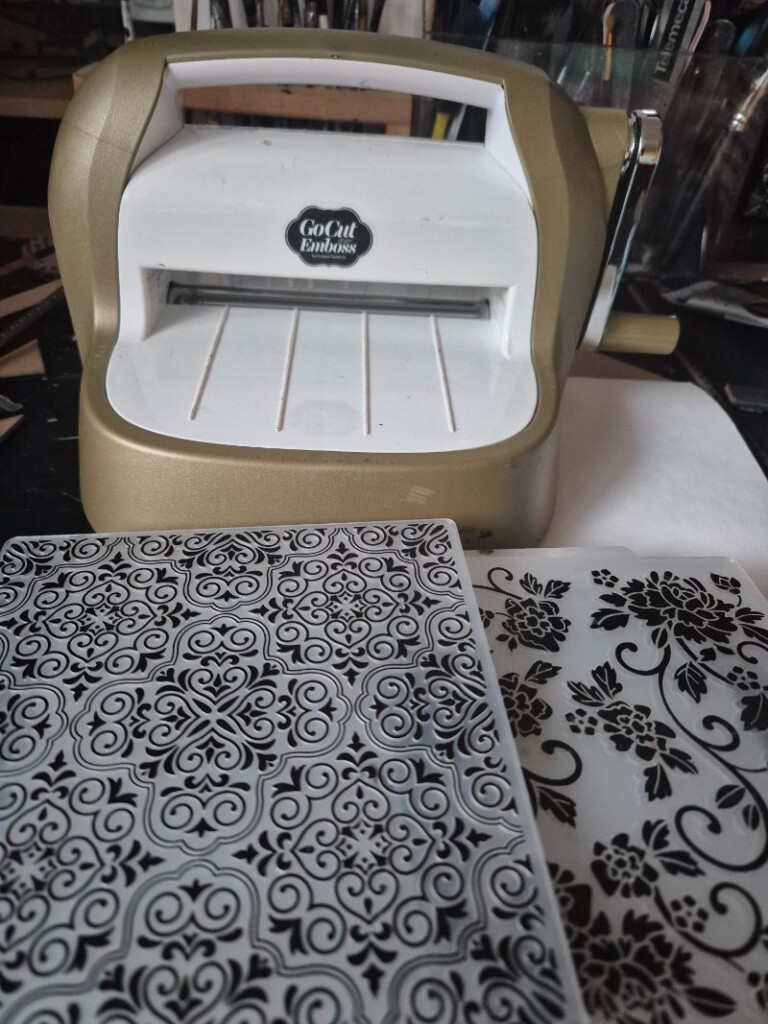
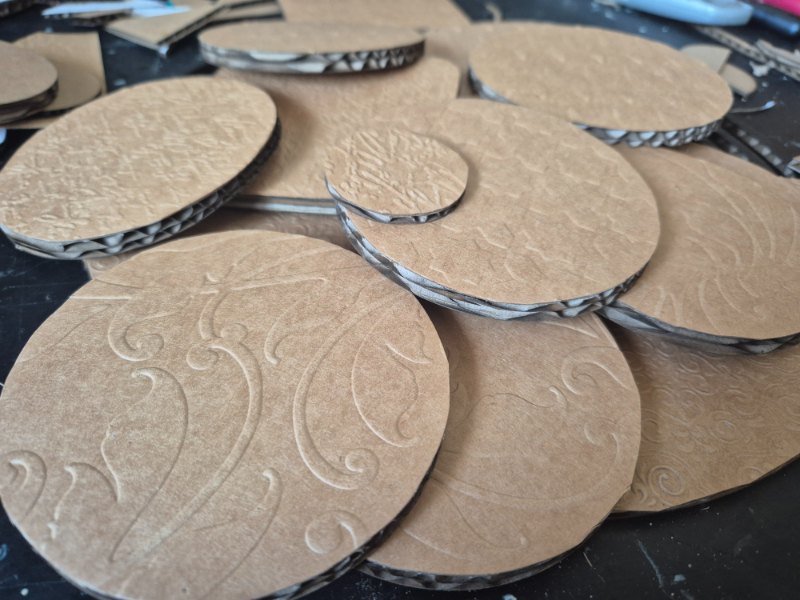
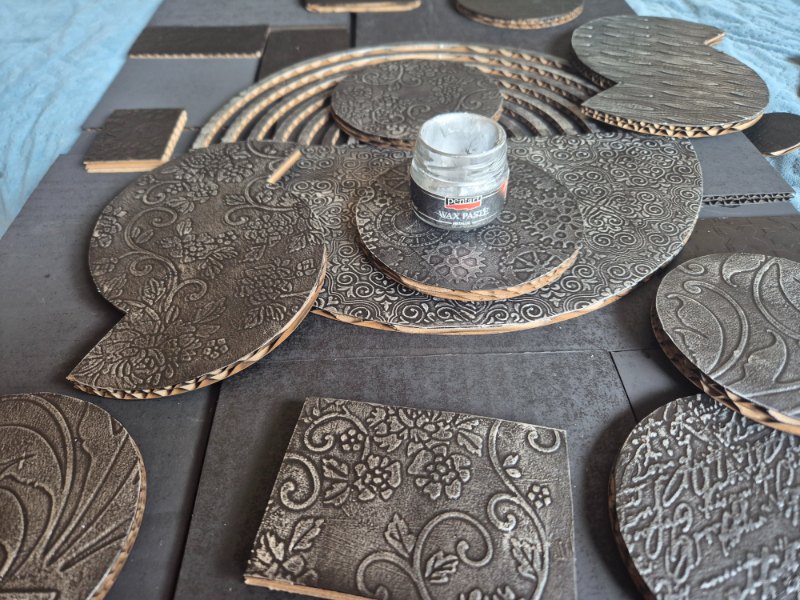
Embossing the cardstock for texture
For this project, I used mainly embossed cardstock glued to the surface to add texture. I have a large collection of embossing folders, which are available at most craft stores. However, I usually buy mine from Temu, where they cost around $3 each.
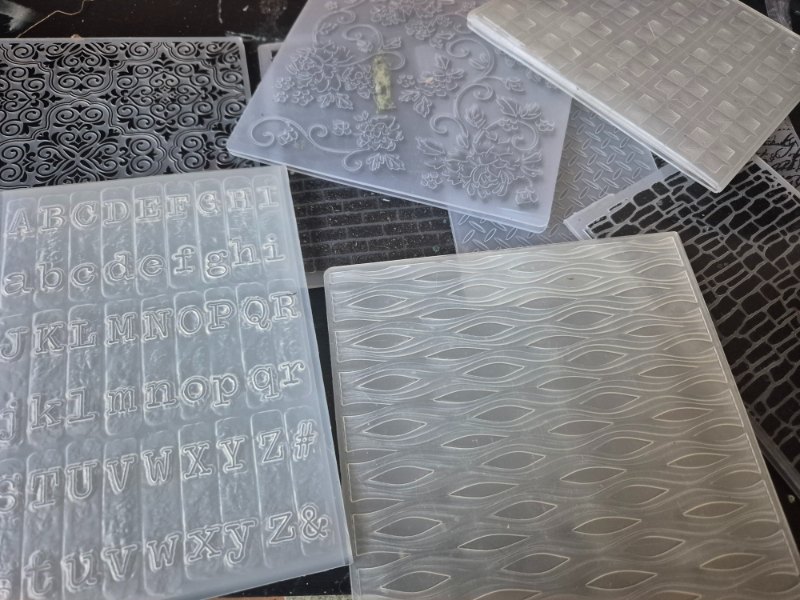
To create the raised effect, I placed the cardstock inside an embossing folder and ran it through my embossing machine. I don’t own a high-end machine, but honestly, you don’t need one. In the past, I’ve used the folders without a machine and achieved great results.
I’m lucky to live near a large paper mill that manufactures cardboard lining for boxes. They generously gave me a massive roll of 440gsm paper, which I now use for all my projects. It’s a fantastic alternative to thick cardstock and saves me the cost of buying it!
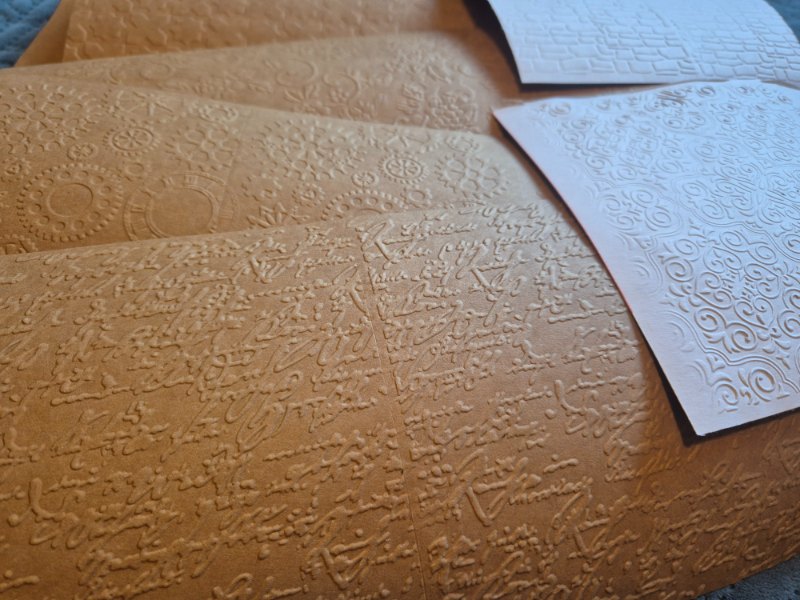
Attaching the embossed cardstock
Next, apply a thin, even layer of glue to the cardboard and press it onto the embossed cardstock. To ensure a strong bond, place a heavy book on top while it dries. I prefer tacky glue over Elmer’s to prevent soggy paper and bubbling in unglued areas.
Once the glue is fully dry, trim away any excess cardstock for a clean finish. Using the Xtool laser from the start would’ve saved time, likely cutting the process in half.
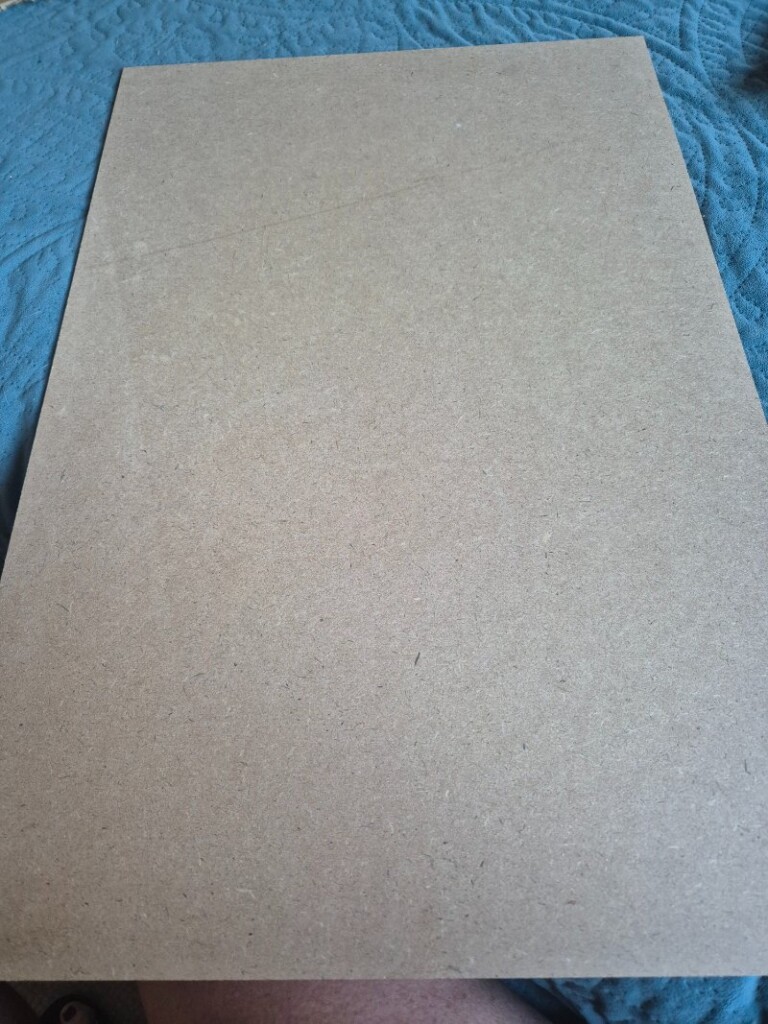
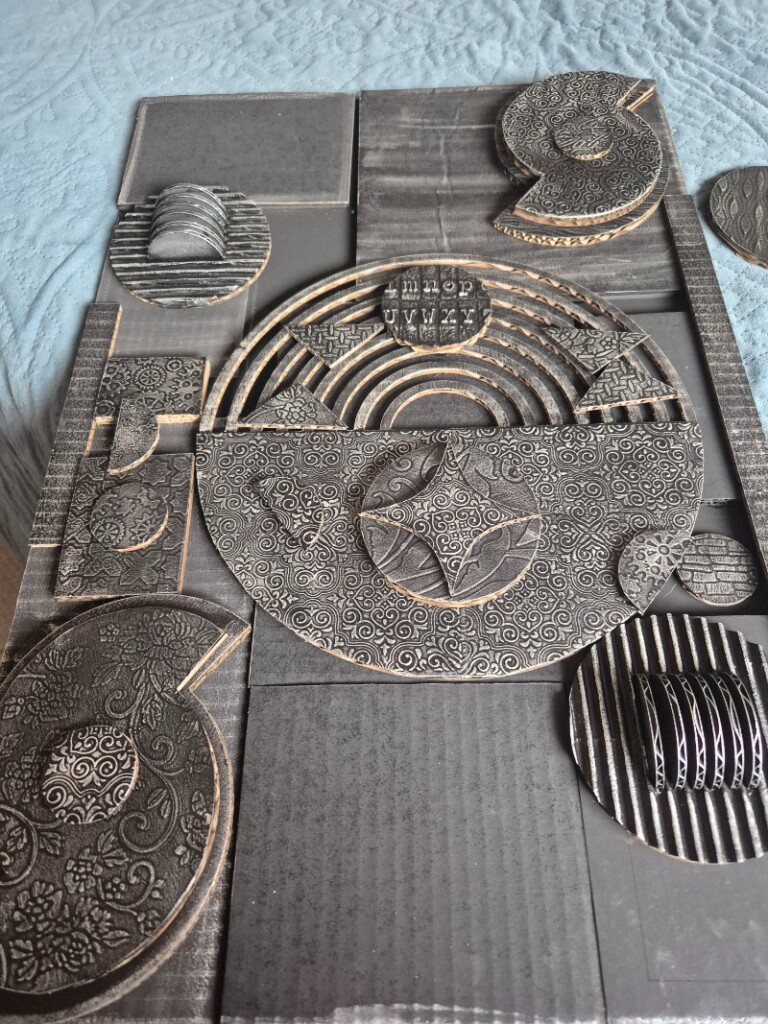
Creating the Base for the Wall Hanging
To build the base of my wall hanging, I used a 60cm x 30cm piece of MDF. To add dimension, I started by layering large cardboard squares over the base.
This created a sturdy foundation for adding depth and dimension to different sections of the design. Layered mixed media art makes reaching hidden bottom layers challenging. To avoid this issue, I used a quick-drying black spray paint to coat the base before assembling the layers.
Painting the cardboard pieces
Next, I painted all the shapes with black acrylic paint. While spray paint is an option, I only had a matte black on hand, which didn’t give me the slight sheen I wanted. The matte finish worked fine for the base since most of it would be covered by the layered design, but for the shapes, I preferred a subtle shine to enhance the overall look.
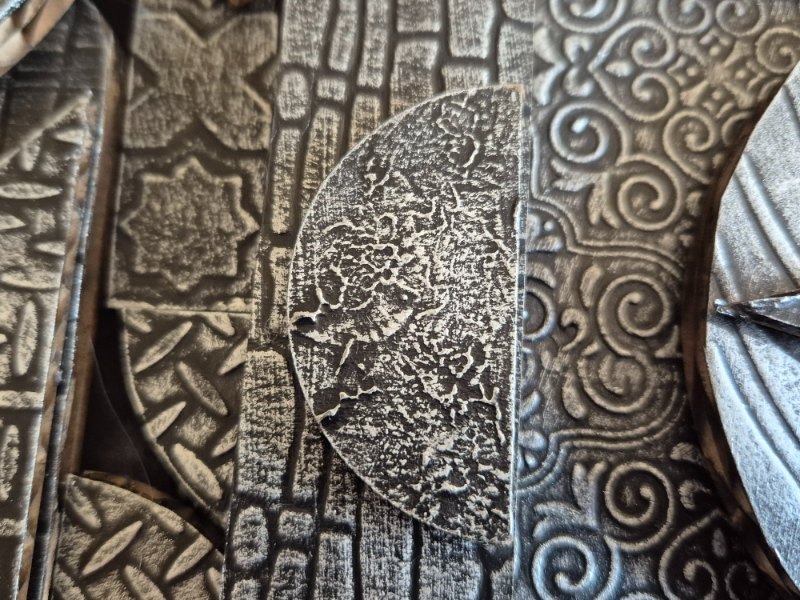
Adding the wax paste
This next step is where the magic happens! I used silver wax paste to highlight the embossed designs, making them stand out beautifully. The process is simple—just dab a small amount of wax onto your fingertip and gently rub it over the raised surfaces to bring out the details. If you don’t have gold wax paste at home, you might already have the ingredients to make your own, and this post will show you how.
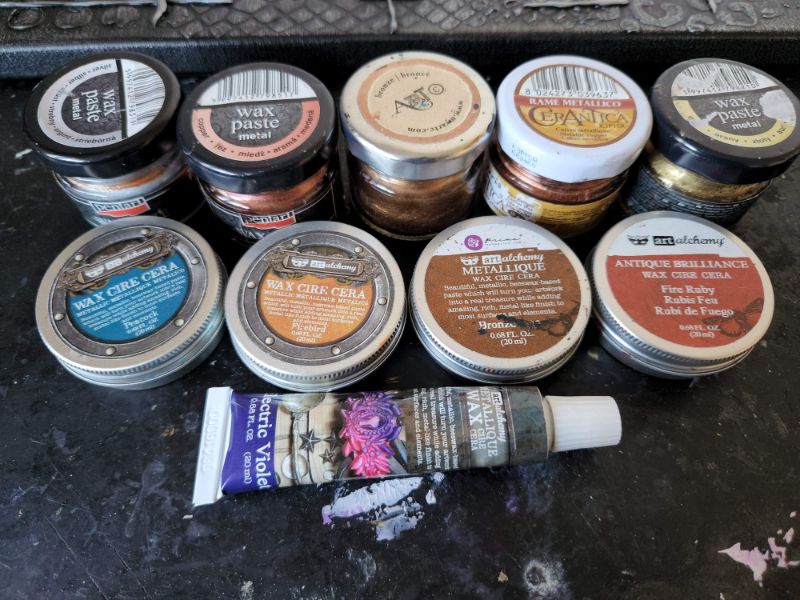
Unfortunately, I wasn’t able to find an active link for the silver wax paste I used, as it’s currently out of stock. However, I’ve included a link to a similar product in a different colour, just so you’ll know what to look for. These days, most wax pastes come in tubes or tins, but the one I used has been a long-time favourite in my craft stash and still works beautifully.
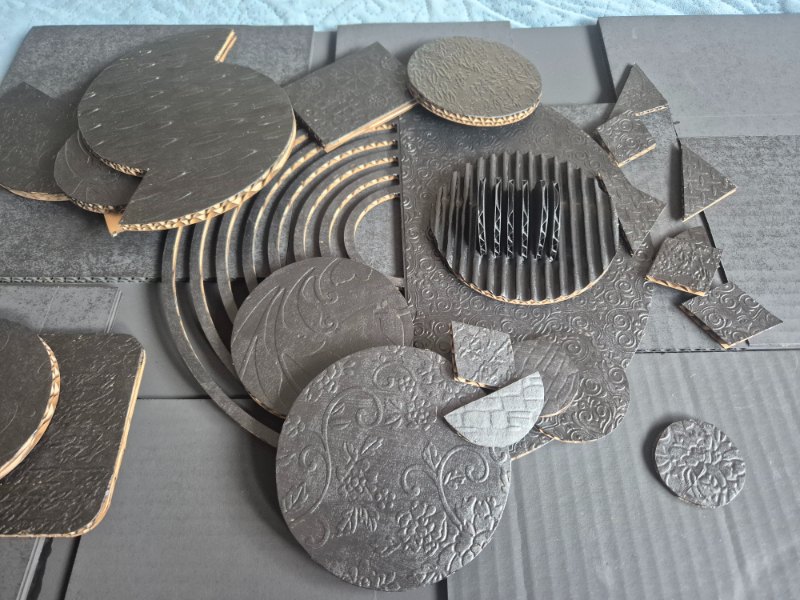
Glueing the pieces to the base
I started in the centre, working outward with gaps to reveal the layer below. I added the big pieces first and covered most of the surface. Then added the smaller pieces, creating multiple layers until I was happy with the design. I used a hot glue gun to keep the pieces securely in place.
Alternatively, you can use the dry brush painting method. Simply dip your brush into a small amount of paint, then remove the excess on a piece of paper until the brush is nearly dry. Lightly run it over the surface to highlight the raised areas. However, in my experience, the effect isn’t quite as striking as wax paste.

Once all the pieces were in place, I used an old paintbrush to apply a bit of silver wax to blend in the plain black areas.
I know this tutorial is quite detailed, but that’s because I wanted to cover everything thoroughly to make it as easy as possible to follow. Even though the project took me about five hours to complete, in reality, it was surprisingly simple to do—and in the end, well worth the effort!
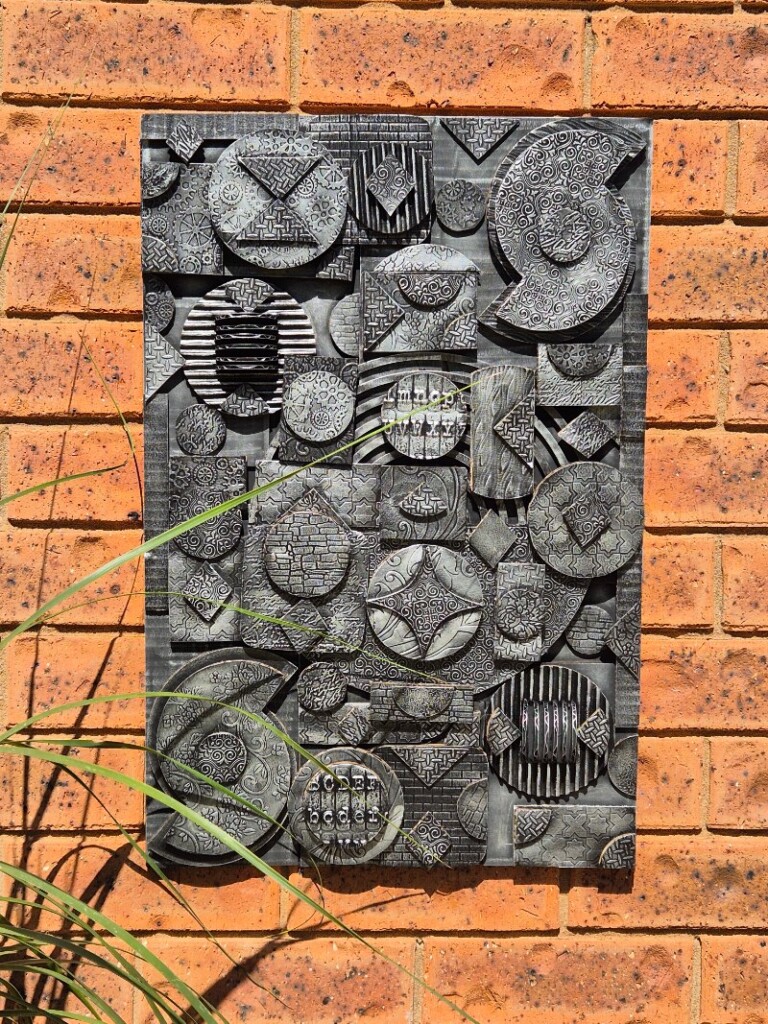
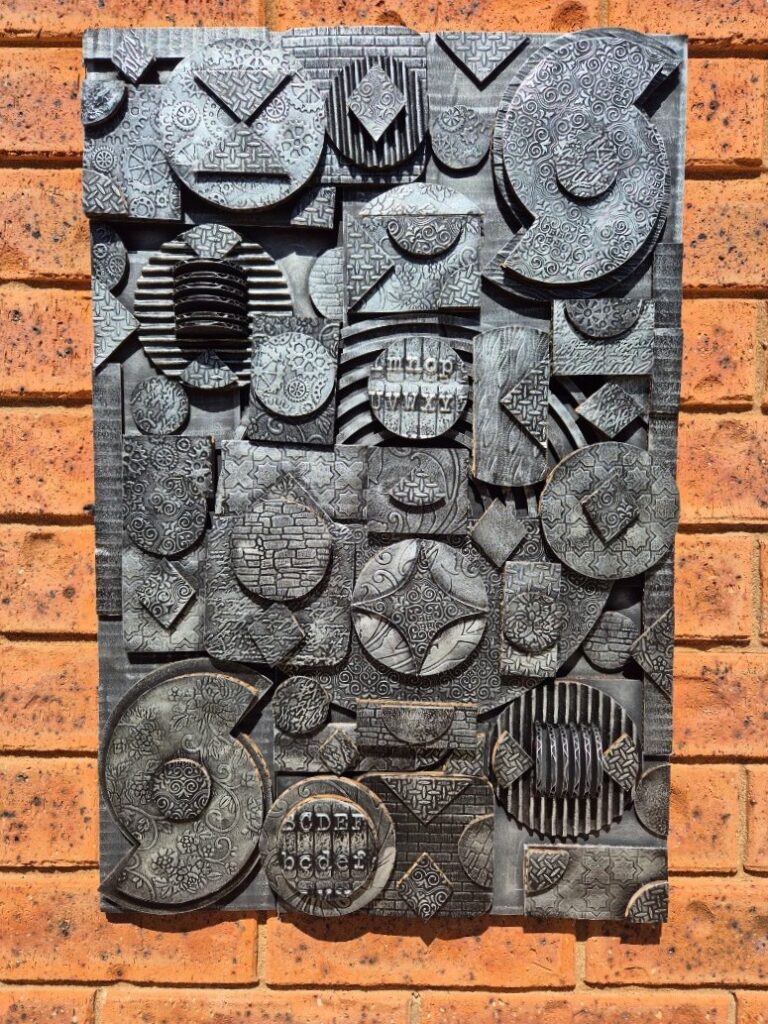
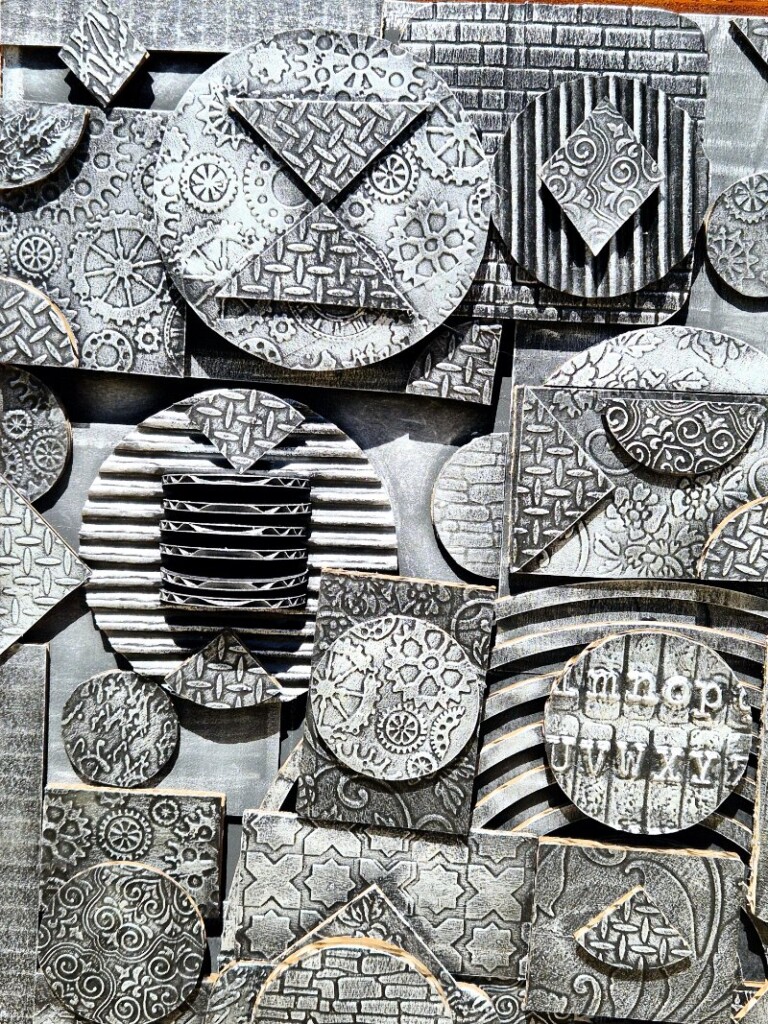
Close-up View of the Textured Cardboard Wall Hanging
I’ve included some close-up shots of the layers to give you a better look at the details.
More project ideas
Here is another project I created using a recycled cardboard box and a mannequin form.

Do over designers’ blog hop
As I mentioned, this is the ‘Do It Over’ Designers Blog Hop, and there are some great projects to explore! Be sure to check out the links below for some inspiring ideas.


If you’d like to find any of the items used in this project, we’d greatly appreciate it if you used our affiliate links. These links provide us with a small commission at no extra cost to you, allowing us to continue creating and sharing more inspiring projects. We’d also love to hear your thoughts—feel free to leave a comment or share this post!


Harry Potter Winged Keys with Upcycled Marauder's Map – Tea and Forget-me-nots
March 22, 2025 at 9:01 pm[…] Unique Creations by Anita […]
Gail @Purple Hues and Me
March 22, 2025 at 11:24 pmYour textured cardboard wall hanging looks amazing and quite fabulous, Anita! I am blown away with your creativity! You go!!!
Anita Holland
March 23, 2025 at 3:36 pmThank you Gail, you always leave such lovely comments, I really do apricate it.
Ann
March 22, 2025 at 11:38 pmOh, Anita, this is absolutely gorgeous! You have certainly showed us how to take a plain cardboard box and turn it into a beautiful piece of artwork. Love it!
Anita Holland
March 23, 2025 at 3:35 pmThank you Ann for the lovely comment, I was pretty stoked with how it turned out.
sara allen
March 23, 2025 at 12:18 amWow Anita – inspiration sure struck in the best of ways; this is stunning! Can I ask what settings you used on the xTool? I’d love to try cutting cardboard but am nervous about starting a fire as ours is in the house.
Anita Holland
March 23, 2025 at 3:34 pmThanks Sara, it took awhile to come. The settings are 80 power and 60 speed. On the thin cardboard I just did one pass and the 6mm I did 2 sometimes 3 each box seemed to be different. The fires I had were so small no drama at all, just the cardboard starting to smoulder before catching alight. But I had plenty of time to just blow it out. But I would watch it all the time.
Kim
March 23, 2025 at 1:19 amAnita, this is stunning and I would never in a million years know this was cardboard. The textures and patterns are so cool…and now I want an embossing machine!
Anita Holland
March 23, 2025 at 3:30 pmThanks for the wonderful comment Kim, I would have thought most crafter would have one. Mine was a second hand one and has opened up a whole new world to textures on my projects.
Cara
March 23, 2025 at 2:32 amWow Anita, this is very creative. I know I would have never come up with this idea. You are so lucky to have the paper gifted from the cardboard company, what a great idea too. I have never worked with embossed sheets or an embosser, but I think I would be addicted if I gave it a try. I love all of the textures and patterns, I am still stunned thinking this came from cardboard. Great job thinking outside the cardboard box!
Anita Holland
March 23, 2025 at 3:29 pmThank you Cara, I love my embosser it can give a project a totally different look. I had to giggle at the outside the cardboard box comment. 😂
Tuula @ Color Me Thrifty
March 23, 2025 at 3:50 amThat is amazing Anita! When I first saw it I thought you went off-challenge for a second, lol, and then I saw that it was cardboard. Such a fun project!
Anita Holland
March 23, 2025 at 3:27 pmThank you Tuula, My sister said the same thing when I sent her the photos. Who would have thought cardboard could look so good.
Julie
March 23, 2025 at 7:10 amWhat a gorgeous art piece, I love it. This idea has so much potential to be changed up to suit any decor or taste, just brilliant.
Anita Holland
March 23, 2025 at 3:26 pmThank you Julie, I agree you can change the colours to suit any decor.
Patti @ Pandora's Box
March 24, 2025 at 9:13 amOne would never guess this was cardboard! Very clear and clever instructions!
Anita Holland
March 25, 2025 at 10:37 amThank you Patti.
Tania
March 24, 2025 at 10:42 pmWow, I would have never guessed this is cardboard! The finished piece would be pretty painted white too for a totally different aesthetic 🙂
Anita Holland
March 25, 2025 at 10:38 amThank Tania, You can use any colour, I am sure they would all look good.
Rachel - Tea and Forget-me-nots
March 25, 2025 at 12:24 amWow, what a transformation. You really made a piece of art.
Anita Holland
March 25, 2025 at 10:38 amThanks for the awesome comment Rachel.
Donna @ Modern on Monticello
March 25, 2025 at 5:26 amImpressive! I really thought you had taken a cardboard box just for the backing and placed metal objects on it. Such a surprise to see it is all cardboard. Great job!
Anita Holland
March 25, 2025 at 10:39 amThank you Donna, the metallic wax pastes are my favourite art medium.
Michelle Leslie
April 13, 2025 at 3:59 amAbSoooooLutely stunning, Anita. One would never say it started out as cardboard. Isn’t it amazing how inspiration strikes when we’re not focused on coming up with an idea?
Psssst, sure happy you’re sharing tutorials again. I missed that creative mind of yours
Anita Holland
April 21, 2025 at 8:42 amThanks Michelle. I have been a bit slow with the tutorials because I found the best job ever which takes up my time now. The tutorials are more a hobby now.
Michelle Leslie
July 27, 2025 at 2:36 amI’m assuming the best job ever invloves little humans who are going to have ball with Ouma <3
Anita Holland
July 27, 2025 at 10:30 amFor sure, there is no better job.