
As a DIY blogger, I’m always excited to try new products, and Unicorn SPiT Stain and Glaze was an instant favourite. After testing it on a wooden party trough table, I couldn’t wait to see how it worked on glass—and it was even better than I expected! You don’t need artistic skills to create stunning designs; even a child could do it. The best part? Each design is unique, making your project one of a kind. Though I’ve used Unicorn SPiT on other surfaces before, applying it to glass brought a whole new level of creativity to the table.

What is Unicorn SPiT Stain and Glaze?
Unicorn SPiT is a versatile gel stain and glaze that can be used on various surfaces, including wood, metal, fabric, glass, and ceramics. It not only stains wood but also gives a gorgeous glazed finish, adding depth and dimension to your projects. It’s the perfect product for adding vibrant colour and texture to any surface, including glass vases, bowls, and even plastic!

Before we dive into this tutorial, be sure to subscribe to my bimonthly newsletter to be the first to see my latest projects. You can also follow me on Pinterest and Facebook, where I also include my unique mixed-media art projects.
Transform Glass with Unicorn SPiT: A DIY Guide
**This post may contain affiliate links. This means I earn a small commission on links used at no extra cost to you. Please see my disclosure policy for more information.**
Materials Needed:
- Unicorn SPiT Stain and Glaze or the new Shimmer range
- Plain glass vases or wine glasses
- Small plastic bottles (for diluting Unicorn SPiT)
- Water spray bottle
- Paper towels
- Metallic gold spray paint
- Clear polyurethane for protection (optional)
- Masking tape
Preparing the Glass for Your Design
Start by choosing glass items with smooth surfaces. I found old wine glasses and a vase around the house, but any clear glass will work. Wash the glass thoroughly in the dishwasher or with warm soapy water. Clean glass ensures the Unicorn SPiT adheres properly to the surface. Cover your work surface with plastic or paper towel to protect your surface.
")
Applying Unicorn SPiT to the Glass
Shake the Unicorn SPiT well before use. Apply a small amount of your chosen colours around the inside rim of the glass. If using black, be cautious—it can easily overpower the other colours. I recommend sticking to just 2 or 3 colours for each project, as too many can blend into one another and diminish the desired effect. Remember, less is more, and a little goes a long way.

The Unicorn SPiT should flow slowly down the glass. If it doesn’t move freely, it’s too thick and needs diluting. I prefer not to dilute the main bottle, as it can change the consistency. Instead, I use small plastic bottles for dilution. A plastic syringe works well for applying the stain to awkward shapes. To dilute, add a small amount of water—about a tablespoon at a time—and stir until the desired consistency is achieved.

As the Unicorn SPiT moves down the glass, you can tilt it on its side to guide the colours in a different direction.
")
A simple trick is to balance the vase on a roll of tape. After a few minutes, move the vase again to help the colours spread. Continue until the entire glass is covered. You can tilt or rotate the glass to help the colours move. Be patient—this part creates the unique marbled effect.
")
How to create the veins in the colours
Once the glass is fully covered with Unicorn SPiT, it’s time to create the veins. For this step, you’ll need a spray bottle set to a fine mist. Lightly mist the inside of the vase three times. As the Unicorn SPiT runs down the glass and mixes with the water, veins will begin to form. If you don’t see any veins, your Unicorn SPiT may be too thick—simply spray another fine mist of water to reactivate the stain.

Next, remove the excess Unicorn SPiT. Lay down some paper towels, then carefully turn the vase upside down. The excess will slowly run out. You can scoop up the runoff and reuse it on another project if you prefer not to waste it. Once all the excess has drained, return the vase to its upright position and leave it in the sun to dry. On a hot day, this should take around 30 minutes.

Add the metallic gold spray paint
I got so caught up in the project that I forgot to take a photo of the vase before I sprayed it. However, the image below shows what it will look like once the Unicorn SPiT is dry, which will give it a powdery finish.

Adding the Gold Spray Paint
Before applying the gold metallic spray paint inside the vase, use masking tape around the rim to prevent any overspray on the glass. There’s no secret to applying the spray—just ensure the entire inside is evenly coated. The gold paint will settle into the veins, enhancing the effect and giving your vase a stunning finish. Let the vase sit until the paint is fully dry.

To protect the interior, you can apply two coats of clear polyurethane. In the image below, you’ll notice some overspray on the top of the vase, which I cleaned off with paint thinner.

")
For a touch of mood lighting at your next dinner party, simply add some battery-operated lights inside the vases. This easy addition will create a beautiful, glowing effect that enhances the overall ambiance.
")
Here is the vase with battery-operated lights inside. These vases are purely decorative and are only suitable for battery-operated lights. They are not designed for use with tea light candles or any flame sources.

More great unicorn spit ideas
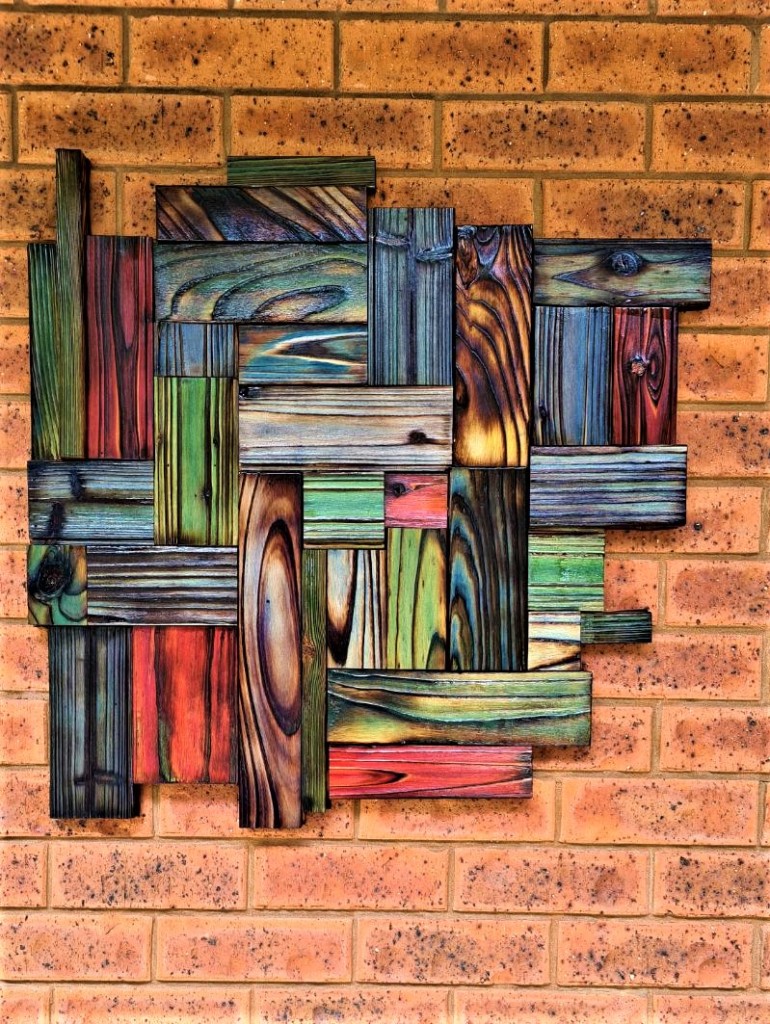
I used Unicorn SPiT to add vibrant colour to this wooden wall hanging, giving it a beautiful and unique finish.
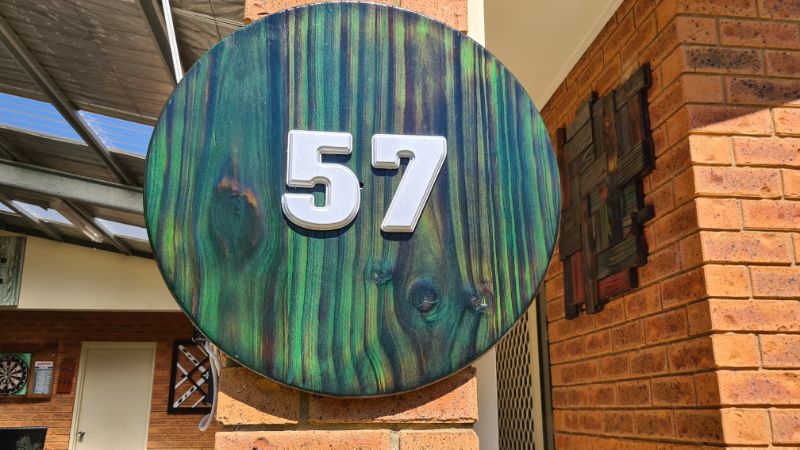
The colour on this wooden house number was created using just one shade of Unicorn SPiT and a burning technique called Shou Sugi Ban, which adds depth and a unique, textured finish. You can find all my unicorn spit projects HERE if you are looking for inspiration.


If you’d like to find any of the items used in this project, we’d greatly appreciate it if you used our affiliate links. These links provide us with a small commission at no extra cost to you, allowing us to continue creating and sharing more inspiring projects. We’d also love to hear your thoughts—feel free to leave a comment or share this post!

42 Comments
Eva Desmarais
December 30, 2017 at 11:18 pmWow, I have never tried Unicorn spit, but gonna do it. Your vases should be in a Museum.
Anita Holland
December 31, 2017 at 6:01 amThank you Eva very kind of you to say that.
Leroy
October 9, 2018 at 7:13 pmVery impressed, I’m off to buy some so I can make Christmas gifts (if I can do as good a job as you’ve done 😁)
Anita Holland
October 10, 2018 at 12:02 amThank you Leroy, If you are buying some have a look at the christmas Baubles I made using it, they turned out great too. There are a few projects I have done with Unicorn Spit if you look at my other posts.
Vanessa
July 24, 2022 at 3:22 amI love the look and have tried and tried and messed up I’ve left it thicker and thinned it. I tried swearing at it and it will not work for me. When I spray the water it either washed it almost all away or did nothing. I tried letting the spit dry and did it wet. Could you possibly post a video of how and when you spritz it? I am jealous.
Patty Davenport
November 9, 2018 at 4:00 amHow do you keep the color on the log planter? I’ve been wanting to try something with spit. I thought once it was sealed,it was water proof. That’s disappointing for my bottle tree.
Anita Holland
November 9, 2018 at 4:53 amThe log planter I made was sealed with marine varnish, it has been outside in the elements for over a year. The creator Michelle sells all her vases as decorative only. Because it is water activated stain if it gets wet it will reactivated. I made all mine for myself and not for sale so I am happy to take the chance that they might run if not sealed properly. I seal all mine with a few coats of spray polyurethane and the ones I used as planters I used acrylic spray. Mine are all over a year old and get watered every week and mine are still fine. I made mine according to the tutorial I posted. You did not say what happened to yours? Regards Anita
Sylvia | Grace for a Gypsy
July 22, 2019 at 12:54 amI have not tried the Unicorn Spit product yet, but I am going to soon! Thanks for sharing.
Anita Holland
July 22, 2019 at 1:38 amYou will not regret it, so easy to do, a child can do it.
Jennifer
July 22, 2019 at 4:20 amI love the glowing light coming through the blue glass. Really cool! Thanks for sharing at the Weekend Blog Hop at My Flagstaff Home! –Jennifer
Anita Holland
July 24, 2019 at 3:24 amThank you, it did turn out very pretty.
Anita currie
August 19, 2020 at 5:06 amWould Unicorn spit work on a gourd. I am a gourd artist and always looking for a new idea
Anita Holland
August 21, 2020 at 8:50 amHi Anita, It depends on what you want to make. Unicorn Spit dries into a powdery colour and needs an oil-based polyurethane to make the colour pop and stand out. So I would have to say I really don’t know. Maybe try a little test first.
Amanda Reece
October 2, 2021 at 12:23 pmHave you experimented with clear epoxy to seal the inside? I’m assuming that you would then be able to put water in the vase?? Jw
Anita Holland
October 2, 2021 at 3:58 pmI have not personally tried epoxy, but I do remember the creator try it a few years back. If I remember correctly she did not recommend it. She felt if the slightest gap was left the water would get under the resin. But saying that many people have the cup turners now for resin so that could work.
Michelle
August 24, 2019 at 8:18 pmThese vases are absolutely fantastic!
Anita Holland
August 24, 2019 at 11:40 pmThank you, Michelle, No skill needed at all, lol
Mother of 3
August 30, 2019 at 10:27 amThose look amazing! What a fun and unique crafting idea.
Anita Holland
August 31, 2019 at 2:44 amThank you so much, they all turn out so unique.
Dee | Grammy's Grid
September 1, 2019 at 7:52 amNever heard of unicorn spit but the vase looks so pretty. I really like the blue one. Thanks so much for linking up at the #UnlimitedMonthlyLinkParty 4. Shared.
Anita Holland
September 2, 2019 at 12:35 pmThank you, It is really a wood stain, but I prefer it on glass.
Julie
September 1, 2019 at 10:09 amWhat a lovely technique with such a funny name! Your tips for getting good results are great – thanks.
Anita Holland
September 2, 2019 at 12:38 pmThank you so much, I thought it was a strange name too. It is becoming very popular in the last year.
Anita Holland
September 7, 2019 at 10:47 pmThank you so much, Beverly, for the great comment and the feature.
Debbie-Dabble
September 9, 2019 at 12:51 amThese are so pretty!!
Hugs,
Debbie
Anita Holland
September 9, 2019 at 11:55 amThank you.
Linda at Mixed Kreations
February 24, 2020 at 5:28 amThat is so cool! I haven’t tried unicorn spit yet but I need to. I LOVE how these turned out. Lovely! I like the ones with the lights in them too. So pretty lit up. Love the tree stump as well! 🙂
Anita Holland
February 25, 2020 at 2:38 pmThank you
Maria
February 27, 2020 at 11:31 pmIt turned out beautiful
Anita Holland
March 3, 2020 at 11:15 amThan k you Maria, it is so exciting to wait and see how they turn out because each one is different.
Terri Kent
August 9, 2020 at 1:02 amThe glassware looks fabulous. I’m about to order some Unicorn Spit for some furniture projects – I didn’t know it could even be used on glass! I was wondering if you can actually use the glasses or vases when they’re painted?
Anita Holland
August 10, 2020 at 5:34 pmHi Terri, Thanks for the kind comment. In my experience unicorn spit on glass is purely decorative. It is water activated, so even the tiniest amount of water getting under the seal will activate the paint again.
Veronica
December 31, 2020 at 5:08 amI love this process. I am a tad bit confused. I could not tell if you put the initial application of the “spit” so it runs inside the vase or on the outside. I think inside but I would like to b3 certain. Thanks much!
Anita Holland
December 31, 2020 at 10:50 amHi Veronica, The spit goes inside the vase. I could not get it right on the outside. lol
Sue
April 17, 2021 at 11:22 amI’ve never left a comment on anyone’s post before but this post was exceptional and very easy to fillow. I can hardly wait to be mobile again so I can try it. Thanks for brightening a rather dull day while my leg heals. Please keep up these pists, they are marvelous.
Anita Holland
April 18, 2021 at 9:41 amThank you so much Sue, I feel very honoured. Thanks for stopping by.
Claudia McDiarmid
August 1, 2021 at 1:48 pmWhat kind of gold spray did you use in your beautiful vases?
Anita Holland
August 1, 2021 at 3:13 pmIt was just a cheap and cheerful metallic gold one from the hardware store.
Teresa Hocevar
January 28, 2022 at 1:48 amCan you paint the inside of the glass with brush rather than spray? In your example, what happened to all the other colors? I only see the green in the finished product. Looks beautiful!
Anita Holland
January 28, 2022 at 11:26 amIf you are using unicorn spit you cant use paint and a brush. Unicorn spit is reactivated by the liquid in the paint, it only seems to work with a thin coat of spray paint. As for the different colours, they all blend in together.
Carolyn
June 5, 2022 at 11:14 amI can not get it to crackle after the inside is covered. What am I doing wrong. I do not think my paint is to thick. Once the paint covers the inside do you let the paint dry and then spray? I water sprayed right after it was covered. Help.The sides are just getting diluted in colour not crackling.
Anita Holland
June 5, 2022 at 11:29 amSorry to hear you are having trouble. You have the inside completely covered first, while it is still wet add the sprays of water and turn it upside dry to let the excess run out. If you are still not getting the cracks once it is dry your paint is definitely too think.