
With the shift towards e‑readers, tablets and audiobooks, printed volumes are becoming relics of the past—but that doesn’t mean they belong in a landfill. In this tutorial, From Page to Treasure: How to Repurpose an Old Book into a Stunning Jewellery Box, you’ll learn how to transform a neglected hardcover into a functional, mixed‑media keepsake that celebrates recycling, reusing and repurposing.
Assemblage mixed media combines found objects and varied materials in one artwork, emphasising texture, depth, and contrast. It tells a story by arranging everyday items—metal bits, wood scraps, fabric, paper—and unifying them with paint, wax, or patina.

With World Environment Day on 5 June fast approaching, this month’s International Bloggers Challenge (IBC) invites us to create eco‑friendly projects that recycle, reuse or repurpose materials to benefit our planet. (More on the IBC at the end of this post.)

Before we dive into this tutorial, be sure to subscribe to my bimonthly newsletter to be the first to see my latest projects. You can also follow me on Pinterest and Facebook, where I also include my unique mixed-media art projects.
How to Repurpose an Old Book into a Stunning Jewellery Box
**This post may contain affiliate links. This means I earn a small commission on links used at no extra cost to you. Please see my disclosure policy for more information.**
Materials Needed
- Thick hardcover book (no glossy finish)
- Sharp craft knife and ruler
- Mod Podge or PVA glue
- Clamps or heavy weights
- Self‑adhesive felt
- Texture paste and stencils
- Tacky glue & hot glue gun
- Assorted embellishments (broken earrings, keys, studs, charms, buttons, book corners)
- Small jewellery‑box legs
- Black gesso or acrylic paint
- Metallic wax paste (or homemade)
- Decorative paper (e.g., Kaisercraft)
- Acrylic spray sealer
- Saran wrap
Find a Suitable Book
Choose a thick hardcover with a plain cloth or paper cover—glossy finishes repel paint and glue.

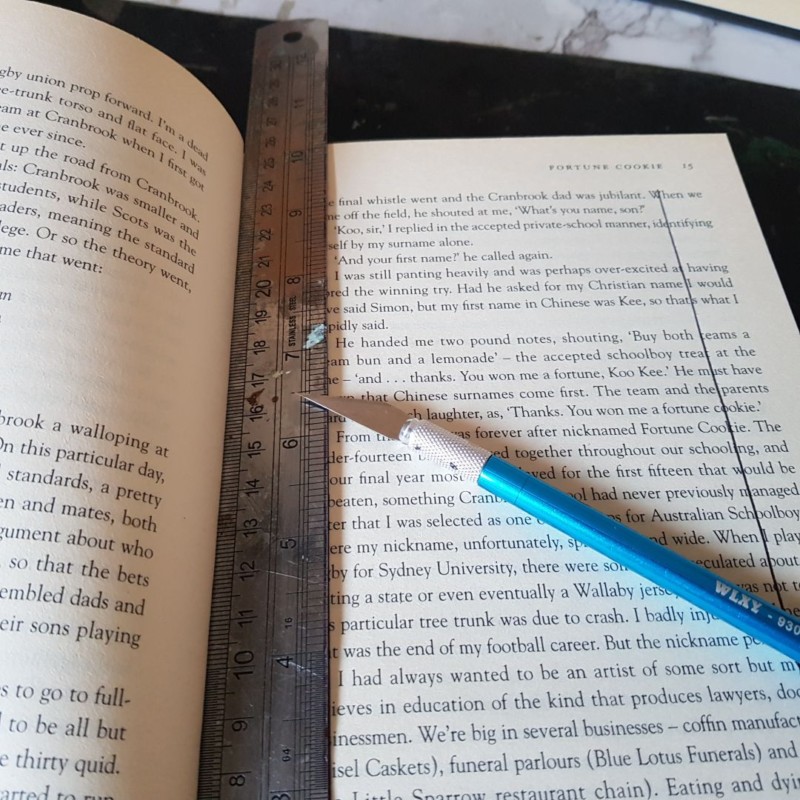
Cut Out the Pages
Mark a rectangle on the top page, leaving a 10–15 mm border for stability. Use a ruler as your guide and slice through a few pages at a time, rotating the book as you go.
Seal the Pages
Add a thick layer of Mod Podge to the inside of the cut-out pages.

Then brush on a second coat of Mod Podge along the exposed edges of the pages. Lay a sheet of Saran Wrap over the top page to protect the cover from stray glue. Spread a generous coat of Mod Podge along the outer edges of the pages to seal them together and prevent any shifting.

Finally, stack heavy weights or secure the book in clamps to keep the pages firmly in place until the glue dries.

Line the Interior
No matter how carefully I cut, the pages along the spine kept shifting and left a jagged edge. Rather than start over, I trimmed a piece of self‑adhesive felt to fit snugly inside and pressed it into place, neatly hiding the uneven cut and reinforcing the jewellery box.

Add texture to the Jewellery Box
Position stencils over the cover and apply texture paste with a spatula.

. Layer different patterns for interest. Smooth down any peaks before the paste dries.

Embellish the Cover
Arrange and glue broken earrings, charms, studs, keys, buttons and book corners onto the textured surface. Build up layers for a dynamic 3D effect.

This is where the magic happens—and yes, it gets delightfully messy. At this stage, your book may look like complete chaos, but that’s exactly what mixed‑media is all about. Don’t be discouraged—keep layering and experimenting. You can attach almost anything: bits of broken jewellery, metal studs, vintage keys, buttons, trim and more. Below is just a sample of the treasures I gathered from around the house and workshop.

Take a look at these close‑ups to see the embellishments in detail. I secured smaller trinkets with tacky glue and attached the larger pieces using a hot glue gun. Layering elements on top of one another creates a striking three‑dimensional effect—feel free to experiment with different arrangements. For more tips on layering and texture, explore this mixed‑media tutorial.

Close-up view of embellishments used.

Attach Legs
Glue jewellery‑box legs into each corner of the lower cover using hot glue. Press firmly and allow to set.

Paint the Box
Cover the entire box in black gesso or acrylic paint.

Use a hairdryer to speed up drying.

Highlight with Metallic Wax
Gently rub silver wax paste over raised details and embellishments, leaving shadowed areas black to enhance depth. If you don’t have silver wax paste, you likely already have the ingredients to make some at home. This post shows you how.

For this step, use only your fingertip—lightly tap into the wax paste rather than scooping it up, then gently rub it over the raised areas. Too much wax will blur your details, but a soft touch will beautifully highlight the texture.

To make your charms and embellishments really pop against the black backdrop, apply the metallic wax sparingly—don’t smother every inch of paint. Let the matte black peek through; it emphasises your stencil‑pressed textures and adds depth and character.

Seal the Project
After 12 hours, apply two light coats of acrylic spray sealer to protect your finish.

Finish the Interior
To disguise the rough page edges, I lined the interior with thick Kaisercraft decorative paper.

After selecting a design, I measured and trimmed each sheet to size, then glued it in place for a polished, professional finish.

Here’s the finished interior of the jewellery box, all neatly lined and ready to use.


More recycled jewellery storage ideas.
I transformed these high‑heeled shoes into unique ring holders and adorned their exteriors with mixed‑media art techniques.

I transformed a vintage display cabinet into a bespoke jewellery box through creative upcycling.

About IBC (International Bloggers Club)
As you may know, I’m a proud member of the International Bloggers Club (IBC), a global collective of creative bloggers from Spain, South Africa, Australia, the United States and Canada. Every month, we unite around a shared theme and challenge ourselves to craft something extraordinary.
Last month’s Black & White theme yielded some truly striking projects. If you missed it, you can catch my wooden wall hanging— it was a crowd favourite! Below, you’ll find links to my fellow IBC members’ creations. I’d love for you to hop over, explore their work and share your thoughts.
- A crafty mix |Kokedama fairy village
- Raggedy bits |Upcycle old paddle paint pouring
- Interior frugalista |DIY Eco-friendly rain barrel and compost.
- Northern feeling |Free abstract plant printable


If you’d like to find any of the items used in this project, we’d greatly appreciate it if you used our affiliate links. These links provide us with a small commission at no extra cost to you, allowing us to continue creating and sharing more inspiring projects. We’d also love to hear your thoughts—feel free to leave a comment or share this post!


65 Comments
Marie
May 19, 2020 at 1:26 amYou know how much I love your steampunk creations. What a creative idea turning an old book into a jewelry box and the cute curvy legs are perfect! I’m always inspired by your mixed media pieces and maybe one day I’ll give it a whirl. As for books becoming a thing of the past makes me sad. I love holding a good book and the turn of each page in anticipation of what’s to come next. It’s not the same reading from a blue screen.
Anita Holland
May 19, 2020 at 8:38 pmThank you so much Marie, I am so glad you like my mixed media style which is a bit out there. I 100% agree with you about the books, I love reading when I am not playing in my shed. That feeling when you just want to read one more page before you fall asleep and then BOOM, that sucker falls and hits you in the face. It is also so much fun on holiday when you can see what everyone else is reading. lol
Cath
November 2, 2020 at 12:15 pmJust be careful that you don’t use an “old book” that could sell to a collector for bigger bucks OR even donate it to a LIBRARY that would give it an even LONGER life…please be aware of books value as learning and entertainment for more than one person.
Michelle Leslie
May 19, 2020 at 1:49 amI’m totally with Marie. Your Steampunk mixed media projects are amazing Anita. They’re always filled with so much detail and interesting bits and the way you’ve used a book to make a jewelry box is genius. I tried drilling through books a few years back and it was waaaaaaay more difficult than I thought. They’re tough. Brilliant idea and so apt for world environment day.
Anita Holland
May 19, 2020 at 8:33 pmThank you so much my beautiful maaitjie. I am definitely steampunk mad at the moment in my craft projects because I am doing my spare room in a steampunk theme. I am trying to come up with some different ideas. Speaking about drilling a book I can totally agree. Two books were sacrificed today when I discovered that for myself. Did you ever get it right to drill all the way through without messing all the pages?
Rosemary Palmer
May 19, 2020 at 5:31 amI love using old books. We have a local store who has bins full of free books. If not taken, they are trashed.
Anita Holland
May 19, 2020 at 8:23 pmIt is a shame they get thrown away. I see a few people making “help yourself libraries” in there front gardens. I thought that was a really sweet idea.
Sara
May 19, 2020 at 8:18 amTruly inspired; awesome upcycle!
Anita Holland
May 19, 2020 at 8:21 pmThank you so much Sara, my kids thought it was a spell book.
Dee | Grammy's Grid
May 19, 2020 at 11:51 amOh WOW, look how pretty that is! Thanks so much for linking up with me at my #UnlimitedMonthlyLinkParty 12, open May 1 to 26. All party entries shared if social media buttons installed.
Anita Holland
May 19, 2020 at 8:21 pmThank you so much for the awesome comment it is really appreciated.
Katrin
May 20, 2020 at 4:48 amWow Anita, you really turned that book into something else! It looks like a treasure chest, beautiful!
Sam - Raggedy Bits
May 19, 2020 at 3:42 pmWow, what an awesome transformation!! Who would have thought to look at the after that this once was a book! Love all the beautiful detail and those sweet little feet! Just gorgeous!!
Anita Holland
May 19, 2020 at 8:20 pmThank you Sam, all those bits of junk are a good disguise. The feet I bought from china thinking I could use them on furniture lol that was years ago when China was really cheap to buy from.
Anita Holland
May 19, 2020 at 8:24 pmThank you so much Michelle, it is honestly so easy to do. You are so creative it would be a breeze for you.
Maria
May 19, 2020 at 9:40 pmThis is beautiful! You did amazing job. I love book decor!
Anita Holland
May 20, 2020 at 8:33 amThank you so much, it was my first book repurpose and I am sure there will be more.
Katrin
May 20, 2020 at 4:47 amWow Anita, you really turned that book into something else! It looks like a treasure chest, beautiful!
Anita Holland
May 20, 2020 at 8:34 amThank you so much Katrin, it turned out better than I hoped.
Meegan
May 20, 2020 at 8:48 amWhat a lovely piece! Thank you for the full tutorial. I love using vintage treasures for decorative accessories.
Anita Holland
May 20, 2020 at 10:13 amThank you so much Meegan, I really appreciate you lovely comment.
Pamela @ DIY Vibes
May 20, 2020 at 10:33 pmThis jewelry box looks amazing, and those legs…perfect! I love the whole feel of this! Pinning this to try this technique soon.
Anita Holland
May 21, 2020 at 8:45 amThank you so much Pamela, I have had those legs for years they have just now become handy.
Lafayne E
May 21, 2020 at 2:33 amWonderful idea. One of our past client used an old book (one of her fave book) and hallowed out the inside and made it her ring pillow (her photo is on our Pinterest board); this was two years ago. The guests were shocked and loved it at the same time. This goes to show, everything that be upcycled. Great atricle.
Anita Holland
May 21, 2020 at 8:46 amThank you so much, I think there are mixed feeling regarding recycling books, but this is better than throwing them away.
creativejewishmom/sara
May 21, 2020 at 8:05 pmGreat project, especially love the paper on the inside, gorgeous! thanks so much for sharing on craft schooling Sunday!
Anita Holland
May 22, 2020 at 7:54 amThank you so much for the lovely comment, I was unsure if the paper was a good choice, but I had nothing else to match the outside.
Chas Greener
May 22, 2020 at 2:31 amLooks fantastic, useful, and this is such a great idea! Thanks for sharing
Anita Holland
May 22, 2020 at 7:54 amThank you so much, Chas.
Kathy A
May 22, 2020 at 5:23 amI’m with Marie; love your steampunk projects. Until you said you lined the top with that gorgeous paper, I was sure that you had used an old Reader’s Digest condensed book–one of the few I wouldn’t mind cutting up! The older ones had beautiful endpapers! A dollhouse club I belonged to made great shallow room boxes replacing the text with a foamcore frame. Your steampunk and my foamcore would make a GREAT spooky Halloween/wizard/witch setting!
Anita Holland
May 22, 2020 at 7:56 amThank you so much Kathy, I suppose you could use them for many things
Lori Nell
May 22, 2020 at 7:49 amWhat a great post! Your DIY details are goof proof, Marie! Such a fun project.
Anita Holland
May 22, 2020 at 7:56 amThank you so much Lori, they are very hard to mess up no matter what you use.
Allyson
May 22, 2020 at 11:01 amWow, amazing mixed media project! The addition of the legs is a wonderful detail.
Anita Holland
May 23, 2020 at 1:08 pmThank you so much, It looks less like a book with the legs.
Tania
May 22, 2020 at 11:15 pmWow, that’s so cool! I love how you embellished the cover! Pinned!
Tania
Anita Holland
May 23, 2020 at 1:07 pmThank you so much, lots of it is junk that has been disguised lol
Grandma's House DIY
May 23, 2020 at 1:23 amI’ll be featuring you on Instagram, my blog and on Facebook next week when the next To Grandma’s house we go party starts. Thanks so much for sharing with us – hope you have a great weekend!
Anita Holland
May 23, 2020 at 1:09 pmThank you so much It is greatly appreciated. Enjoy your weekend
Claire
May 23, 2020 at 2:15 amWow that looks fabulous so clever and I love the paint finish.
Anita Holland
May 23, 2020 at 1:08 pmThank you so much, It is so simple to do as well.
riitta k
May 23, 2020 at 7:33 pmWow, a lot of work, but you created a fantastic jewellery box <3 I use paper books & audio books side by side…
Anita Holland
May 25, 2020 at 3:56 pmThank you so much, it looks more work than it is. Glueing the book took the longest.
Cecilia
May 25, 2020 at 5:59 amHow creative, Anita! Thanks for sharing at Vintage Charm!
Anita Holland
May 25, 2020 at 3:56 pmThank you so much and thanks for hosting a great party each week.
Michelle
May 26, 2020 at 12:01 amThis is so creative and beautiful, too! What a great way to store jewelry.
Anita Holland
May 27, 2020 at 8:04 amThank you so much, it does look great on my dresser.
Ann
May 26, 2020 at 4:57 amWhat a wonderful way to repurpose an old book! Thank you for sharing at Party In Your PJ’s, you are being featured on my blog Tuesday evening.
Anita Holland
May 27, 2020 at 8:05 amThank you so much Ann for the lovely comment and for the great feature.
DW | breakroombuddha.com
May 27, 2020 at 9:07 amI have a ton of childhood books that I’ll probably never re-read, so this is the perfect way to re-use them! Thank you!
Anita Holland
May 28, 2020 at 8:29 amThank you, I am glad I could inspire you to reuse them in a pretty way.
Carol
May 29, 2020 at 6:14 amOh my gorgeous! What an absolutely stunning piece of art. I love it so much and am featuring it when my party opens up!
Anita Holland
May 29, 2020 at 2:22 pmThank you so much Carol, I really do appreciate the feature.
Anita Holland
May 29, 2020 at 2:23 pmThank you so much for the feature.
Anita Holland
May 29, 2020 at 2:25 pmThank you so much for the feature, You have made my day
Jayne @ Sticky Mud and Belly Laughs
May 31, 2020 at 11:52 pmWow! This is brilliant. I love how you’ve transformed this book into a jewellery box. I must have a go at this!
Thanks so much for sharing with #MMBC. 🙂
Anita Holland
June 1, 2020 at 11:07 amThank you so much Janyne, it turned out better than I had hoped. So much better than throwing the book away.
Anna
June 11, 2020 at 3:01 pmHi: I just came upon your site while I was surfing the web and I am so in awe of what you did. I bet it took you some time to get it done because of all the steps it required, but I think it was worth every minute. Since it’s 1 am I’m afraid I’ll have yo look at the other things you have made tomorrow. May I make a suggestion the lady who has most of her childhood books now. When I read that, I couldn’t help think if she has a lot and no one else to give them to she could take them to almost any charity so that some else can enjoy them as she did. I look forward to viewing all your creations.
Anita Holland
June 12, 2020 at 12:09 pmThank you so much for the lovely comment Anna and for taking the time to stop by. It really was very simple to do it just looks technical. I totally understand how you feel about the books, but in our town, no shops will take them because they are snowed under with them. I hope you will stop by again because I have lots more projects I am sure you will like.
You’re the STAR Blog Hop – June 22, 2020 – KrisandLarry.com – Homestead and Homeschool
June 23, 2020 at 5:04 am[…] On-Line Recipe Box 20 Frugal Recipes from The Great Depression by Artful Homemaking Book Repurposed Into A Jewelry Box by Unique Creations by Anita If you’ve been featured then please grab a STAR button below: […]
Anita Holland
June 23, 2020 at 7:31 amThank you so much for the feature on my book repurposed into a jewellery box.
Anita Holland
June 25, 2020 at 10:55 amThank you so much for the feature.
Upcycling Books for Fun and Profit - GBN NEWS
October 19, 2023 at 1:51 pm[…] picture: Unique Creations by Anita […]
Upcycling Books for Fun and Profit - CHECKING SEO
October 19, 2023 at 5:38 pm[…] image: Unique Creations by Anita […]
How to Build a Kokedama Fairy Village - A Crafty Mix
September 6, 2024 at 4:44 pm[…] Frugalista | Unique Creations By Anita | A Crafty […]