
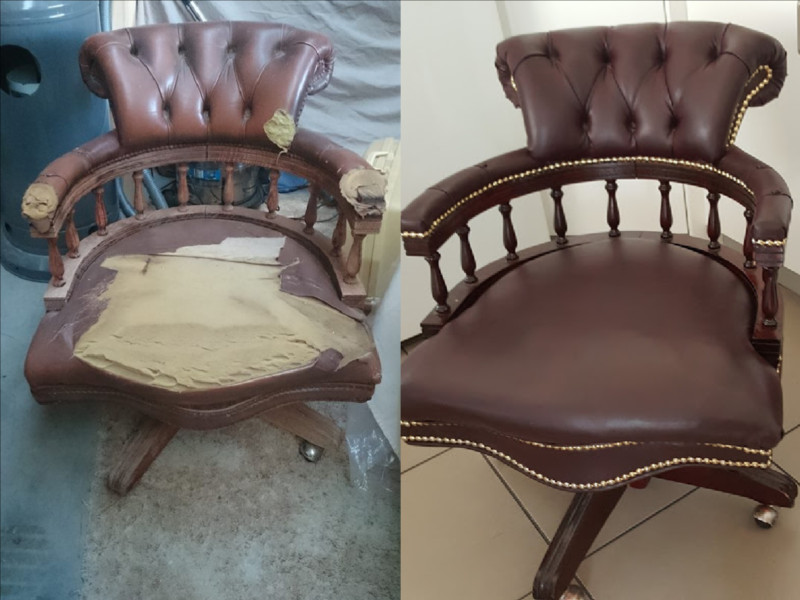
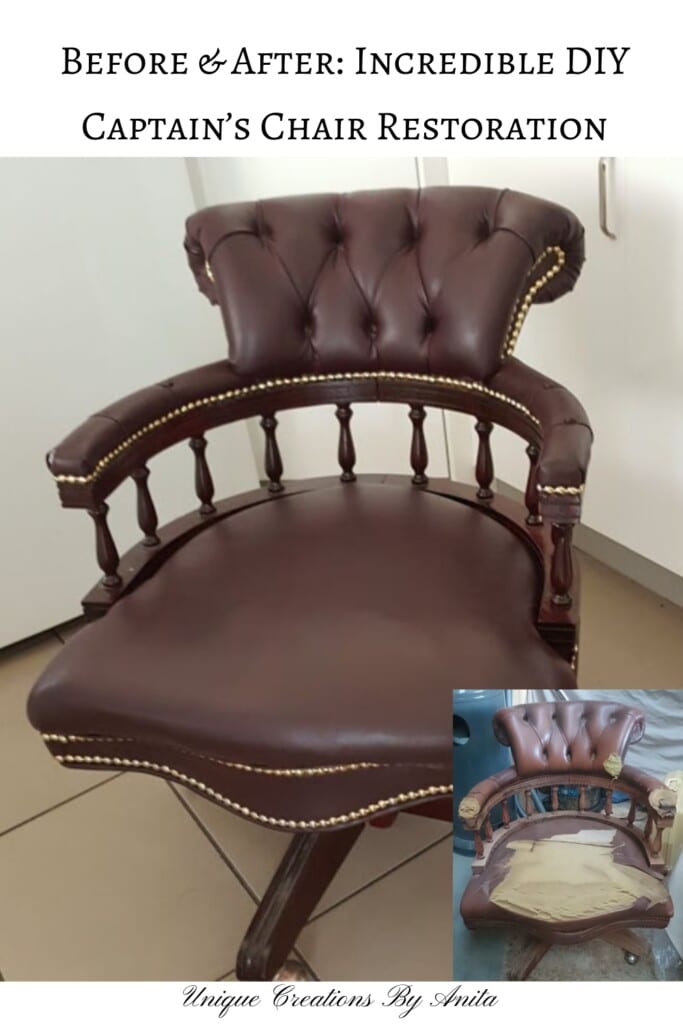
Have you ever spotted an old chair on the side of the road and imagined its potential? That’s exactly what happened with this vintage captain’s chair. I found it abandoned outside my chiropractor’s office, drenched from the rain and waiting for the skip. I asked if I could rescue it to practise my furniture restoration skills. I’d never restored a captain’s chair before, so it seemed like the perfect low-risk challenge. If it didn’t work out, at least I’d learned something new.
Being self-taught, I always look for projects like this. You’re more likely to try new techniques when the piece costs nothing. Pulling apart furniture and figuring out how to reassemble it teaches you valuable skills for future projects. This restoration turned out better than I expected—I even sold it for a healthy profit!
Before we dive into this tutorial, be sure to subscribe to my bimonthly newsletter to be the first to see my latest projects. You can also follow me on Pinterest and Facebook, where I also include my unique mixed-media art projects.
This project is also part of this month’s Do It Over Designers Blog Hop, where talented DIY bloggers share their latest upcycling or recycling makeovers. Be sure to check out their ideas using the links at the end of this post!
How to restore a Captain’s Chair
**This post may contain affiliate links. This means I earn a small commission on links used at no extra cost to you. Please see my disclosure policy for more information.**
Materials Used
- Fine steel wool
- WD-40
- Furniture oil
- Mahogany wood stain
- Oil-based polyurethane
- Upholstery leather
- Upholstery wadding
- Upholstery buttons (blank)
- Upholstery needle and thread
- Brass decorative studs
- Chrome spray paint
- Camping mattress (foam)
- Tin foil
- Coke Cola (for rust removal)
- Screws and bolts (existing)
- Citri-strip paint remover
- Soft sanding block
- Long nose screwdriver

Dismantling the Captain’s Chair
The first step was removing the chair seat from the metal base. I unscrewed the bolts holding the seat to the lift mechanism. Some chairs have fabric under the seat to hide the screws. If yours does, remove this first.
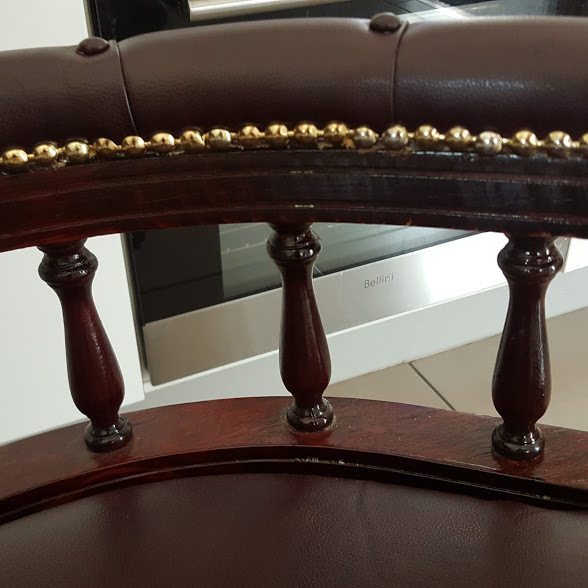
Once the lift was off, I removed the spindles and the top headrest by undoing more screws. The backrest leather was held in place with copper studs, which I pried off. That allowed access to the hidden screws underneath. The chair came apart in four main pieces: the base, the seat, the spindles, and the headrest.
Restoring the Timber Sections
The wood was in rough shape. In hindsight, using Citri-strip would have saved me hours of sanding. If you try this, coat the wood in stripper, wrap it in plastic wrap, and leave it overnight. Scrape off the softened finish with a paint scraper. Rinse the residue off using soapy water and a scrubbing brush. Let the wood dry fully.
Before

To rehydrate the dry timber, I applied furniture oil in circular motions. After letting it absorb and dry over several days, I stained the wood with a dark mahogany stain, then sealed it with two coats of oil-based polyurethane.
After
Reviving the Cast Iron Wheels
The wheels were solid cast iron but completely rusted. I soaked them in Coca-Cola for a few hours, then scrubbed them using tin foil rolled into a ball. Once clean, I sprayed them with chrome spray paint for a fresh new look. The lift mechanism was also rusted tight. I loosened it using WD-40 and fine steel wool, then greased it to prevent squeaking.

Upholstering the Backrest
The backrest foam was still usable, except for one corner. I removed all the buttons and studs, then peeled off the old fabric. Using it as a guide, I cut new leather 15 cm larger on all sides.

To fix the damaged corner, I added a thin layer of wadding, secured with spray adhesive. I covered new blank buttons with matching leather. That was a fiddly job but worth it.

I stapled the leather starting from the centre, folding the excess neatly. I pulled the buttons through with a long upholstery needle, stapling the thread at the back. The armrests screwed off easily, so I reupholstered those the same way with added decorative folds.

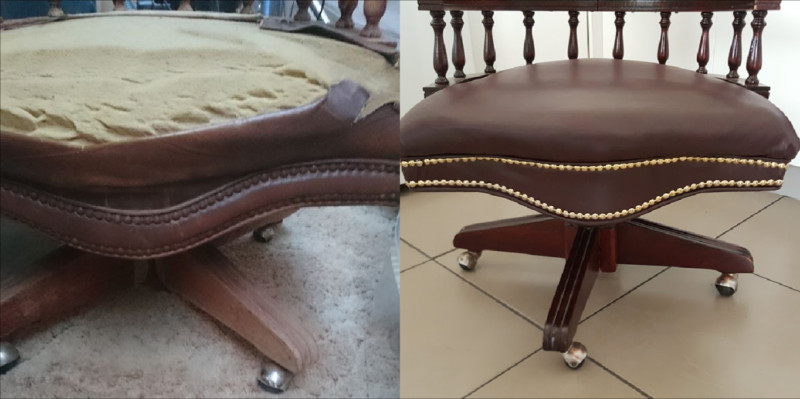
Replacing the Seat Cushion
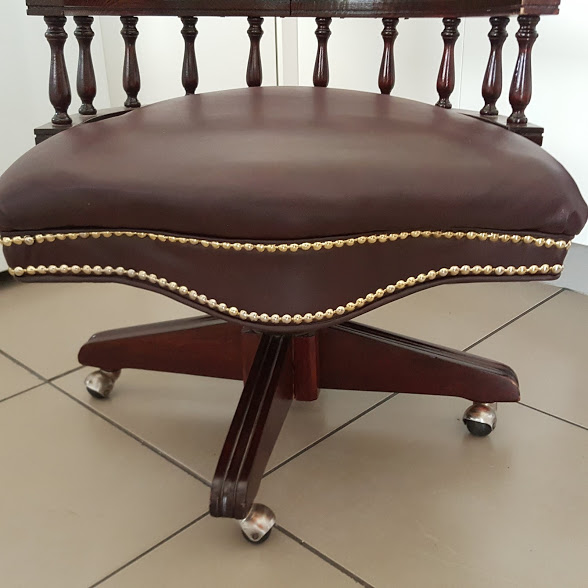
The original foam was ruined, so I cut a new cushion from an old camping mattress. I covered the base with new leather, leaving extra to staple underneath. Even though the front wood section was being covered, I still applied two coats of varnish. This helped fill in old staple holes and provided a smooth surface for new staples. I cut the leather to shape, stapled it to the base.
Adding New Decorative Studs
The old copper studs were too damaged to reuse. I replaced them with brass decorative studs, which instantly upgraded the look. These are flexible and easy to bend around curves. They also neatly hide all the staples.
Reassembling the Captain’s Chair
First, I reattached the headrest to the wooden back section using a small screwdriver. I stapled a strip of leather around the base top, then secured the spindle section in place. Next, I pulled the leather down tightly and stapled it under the seat. Lastly, I added the front section to hide all visible staples.
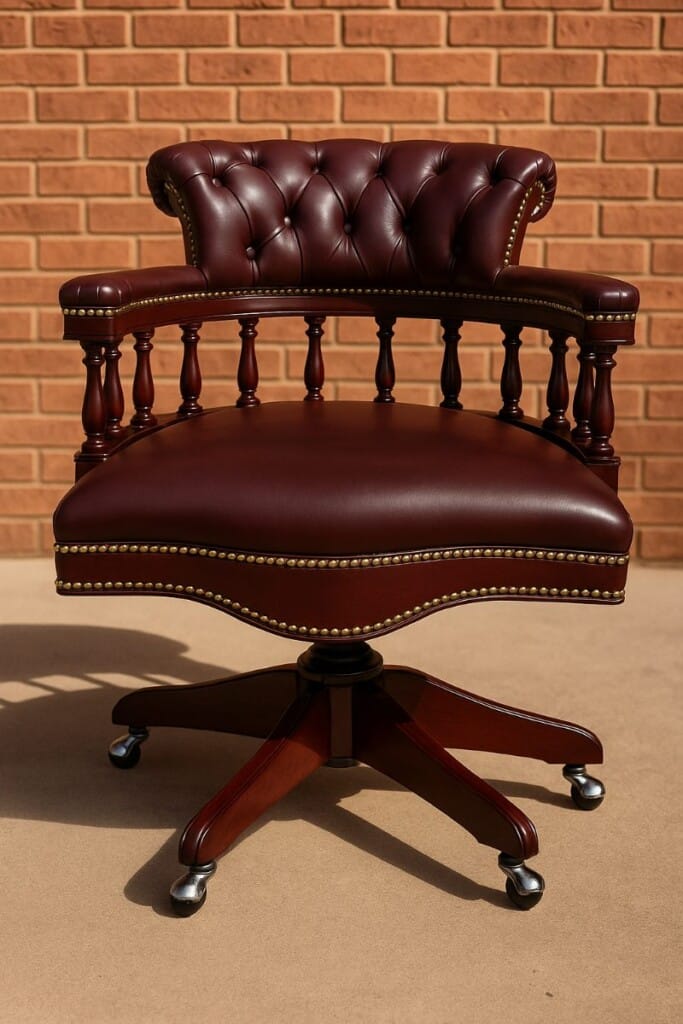
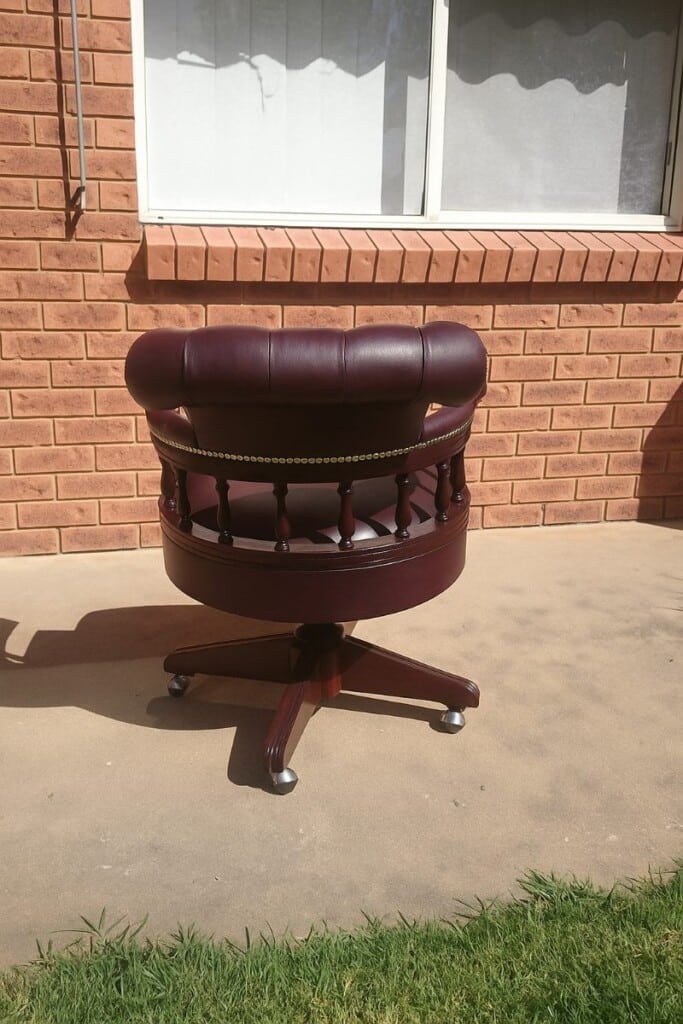
I photographed the chair outside so the natural light could capture the true richness of the stain and leather.
Before and After Reveal
You’ll be amazed at the transformation! Scroll down to see side-by-side photos of the original rain-soaked wreck and the beautifully restored vintage captain’s chair.

Final Thoughts
This DIY restoration was an incredible learning experience. It’s now one of my favourite pieces! Projects like this teach you so much about structure, upholstery, and patience. If you’re just starting out, I highly recommend rescuing a “freebie” to practice on—you’ve got nothing to lose.
More restoration projects
How to restore a woven upholstery rocking chair
I transformed a dresser destined for the tip into a stunning statement piece.

It’s time for more ideas and my friends have lots of them for you. Be sure to visit them and see what they’ve been upcycling/recycling/DIYing. Here are the links:
Southern Sunflowers
My Hubbard Home

If you’d like to find any of the items used in this project, we’d greatly appreciate it if you used our affiliate links. These links provide us with a small commission at no extra cost to you, allowing us to continue creating and sharing more inspiring projects. We’d also love to hear your thoughts—feel free to leave a comment or share this post!


33 Comments
How to repurpose a CD rack into something beautiful –
May 28, 2022 at 9:30 pm[…] Unique Creations by Anita […]
Kim
May 28, 2022 at 9:38 pmAmazing transformation, Anita! I’m so impressed with your skills!
Anita Holland
May 31, 2022 at 4:10 pmThanks so much Kim.
DIY Mid Century Modern Inspired Side Table - Modern on Monticello
May 28, 2022 at 10:00 pm[…] Unique Creations by Anita […]
Gail @Purple Hues and Me
May 28, 2022 at 10:05 pmWow, Anita! This is a spectacular transformation! You are definitely not a novice when it comes to this fabulous captain’s chair restoration! Great job!
Anita Holland
May 31, 2022 at 4:10 pmThanks Gail, I do projects like this to learn new skills.
Sara
May 28, 2022 at 10:26 pmAnita, this is unbelievable! If this is ‘practice’ imagine what the next one will be? So impressed with your mad skills!
Anita Holland
May 31, 2022 at 4:11 pmThanks Sara, It was a challenge but so worth the effort.
Ann
May 28, 2022 at 10:27 pmIt looks like a brand new chair, Anita and how sweet to get it for free! Upholstery is on my list of things to try – I’m inspired!
Anita Holland
May 31, 2022 at 4:12 pmThanks Ann, It was so much easier than I thought it would be. I think we all need to jump in and have a go. We might surprise ourselves.
Tania
May 28, 2022 at 10:54 pmWow, I’m so impressed! I’m not sure I would have tackled that but it looks so good now, just like new!
Anita Holland
May 31, 2022 at 4:13 pmThank you so much Tania.
Rachelle
May 29, 2022 at 12:02 amAnita, great tip on using Citri Strip. I will remember that for future projects. This chair turned out beautiful and I am not surprised that you were able to sell it. You really do have the most amazing creative skills!
Rachelle
Anita Holland
May 31, 2022 at 4:13 pmThanks Rachelle, I seem to have lost my fear when trying new projects. lol
Michelle
May 29, 2022 at 12:10 amOh wow! The chair looks brand new. What an amazing save.
Michelle
https://mybijoulifeonline.com
Anita Holland
May 31, 2022 at 4:14 pmThanks so much michelle.
Rachel - Tea and Forget-me-nots
May 29, 2022 at 4:49 amWhat a labour of love, I’m glad it worked out so well for you. I enjoyed our hop!
Anita Holland
May 31, 2022 at 4:15 pmThanks so much, I was thrilled with the results. See you next time.
Allyson @ Southern Sunflowers
May 29, 2022 at 9:13 amWhat a challenge! You did a spectacular job and I can see how you were easily able to sell it. It looks grand!
Anita Holland
May 31, 2022 at 4:16 pmThanks Allyson, It sold within minutes of posting it. So I was pleased.
Marie-Interior Frugalista
May 31, 2022 at 3:35 amWow, Anita, you are a brave woman to take on this chair, even despite it being a freebie. Did you ever show it whose boss with such a gorgeous restoration! I love a good curbside redemption story and congrats on selling it for a nice profit. Yikes, so if coca-cola does the trick for removing grime and unsticking old castors, you gotta wonder WTH it’s doing to our guts! LOL Pinned 🙂
Anita Holland
May 31, 2022 at 4:18 pmThanks Marie. After I had already sold it, I did show him, and he said he would have paid me more than I asked. As for the coke, I use it to remove rust that I get on my cutlery from my dishwasher from time to time. It works wonders, so I would also be interested to know what it does to our insides.
Susan M.
May 31, 2022 at 8:59 amI had no idea that you could buy the studs/tacks that are all joined! I thought you had to nail them in one by one. Thanks for the useful tip!
Anita Holland
May 31, 2022 at 4:19 pmI did too susan, For my vintage couch, I did them one by one. These are amazing.
maria
May 31, 2022 at 11:05 pmGreat job! Wow that a great idea about the tacks. I had to add tacks to my sofa the movers ruined, this would have helped me so much.
Anita Holland
June 5, 2022 at 11:23 amThanks Maria, they are so good and easy to use.
Donna @ Modern on Monticello
June 4, 2022 at 12:32 amWow! Amazing transformation. This project would have totally overwhelmed me and I wouldn’t even attempt it. Congrats on getting it done so beautifully!
Anita Holland
June 5, 2022 at 11:26 amThanks, Donna,You have to just jump in and attempt it you might surprise yourself.
Shirley
June 12, 2022 at 12:59 pmBeautiful tucks, nice detail work and absolutely a gorgeous job!
Anita Holland
June 13, 2022 at 4:02 pmThanks Shirley, I was over the mon how well this one turned out.
Michelle Leslie
June 14, 2022 at 11:01 pmI love your attitude towards leaning new things and your work always amazes me, Anita. I’ve probably said this so many times before, but I’m blown away with how beautiful she (he) turned out. There’s no ways I would have sold her. Not ever.
Zack Hussain
May 17, 2023 at 9:53 amHi Anita. I have just completed a similar Captain Chair. I have hit a snag, when I sat on the chair it rolled back much further than it should. Upon inspection there seems to be a block or spring thats missing. Presumably this prevented the chair from rocking back too far. I dont have picture or what it is called, any ideas where I could source the “thingamajig”.
Anita Holland
May 18, 2023 at 7:07 pmGood on you for having a try. Unless you have a similar chair I don’t know where you would find one. If I remember correctly the spring just allowed you to rock the chair. The chair I had also had a know that could be screwed into prevent this function. That might be an option for you.