
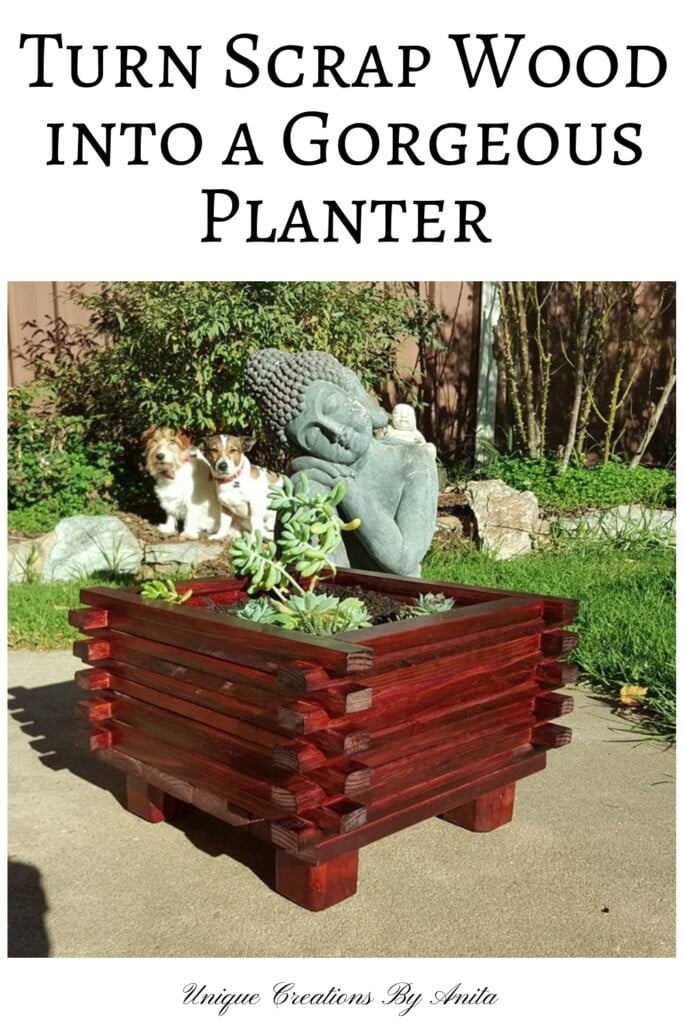
If you’ve followed my blog for a while, you’ll know that most of my projects are made using recycled materials, and wood is no exception. I hate wasting even the smallest offcut. So when my scrap wood pile starts to get out of hand, I like to come up with quick and useful ways to put it to good use. That’s how this DIY Wooden Planter Made from Scrap Wood came to life. It’s a simple project that’s perfect for beginners, and a great way to turn leftover timber into something beautiful and practical for the garden. I made mine to display my succulents, but you can easily adjust the size to suit your own plants and space.

Before we dive into this tutorial, be sure to subscribe to my bimonthly newsletter to be the first to see my latest projects. You can also follow me on Pinterest and Facebook where I also include my unique mixed-media art projects.
How to make a wooden planter
**This post may contain affiliate links. This means I earn a small commission on links used at no extra cost to you. Please see my disclosure policy for more information.**
Materials Used
- Scrap wood in various sizes
- Wood glue
- Wood screws or nail gun
- Outdoor wood stain
- Outdoor varnish
- Planer or sander
- Table saw
- Drill
- Succulent potting mix
- Decorative stones
Step 1: Cut and Prepare the Wood
My scrap wood was already stained and varnished. To clean it up, I ran each piece through the thickness planer. This tool is a lifesaver if you work with recycled wood—it makes old timber look brand new in seconds.

If you don’t have a planer, give the wood a good sanding to remove any old finishes.
I used a table saw with a guide rail to cut all the lengths to the same size. This helps everything line up neatly when assembled.

Wood cut list:
- 20 x 410mm x 35mm x 20mm (long sides)
- 20 x 300mm x 35mm x 20mm (short sides)
- 4 x 360mm x 90mm (base slats)
- 4 x small timber blocks (legs)

")
Step 2: Build the Base
Start by assembling the base using the four larger slats. Add a little wood glue to the edges, then use a nail gun to hold everything in place. Once dry, glue and attach the 360mm slats across the frame to create the bottom.

You can also screw them from underneath for extra strength. Flip the base over and glue the wooden blocks into place as legs. I added a screw through each leg for extra support.

Step 3: Add the Sides
This part is quick and easy. Take one long piece, glue it to the edge of a short piece, and secure with the nail gun.
Repeat the process, alternating long and short pieces. Make sure to line up the edges as you go.
Continue layering the wood until you reach your desired height—or until you run out of timber!

Step 4: Stain and Seal
I recommend staining your timber before assembly. It’s much quicker and neater that way. Choose a wood stain that suits your garden style. I applied two coats of outdoor varnish to protect the timber from the weather.

Lining the planter
To help your wooden planter last longer, it’s a good idea to add a plastic liner inside. Even though outdoor varnish offers some protection, constant moisture from soil and watering can eventually cause the wood to rot. A simple piece of heavy-duty plastic sheeting stapled inside will do the job, or you can reuse an old plant tray or storage tub that fits. Just make sure to poke a few drainage holes in the bottom so excess water can escape. Adding a layer of stones before the soil will also improve drainage and help keep your plants healthy.
Step 5: Add Plants
You don’t need to fill the whole planter with soil—succulents don’t need that much.
I added a layer of decorative stones to the bottom, then filled it about three-quarters full.
")
Add your potting mix and arrange your succulents. That’s it!
More DIY planter ideas
Tiered Pallet Planter – Perfect for small balconies

PVC Pipe Photo Planters – A fun gift idea


If you’d like to find any of the items used in this project, we’d greatly appreciate it if you used our affiliate links. These links provide us with a small commission at no extra cost to you, allowing us to continue creating and sharing more inspiring projects. We’d also love to hear your thoughts—feel free to leave a comment or share this post!


No Comments