")
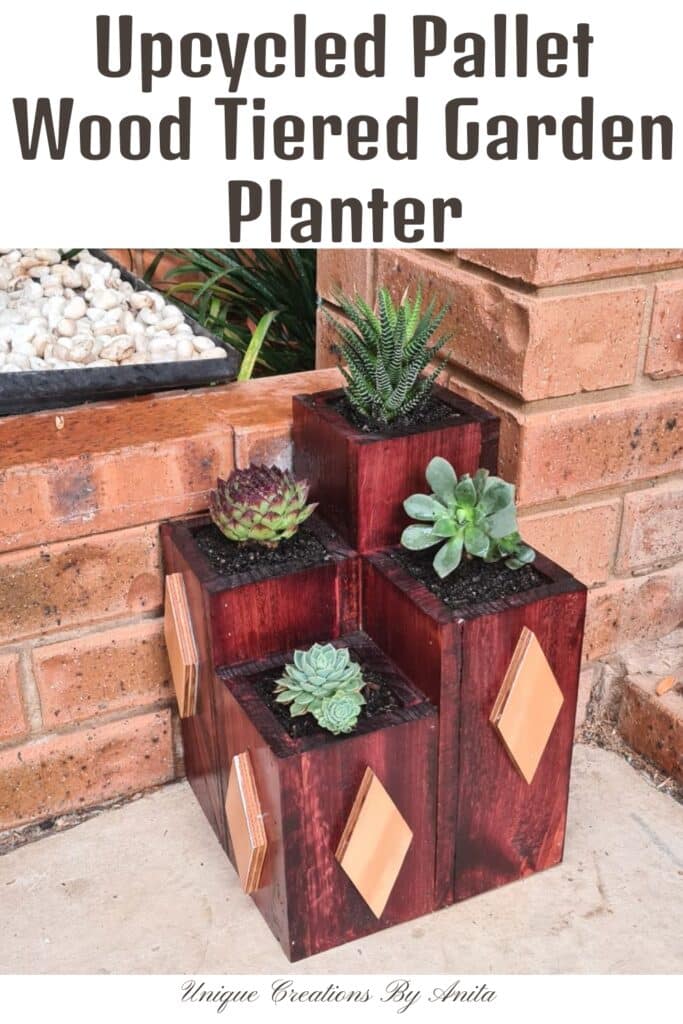
Turn reclaimed pallets into a stunning multi‑tier wooden planter made from pallet wood with this simple DIY tutorial. After salvaging free pallet boards (and wrestling with them like Hercules), I crafted a stepped planter perfect for succulents or seasonal blooms. You’ll save money, reduce waste and add rustic charm to your garden—all using basic tools and leftover materials.

Before we dive into this tutorial, be sure to subscribe to my bimonthly newsletter to be the first to see my latest projects. You can also follow me on Pinterest and Facebook, where I also include my unique mixed-media art projects.
Multi‑Tier Wooden Planter Made from Pallet Wood
**This post may contain affiliate links. This means I earn a small commission on links used at no extra cost to you. Please see my disclosure policy for more information.**
Materials Needed
- Untreated wooden pallet boards
- Jigsaw or pry bar (to dismantle pallets)
- Table saw or hand planer (for trimming boards)
- Orbital sander or sanding block (120‑grit)
- Measuring tape & pencil
- Exterior‑grade wood glue
- Nail gun & galvanised nails or exterior‑grade screws
- Clamps (to hold pieces straight)=
- Small stones or gravel (for drainage)
- Styrofoam or packing foam (optional soil filler)
- Exterior stain (e.g. dark mahogany)
- Exterior varnish or sealer (2 coats)
- Drill with 5 mm bit (for drainage holes)
- Safety gear: gloves, goggles, dust mask
Step 1: Gather and Prepare Your Pallet Wood
Choose pallets stamped “HT” (heat‑treated) or “KD” (kiln‑dried) to avoid chemical treatments. Wear gloves and goggles when dismantling. I found a jigsaw worked best—cut along the support beams rather than prying, to save time and reduce damage. To salvage full‑length pallet boards for projects—like my wall‑mounted bar—invest in a pallet buster tool for quicker, cleaner dismantling.

Step 2: Cut the Wood to Size
Measure and mark:
- 4 boards at 330 mm
- 4 boards at 180 mm
- 8 boards at 250 mm
- 4 support blocks at approximately 85 mm × 85 mm
Trim rough edges on a table saw or hand planer, then sand each piece smooth with an orbital sander.

Step 3: Assemble the Planter Box
Form the box by overlapping each pallet board at the corners (as shown below); this tightens the seams and creates crisp, square edges. Begin by assembling the largest section: spread exterior wood glue along each edge, fit the boards into a box, and reinforce with a nail gun. Because pallet timber often runs unevenly, clamp the frame firmly until the glue cures to keep everything square.

Apply wood glue to the ends of two 250 mm boards and join them at right angles to form an L‑shaped bracket. Clamp until the glue cures, then position the L‑shape against two adjacent sides of the 330 mm box frame and secure it with screws, as shown.

Form two more L‑shaped brackets from the remaining 250 mm boards. Position each against the 330 mm frame so they overlap the first L‑shape, then clamp and screw them in place to close the box.

Clamp each section securely with wood clamps while the glue cures—when I did mine, the clamps criss‑crossed so wildly it looked like a game of Twister.

Glue two of the remaining 180 mm boards at right angles to form an L‑shaped bracket. Clamp until the glue cures, then position this L‑shape at the junction of the two stacked tiers. Pre‑drill pilot holes and drive in screws to lock it in place for extra strength, just as you did with the previous supports.

Fit the final board, clamp it squarely, and fasten with a nail gun—its brads hold immediately, so you can move on without waiting for the glue to dry.

Step 4: Fit and Secure the Bottom
None of the 85 mm squares slid into place straight away, as pallet timber varies in thickness and quality. I repeatedly measured each piece and gently sanded off the excess with my table‑top sander until they fit snugly.

Since the base isn’t visible, just ensure the gaps are small enough to keep soil from falling through.

Step 5: Sand, Stain and Seal
Give the entire planter a final sanding to remove any splinters, then wipe away the dust.

Apply your chosen exterior stain (I used dark mahogany), allowing it to dry fully.

Once the stain is set, brush on two coats of exterior varnish for durable weather protection.

I had some scraps of wood leftover from a barn quilt I recently made, which were nailed onto the front for decoration.
Step 6: Plant and Enjoy
I designed this multi‑tier planter specifically for succulents, which thrive on minimal soil and moisture. To save on potting mix and ensure good drainage, I first packed each tier’s base with cut‑to‑size Styrofoam blocks, then topped up with succulent‑specific soil before arranging my plants.

Completed Multi‑Tier Wooden Planter Made from Pallet Wood before adding plants.

When adding succulents, choose varieties that are easy to separate and replant once they outgrow their slots.

This planter slots neatly into a corner, transforming an empty nook into a vibrant display of greenery.

More garden planter ideas
I repurposed a dead tree‑fern stump into a succulent planter by filling its hollow base with soil and tucking in assorted cuttings.

Here’s another planter you can craft from pallet wood to achieve this distinctive layered look.


If you’d like to find any of the items used in this project, we’d greatly appreciate it if you used our affiliate links. These links provide us with a small commission at no extra cost to you, allowing us to continue creating and sharing more inspiring projects. We’d also love to hear your thoughts—feel free to leave a comment or share this post!


37 Comments
creativejewishmom/sara
July 12, 2020 at 7:08 pmLove it Anita, totally jealous of your workshop and DIY abilities with wood! thanks so much for sharing on craft schooling sunday!
Anita Holland
July 14, 2020 at 9:18 amThank you so much, It took me a while to take over my husband entertainment shed. But I got there in the end, it is now mine. lol
Cynthia
July 12, 2020 at 9:51 pmThis turned out great! Someday I will be more comfortable working with wood… at least that’s the plan! Great tutorial.
Anita Holland
July 14, 2020 at 9:19 amThank you, It took me a few years of youtube training now I will try any project.
Pam @ House Of Hawthornes
July 13, 2020 at 9:40 pmI love your pallet planter idea! The diamonds sort of give it a cool mid-century vibe!
Anita Holland
July 14, 2020 at 9:20 amThank you, the diamonds were just leftover scrap but they do their job.
Janet
July 13, 2020 at 9:48 pmYou’re so creative and I love this project!
Anita Holland
July 14, 2020 at 9:20 amThank you, Janet.
Sharon Hazel
July 13, 2020 at 9:56 pmWow so impressed with your skills! I have seen some ‘pallet’ furniture that other people have made but never felt able to tackle anything like that….ps loved your JRT models 🙂
Anita Holland
July 14, 2020 at 9:22 amThank you, this project is very simple when you see it broken down into simple steps. As for my JRT they seem to get into all my pictures because they follow me everywhere. I go Fed up of chasing them away and they are great props.
Sara
July 13, 2020 at 10:27 pmLove the configuration and the look. I’d never guess its humble beginnings
Anita Holland
July 14, 2020 at 9:23 amThank you Sara, the humble pallet can be pretty with a little TLC.
Linda
July 13, 2020 at 10:33 pmWhat a great idea, yours turnedout lovely.
Anita Holland
July 14, 2020 at 9:24 amThank you Linda, I just as surprised how cute it looked being pallet wood.
Michelle Leslie
July 13, 2020 at 11:22 pmHow beautiful Anita and that corner spot is so perfect for the planter too. The stains you used on the planter complement the brickwork perfectly. P.S. every time I see you using your plainer I’m more and more convinced I have to get one 😉
Anita Holland
July 14, 2020 at 9:27 amThank you Michelle, that corner has been bare for so long it needed to be filled. I must admit the planer is one of my most used machines because I build from recycled wood, it saves so much time. I was lucky my son picked this one up a few years ago for $30 and it is still going strong for a cheap brand.
Kim Purvis
July 14, 2020 at 3:44 amWhat a groovy planter. I love the diamonds on the front! I know what you mean about taking apart a pallet. Its no joke. Like a wrestling match!
Kim
Anita Holland
July 14, 2020 at 9:28 amThank you, Kim. I like to think I can do anything I put my mind too, but the simple pallet had me beat. lol
Deana Landers
July 14, 2020 at 5:08 amThis planter is beautiful. You ate so talented. Anita. Thank you for sharing
Anita Holland
July 14, 2020 at 9:28 amThank you for the lovely compliment, that is so nice of you to say.
Marie
July 14, 2020 at 10:59 pmA girl who knows how to rock the power tools. Your planter is awesome, Anita! Love how the diamond shapes give it an MCM vibe. I’m asking Santa for that sweet power planer.
Anita Holland
July 16, 2020 at 3:10 pmThank you, Marie, A planer is definitely a great machine to have, it saves so much time sanding.
Regina Sober
July 15, 2020 at 8:30 pmHow long did it take you to complete this project?
Anita Holland
July 16, 2020 at 3:11 pmIt took about 4 hours because I had to clean up all the wood. That is not including the final coats of polyurethane, which I left overnight to dry.
Virginia
July 15, 2020 at 10:44 pmI love the planter! Great job.
Suzan Perry
July 17, 2020 at 3:03 amWhere can I find that beautiful stain you used on your planter. It looks amazing!
Anita Holland
July 20, 2020 at 9:07 amThank you Susan, It is dark mahogany by Wattyl.
Anita Holland
July 20, 2020 at 9:11 amThank you so much, the stain is Dark mahogany by Wattyl.
Marty Walden
July 17, 2020 at 9:36 amWhat an unusual and beautiful planter!
Anita Holland
July 20, 2020 at 9:12 amThank you Marty.
Debbie-Dabble
July 18, 2020 at 12:23 amBeautiful!! What a great project!! Thanks so much for stopping by!!
Hugs
Deb
Anita Holland
July 20, 2020 at 9:12 amThank you so much Debbie.
Linda
July 20, 2020 at 11:43 amWhat a great idea. Thank you for sharing on the Classy Flamingos Blog Party.
Anita Holland
July 22, 2020 at 6:46 pmThank you so much Linda
Anita Holland
October 31, 2020 at 12:58 pmThank you so much, I am sure your husband will have no problem doing it.
20 Easy and Amazing DIY wooden planter box ideas
April 10, 2021 at 12:00 am[…] Pallet Wood Planter from Unique Creations By […]
20 Outdoor Pallet Ideas For Your Backyard – Home and Garden
May 7, 2024 at 5:55 pm[…] Pallet Wood Succulent Planter from Unique Creations By Anita […]