
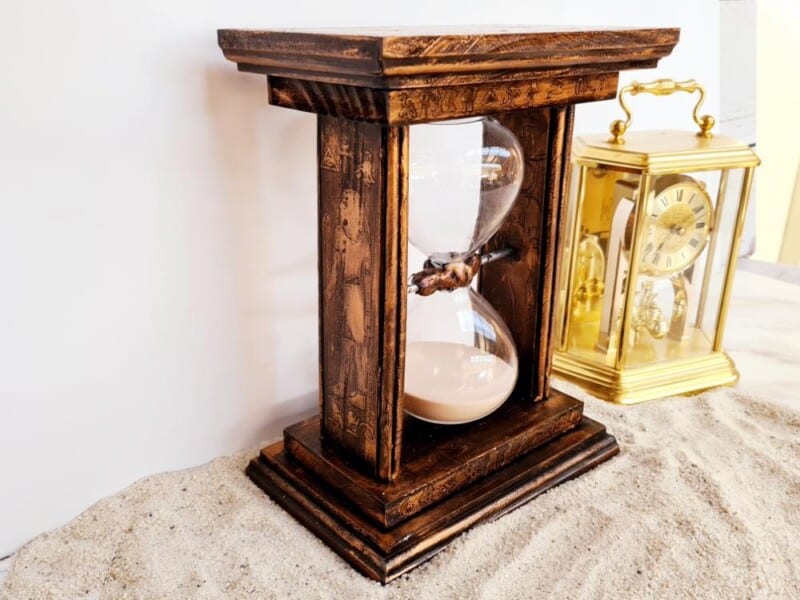
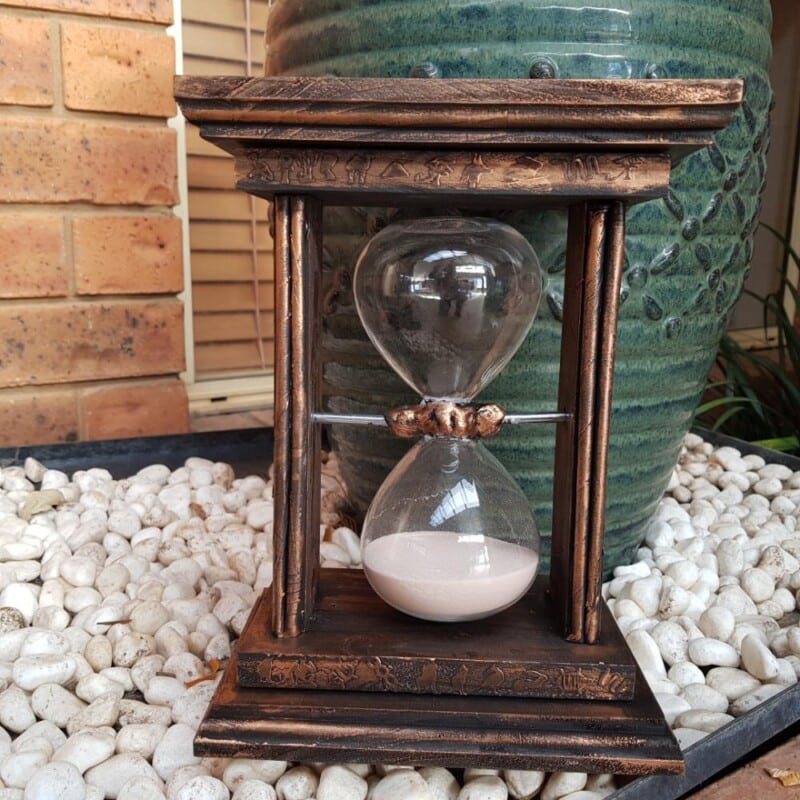
Welcome to this month’s International Blogger Club (IBC) challenge! It’s time for the Sands of Time theme, and I’m thrilled to share my Upcycled Sands of Time: Egyptian‑Themed Sand Timer Stand. I rescued an old hourglass from my cupboard and transformed it into a striking Egyptian‑inspired décor piece using pallet wood, vinyl decals and metallic wax highlights.

Before we dive into this tutorial, be sure to subscribe to my bimonthly newsletter to be the first to see my latest projects. You can also follow me on Pinterest and Facebook, where I also include my unique mixed-media art projects.

Upcycled Sands of Time: Egyptian‑Themed Sand Timer Stand
**This post may contain affiliate links. This means I earn a small commission on links used at no extra cost to you. Please see my disclosure policy for more information.**
Materials Needed
- Old sand timer (hourglass)
- Pallet wood off‑cuts
- Wood planer (optional)
- Orbital sander and sanding paper
- Screws (20 mm) and screwdriver
- Wood glue and clamps
- Polymorph beads (mouldable plastic)
- Short metal rods (for supports)
- Router with edge bit (optional)
- Cricut machine, black vinyl and transfer tape
- Black gesso primer
- Gold metallic wax paste
- Clear acrylic sealant spray
- Heat gun (for polymorph adjustments)
Step 1: Prepare the Wood
I used leftover pallet wood and ran it through my planer to flatten the surface, then trimmed the edges and sanded smooth with an orbital sander.


Cut two larger boards for the top and bottom, and two narrower boards for the sides.

Step 2: Build the Base Frame
Drill pilot holes to prevent splitting, then screw the sides to the top and bottom pieces.

Next, cut and attach a second layer of wood a few centimetres larger for a decorative reveal.

If you have a router, add a rounded or chamfered edge for a refined finish.

Screw the new board onto the bottom panel, countersinking the screws so the base sits perfectly flush on the table. Fit the top piece only once everything else is assembled.

Step 3: Create the Timer Supports
Place the polymorph beads into boiling water; they’ll melt and become clear.

Mould a band of Polymorph around the centre of the hourglass—this will anchor the timer to the stand. Then form two small Polymorph balls, pressing each metal rod into a ball to create a snug socket. When you’re ready to install, warm the Polymorph with a heat gun and press each ball onto the central support, locking the rods—and the timer—securely in place.
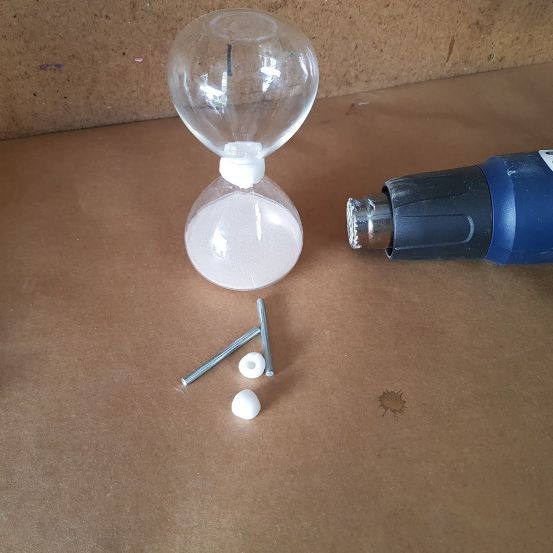
Clamp the two wood pieces together, mark the exact centre, then drill through both layers in one go—this guarantees your metal supports will line up perfectly on each side.

Insert and secure the metal rods into the side supports, drilling each hole slightly deeper to provide enough clearance for the hourglass to slide smoothly back into the frame.

Step 4: Apply Egyptian Decals
Search online for free Egyptian god silhouettes or download vector files. Upload to Cricut Design Space, cut in black vinyl.

Adhere the vinyl decals to all faces of the frame so the design remains visible from every angle as you admire the sand timer.

Since the side panels were too narrow for decals, I created miniature pillars by wrapping reed sticks in rolled newspaper to mimic classic column shapes.

Step 5: Paint and Highlight
Prime the entire stand with black gesso. Once dry, assemble the top layer with wood glue and clamps—no screw holes to fill!

Dip your fingertip into gold metallic wax paste and lightly rub over raised details and decals. Avoid covering all the black to maintain contrast. Let wax cure for 12 hours.

Step 6: Seal and Finish
Mask the sand timer to protect it from overspray, then apply a clear acrylic sealant.


More Pallet wood projects
Using leftover pallet wood, I crafted a bar‑style bird feeder so that birds can fly up, perch comfortably, and enjoy their meal.

I crafted this pallet‑wood shelf to hold keys, dog leads and hats, while also doubling as a stylish display surface.

About IBC (International Bloggers Club)
If you follow my blog, you will know I am part of IBC (International Bloggers Club), which is a group of talented bloggers from around the world. We have members from Spain, South Africa, Australia, the United States, and Canada. Each month we come together and create a project in a common theme.
If you missed last month’s Rock N Roll theme, here is the link to my Elvis tribute guitar. The contributions from my fellow bloggers are listed below. Please feel free to jump over and share your thoughts.
- Me| Unique creations By Anita
- Interior frugalista |How to turn photos into watercolour prints
- Birdz of a feather | DIY Sand Candle
- A Crafty Mix|DIY Sands of Time Hourglass


If you’d like to find any of the items used in this project, we’d greatly appreciate it if you used our affiliate links. These links provide us with a small commission at no extra cost to you, allowing us to continue creating and sharing more inspiring projects. We’d also love to hear your thoughts—feel free to leave a comment or share this post!

33 Comments
Michelle Leslie
August 24, 2020 at 11:35 pmOh my goodness. I didn’t realize you built the whole frame and added Egyptian hieroglyphs too. Stunning Anita. One day I do hope you get to see some of them for real. It’s an amazing experience. My mind was totally blown when we went and I would love to go back again, and again.
Anita Holland
August 27, 2020 at 11:46 amThank you so much, Michelle, I built it twice because I changed my mind. lol I would love to see all the sights over there too. Hopefully, we will be travelling around the world again soon.
Sara
August 25, 2020 at 1:12 amIncredible! I love your solution to turn the the hourglass! Curious to know: what would you have used instead of the beads, if you could get it?
Anita Holland
August 27, 2020 at 11:49 amTo be honest I have no clue. I solve these issues by walking around a hardware store just looking for items and making it up as I go along. If I had to take a guess it would be a hose clamp and weld putty to hold the supports.
Marie-Interior Frugalista
August 25, 2020 at 2:36 amWow Anita, I had no idea that you actually built the frame and added the Egyptian graphics. Wowsers, such a clever idea and girl you are so talented!
Anita Holland
August 27, 2020 at 11:53 amThank you Marie, that is so kind of you to say. I was going for a pillar theme first like in Rome but then changed it to Egyptian gods in the end.
CoCo
August 27, 2020 at 6:50 amThis is so creative, Anita! I can’t believe you made the from and added the graphics too – that is so cool! This takes upcycling to a brand new level. I love it!
Anita Holland
August 27, 2020 at 12:05 pmThank you so much. It turned out really cute in the end and was so much fun to make.
Leanna
August 31, 2020 at 9:00 amThe Egyptian hieroglyphs you added take this from home decor to art. Such a well done upcycle.
Anita Holland
September 1, 2020 at 12:28 amThank you so much, Leanna. They were a bit of a pain in the butt to do, but they turned out great in the end.
Michele Morin
August 31, 2020 at 10:01 amYou followed your instincts and inspiration, and look at the great result!
Anita Holland
September 1, 2020 at 12:39 amThank you, Michelle, It does not always work the first time.
Kim Purvis
September 1, 2020 at 3:17 amYou are very crafty! I have not heard of those beads you can met and mold! That’s awesome! Great project.
Anita Holland
September 2, 2020 at 8:13 amThank you Kim, they come in handy because they have so m any uses.
Deana Landers
September 1, 2020 at 4:06 amAnita, this is beautiful building and art at the same time. I think is because you create as you work. I love it!
Anita Holland
September 2, 2020 at 8:13 amThank you so much.
Lydia C. Lee
September 2, 2020 at 6:49 amLooks fantastic!
Anita Holland
September 2, 2020 at 8:15 amThank you so much, Lydia.
meegan
September 2, 2020 at 3:52 pmYou would never even guess it was the same piece! What a fabulous job!
Anita Holland
September 3, 2020 at 3:32 pmThank you so much.
creativejewishmom/sara
September 4, 2020 at 2:43 amwow, gorgeous! thanks for sharing on craft schooling Sunday!
Anita Holland
September 5, 2020 at 9:32 amThank you so much, I will be back next week. Have a great weekend.
Condo Blues
September 5, 2020 at 1:12 amI love the frame and the graphics give it a nice pop of interest. I’d love it if you shared this on my Friday Favorites Linky Party!
Anita Holland
September 5, 2020 at 9:34 amThank you so much, I will pop over now. Thank you so much.
Naush Samama
September 6, 2020 at 12:41 amAnita, I’m totally blown by your creativity, A handmade hour glass with base AND graphics !! Wow !! We are happy to let you know that you are one of our features at Meraki Link party at Doodle Buddies, this Monday,
Naush
Anita Holland
September 6, 2020 at 9:49 amThank you so much Naush, for the lovely comment and for the feature. I am very grateful.
Cherelle | The Inspired Prairie
September 10, 2020 at 7:10 amWhat a cool project, Anita! I love the look of sand timers; they seem so vintage and look great in vignettes. Thanks for sharing this post with us on the Embracing Home and Family Link-up party. We hope you join us again this Friday!
-Cherelle
Anita Holland
September 11, 2020 at 12:14 pmThank you so much Cherelle, that is very nice of you to say.
Dee | Grammy's Grid
September 18, 2020 at 12:07 pmThanks so much for linking up with me at my #UnlimitedMonthlyLinkParty 16, open until September 26!
Anita Holland
September 19, 2020 at 7:50 amThank you Dee.
Dee | Grammy's Grid
September 30, 2020 at 2:22 pmCONGRATS! Your post is FEATURED at my #UnlimitedMonthlyLinkParty 17.
Anita Holland
October 2, 2020 at 8:04 pmThank you so much for the feature.
A Crafty Mix | A DIY Inspired by the Sands of Time Hourglass - A Crafty Mix
April 18, 2022 at 11:12 pm[…] Unique Creation by Anita – Upcycling a Sand Timer […]