")
If you’re anything like me, your pets are part of the family. You want them cool, hydrated, and happy—especially during scorching Aussie summers. That’s exactly why I created this DIY pet water auto feeder. Here in Australia, it’s not unusual for temperatures to soar past 40°C. I used to leave out extra bowls of water before work, only to return home and find them empty. I hated not knowing how long they’d gone without water.
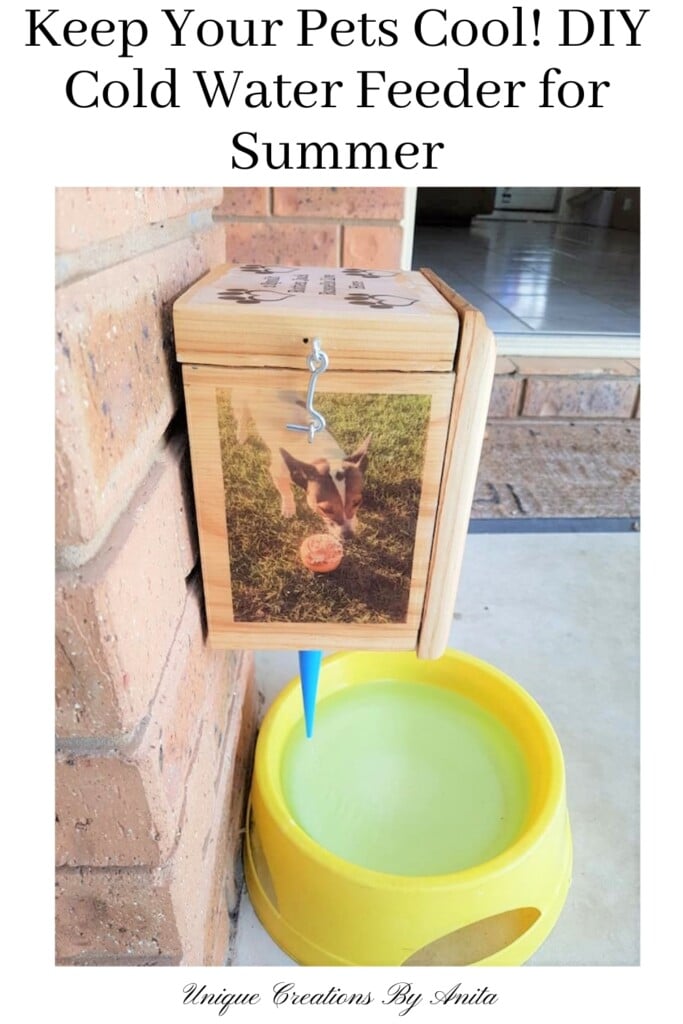
So I built this insulated pet water feeder using a frozen water bottle and a plant feeder spike—genius, right? The basic idea behind this project is simple: create a wooden box that’s insulated and designed to hold a frozen water bottle. As the ice melts throughout the day, it slowly releases cold water into your dog’s bowl. I’ve included a photo to show you the setup and how it’s meant to look, even though mine turned out a bit rough around the edges. It might not be perfect, but it works! This is due to using only recycled materials.

Before we dive into this tutorial, be sure to subscribe to my bimonthly newsletter to be the first to see my latest projects. You can also follow me on Pinterest and Facebook, where I also include my unique mixed-media art projects.
How to Make a DIY Pet Water Auto Feeder That Keeps Water Cold All Day
**This post may contain affiliate links. This means I earn a small commission on links used at no extra cost to you. Please see my disclosure policy for more information.**
Materials Needed
- Recycled wood for the box
- Styrofoam or packing foam (for insulation)
- 750ml plastic pump bottle
- Plant watering spike (auto-feed nozzle)
- Contact adhesive
- Wood glue
- Hook and eye latches
- Clear water-based varnish
- Waterslide decal paper or tattoo paper (optional for decoration)
- Acrylic spray sealer
- Interlocking picture hangers
- Router (optional for smoothing edges)
- Hole saw or jigsaw
- Paintbrush
- Photos or graphics for decorating (optional)
Step 1: Build the Base Box
Because I built my box entirely from recycled materials, I had to adjust my plan every time I ran short on something. Instead of giving up, I worked with what I had—true DIY style! Build a basic wooden box without the top attached.

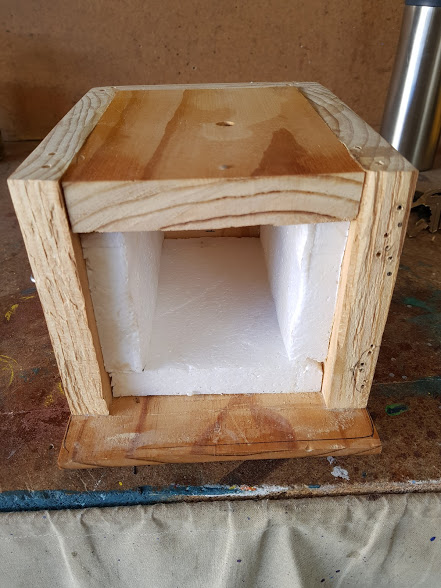
Step 2: Add Insulation to Keep Water Cold
Line the inside of the box with Styrofoam. I salvaged mine from packaging that came with a pot. Cut the foam to fit snugly, then glue it in place with contact adhesive.
When I realised I didn’t have enough wood for the back panel, I trimmed the insulation instead. This meant one side wasn’t fully insulated, but it still kept the water cool for most of the day.
Step 3: Cut the Feeder Hole
Use a hole saw to cut a hole in the base of your box. This is where the water bottle will sit.

Make sure the hole fits the neck of your bottle snugly so the feeder spike can reach the bowl beneath.

Step 4: Attach Lid and Hardware
To make it easy to change the bottle, I used hook-and-eye latches to secure the lid.

Use a router to smooth sharp edges, then seal the entire box with two coats of clear water-based varnish for durability. I filled the drawer handle hole with wood filler.

Step 5: Add the Feeder Bottle
Attach the plant watering spike to the bottle. Fill the bottle with water and freeze it overnight. Each morning, insert the frozen bottle into the box. As the ice melts, cold water dispenses automatically into their water bowl..

Step 6: Decorate the Box with Pet Photos
Select and Print Your Images
- Choose the images you want to transfer onto the box. For a personal touch, consider using pictures of your pets or favourite memories.
- Print the selected images onto waterslide paper using an inkjet printer. There’s no need to reverse the images, as the waterslide paper method accommodates normal image orientation

Protect the Images with Acrylic Spray
- Once the ink is dry, apply the first coat of acrylic spray to protect the images.
- Allow the first coat to dry for about 15 minutes before applying the second coat.
- Repeat this process for a total of three coats, ensuring about 15 minutes of drying time between each coat.
Cut and Apply the Images
- Use a soft cloth to gently remove any air bubbles, creases, and excess water from the applied image.
- After the third coat is dry, cut the image to the desired size using scissors or a craft knife.
- Fill a small container with water, then immerse the cut image in the water with the image side facing down.
- Wait for about 15 seconds or until the image starts to slide off the paper. Be cautious not to soak the paper for too long, as this can cause the image to lift or distort.

5. Carefully slide the image from its backing paper and position it on the wooden surface. Hold down one corner of the image and slide the backing paper out.

Use a soft cloth to gently smooth out any air bubbles, creases, or excess water from underneath the transfer.
The clear waterslide paper backing allows the natural wood grain to show through the image, creating an integrated appearance. Finish with two coats of clear spray to seal in the images.


Step 7: Mount the Box to the Wall
Use interlocking picture hangers to attach the box to your fence or wall. This makes it easy to remove for cleaning or refilling.

Mount it at the right height so the feeder nozzle sits just under the water surface.
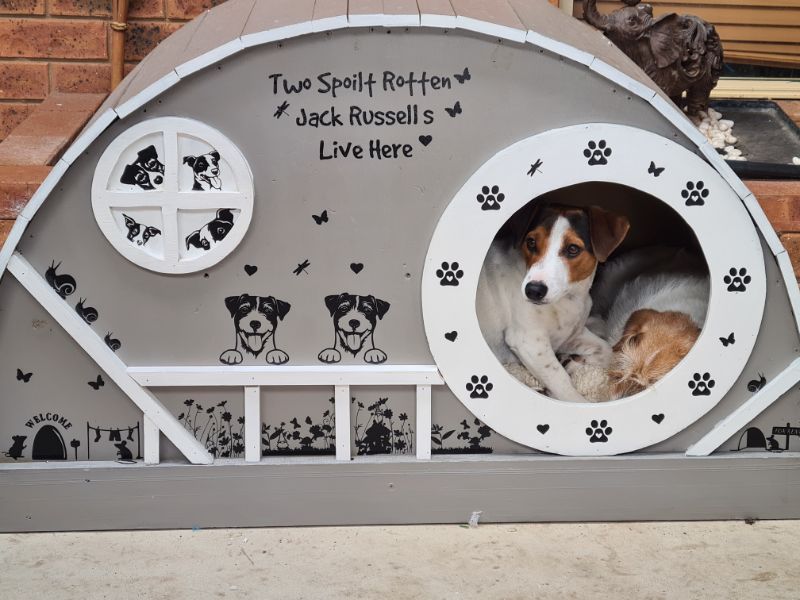
More projects for your pets.
Here is a hobby-style house I built for my two Jack Russells using recycled materials..
How cute will your dogs look with a novelty bandanna?


If you’d like to find any of the items used in this project, we’d greatly appreciate it if you used our affiliate links. These links provide us with a small commission at no extra cost to you, allowing us to continue creating and sharing more inspiring projects. We’d also love to hear your thoughts—feel free to leave a comment or share this post!


21 Comments
Suzanne
June 21, 2018 at 9:57 amThose two darlings have personality written all over their faces!!
Anita Holland
June 21, 2018 at 12:40 pmThat is for sure, I said it looked like she was laughing at me because they got me to make a project to give them cold water.
Bright
September 2, 2018 at 7:01 amCool idea for thirsty pooches!
Michelle Leslie
October 9, 2018 at 12:03 pmThat’s brilliant Anita. Adding the polystyrene to keep the water cool is pure genius. I have to try make something similar for our fur babies. Love it
Anita Holland
October 10, 2018 at 12:00 amThanks Michelle, It gets so hot here, If I remember right you are in South Africa which gets just as hot as here. And it works perfectly.
Naomie Moore, Castaic, CA
October 19, 2018 at 5:19 amBrilliant idea! And the photos just take it over the top! Genius and too cute. Your dogs are darling. I have several bowls going at all times, 6 cats, 3 dogs plus the neighbors 3 dogs (and any visiting pets), so I fill the bowls up with ice then pour cold water over them. They are spoiled and like their water COLD and will drink more than if at room temperature.
Anita Holland
October 23, 2018 at 4:18 amThank you Naomie, Nothing is to good for my pets. It was heartbreaking to come home and see the empty water bowl, but this makes up for it and they love it. They were a bit cautious in the beginning having a box over their water bowl, but now they don’t bother about it.
Vanessa
July 25, 2019 at 8:40 pmClever idea! Mine are indoors most of the time, but they definitely prefer their water cold too!
Anita Holland
July 26, 2019 at 2:33 amMy dogs are only out during the day when we are at work, they would not lower their standards by sleeping outside. LOL They are too spoilt for that
Dee | Grammy's Grid
September 10, 2019 at 10:35 pmYay, fresh cold water! Angus MacGyver was awesome, Richard Dean Anderson was pleasant to watch!! Have you seen the new MacGyver show with Lucas Till? Thanks so much for linking up at the #UnlimitedMonthlyLinkParty 4. Shared.
Anita Holland
September 11, 2019 at 3:31 amThank you so much, I have not watched the new one but remember watching the old one as a kid.
Marie
September 12, 2019 at 3:30 pmVery clever, Anita! Pinned 🙂 I need me some of that waterslide paper. If you use a laser printer, do you still have to seal the image first?
Anita Holland
September 12, 2019 at 9:45 pmThank you, Marie. I have never tried it on a laser printer so could honestly not say. If it does not smudge when you add the water it will be fine. The ink washed off with the inkjet printer when added to the water.
Liberty
September 12, 2019 at 7:54 pmThis is a great idea! Except I don’t think it would work because my dog would chew up the plastic spout. My dog likes running water, so I would like to get her a drinking fountain someday, but it needs to be durable so she doesn’t ruin it…..
We have MacGyver DVDs— very entertaining and it does help you to think outside the box!
Liberty @ B4andAfters.com
Anita Holland
September 12, 2019 at 9:48 pmMy daughter has one of those dogs, he would try to eat the box too. I have seen those water fountains you add to the hose pipe and the dog learns to stand on it to get the water to spray. But my dogs love water so much they would play all day with it.
Michelle
September 18, 2019 at 7:26 amReally clever! And really something almost anyone could do.
As for spoiled, my fur baby is lying next to me under the covers. We give him filtered water, because the vet recommended after finding crystals in his urine. Also as most dog food seems to disagree with him, he gets canned chicken. So yeah, I know about spoiled critters. Yours are lucky to have you as their mom.
Thanks for linking up with Creative Compulsions!
Linda on Poinsettia Drive
September 19, 2019 at 1:34 amThank you for sharing on the Classy Flamingos. We love having you.
Julie Briones
September 27, 2019 at 8:03 pmSuch a loving thing to do for your pets! Thanks for sharing at Tuesday Turn About.
Anita Holland
September 29, 2019 at 9:24 amThank you, they are super spoilt.
Little Wandering Wren
September 28, 2019 at 10:58 amSuch an impressive idea and construction! luckily for us, we have a big fish pond outside the back door, otherwise, you’re right the water would be dried up on many occasions!
Wren x
Anita Holland
September 29, 2019 at 9:25 amThank you so much, I could never have a pond, my dogs love water. They would never get out.