")
I’ve been on a mission to make my final steampunk project photos truly pop, so I designed these DIY Steampunk Prop Books to add Victorian flair to every shot. In this tutorial, you’ll learn how to upcycle old hardcover books using waterslide decal paper, chalk paint and clear acrylic sealant to create eye‑catching steampunk book props. Follow along and master this easy technique—no fancy tools required!
I’ve had fantastic results using waterslide decal paper on wood—it’s quick, straightforward and delivers crisp images every time. Curious to see if this technique would translate to book covers, I gave it a go. While the transfers weren’t perfect, I’ve pinpointed the hiccups so you can avoid the same pitfalls.

Before we dive into this tutorial, be sure to subscribe to my bimonthly newsletter to be the first to see my latest projects. You can also follow me on Pinterest and Facebook, where I also include my unique mixed-media art projects.
DIY Steampunk Prop Books: Upcycle Hardcover Books with Waterslide Decals for Stunning Photo Props
**This post may contain affiliate links. This means I earn a small commission on links used at no extra cost to you. Please see my disclosure policy for more information.**
Materials Needed
- Hardcover books with smooth paper covers
- Waterslide decal paper (inkjet compatible)
- Chalk paint (white) or gesso/acrylic paint
- Clear acrylic spray sealant
- Sharp craft knife or scissors
- Shallow tray or sink for water bath
- Felt scraper or old credit card
- Precision ruler or measuring tape
Step 1: Prepare Your Books
Choose hardcover books with plain paper covers—matte surfaces let decals stick smoothly. Avoid plastic‑coated jackets, which repel waterslide transfers, and steer clear of embossed lettering, as raised titles will show through the paint.
")
Step 2: Paint the Covers
Paint the front, back and spine with white chalk paint (or gesso/acrylic) to create a bright base for your images. Apply two thin coats, letting each dry 10–15 minutes in warm weather. This opaque layer ensures vivid decal colours.

Step 3: Print and Seal Your Images
Download free‑stock steampunk graphics (check licence for commercial use). Resize images to fit your book’s cover plus an extra 1 cm border for wrapping.
")
Print onto the glossy side of waterslide decal paper using an inkjet printer. Let the ink dry completely (5–10 minutes). In a well‑ventilated area, spray a light coat of clear acrylic sealant; wait another 5 minutes, then apply a second coat.
")
Step 4: Trim the Decals
Cut your printed decal so the main design is centred, then leave an extra 1 cm border all the way around. That little “wrap‑around” margin lets you fold the edges over the cover and spine and tuck them neatly inside. Once the decal is applied and fully dry, you can seal those folded flaps under a final coat of clear acrylic spray for a clean, secure finish.

Step 5: Apply the Waterslide Decals
Fill a shallow tray with lukewarm water—just enough to cover the paper.

Submerge one decal; after 15–20 seconds, the decal will loosen and you’ll see the image through the film. The curling up of the paper is natural.
")
")
Gently slide the film onto the book, lining up one corner first, then smooth it across the surface.

Use a felt scraper or credit card to press out air bubbles and excess water. Once positioned, blot lightly with a soft cloth and let dry 30 minutes.

Step 6: Seal and Finish
After the decal is fully dry (ideally 24 hours for best adhesion), apply a final coat of clear acrylic spray to lock everything in place.

")
And just like that, my steampunk prop books were complete! I’ve already styled them in several shoots where they add the perfect industrial‑vintage flair. You’ll also spot the custom steampunk camera prop I handmade alongside them.

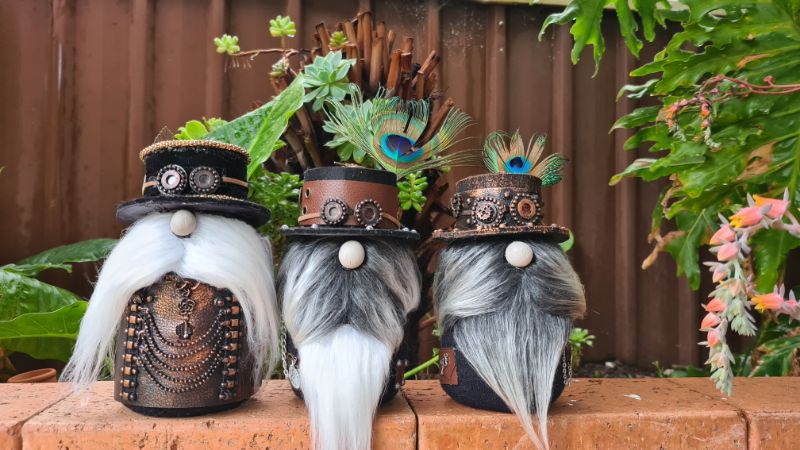
Calling all steampunk fans—if you’re keen to craft your own steampunk gnomes, follow this tutorial!


If you’d like to find any of the items used in this project, we’d greatly appreciate it if you used our affiliate links. These links provide us with a small commission at no extra cost to you, allowing us to continue creating and sharing more inspiring projects. We’d also love to hear your thoughts—feel free to leave a comment or share this post!
15 Comments
Ann
January 11, 2021 at 10:20 amThey look great, Anita. I’ve never used waterslides, although my husband has with great success!
Anita Holland
January 12, 2021 at 5:13 pmThank you Ann, I love using it for image transfers they work sp perfect.
Michelle Leslie
January 12, 2021 at 6:41 pmI have got to try some of that paper. I have soooooo many books with yucky covers that I can do this with. Thanks a mil, Anita. It’s a great idea.
Anita Holland
January 15, 2021 at 12:09 pmThanks, Michelle, it is so easy to use which is the best.
Maria
January 13, 2021 at 3:51 amWhat a great idea! I need to try this someday
Anita Holland
January 15, 2021 at 12:09 pmThanks Maria
Amy
January 13, 2021 at 6:56 amThis is a great idea! So fun!
Anita Holland
January 15, 2021 at 12:10 pmThank you so much Amy.
Kim Purvis
January 13, 2021 at 7:23 amWhat a cool way to cover a book. Thanks for the tips! Love that gnome! Pinned!
Anita Holland
January 15, 2021 at 12:11 pmThank you so much Kim, those gnomes were my cutest project last year. lol
Marie B.
January 14, 2021 at 12:50 amGreat idea for book props! I’ve never tried waterslide paper but now I’m itching to give it a try. Love how you covered the books in your signature steampunk style, Anita.
Anita Holland
January 15, 2021 at 12:17 pmThank you Marie, I thought I was over the steampunk phase, but I am not yet so you will be seeing more.
Deana Landers
January 14, 2021 at 6:56 amThis is so unique, Anita. I love all your steam punk creations!
Anita Holland
January 15, 2021 at 12:17 pmThank you Deana, I have a few ne steampunk idea for this year.
Marilyn Lesniak
January 15, 2021 at 11:32 amThank you for sharing at #OverTheMoon. Pinned and shared. Have a lovely week. I hope to see you at next week’s party too! Please stay safe and healthy. Come party with us at Over The Moon! Catapult your content Over The Moon! @marilyn_lesniak @EclecticRedBarn