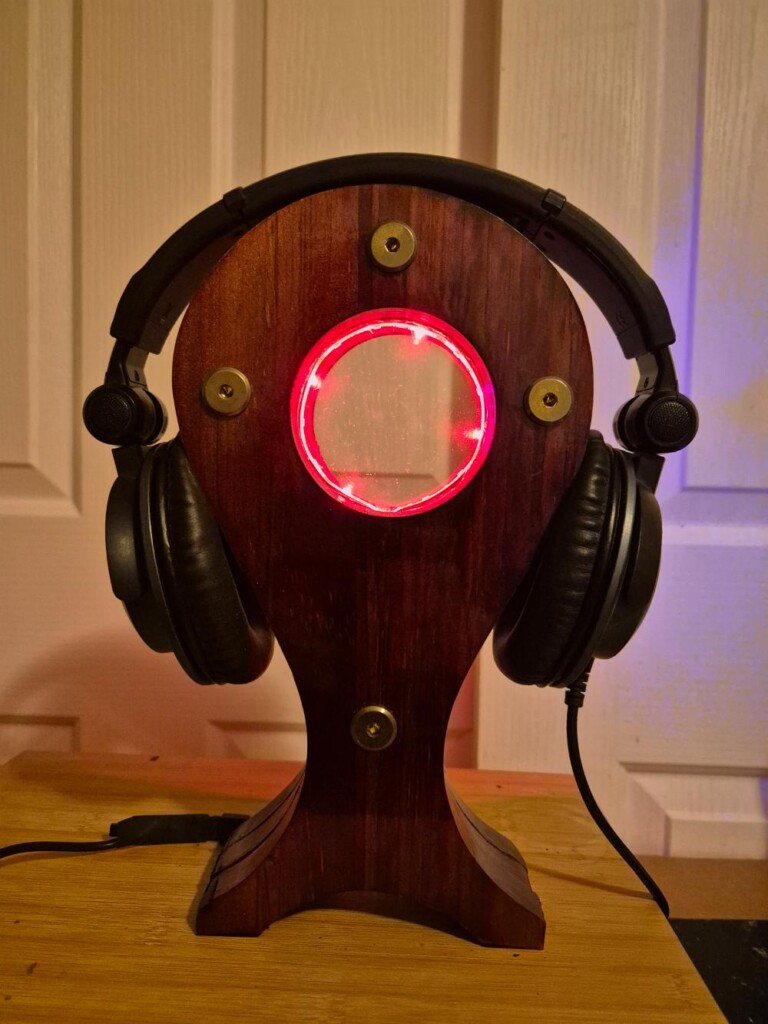
If you love a tidy desk and a bit of gamer-style ambience, this DIY LED Headphone Stand with Perspex Glow is a winner. I first built a simple stand for my husband’s headset; this version takes it up a notch with remote-controlled LED lights that plug into your computer via USB. The layered wood and Perspex create a gorgeous edge glow so your headphones look like they’re floating—day or night.

Before we dive into this tutorial, be sure to subscribe to my bimonthly newsletter to be the first to see my latest projects. You can also follow me on Pinterest and Facebook, where I also include my unique mixed-media art projects.
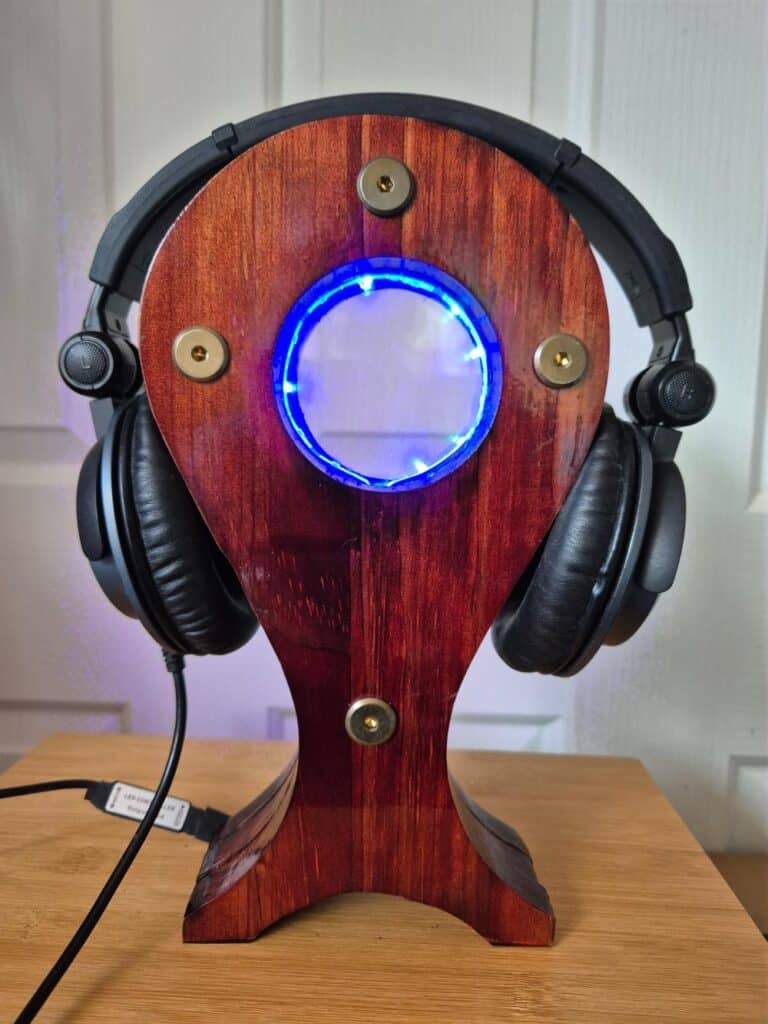
This is a short clip of the LED lights working.
DIY LED Headphone Stand with Perspex Glow (Remote-Controlled)
**This post may contain affiliate links. This means I earn a small commission on links used at no extra cost to you. Please see my disclosure policy for more information.**
Materials needed
- timber (hardwood or quality ply) for three identical layers, sized to your headset
- Perspex/acrylic sheets, 3 mm thick
- USB LED strip lights with remote (5V, cuttable)
- decorative bolts with matching nuts or threaded insert nuts
- two-part epoxy
- wood stain
- Orbital sander and discs
- jigsaw
- scroll saw (for cutting perspex)
- hole saw
- drill with assorted bits
- clamps
- benchtop sander
- flap sanding wheel for a drill
Make and trace the template
I still had the template from my last headset project, so I used it again. It is just a basic headphone stand shape. Place the template on the wood and trace around the outline. Cut three identical pieces with a jigsaw, staying about 2 mm outside the line so you can sand back flush on the benchtop sander later. That was the most reliable way I found to get all the sides matching.

Next, I used an orbital sander with 120-grit discs to remove all the old stain and varnish.

Drill the centre opening cleanly
Clamp all three blanks together so the centre hole aligns on every layer. Mark the opening and use a hole saw, drilling halfway from one side, then flipping and finishing from the other side for a clean edge.

Smooth the inside with a flap sanding wheel in a drill; hand-sand if you don’t have flap wheels.

Prepare the Perspex layers
The glow comes from Perspex sandwiched between the timber layers. Ideally, order Perspex to the full size of your blanks. If you only have A4 sheets, place a blank on the Perspex, trace the outline, and cut just shy of the line on a scroll saw (a jigsaw can crack acrylic). Leave a small margin; you can sand flush later.

Adding the perspex
I planned to sandwich two Perspex sheets between the timber so the LED glow could be seen from every side. I’d only bought A4 Perspex, which was too small, so instead of stopping the build, I traced the wood onto the sheets, cut just shy of the line on a scroll saw (a jigsaw kept cracking the Perspex), then sanded them flush on the benchtop sander.

To make the undersized sheets work, I inlaid them: measured the 3 mm Perspex thickness, set a straight bit to 3 mm on the router table, and routed a shallow rebate on both faces of the middle layer.


After a quick tidy with the orbital sander and 120-grit, the Perspex sat perfectly flush—problem solved without reordering. The LED strip I used offers multiple modes (single colour, flashing, breathing), so the edge-lit effect still looks fantastic.

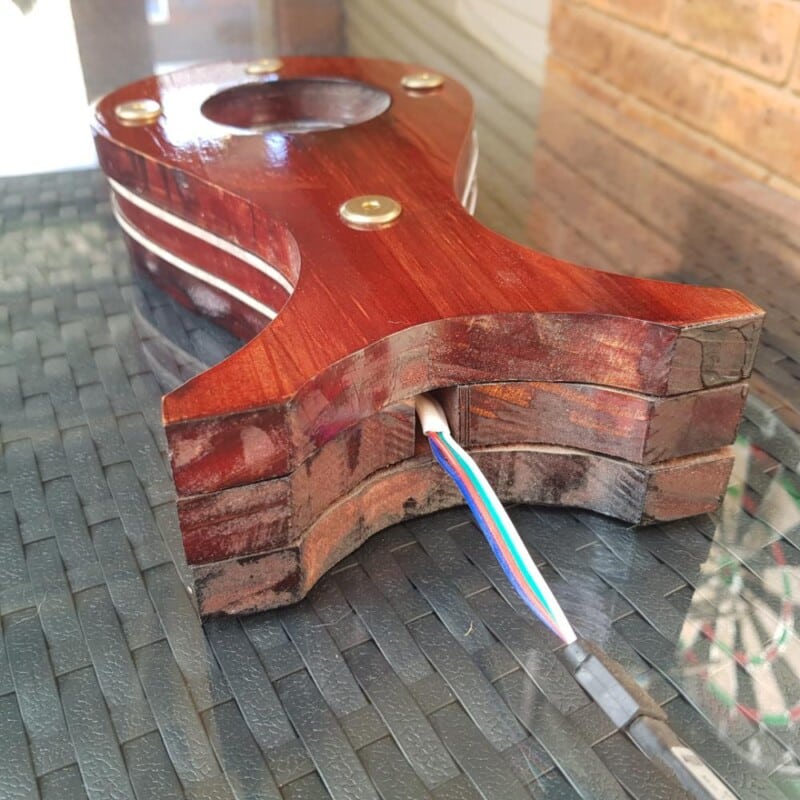
Plan the LED path and hide the wiring
Test the LED strip around the inside of the centre opening. To keep wires invisible and to get light shining all the way around, cut a channel in the middle layer so the strip runs up from the base, around the circle, and back down to the base. Cut the strip only at the marked cut points. Feed the USB lead so it exits neatly at the back or base.

Dry-fit and drill for the fasteners
Stack the layers with the Perspex in place and align via the centre opening. Clamp the stack. Drill through for your decorative bolts and insert-nut locations so everything lines up. I originally hid the front bolts, but I recommend drilling right through and using insert nuts at the back—the exposed hardware looks great and makes future disassembly easy.

I didn’t do that—instead, I drilled only partway through the front so it lined up with the other holes.

Putting the LED headphone stand together
I matched nuts to the bolts on hand. Drill a recess slightly larger than the nut, then mix a small amount of epoxy and brush a thin film around the recess—too much will pool and clog the threads. Seat the nuts and tap them in gently with a hammer until they’re flush and tight in the timber. Let the epoxy cure before bolting everything together.

Flush-sand the profile
Bolt the stack together temporarily and sand the outside edges on the benchtop/belt sander until the timber and Perspex are perfectly flush with your template line. Use the top belt curve to smooth the bottom arch.

Staining and sealing the wood
After the dry fit, I pulled the stack apart and numbered the layers so reassembly was foolproof. I stained the timber in dark mahogany, then sealed the exposed surfaces with three light coats of spray satin polyurethane, lightly sanding between coats. The LED strip came with adhesive backing, so I peeled it off and pressed the strip into the routed channel inside the middle layer.

Final assembly
I reassembled the layers and tightened the bolts with an Allen key. In hindsight, I wish I’d run the bolts right through—but that’s the learning you get when you make it up as you go. A small misalignment also crept in, leaving one Perspex layer slightly out at one end.


More great DIY projects
This cool towel rack was made using scrap wood and old horseshoes.

Another scrap wood project, this wooden barn quilt is made up of small pieces of wood cut to size and put together like a jigsaw.


If you’re interested in any of the items used in this project, we’d appreciate it if you used our affiliate links. Clicking these links earns us a small commission at no extra cost to you, helping us create more inspiring and exciting projects to share. We’d also love to hear your thoughts—feel free to leave a comment or share this post!


17 Comments
Julie Briones
October 7, 2019 at 3:31 amYour posts are always so unique, Anita! Thanks for sharing at Tuesday Turn About!
Anita Holland
October 9, 2019 at 4:25 pmThank you so much, Julie, very kind of you to say.
Alexandra
October 8, 2019 at 7:45 pmThis is awesome! And a great “gift for him”. Pinned, and shared with my uncle (the woodworker).
Anita Holland
October 9, 2019 at 4:26 pmThank you, my husband is a gamer so he loves it gimmick and all. lol
Iveth R.
October 8, 2019 at 11:41 pmWow!!! impressive work .. So unique … Thanks for sharing with us at #alittlebitofeverything
Anita Holland
October 9, 2019 at 4:27 pmThank you so much, it was hit and miss to whether it would work out.
Michelle
October 13, 2019 at 5:43 pmWow! I also love things that light up. Totally awesome! Thanks for linking up to Creative Compulsions!
Anita Holland
October 14, 2019 at 10:34 pmThank you.
Robin
October 16, 2019 at 7:22 pmSuch a fun project and something that my boys desperately need. Thanks so much for sharing your talent with us at the Creative Muster. Looking forward to seeing what you’ll be sharing next week. Pinning!
Robin😊
Anita Holland
October 16, 2019 at 11:57 pmThank you so much Robin, It looks cute flashing on the front door Halloween night.
Cecilia
October 17, 2019 at 6:45 pmMy son would love this–great tutorial. Thanks for sharing at Vintage Charm!
Anita Holland
October 19, 2019 at 3:25 amThank you.
Linda
October 17, 2019 at 8:02 pmSuch a cool project. You are so creative and your projects are eye catching. Thanks so much for sharing your talents at “Love Your Creativity.”
Anita Holland
October 19, 2019 at 3:25 amThank you so much for the lovely compliment.
Barb
April 25, 2020 at 1:29 pmLove the design! My husband needs one for his headset. I would love to make one for him. What was the thickness of wood you used in both projects, and what were the finished dimensions? I don’t see where you mentioned it. You said the first one was thick, and this one was a recycled tabletop. Without a pdf template to print, makes it difficult to determine the size. Very awesome project!
Anita Holland
April 27, 2020 at 8:53 amHi Barb, sorry for the delay in getting back to you. I don’t have a PDF for this project because I make them up as I go along. When I make the second one I trace the outline and printed it out on an A$ sheet of paper as large as it would fit on to the page. To give you an idea on the overall size the height is 27 cm and the thickness is 5.5 cm. I really don’t think the exact measurement will affect the function. And thank you for the lovely comment.
13 DIY Headphone Stand Ideas for Your Home - DIY & Crafts
March 24, 2022 at 12:40 pm[…] Click Here […]